In the summer of 1995, the first production copies of the VAZ 2110, popularly known as the “ten,” rolled off the assembly line of the Volzhsky Automobile Plant. Based on this model, two more cars were later developed: the VAZ 2111 station wagon and the VAZ 2112 hatchback. When tuning the VAZ 2110 and its modifications, you need to know the features of upgrading this car yourself.
Improved dashboard lighting
The VAZ 2112 dashboards have always had one problem: dim lighting. This was especially noticeable at night. So the first thing tuning enthusiasts do is change the light bulbs in the instrument panel. Initially, there are simple and extremely weak incandescent lamps. They are being replaced by white LEDs, which have two advantages: some are durable and economical. Here's what you'll need to get started:
- 8 white LEDs;
- medium sized flathead screwdriver.
Sequence of operations
To remove incandescent lamps from the VAZ 2112 instrument unit, you will have to unscrew it and pull it out.
- The steering wheel moves down all the way.
- Above the dashboard there is a visor into which a pair of screws are screwed. They are removed using a screwdriver.
The location of the screws holding the panel is shown by arrows - The visor is pulled out from the panel. To do this, you need to slightly push it towards you, and then pull it forward and up.
- Under the visor there are 2 more screws, which are unscrewed with the same screwdriver.
- The block with instruments is removed from the niche. The wires located on the rear wall of the unit are disconnected. There are also light bulbs there. They are unscrewed and previously prepared LEDs are installed in their place.
Light bulbs are unscrewed from the printed circuit board by hand, their location is shown by arrows - The wires are connected to the block, it is installed in a niche and screwed together with a decorative visor.
Video: removing the instrument panel on a VAZ 2112
Installation of a new instrument panel and modernization of the existing one
If you look closely at the photos of the VAZ 2112 tuning, you can notice multi-colored instrument panels. And this is not surprising, because the factory version is not very stylish and beautiful, so improving the instrument panel is the most popular way to change the interior design of a car.
Read more: BMW X7 2022: video, photos, specifications, price
Installing an instrument panel from a more expensive car model. A dashboard from Ford, Renault or Priora would fit very well here.
https://www.youtube.com/watch?v=videoseries
Purchasing a new device from companies that produce components for those who like to improve their mechanical friend.
Carry out tuning of an already installed shield. This practice is very common, as it does not require large financial costs. In addition, you can completely come up with your own concept, realizing all your wildest dreams.
In principle, replacing the instrument panel is not so difficult, so you can upgrade it yourself. Moreover, this work will not take much time.
The most popular way to change the interior of a car is to modernize the instrument panel. It is this element that is in the center of the driver’s attention throughout the entire time he drives the vehicle.
Conventionally, the following methods for upgrading the instrument panel can be distinguished:
- Installing a version from another car. In this case, the dashboard from Priora is suitable. At the same time, we note that there are two versions of this design; for the car in question, 2170-3801010-50 without a CAN bus is suitable. As a rule, a similar design was installed on Priora until 2012.
- You can also purchase an instrument panel, which is produced by companies that create components for tuning. In the modern world, tuning of domestic cars is carried out quite often, which has determined a large selection of such designs.
- It is possible to modify an already installed structure. This method of changing the instrument panel is quite popular, as it does not lead to high costs. At the same time, you can fully realize your fantasies.
Let's look at each method of changing the instrument panel in more detail.
1. Switch with joystick, which is located on the right side. A similar switch is used to control the installed navigator. The switch has several function keys2. GPS antenna, which is installed on the roof. The correct installation of the antenna determines how well the signal from the satellite will be received in high-rise buildings.
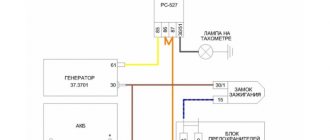
1. If a new type of instrument cluster was installed in the car from the factory, then there will be no need to make changes or upgrades. The work consists of removing the old shield, and then installing a new one and connecting the antenna. Connecting the antenna can be done simply, in much the same way as with a walkie-talkie.2.
If your car has an old-style instrument panel, you will have to significantly modify the front panel. The changes consist of cutting off the red and white blocks belonging to the 13-pin group, and then connecting them to the 32-pin according to the diagram. The next step is to upgrade the mounting and weight, since they do not fit the shape of this car. The process is quite complicated, but the result will not disappoint expectations.
The panel in question has a screen that displays a map with navigation. When creating this design element, the Windows CE 6.0 operating system was used. A fairly popular program called Navitel is installed as navigation software. It has detailed maps and a fairly high accuracy of display of all objects.
Another way of tuning is to install previously manufactured dashboards. As a rule, during their manufacture the structure is adjusted to the landing area. When choosing, you should take into account the location of the main scale, as well as the backlight features.
| 2112 | 21122 | ||||
| Versions: | 01 norm | 02 lux | 00 standard | 01 norm | 02 lux |
| Body type | hatchback | ||||
| Number of doors | 4 | ||||
| Places | 5 | ||||
| Trunk volume, dm3 | 350/720 | ||||
| Overall dimensions, mm: | |||||
| length | 4170 | ||||
| width | 1676 | ||||
| height | 1435 | ||||
| own weight, kg | 1070 | 1040 | |||
| payload, kg | 475 | ||||
Read more: How to check the oil in a Lada Granta manual and automatic transmission
You can independently change an already installed dashboard quite quickly and easily. As an example, consider the following type of modernization:
- First you need to dismantle the old panel. To do this, just unscrew a few bolts, remove the clamps and plugs.
- It is recommended to pay special attention to removing chips and disconnecting wires. Everything should be numbered when dismantling.
- The next step is to remove the instrument panel and disassemble it. This is quite difficult to do; the protective glass is secured using plugs.
- Changes may look different. The most popular is changing the backlight or scale. As a rule, diodes are used for illumination.
Self-upgrading does not take much time. At the same time, cash costs will be kept to a minimum. It can be carried out within one day with careful preparation for the work.
After a while, the interior of the purchased car becomes boring, and it needs to be updated. A significant change to the car's interior can be called the replacement of the central dashboard. On the Internet you can find many examples of such alterations. In most cases, a panel from old Opel or BMW models is installed.
The work of replacing a torpedo takes a lot of time. At the same time, dismantling work takes no more than one day, but work on adjusting the panel takes at least 2-5 days. The panel from older Volkswagen models is most suitable for installation, since fitting takes little time and the cost of the panel itself is relatively low.
In conclusion, we note that there are quite a few ways to modify the interior of a car. It is important to understand that even the smallest modification requires maximum care. Mistakes made can lead to serious problems and unexpected costs. Therefore, before performing work, you should study the recommendations.
Panel modernization
The appearance of the dashboard on the very first Twelves was very far from ideal. In 2006, AvtoVAZ engineers tried to correct this situation and began installing “European”-style panels on these cars. And today, owners of old cars are modernizing their cars by installing Europanels on them.
Europanels began to be installed on the VAZ 2112 only in 2006
Sequence of work
To remove the panel you only need a couple of tools: a knife and a Phillips screwdriver.
- The instrument unit is removed along with the decorative visor as described above.
- The car glove compartment opens. There are 3 self-tapping screws inside; they are unscrewed with a Phillips screwdriver.
To remove the VAZ 2112 panel, you only need a knife and a screwdriver - There are 4 plugs located near the central control unit. They are pryed with a knife and removed. The screws located under them are unscrewed.
- The safety block opens. Inside there are 2 self-tapping screws. They also get out.
- The old dashboard trim has been removed from its fasteners. All that remains is to remove it by pulling it towards you and up.
- The removed trim is replaced with a new europanel, the fastening screws are returned to their places (all the mounting holes for the old and new trims match, so there will be no problems).
Suspension
Often the object of tuning on the VAZ 2110 and related cars is the suspension. The following manipulations are performed with this VAZ design element:
- Lowering the car. Despite the possibility of purchasing new lowered springs, many owners of the “ten” prefer to limit themselves to shortening the factory units, sawing off several turns from them.
- Installation of helical suspension and adjustable shock absorbers - coilovers. Such a suspension has a high price, however, making coilovers with your own hands is difficult if you lack experience.
- To increase the stiffness of the springs and increase the ground clearance of the car, interturn spacers - buffers - are installed.
- To give the “ten” an extravagant look, wheels with a negative camber angle are installed.
- Manufacturing of independent rear or front suspension.
Despite the ban on most of these modifications, tuning enthusiasts make the following changes to the car’s braking system:
- installation of rear disc brakes;
- installation of multi-colored pads on the caliper;
- installation of brake pads with a modified appearance.
Ceiling covering
The material from which the ceiling covering in the VAZ 2112 is made gets dirty very quickly. Over time, a dark spot appears on the ceiling, directly above the driver's seat. Similar spots appear above the heads of passengers (but, as a rule, later). Re-upholstering the ceiling covering on your own is not an easy task. But finding a reupholstery specialist is not easy, plus his services are not cheap. So VAZ 2112 owners do it simpler and simply paint the ceilings of their cars using universal paint in spray cans (to paint the ceiling of a “two-wheeler” you need 6 of them).
Sequence of work
Painting the ceiling directly in the salon is not an option. First, the coating must be dismantled.
- The ceiling covering in the VAZ 2112 is held on by 10 screws and 13 plastic latches located around the perimeter. To remove the screws, use a Phillips screwdriver. The latches are opened manually.
The material of the ceiling covering on the VAZ 2112 gets dirty very quickly - The removed covering is removed from the passenger compartment through one of the rear doors (to do this, the covering will have to be slightly bent).
- The selected paint is sprayed from a can onto the ceiling covering (no preliminary primer is required - the universal paint is well absorbed into the material).
- After painting, the ceiling needs to be dried. It takes 6-8 days for the smell to completely disappear. Drying is carried out only in the open air.
The coating needs to be dried in the open air for 6–7 days. - The dried coating is installed back into the interior.
Noise insulation
The interior of the VAZ 2112 has always been characterized by a high noise level. Here's what is used to improve sound insulation:
- vibroplast. From the name of the material it is clear that its main purpose is vibration damping. It looks like thick rubber. Used to insulate metal surfaces;
- isolon. Another material that is always used in combination with vibroplast (the thickness of the isolon sheets should be at least 7 mm, and it is better to buy it in construction stores, not in automobile stores);
- foam rubber 2 cm thick;
- can of construction mastic;
- bottle of white spirit.
Sequencing
First, the interior of the VAZ 2112 is completely disassembled. Almost everything can be removed: seats, dashboard, steering wheel. Then all surfaces are cleaned of dirt and dust.
Before installing sound insulation, you will have to remove almost everything from the interior
- Glue is prepared using construction mastic. White spirit is added to the mastic with constant stirring. The composition should be viscous and resemble honey in consistency.
- All metal surfaces of the interior are covered with vibroplast (it is most convenient to apply mastic to this material with a small paint brush). First, the space under the instrument panel is covered with material, then the doors are covered, and only after that the floor is covered.
- The second stage is laying the isolon, which is secured with the same mastic-based glue.
- After the isolon there is a layer of foam rubber. For it, either universal glue or “liquid nails” are used (the latter option is preferable because it is cheaper). Foam rubber is used to cover the area under the dashboard and doors. This material cannot be laid on the floor, as passengers will quickly crush it under their feet. It will become thinner and will not interfere with the passage of sound.
Decorative overlays in the interior
Taking advantage of the fact that your interior is in a disassembled state at this stage, you can introduce a new color scheme into the inner world of your car. Plastic linings can be painted or covered with a special polyvinyl chloride colored film in the color you desire. When pasting with film, you can choose a pattern that imitates materials such as carbon, wood or aluminum.
We recommend treating all edges of plastic panels with anti-squeak - this is a special self-adhesive material to eliminate the sounds that the upholstery of domestic interiors often makes. If you additionally cover the inner surface of the panels with a thin noise-reducing material, you will be able to significantly increase the noise insulation of the car.
Replacing the steering wheel
Here's what's required to replace the steering wheel on a VAZ 2112:
- large flat screwdriver;
- socket head 22;
- new steering wheel.
Sequence of work
The first step is to get rid of the decorative trim on the steering wheel. It is most convenient to pry it off with a thin knife.
- The horn switch is attached to three self-tapping screws. They should be unscrewed using a large screwdriver.
- There is a 22 nut under the panel. It is most convenient to unscrew it with a socket head on a long wrench.
It is convenient to unscrew the nut 22 using a socket head on a long wrench - The steering wheel can now be removed and replaced with a new one.
After unscrewing the central nut, the steering wheel can be easily removed
Replacing the braid on the steering wheel
The standard braid on the VAZ 2112 is made of leatherette, the surface of which seems too smooth to many. The steering wheel simply slips out of your hands, which is very dangerous when driving. Therefore, almost all owners of “dvenashki” change the standard braids for something more suitable. There is now a huge selection of braids in spare parts stores. The steering wheel of the VAZ 2112 requires a braid of size “M”. It is put on the steering wheel and sewn along the edges with ordinary nylon thread.
Clamp needles and nylon threads are used to sew the braid together.
Eliminating "crickets"
Almost all owners of VAZ cars know what “crickets” are. When driving at a high enough speed, a hum, noise, creaking and many other sounds appear that are very annoying. This is why moving long distances will be quite painful. Let's look at the most common problems associated with car sound insulation, as well as ways to solve them.
A fairly common problem is squeaks. This is due to poor sound insulation of the interior, which does not improve even with each generation. Plastic rattling can, as a rule, be provoked by a regular blow; periodic rocking of some structural elements of the interior trim also causes quite a lot of problems.
The creaking of plastic is quite unpleasant and can make even the calmest driver nervous, and this promises big problems. There is an opinion that such sounds prevent the driver from falling asleep while driving, but this is not the case. If the driver wants to sleep a lot, then even the loudest sound will become soothing music.
Read more: Types of cargo transportation in the modern market International rail transportation
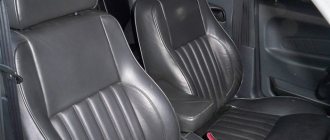
About replacing seats
The seats on the VAZ 2112 cannot be called comfortable. This is especially noticeable on long trips. So, at the first opportunity, drivers put seats from other cars on the “two-wheeler.” As a rule, Skoda Octavia acts as a “seat donor”.
Skoda Octavia is the most popular “seat donor” for the VAZ 2112
It is impossible to install the seats from this car on a VAZ 2112 in the garage, since serious adjustment of the fasteners and welding are required. There is only one option: use the services of specialists with the appropriate equipment.
Trunk shelf
When doing the internal tuning of a VAZ-2112 with your own hands, do not forget about such an important part of the interior as the trunk shelf. Considering the work done previously, it makes sense to install a high-quality stereo music system in your car. Therefore, it is best to replace the original shelf with an acoustic one, which is installed to replace the old one.
The plastic sidewalls are also replaced with wooden ones, which makes the new design quieter than the factory one. There is no point in designing a special shelf and sidewalls yourself; they are available for sale, and the range of offers allows you to choose the most interesting option for you.
All you have to do is install it. Tuning the trunk of a VAZ-2112 with your own hands will not only make the interior of the car quiet, but also install larger speakers or a different shape.
Photo gallery: tuned VAZ 2112 salons
Interior tuning is done in contrasting red and black colors
The red braid of the steering wheel and the red seats are clearly from another car.
The steering wheel on this “two-wheeler” is small, and the interior is trimmed with leatherette
The white trim of the seats looks interesting, but the practical benefits of such a solution are very doubtful
The dashboard of the VAZ 2112 is trimmed with brown leatherette, the steering wheel is sporty
A very successful combination of two colors and a non-standard steering wheel shape
This VAZ 2112 car owner decided not to skimp on the interior and trimmed the seats in leather
Floor lighting in the VAZ 2112 is a rather rare occurrence
The owner of this “twin” is clearly partial to the color blue
This car has a new europanel installed in combination with a non-standard leather-wrapped steering wheel.
The car owner is quite capable of making the interior of the VAZ 2121 a little more comfortable and reducing the noise level in it. But any improvement is good in moderation. Otherwise, the car may turn into a laughing stock.
Content
Immediately after the appearance of the VAZ 2112, it became very popular.
This is due to the fact that the car, compared to its predecessors, has fairly good equipment and a rather attractive appearance. The car especially attracted fans of tuning. While some thought that earlier models were not worth the investment, this one is worth the attention and money spent. When changing a VAZ car, the interior is almost always upgraded, since the build quality is terrible, as is the insulation. Let's look at all the most popular ways to modify the interior of the car in question. VAZ 2112 interior tuning can be done independently at minimal cost.