Model 2105 Instrument Panel - Removing and Replacing Bulbs
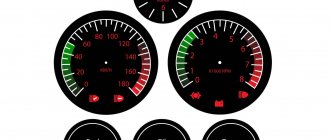
Location of lamps on the instrument panel: 1 — speedometer illumination lamp (AMH 12-3-1 (T3W); 2 — signaling unit (A 12-1.2 (W1.2W); 3 — battery charge indicator lamp (AMH 12- 3-1 (T3W); 4 — instrument cluster illumination lamp (AMH 12-3-1 (T3W); 5 — insufficient oil pressure warning lamp (AMH 12-3-1 (T3W); 6 — fuel reserve warning lamp (AMH 12-3-1 (T3W); 7 — voltmeter backlight lamp (AMH 12-3-1 (T3W); 8 — control lamp for turning on the external lighting (AMH 12-3-1 (T3W); 9 — control lamp for turning on the direction indicators (AMH 12-3-1 (T3W); 10 - high beam indicator lamp (AMH 12-3-1 (T3W)
1. We prepare the car for operations (see “Preparing the car for maintenance and repair”).
2. Disconnect the wire from the negative terminal of the battery (see “Battery - removal and installation”).
3. Using a thin screwdriver, remove the two plugs for the screws securing the shield.
4. Using a Phillips screwdriver, unscrew the two screws.
5. Disconnect the wires from the fan switch terminals. The top wire is blue-black, the middle wire is yellow-blue, and the bottom wire is red.
To avoid injury from the protruding plugs of the switch when disconnecting the speedometer drive cable, we recommend removing the switch by squeezing its latches.
6. Moving the instrument panel as far as possible to the left, unscrew the knurled nut securing the speedometer cable by hand and disconnect the cable.
7. Disconnect the three colored connectors of the instrument panel wiring harness (red, green and white) from the instrument panel wiring harness.
8. Moving to the right, remove the instrument panel.
1. Remove the lamp socket from the housing.
2. By pressing and turning counterclockwise, remove the lamp from the socket and install a new one.
Replacing the backlight lamps of the speedometer and voltmeter instrument cluster
1. Using a screwdriver, remove the lamp socket from the lamp body.
2. By pressing and turning counterclockwise, remove the lamp from the socket.
Replacing indicator lamps
1. Having turned the lamp socket 90° until its protrusion coincides with the slot in the board, remove the lamp socket from the hole in the board.
2. Replace the lamp together with the socket.
Replacing the cigarette lighter socket lamp
We replace the cigarette lighter socket lamp with the instrument panel removed.
1. Squeezing the walls of the lamp housing, disconnect it together with the lamp from the cigarette lighter housing.
2. Remove the lamp socket from the housing.
3. By pressing and turning counterclockwise, replace the lamp.
Installation of all removed parts is carried out in reverse order.
Source
Complete diagram and arrangement of light and sound signaling elements...
presented in the diagram. True, the equipment of the VAZ-2105 is shown here. It differs from the VAZ-2104 only in a different shape of the rear lights, but otherwise everything is identical.
Scheme of light and sound alarm system VAZ-2105:
I – headlight; II – side turn signal; III – rear block lights; IV – interior lamp; V – license plate lighting lamp; VI – engine compartment lighting lamp; VII – diagram for switching on the headlights.
Related link:
Repair of a VAZ-2105 car gearbox
| 1 | Diffuser | 27 | PTF lamp |
| 2 | Lamp | 28 | Side light bulb |
| 3 | Lamp screen | 29 | Pay |
| 4 | Side light bulb | 30 | Reflector |
| 5 | Spring | 31 | Brake light |
| 6 | Emphasis | 32 | Board holder |
| 7 | Turn signal lens | 33 | Key |
| 8 | Lamp | 34 | Holder |
| 9 | Connection socket for hydraulic light position corrector | 35 | Power supply plug |
| 10 | Vertical light beam adjustment screw | 36 | Contact washer |
| 11 | casing | 37 | Spring pin |
| 12 | Screw for horizontal light beam adjustment | 38 | Lamp |
| 13 | bracket | 39 | Screen |
| 14 | Frame | 40 | Lamp |
| 15 | Reflector | 41 | Guide key |
| 16 | Adhesive layer for fixing the reflector | 42 | Lamp mounting bracket |
| 17 | Lamp | 43 | Headlights |
| 18 | Holder | 44 | battery |
| 19 | Holder with chuck | 45 | Generator |
| 20 | Plug stand for power supply and lamp mounting | 46 | Mounting block |
| 21 | Lamp | 47 | High beam relay |
| 22 | Plug stand for power supply and lamp mounting | 48 | Low beam relay |
| 23 | Ground connection plug | 49 | High beam warning lamp on the dashboard |
| 24 | Switch | 50 | Exterior light switch |
| 25 | Door switch connection plug | 51 | Egnition lock |
| 26 | Bulb holders-plugs | 52 | Light switch. |
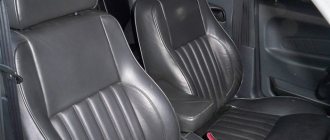
The auxiliary equipment provides information to the driver about key engine parameters and also improves visibility while driving in bad weather conditions.
Auxiliary equipment includes sensors for monitoring engine operation (pressure, temperature, etc.), a cooling system fan, a system for washing and cleaning car windows (wipers, washers, glass heaters).
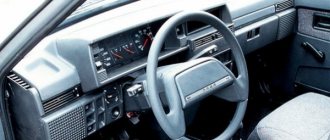
Instrument panel and key switches
Instrument panel model 2105
Instrument panel model 2105:
1 - external lighting switch. The three-position switch has three fixed positions. In the first - the external lighting is turned off; in the second, the side lights and instrument lighting are turned on; in the third - the low beam headlights are additionally turned on;
2 — warning lamp for insufficient oil pressure.
When the ignition is turned on, it lights up red and goes out after the engine starts. If the lamp continues to light after starting the engine, this indicates low pressure in the lubrication system. To avoid engine failure, it should be turned off and the cause of the malfunction eliminated;
3 — liquid temperature indicator in the cooling system.
The transition of the indicator arrow to the red sector of the scale indicates engine overheating. You should stop and eliminate the cause of overheating;
4 — battery charge indicator lamp.
When the ignition is turned on, it lights up red and goes out after the engine starts. If the lamp continues to light after starting the engine, this indicates insufficient tension of the generator drive belt, a malfunction of the generator or the warning lamp circuit;
— activation of the parking brake (lights up red when the ignition is on and the parking brake lever is raised);
— covering the carburetor air damper (lights up in orange when the ignition is on and the air damper control handle is extended);
— emergency condition of the working brake system (lights up red when the fluid level in the hydraulic brake reservoir drops below the permissible level and the ignition is on);
— unfastened seat belts (lights up red when the ignition is turned on, if the driver’s seat belt is not fastened; installed on parts of cars);
— turning on the fog light in the rear lights (lights up in orange when you press the corresponding key switch when the headlights are on);
— turning on the heated rear window (lights up in orange when the heated rear window is turned on and the ignition is on);
6 — speedometer (vehicle speed indicator);
7 — odometer (trip meter);
8 — rear window heating switch.
The heated rear window is activated by pressing the button when the ignition is on;
9 — plug for screws securing the instrument panel;
10 — heater fan operating mode switch.
The switch provides two fan speeds - low and high;
11 — indicator lamp for turning on the high beam headlights.
Lights up blue when the high beam headlights are turned on;
12 — indicator lamp for direction indicators and hazard warning lights.
Lights up with a flashing green light when the direction indicator switch is moved to the lower (left turn) or up (right turn) position, as well as when the hazard warning lights are on;
13 — control lamp for turning on external lighting.
Lights up green when the exterior lighting is turned on;
14 — voltmeter.
When the ignition is on and the engine is not running, it shows the voltage at the battery terminals, and when the engine is running, it shows the voltage supplied by the generator. The voltmeter needle in the green zone indicates normal voltage in the on-board network. If the voltmeter needle is in the red zone of the scale while the engine is running, this indicates a weak tension of the generator belt or a malfunction of the generator itself, and in the white zone it indicates an unsteady charge-discharge mode;
15 — fuel level indicator;
16 — fuel reserve warning lamp.
Lights up yellow if there is less than 6.5-4 liters of fuel left in the fuel tank;
17 — fog light switch in the rear lights.
The fog light is turned on by pressing the button when the headlights are on.
Instrument panel model 2107
Instrument panel model 2107:
2 — speedometer (vehicle speed indicator);
3 — odometer (trip meter);
4 — tachometer.
Indicates the crankshaft speed. The yellow zone of the scale indicates the engine operating mode with a high crankshaft rotation speed, the red zone indicates unacceptable modes. The maximum permitted engine speed is 6000 rpm;
5 — coolant temperature gauge.
The arrow in the green zone of the scale indicates the normal coolant temperature. Red zone - engine overheating. It is prohibited to operate the vehicle at a coolant temperature above 118°C;
6 — econometrician
Helps to select the most economical (in terms of fuel consumption) mode of engine operation when the vehicle is moving.
In this case, the instrument needle is in the green zone of the scale; — direction indicators
(lights up with a green blinking light when the right or left turn is on);
— malfunction of the engine management system
(connected on a car with an injection system. Lights up in orange when the ignition is turned on and goes out after the engine starts).
If there is a malfunction in the system, the indicator flashes or lights up constantly. Operation of the vehicle is not prohibited, as the system will switch to backup mode (with loss of power and increased fuel consumption). Fix the malfunction yourself or in a specialized workshop; - battery charge.
When the ignition is turned on, it lights up red and goes out after the engine starts. If the warning light remains on after starting the engine, this indicates a lack of battery charge. The cause may be insufficient tension in the alternator drive belt, a malfunction of the alternator or the warning lamp circuit. Further movement with the warning light on may lead to a complete discharge of the battery and engine shutdown, as well as a fire (if the malfunction is caused by a short circuit in the electrical wiring);
Scheme for VAZ-2104 injector
1 – electric motor of the engine cooling system fan; 2 – mounting block; 3 – idle speed regulator; 4 – electronic control unit; 5 – octane potentiometer; 6 – spark plugs; 7 – ignition module; 8 – crankshaft position sensor; 9 – electric fuel pump with fuel level sensor; 10 – tachometer; 11 – control lamp “CHECK ENGINE”; 12 – car ignition relay; 13 – speed sensor; 14 – diagnostic block; 15 – nozzle; 16 – adsorber purge valve; 17, 18, 19 – injection system fuses; 20 – ignition relay for the injection system; 21 – relay for turning on the electric fuel pump; 22 – intake pipe electric heater relay; 23 – electric heater of the intake pipe; 24 – intake pipe heater fuse; 25 – oxygen concentration sensor; 26 – coolant temperature sensor; 27 – throttle position sensor; 28 – air temperature sensor; 29 – absolute pressure sensor;
- A – to the “plus” terminal of the battery;
- B – to terminal “15” of the ignition switch;
- P4 – relay for turning on the fan motor.
Remove the instrument panel and change the light bulbs
The control devices stopped working or they began to “confuse” the readings, the control lamps and lights do not light up - in this case the panel will have to be removed.
Preparing for work
Before starting work, you need to buy replacement light bulbs. You can choose standard ones with or without sockets, as well as LED ones. If it is necessary to replace the incandescent lighting elements responsible for the backlight, then you will need light bulbs of the AMN 12-3-1 (T3W) type. These are ordinary filament bulbs that are installed in the dashboard of VAZs from the factory. If it is necessary to replace indicator lights, then type A 12-1.2 elements are used. Are you choosing LED?
You don't need a lot of tools:
- flat screwdriver;
- Phillips screwdriver;
- pliers.
If you are going to disassemble the panel and repair it, you will additionally need:
- multimeter or probe;
- soldering iron from 40 Watt;
- solder and rosin;
- side cutters;
- small screwdrivers.
Removing the panel from the car
Using a slotted screwdriver, remove the plastic plug on which the heating sign is depicted. This plug is on the right, and under it there is a Phillips screw that needs to be unscrewed. (There are 2 screws under the plug, but only one needs to be unscrewed - the top one, which secures the right side of the dashboard).
Next to the hazard warning button, there is an odometer reset button, which is secured with a plastic nut. The nut must be unscrewed and removed with the washer located behind it. The button is recessed inside the panel.
The right side of the tidy is weakened at this stage, and it remains to perform several additional manipulations in order to completely dismantle the device. To do this, pull out the right side of the device, thereby freeing access to its rear part. Here you need to disconnect all the chips and wires to perform dismantling.
Initially, the power chips for the stove button are disconnected. Be sure to remember the location of the wires. It is recommended to take photos so as not to be confused when assembly is carried out. Next you need to disconnect the speedometer cable. It is secured with a special nut, which can be unscrewed by hand.
All chips connected to the dashboard are disconnected. It is almost impossible to confuse their locations, since they have different fastenings and differ in size.
The supply hose is removed from the economizer fitting. This cable is located on the left side of the device. After all the chips, cables and wires are disconnected from the device, you can dismantle it.
Determining what doesn't work
If the backlight of the VAZ 2107 dashboard does not light up, this may be due to the following factors:
Faulty incandescent lamps
This rarely happens, however, due to the fact that from the factory the lighting of the panel is realized through the use of incandescent lamps, their burnout periodically occurs. The problem can be fixed by replacing the lighting elements, or better yet, installing LEDs. To make a replacement, you will need to dismantle the instrument panel. This is not difficult to do, but it will take a lot of time to disassemble the shield. The panel contains lighting elements, which must be replaced in order to restore the functionality of the VAZ 2107 instrument panel lighting. Before replacing, you should first check the serviceability of each lamp. The design of the shield uses 4 main lighting elements, which are responsible for lighting, as well as additional ones that act as an indication. If you had to disassemble the panel, it is recommended to immediately change them to LED ones.
Brightness control
The malfunction may be hidden in the part that is responsible for adjusting the backlight intensity. Although this part fails extremely rarely, its malfunction cannot be ruled out, especially if it has been established that the incandescent lamps are in good working order and do not need to be replaced. The light brightness control is located directly on the right side of the steering wheel near the headlight range control. If diagnostics have shown that this particular part is the reason that the backlight does not light, then it should be replaced.
Circuit breakers
The search for the reason why there is no instrument lighting on the seven should begin directly with the fuses. These elements protect the circuit from voltage surges, and as soon as a large current flows in the circuit or a short circuit occurs, the fuse link blows. If such a malfunction occurs, replace the fuse and check the power circuit.
Absence or poor contact at the point where the chip connects to the power wire
The reason for the lack of contact may be that the chip is not tightly pressed to the terminal block of the instrument panel. Poor contact occurs when contacts become oxidized. You can fix such breakdowns yourself by cleaning the contacts from oxides.
Good afternoon dear friends. Many Classic car owners do not like the backlighting of the instrument panel. The question arises whether you need to either change the lamps to brighter ones, or carry out tuning - upgrading the lighting of the VAZ 2107 dashboard. And it happens that you need to change the light bulbs for a completely banal reason - one of them has burned out. Today we will look at the process of replacing the backlight and alarm lamps of the VAZ 2105-07 panel. It is these two Zhiguli models, because their devices are similar.
Replacing burnt-out lamps on the dashboard of a VAZ Semerka
First of all, before you start replacing, you need to find out what kind of light bulbs are used on classic VAZ models. Because it will be a shame to buy the wrong one, or with a different base. And find out after the device is completely disassembled.
So, how are light bulbs used:
- Lighting for the speedometer and tachometer and the entire panel as a whole: power 3 Watt, base type – T3W,
- Signaling lamps for turning on the dimensions, high beam, parking brake, opening the air damper (choke for carburetor modifications), low battery charge, oil pressure, direction indicators: baseless linden lamps W1.2W, power 1.2 W.
What is needed to carry out work on changing the dashboard?
As previously noted, in this case we will consider a budget method of changing the dashboard. To perform the work you will need diode bulbs that are blue. When choosing them, you should pay attention to the following points:
- LEDs that are shaped like a funnel are most suitable for changing the design. This is due to the fact that this type of lens scatters light best throughout the structure.
- The blue color was chosen because such light creates a rather interesting effect - it seems that we are looking at a dashboard that is used on a foreign car. For example, white diodes do not create a similar effect.
At the same time, we note that for the dashboard you will need one small diode for small instruments, and for large ones, for example, a tachometer and a speedometer, you will need 4 standard diodes and one diode lamp. The diode lamp is quite large, but it is necessary to increase the readability of all information.
Location of lamps on the instrument panel of the VAZ 2107
Before we start replacing the light bulbs, let’s see where they are located on the PCB board and what the VAZ 2107 is responsible for illuminating or indicating.
- Fuel level.
- Instrument lighting.
- The direction indicators are on.
- Engine control controller malfunction.
- Exterior lighting is on.
- Emergency oil pressure.
- The parking (hand) brake is on.
- High beam headlights are on.
- Battery charge indicator lamp.
Key switches VAZ-2107
1 - external lighting switch. This switch has three positions. The first signals that the external lighting is turned off; second - the lamps that illuminate the license plates, instrument illumination lamps and side lights are turned on; third position - additionally switched on low beam headlights;
2 - car rear window heating switch. If the ignition is on, press the key;
3 — transport switch for fog light of rear lights. It is turned on by pressing the key if the low beam headlights are on;
4 — heater fan switch. The switch can provide two speeds at which the fan can rotate - low and high.
In addition, the central console of the VAZ 2107 dashboard is equipped with additional warning lamps:
A - seat belts are not fastened (the lamp glows red when the ignition is turned on);
B – (CL) turning on the heated rear window (lights up with a special orange light);
B - emergency condition of the automobile service brake system (the lamp first lights up red in the situation if the fluid level in the tank of the engine hydraulic brake drive decreases).
Removing the instrument panel and preparing for replacement
To change the lamps in the instrument panel, the latter will have to be removed. It cannot be said that the PP can be removed with one movement of the hand: the designers of the VAZ 2107 made dismantling a little more difficult than on other cars of the VAZ family. Nevertheless, dismantling the PP is quite feasible in a garage or even a parking lot. In this case, the operation does not require any special knowledge. The tools we will need are:
- small flat screwdriver or knife;
- crosshead screwdriver.
I think all this will be found in the trunk of any VAZ 2107, and we can get started. First of all, we remove the plastic handles from the heating control knobs by prying them off with a flat screwdriver.
Removing handles from the seven's interior heating system
We unscrew the nut securing the daily counter reset button (marked with a red arrow), and push the button itself inside the shield.
Removing the daily counter reset button
Now you need to unscrew the screw that is located under the plug and secures the decorative trim. Remove the plug using a flat-head screwdriver and unscrew the Phillips screw.
Removing the fixing screw of the PP decorative trim
After this operation, the right side of the panel will move away so that you can get to the flexible speedometer control shaft.
Releasing the right side of the control panel on a VAZ 2107
The shaft is removed with bare hands: simply unscrew the nut securing it.
Removing the speedometer drive
Now remove the instrument panel from the clamp that secures its left side and pull it out slightly to get to the vacuum hose connected to the econometer. It can also be removed with bare hands, but be careful not to tear it.
Removing the vacuum hose from the econometer to the PP
It remains to disconnect the three power connectors of the instrument panel and the three wires on the VAZ 2107 heater switch. Before disconnecting, it is advisable to mark them so as not to confuse them when assembling the panel.
Disconnecting the power wires from the heater switch
We remove the decorative trim along with the PP and unscrew the four self-tapping screws securing the shelves (two on each, I marked them with red arrows) to the decorative trim, and the instrument panel can be removed.
Removing PP from a decorative trim
Instrument panel of the domestic seven
The VAZ-2107 panel, like any other car, is equipped with only the most important indicators of the “life activity” of the vehicle.
Of course, there are few of them, but they are mandatory and should be known well. This will help you notice a problem in time. While driving, every professional driver looks at the dashboard every few minutes to assess the operation of the vehicle's systems. This will help him, if necessary, correct his own actions in time.
However, there are times when inexperienced drivers do not fully understand the meaning of the instrument panel sensors.
The most common emergency situations are the following:
- The oil pressure warning light comes on. In such a situation, you need to stop driving by turning off the engine. It is necessary to check the oil level. If it is insufficient, you should add oil and only then start the engine. It is possible that the hazard warning lights will remain on. In this case, it is necessary to turn off the engine again and find a way to transport the car by tow to the place where the repair will be carried out. If you continue driving with the hazard warning light on, after a while the engine will “knock” due to the fact that the connecting rod bearings have rotated. If you continue driving, the engine will jam. And in this situation, it will be necessary to carry out a major overhaul of the power unit.
- The battery warning light may come on. In this situation, you first need to check the terminals - perhaps they have oxidized and there is no reliable contact. If this does not help, then the problem is in the generator. It does not produce the required level of current to charge the battery. If the malfunction occurs during the daytime, it is better to try to get to the nearest service station. In this case, you need to turn off all electrical appliances. A high-quality battery in such conditions will “last” 100 or even more kilometers (the energy will only go to power the ignition system). Most often, in such situations, the voltage regulator relay fails.
- If the brake fluid warning light comes on, you should stop immediately. Driving without brakes is always a dangerous activity; this is not an extreme sport, but a normal safety precaution. If such a malfunction occurs, check the brake fluid level and, if necessary, add it. If the car can slow down, you need to try to slowly get to the nearest service station. If things are such that the car does not react, that is, does not brake, it is better to call a mechanic or, if you know how, eliminate the cause of the breakdown yourself.
- The sensor that shows the coolant temperature is “placed” in the red zone. The “classic” does not have a special alarm system that informs the driver about the “boiling” of the engine. Therefore, an inexperienced driver can easily “sleep through” such a moment (but it is very difficult not to notice the steam from under the hood). In such a situation, you need to stop and let the engine cool. You don't need to go under the hood right away. You may get severely burned. When the engine has cooled down, check the coolant level. If there is no break in the pipe of the coolant mechanism, then you need to try to get to a service station or garage and find out there why the temperature has increased. Most often this happens due to a thermostat failure or the radiator fan not turning on.
- The sensor that signals the fuel level is at zero. If there are less than five liters of gasoline in the gas tank, then the warning light will come on. In this situation, you need to refuel.
What kind of lamps are needed?
Before disassembling your VAZ, it makes sense to drive it to the nearest auto store and stock up on new light bulbs. But which ones to buy? Judging by the first photo, the backlight and indication lamps have different sizes. The choice is simple: if the backlight bulbs have burned out (position 2 in the same photo), then you will need AMN 12-3-1 (T3W) bulbs. If they are indicator ones, then A 12-1.2 (Wl.2).
Dashboard illumination lamp VAZ 2107 with and without socket included
LED light bulbs
If you are tired of changing light bulbs in the power supply of your VAZ or are just a fan of modern tuning, then you can install LED light bulbs instead of incandescent ones, since the industry also produces those that have the same standard size, base, socket and operating voltage.
LED lights for the dashboard illumination (left) and indication for the VAZ 2107 car
Important! The battery charge indicator lamp cannot be changed to an LED one - the battery will not be charged properly.
Replacing warning lamps and backlight bulbs
We lay the VAZ 2103 dashboard on a smooth soft surface face down and see the backlight and indication lights (see the very first photo). I hope that before removing the dashboard, you found out which bulbs burned out and, using the recommendations above, purchased new ones of the right type. As I already indicated above, backlight lamps can be sold both with sockets, ready for installation, and without them.
We can easily remove the lamp together with the socket directly from the rear side of the instrument panel of the VAZ 2107 (in the photo is the PP of another VAZ model)
If you purchased lamps with sockets, then simply install a new one to replace the burnt one and fix it by turning it clockwise. If the light bulb was purchased without a socket, then you need to first remove the burnt one from the socket and install a new one in its place. The lamp is removed by lightly pressing it and turning it counterclockwise.
To remove the light bulb from the socket, you need to press it and turn it 90 degrees.
After this, we install the finished light bulb-socket set in its place. All that remains is to put the PP in place, not forgetting to connect 3 power connectors, 3 wires of the heater switch, the speedometer drive and the vacuum hose.
LED backlight for VAZ 2107 panel
Most often, when tuning the interior devices of a VAZ 2107, they remember the LED lighting, which gives the VAZ 2107 “torpedo” a beautiful and modern look. We should talk about one of the most common options for tuning it.
During operation, it will be necessary to use 10 LEDs of 3 volts each. To connect them directly, you need to use a special cable, and as fastening - a small piece of wire from the molex connector. You also need to take two 680 Ohm resistors.
In fact, you only need 8 LEDs, which will be the same in current and voltage, but it is better, of course, if all ten are the same in these parameters.
All work, in general, comes down to 3 main stages, which should be described in more detail:
- First you need to cut off the heads of the LEDs. A file is suitable for this. Next, you should sand the entire surface to achieve a more uniform and soft glow. After this, we take the wire from the molex, strip it and cut it into pieces, each three centimeters. Bend them into an “L” shape. Then you need to decide where you want to put the LEDs. For example, you can place them like this: there are four around a large device in the corners, and one between a pair of small devices on the side wall. After this, we take the wires we have already prepared (using tweezers) and solder them in the place where we will place the LEDs. As a result, you will get excellent holders. Next, you should solder the LEDs to them with one leg. This method differs from others in that you can immediately turn the backlight off and on on the spot and, if necessary, direct it in the appropriate direction.
- The second step is trimming the LEDs. It is necessary to cut the cable, after which we form the wiring. Four LEDs (around a large device) are soldered in series into one circuit using small wires. We solder the side LED through a resistor. The minus and plus must be taken from the contacts of the old backlight.
- Adjust the brightness. This is done using the adjustment knob. The brightness is adjusted in two circuits, in the middle, where there are four diodes. While working with such a dashboard, you can drive a car, but very carefully.
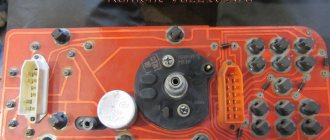
Location of lamps on the instrument panel of VAZ 2107
The photograph shows the reverse side of the car's instrument panel. Light bulbs are marked with numbers. Four of them under No. 2 are backlight lamps, the rest are control lamps.
They are located on the board and are intended for visual information to the driver. Each of them indicates the operation of certain systems, components and assemblies of the car:
- Alarm for low amount of gasoline in the tank.
- Instrument lighting.
- Monitoring the operation of direction indicators.
- Signal about lack of battery charging.
- Indicator of included side lights.
- Low oil pressure alarm.
- Indicator of the applied handbrake.
- High beam indicator.
- Alarm about malfunction of the forced injection system on engines.
Determining what doesn't work
Before you begin work on removing the instrument panel and changing light bulbs, you need to visually determine which of them are out of order. If the panel is not illuminated at all, there are several options for where to start checking.
Circuit breakers
First, check the fuses; they are located in the mounting block under the hood on the right side (in the photo under No. 5).
Fuse F10 is responsible for the instrument panel.
If the fuse link has melted, it means a short circuit has occurred. It makes sense to examine the part of the electrical circuit for which this fuse is responsible. Perhaps it worked due to the burnout of one of the lamps or the influence of external factors on a section of the circuit. If the fuse is intact, you should investigate further.
Brightness control
This is a variable resistor, located to the right of the steering wheel, near the clock. With its help, the intensity of illumination of instruments and control lamps is changed. It rarely fails, but sometimes it fails.
To check the regulator, you need to remove the plastic insert where it is located along with the clock and cigarette lighter. Pry it off with a flathead screwdriver. After this, disconnect the power supply and remove the plastic round handle by pulling it towards you. Using a socket wrench, unscrew the nut securing the regulator to the liner and remove it.
The functionality of the regulator can be checked using a multimeter. If the resistor is faulty, replace it with a new one.
It should be borne in mind that when working with electrical equipment, it is necessary to disconnect the power supply from the battery.
Faulty incandescent lamps
If everything you did above did not produce results, you need to remove the panel and check all the light bulbs.
Failure of incandescent lamps involves burnout of the tungsten filament. In another case, there may be physical impact on the lighting device, after which it will not be able to function.
You can check it visually, one by one removing the electronic board from the sockets and inspecting the integrity of the tungsten filament. Or using a multimeter.
To eliminate all the reasons why lighting and signaling devices may not work, it is worth checking the integrity of the conductive paths printed on the electronic board.
Due to environmental influences, they oxidize and break down. It's not difficult to fix. It is necessary to find, clean and solder. It is also worth checking the terminals connecting the wires.
Why doesn't it light up?
- First, remove the cover of the mounting block and make sure that the fuse is intact. The fuse markings are located on the inner surface of the cover. You should look for fuse F16 or F5, depending on the year of manufacture of your VAZ 2109.
- If the fuse is intact, be sure to check whether the contacts of the fuse you are looking for have not oxidized. It is not uncommon for shields to fail due to broken contact.
- Check if there is power to the dashboard. To do this, you will need a warning light and the ignition on. Disconnect connector X4 in the mounting block and check for voltage at pin 3. The disadvantage of the VAZ 2109 design is that when it rains, the mounting block immediately becomes wet. This causes oxidation of the contacts in the pads, which causes the electrics to stop working. Sometimes not only the contact is oxidized, but also the board of the Nine mounting block.
Removing the instrument panel and preparing for replacement
As mentioned above, when performing any work on electrical equipment, it is necessary to disconnect the power supply from the battery. Including when removing the dashboard and performing manipulations with it.
To remove the panel you will need a minimum of tools:
- Phillips screwdriver;
- flat screwdriver;
- pliers.
First, remove the plastic tips from the interior heater control levers using a flat-end screwdriver.
Using pliers, unscrew the nut from the trip odometer reset handle.
On the front part of the panel near the interior heater control levers, open the plug using a flat-head screwdriver.
Using a Phillips screwdriver, unscrew the screw that secures the decorative panel to the car frame.
We move the right side of the panel to the side and towards ourselves. Inside you can see the flexible speedometer drive.
Unscrew the nut by hand and remove the end of the drive cable. Remove the pipe connected to the econometer. Disconnect the electrical wires going to the instrument panel and the three wires going to the interior heater electrical switch.
We turn the panel over together with the decorative trim, turn it over, and unscrew the four screws that secure it to the trim. After this, the panel can be removed and the bulbs that have burned out can be replaced.
What lamps to install in the instrument panel for lighting
On the VAZ 2107 car, simple incandescent light bulbs with a tungsten spiral are used for instrument lighting and display. With the development of industry, LED lamps of suitable sizes began to be produced. Despite the fact that they are more expensive, they began to replace incandescent lamps.
- cleaner light;
- less power consumption;
- durability.
Incandescent lamps
AMN 12-3-1 lamps are installed to illuminate the instrument panel.
Brand A 12-1.2 lamps are installed as signal lamps.
LED bulbs
As mentioned above, LED bulbs have a number of advantages over incandescent bulbs, so you should consider changing them. Selecting the size and power of lighting is quite simple.
You just need to take into account that the battery charging indicator lamp must be connected to the nominal resistance of the incandescent lamp previously installed. Otherwise the control will not be correct. Types of light bulbs for illumination and indication are shown in the photo below.
Replacing warning lamps and backlight lamps
First you need to determine exactly which light bulbs need to be replaced. Next, in order not to damage the panel when changing lamps, it must be placed face down on something soft, as shown in the photo at the beginning of the article.
We take the socket in which it is necessary to change the light bulb with two fingers. With a slight movement, turn it counterclockwise and remove it from the electronic board.
If new light bulbs were purchased together with a socket, then carefully insert them into the board together with the socket, turning them all the way.
If the light bulbs were purchased without a socket, then remove the burnt out bulb from the socket, insert a new one and return the socket to its place on the board.
Carry out this operation with all burnt out bulbs.
After replacing the light bulbs, you need to assemble the instrument panel and install it in place. All assembly and installation operations are done in reverse order.
Source