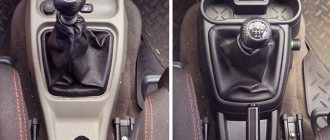
It is known that locks for VAZ-1118 car doors have an interesting property - you can replace their cylinder without removing the mechanism from the door itself. On previous models, dismantling is more difficult: you need to press the bracket holding the cylinder with a paper clip or an awl, getting into the hole on a mechanical drive. In the Kalina model, that is, VAZ-1118, this bracket is pressed out by pressing with a ruler or a screwdriver. Which, in turn, is done on the installed lock (there is no point in removing it). Next, the replacement operation is discussed in more detail.
Design of VAZ-2109 locks and disadvantages
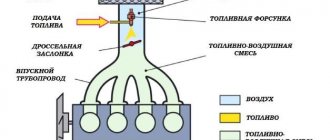
The lock cylinder is a cylinder that is equipped with a secret mechanism. In all locks with a flat key, the cylinder is replaceable. For example, on VAZ-2109 cars it is replaced like this.
The rotating part that is connected to the rod is called the “drive”. As we can see, this drive has a hole for removing the cylinder. By applying pressure with a thin axle or an awl, the larva is pulled out.
There is only one drawback - it is hardly possible to complete the steps indicated here without first removing the lock completely.
It should be noted that even when the mechanism is removed, it will not be easy to pull the larva out of it.
Therefore, before dismantling, be sure to insert a key into the cylinder and turn it left or right 90 degrees. The purpose of this action is to be able to dismantle the larva. This action is performed effortlessly, and the key is then simply pulled towards you.
Features of standard central locking
AvtoVAZ even installs a central locking system with a remote control from the factory even on the most budget versions of Kalina. However, such a system is clearly not enough to effectively protect a car from theft. The Lada Kalina central locking system is also controlled from the interior. On the driver's door next to the power window control unit there is a central locking button. The ignition key simultaneously functions as a remote control. On its plastic part there are three buttons, the purpose of which is as follows:
- Unlocking. One press – the actuator should click and the driver’s door will open, two presses – the rest.
- Closing. To close all doors at the same time, just press the button once.
- Opening the trunk. Not available on all trim levels, as a trunk lock actuator is required. You can also install the electric drive yourself.
Kalina also provides another important function - rear door locking, as it is also called - child protection. To activate it, you need to use the key to turn the red chip to the right near the lock from the outside. After this, opening the rear doors from the passenger compartment is not possible, so that children cannot accidentally fall out while driving.
The central locking system does not have anti-theft functions; there are no shock sensors. All that the central lock can do is signal an unauthorized opening.
Replacing the larva in Kalina
First of all, replacing the lock elements means that the door trim will be completely missing. Therefore, first we will figure out how to dismantle the trim on Lada Kalina cars. The second chapter is devoted to how to remove the larva and install a new one in its place. The last step will actually be the simplest.
Removing the door trim yourself
The casing is attached not only to screws, but also to plastic pistons. The number of screws holding the part in question is four:
Numbers here indicate all fastening elements. But to get to them, you need to remove the screw cap “3”, as well as the inner door handle. The pawl handle also needs to be unscrewed.
If these actions are completed successfully, the casing begins to be dismantled, moving it away from the metal. Dismantling is carried out starting from any of the corners, but care must be taken: the pistons holding the plastic are fragile.
How to remove the lock and replace the cylinder
To gain access to the trunk lock of the Kalina sedan, it is necessary to dismantle the internal plastic trim. It is held on by two bolts, which makes it easy to remove. They are located in the places where the handle is installed, in the so-called latching pistons. You can pry them off using an ordinary screwdriver.
The design of the trunk lock of the Kalina hatchback consists of two parts. This is the larva and the mechanism itself responsible for blocking the door. Elements must be disconnected individually. Below you will find information about such deletion.
If you need to replace the larva, everything can be done in a couple of movements. All you need is a deep socket and a flathead screwdriver. Then you should unscrew the bolts and release the desired part of the housing. When the work is done, you need to use a plastic screwdriver to remove the clamp, which is attached to the body of the larva. Next, it is carefully removed, holding the spring. Then the replacement is made, but in the reverse order.
Replacing a trunk lock or disassembling the entire mechanism requires a lot of effort. You need to unscrew the door lock using a screwdriver. There are only two bolts, so the job is quick. You can remove the mechanism using a Phillips screwdriver. When everything is done, just pull the lock and it will come out easily.
To summarize, it is necessary to note what tools are needed for the job. These include:
- plastic screwdriver;
- deep head;
- Phillips screwdriver.
The work is not at all difficult, the main thing is to purchase an electric trunk lock and perform all the steps described.
Recommendations from the magazine “Behind the Wheel”
Let’s turn again to the “Behind the Wheel” review, which discusses how to remove door locks in a VAZ-1118 Kalina. If the casing has been dismantled, this is not bad. Next, according to the recommendations, unscrew the screw securing the inner handle:
The lock mechanism is connected to two rods made in the form of rods. Both of them are dismantled by disconnecting the plastic clips:
To disengage the latch, press on the plastic tab with a screwdriver.
At the last step, as you might guess, all that remains is to unscrew the screws holding the mechanism motionless.
But first, you need to dismantle the external handle. To do this, unscrew two bolts equipped with an “8” hex head.
By the way, if the central locking connector is attached to the mechanism module, it is also disconnected.
Let the wiring harness for the central locking drive remain in the door.
Of course, all door locks must be unlocked with one key, which is supposed to be used in the future.
The work indicated here is carried out on each of the four doors. In addition, it is very desirable that the ignition key also unlocks the doors. However, replacing the cylinder on the steering column will not be so easy. Can you handle the total amount of work that needs to be done? Decide for yourself.
What problems does the Kalina ignition switch have?
The ignition switch on the Lada Kalina is a contact group with a cylinder that turns only when the appropriate key is used. When you turn the key, the contact group turns, which closes certain circuits - first the ignition is turned on, then the starter. Simultaneously with turning the key, the steering shaft locking pin moves away.
This mechanism is characterized by the following malfunctions:
- the ignition turns on, but the starter does not turn on;
- the starter does not turn on the first time;
- nothing happens when you turn the key;
- the lock does not turn;
- the key is stuck in the ignition.
As a rule, if the starter or ignition fails, the contact group may be to blame. The contacts oxidize and the circuit stops working.
However, the ignition switch is far from the only reason for these phenomena. There may also be problems with the immobilizer. Therefore, it is important to make the correct diagnosis.
Mechanical problems, such as when the key gets stuck in the lock, occur much less frequently, but they are the ones that cause the most panic among car owners.
In any case, if the ignition switch malfunctions, it must be replaced immediately.
Changing the secret code yourself
Kalina rear handle repair
Remove the rear door .
Putting the handle on the shaft, set the glass to the upper position, and then remove the handle.
1. Remove the vibration damping element from shaft .
2. Fix the glass in the raised position by installing two wooden wedges between the glass and the inner door .
3. Using a 8-mm socket with an extension, unscrew the two bolts securing the glass holder to the guide slide of the window lift mechanism.
4. Repair of the rear door, two screws securing the front door handle of the Lada Kalina;. Using a socket or a size 8 wrench, unscrew the three nuts securing the window lift mechanism.
5. Using a socket or a 10mm wrench, unscrew the three nuts securing the guide of the window lift mechanism.
6. We remove the window lift mechanism through the lower technological hole in the inner door .
Alarm connection
The connection is based on the wiring diagram. If the Lada Kalina limit switches are installed incorrectly to the alarm system, it will not work normally and the car will be left unprotected.
Connection procedure using the StarLine E90 alarm system as an example:
- Driver's door. Connect the limit switch to the brown-red wire.
- Front passenger door. Connect the switch to the brown-red wire.
- Left rear door. Connect to the black and white cable.
- Right rear door. Connect to the black and white wire.
The door switches are connected in the left kick panel and the right threshold. The kick panel is where all the elements of the audio system are installed.
Kalina door limit switches are connected in the same way in the Pandora security and anti-theft system.
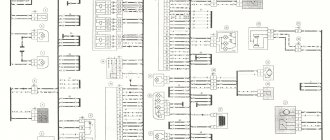
The model of the domestic manufacturer is extremely in demand among car enthusiasts in Russia and the CIS countries. This is due to its moderate cost and ease of maintenance. However, a characteristic disadvantage of the car is unreliable wiring. The standard Kalina pinout is made in the form of 4 separate zones, united into a single whole by connecting harnesses.
- The front part is a “web” that combines the battery, dashboard, generator and optics.
- The instrument panel bundle is arranged to connect the front and rear compartments with the ECM, fuses and the instrument itself.
- The aft branch contains outputs from consumers in the doors, aft dimensions, license plate lighting, and trunk lid.
- The fourth section is responsible for powering the engine management system. This is where the ECU meets the relays and fuses. Sensors with instruments and indicators are also connected.
It should be noted that some design elements are interchangeable with other VAZ models. If any component fails, it is allowed to use components from other modifications of the automaker to repair the car.
Repair of door handle on Kalina VAZ-1119
A very simple way to quickly repair a door handle
, no need to open the
door
, everything is done from the outside.
3. To remove the door lock, disconnect the wire terminal from the “negative” terminal of the battery
Using a Phillips screwdriver, unscrew the screw securing the intermediate lever of the locking rod, and remove the lever together with the rods from the rectangular protrusion, removing the locking rod from the plastic holder (shown by the arrow).
4. Use a Phillips screwdriver to unscrew the screw securing the base of the inner door handle and remove it. together with traction from a hollow pin. Remove the decorative glass trim and take out the glass guide.
5. Removal, installation, replacement and repair of the outer front door handle of the Lada Kalina | Section 10. Using a Phillips screwdriver, unscrew the three screws securing the door .
We remove the electric lock through the technological hole in the inner door .
6. Squeezing the two clamps of the wiring harness , disconnect the block from the electric drive and remove the lock with rods.
Rear door lock with electric drive and rod assembly
Install the rear door in reverse order .
What to do if a key is stuck in the lock and other problems
There is a very rare malfunction - the key gets stuck in the ignition switch of the Lada Kalina. The car owner can neither unlock the steering wheel nor start the car. As a result, the car becomes immobilized.
This can happen for two reasons:
- The lock is defective - it begins to jam due to manufacturing errors.
- The key is defective or its copy is incorrect.
Keys are often lost. Car owners, in order to save on the original, turn to the services of people who know how to make spare parts. The result is not the copy that the castle needs.
However, the key cannot unexpectedly get stuck tightly. The malfunction first manifests itself in the form of rare jams, which are eliminated by rocking the key from side to side.
Below is a table that tells you what to do in case of various ignition switch malfunctions:
| Malfunction | Method for starting the engine or solving a problem |
| The starter does not turn on, but the ignition works | Turn on the ignition, apply positive voltage to the starter relay directly from the battery. |
| The key won't turn | Rock the steering wheel in different directions. Perhaps it was blocked. At the same time you need to try to turn the key. |
| The key blade broke and remained inside the lock. | Heat a piece of hot melt glue and apply it to the end of the sting. Pull it out of the mechanism. If this fails, you can insert the knife into the hole of the cylinder and turn it together with the rest of the key until the engine starts. After starting the engine, move to the repair site. |
The car owner can replace the faulty ignition switch himself. However, it is important to be able to choose it correctly.
Instructions for replacing the rear door lock on Kalina
- The first step is to perform a procedure such as removing the rear door trim.
- Also, for greater convenience, you can remove the door glass, although it is not necessary. But, again, I repeat, doing everything without glass is much more convenient.
- When the glass is removed, from the inside of the door you need to get to the block with the connector and, pressing the latch, disconnect it.
- Using a screwdriver, as well as light finger efforts, release the drive rods from the lock
- From the end of the door, unscrew the three screws securing the lock.
- From the inside we remove the lock from the door
- Install the lock in reverse order
In order not to show off everything and to convey everything as clearly as possible, I tried to make a video review of this repair.
Installation and connection of central locking depending on the modification of Kalina
The central locking is controlled by an electronic unit, from which wires go to the door actuators. A wire also goes from the block to the driver's door microphone, which is located inside the actuator. When connecting, installing or repairing the central locking system after dismantling the left door trim, you need to find the cable from the drive to the 7-pin connector.
Central lock connection
Depending on the configuration (“Norma”, “Standard”, “Lux”) under the casing you can see:
- Six wires suitable for the connector (drive and two microphones).
- Unconnected wires from the drive.
- Lack of wires that should be in the connector on pins 4/6.
If there is an alarm, then wires 2/7 must be connected to the central locking unit. If the package does not include connecting all the actuators, then you need to do this yourself by connecting the missing ones to the control unit. To do this, you can use a two-wire cable that runs from the door to the central locking control unit. The electrical circuit of one or another modification of Kalina will help with the work.
Central lock connection diagram