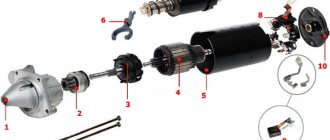
On VAZ-2110 cars, the starter can be either old or new. The latter is distinguished by the presence of a gearbox, which is made on the basis of a sun gear. The whole device consists of several parts - an electric motor, a gearbox, and a bendix. It also includes front and rear covers, inside of which there are bronze bushings. Such starters are increasingly used in cars, as they have the advantages of small size and high speed when compared with their predecessors.
What does the starter consist of?
The main elements that make up the VAZ-2110 starter, the price of which is 2300-2500 rubles, were discussed above. But it also contains a number of parts that affect the performance of the device. The stator winding, located on the stationary part of the device, is necessary to generate an electromagnetic field with the help of which movement is created. But it cannot be created without a counteracting field that forms around the rotor winding.
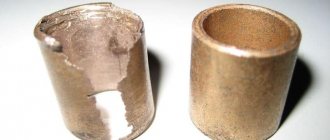
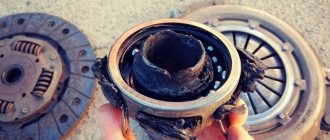
Consequently, the engine rotor also has a winding, which is powered from the on-board network through a brush assembly. This is the most vulnerable unit, since the brushes are made of graphite. Although it is durable, you should not forget that it constantly rubs against the slats, between which there is a small gap. This results in significant wear, and its result is loss of contact between the starter power input and the rotor lamellas. In the back cover there is a bronze bushing, which is used to center the rotor and power it from the battery negative.
vtulka_0.jpg
How can you get it out yourself? If you were able to notice that the starter sometimes cranks your power unit with tension when the battery is fully charged, then the culprit for the phenomenon is the armature, which touches the stator. A small problem is enough for the starter shaft to become slightly misaligned: the narrow gap disappears completely. But sometimes the reason lies in severe wear of the bearing (front). You can sleep peacefully for a day: this problem can be quickly solved. To eliminate it, you need to prepare a tap of suitable size, find a drill chuck, take a long bolt and an old bushing, a jar of nuts and a box of nails. Now it’s worth disconnecting the battery, the starter, and then removing it from the “coat,” that is, removing the wiring. Happened? Proceed to unscrew the lower bolt of the device and remove the remaining fasteners from the starter.
We take the sword and install it in the chuck of a hand drill: let's try to make a thread in the sleeve. Carefully! Carry out the following actions at low speeds. A marksman is like a girl: the object is fragile. Excessive force or slight misalignment can break it. God forbid this happens: you have to fork out money for a new product. Although you can carry out resuscitation using a long threaded bolt, turning out new grooves. Once they are ready, you need to insert the nails so that their tips protrude no more than a centimeter above the end.
It turned out to be a real masterpiece of futurism! We mount it into the bushing, perform manipulations, trying to pull out the fragment, while doing everything smoothly, without distortions. As soon as we succeed in cutting the revolutions, we pull out the tap, then insert a bolt of a suitable size and pull the sleeve out. This operation can be performed several times. The starter likes to be capricious due to the misalignment of the shaft, so after some time it will again be difficult to hold the bushing. What to do? Definitely don’t wipe the sweat from your face, finish repairing the VAZ 2109 starter, repeating monotonous actions. Get ready for a shopping trip. While you are enjoying the smell of iron, your significant other will buy a magazine where they will read an article about the history of the VAZ 2109 brand and regret that they purchased a non-domestic unit at a lower price.
Solenoid relay
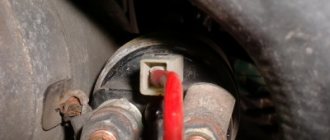
If the VAZ-2110 starter does not turn, then you need to look for the reason for this behavior. And there may be several of them, among the first is a breakdown of the traction relay. It is installed directly on the starter housing and has two functions: it supplies power from the battery positive to the windings, and also moves the bendix along the rotor axis, connecting its teeth to the flywheel crown. Consequently, the crankshaft rotates from the electric motor.
A lot of troubles can happen with the solenoid relay. For example, often its winding simply burns out. Consequently, the traction relay armature does not move and the starter does not turn on. The second, no less common breakdown is contamination of the power contacts. When switching a high current, the copper plates are destroyed, they become covered with soot, causing contact to be lost. Therefore, the retractor will click, but the starter will not turn over.
The starter of VAZ 2101, 2102, 2103, 2104, 2105, 2106, 2107 does not start
What signs indicate that the starter needs to be repaired or is time to be replaced? Why does the starter sometimes not start?
These questions have their own answers:
- The relay functions without problems. However, the anchor does not respond or makes slow rotational movements. Solution ! As a rule, this is due to burning of the collector. It is also necessary to pay attention to the winding. It must be complete. It is also possible that the relay fastening elements are loose, there is a short circuit in the commutator, the brushes are stuck or have become completely unsuitable for further use. However, the reason may lie in a discharged battery.
- The starter responds, but the armature relays do not function. Solution ! Often the whole point is that the anchor is stuck. In this case, it is worth checking how the tips are fixed. Is there a short to ground and what is the condition of the wiring?
- The armature rotates, but problems arise with the crankshaft. Solution ! It's worth checking the buffer spring. Most likely it's broken. Some components of the coupling may be damaged.
- Powerful noises are heard. This is often the result of damaged bushings and gears.
- In turn, the starter turns, but does not start. You need to take a closer look at the return spring. The device may also be skewed. It is also possible that the relay and drive handle are jammed.
Connection diagram
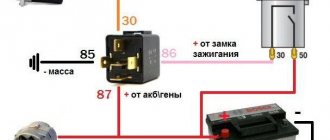
The starter is connected to the on-board network of the VAZ-2110 car according to the standard scheme. It is working and tested, does not require any intervention. The ignition switch has two contacts that close when the key is turned to the extreme position. Now there is no need to talk about the fact that power is supplied to the ECU, fuel pump and other elements of the car. We are talking exclusively about the starter, so only its operation needs to be considered.
So, the contacts closed when the key was turned to the extreme position, and power was supplied to the electromagnetic relay. It is installed under the dashboard. Its switching terminals are supplied with the positive terminal from the battery through a fuse. The voltage is removed from it and supplied to the winding of the traction relay of the VAZ-2110 starter. The result of this is that the armature retracts, moves the bendix and closes the power contacts. The latter are connected as follows: one directly to the battery positive, and the second to the starter power wire.
Typical starter faults
All breakdowns of starter mechanisms are divided into two types: mechanical and electrical. If the working elements of the Bendix gears, flywheel fail (their wear or damage to the teeth), the drive lever, overrunning clutch, or return spring malfunction, the cause of the failure is mechanical, but the starter is repairable. A worn part must be replaced.
Violations of the operating mode in the starter electrics are more complex: a burnt-out commutator or armature winding, a broken gearbox, and worn brushes cannot be restored; in this case, the entire mechanism assembly is replaced with a new one. The only part in the electrical circuit that can be replaced without consequences is the solenoid relay. Electrical failures often occur as a result of moisture and contamination, which can lead to a drop in power, short circuits and oxidation of contacts. This kind of malfunction is eliminated by cleaning the electrical elements followed by treatment with a special anti-corrosion compound.
Typical signs of a starter malfunction:
- When you turn on the ignition (supplying current from the battery), the starter does not turn, a click is heard, the engine does not start: a possible reason is a relay failure, a gearbox failure, jamming of the gears of the Bendix transmission units or flywheel, short circuit of the brushes.
- The starter starts slowly with a loss of shaft speed and extraneous grinding noise - mechanical damage to the transmission links, breakage of the winding in the commutator or armature, contamination of internal components.
- After starting the engine, the starter continues to work - failure of the retractor relay, breakdown of the return spring or overrunning clutch.
- The ignition does not fire, or fires with a delay and subsequent loss of power, insufficient to turn the crankshaft - disturbances in the electrical circuit, oxidation of the terminals, breaks in the armature winding.
- The starter does not respond to turning the key in the ignition switch - no current is supplied from the battery: the contacts on the battery terminals are broken, or it is discharged.
Diagnosis of the electrical causes of malfunctions can be made without removing the starter, using special equipment (micrometer or tester) by measuring the power and current indicators on the armature, solenoid relay contacts and return clutch. The first sign of electrical failure is a drop in voltage during startup. A deviation of 1-2 Volts when the ignition is turned on is considered the norm; large deviations (possibly twice) are a sure sign that the brushes, windings, or bushings are faulty. If everything is in order with the electrics and the indicators are normal, then to determine the mechanical cause of the breakdown, the starter is dismantled and disassembled, identifying possible damage visually.
The service life of the starter depends on the number of complete starts of the ignition system and operating conditions. At low temperatures, its wear occurs faster: the oil in the engine becomes viscous, so the electrical circuit, gearbox and moving components experience increased load. Frequent starting with an insufficient charge of the car battery can also lead to malfunction of the relay, premature wear of the commutator winding, armature and brush assembly.
Replacing the starter on the “ten”
On fuel-injected cars this procedure will be slightly problematic. The reason for this is the air filter, which is located in the engine compartment above the clutch housing. Changing the VAZ-2110 starter solenoid relay will also be problematic. There is not enough space, and if you remove the filter, it is not a fact that you will be able to put it back in place. The rubber bands on which it is attached are so inconvenient that when installing them into the holes on the brackets, you can not only cut them, but also get injured.
In general, after removing the air filter, there will be little work left to do for dismantling. First, disconnect the battery. This action is mandatory, you can’t do without it. After this, unscrew the nut on the traction relay and pull the wire out of the connector. That's all, now unscrew two or three nuts from the studs (depending on what model of starter). All that remains is to slightly pull the body towards the left wheel and lift it so that it comes up. But it will be quite easy to pull it out through the top.
↑ Starter ST 221 (35.3708)
On VAZ-2106, VAZ-2107 and other classic Zhiguli models, a starter 35.3708 (ST 221) is installed, which is a 4-pole mixed-excitation DC electric motor with four brushes.
The starter is controlled remotely by a special electromagnetic retractable relay. The starter is connected and disconnected from the engine flywheel by a device through a ring gear. The starter is located in the engine compartment to the right of the engine. Attached to the clutch housing with 3 bolts. A thermally insulating protective screen is installed between the hot exhaust pipe of the engine and the starter.
How to repair a starter
To carry out repairs, you will need to disassemble the device completely, literally piece by piece. At the same time, the traction relay, which drives the starter on the VAZ-2110, is generally checked and serviced separately. New models are not subject to repair; they are enclosed in a solid body. But if you look at its cost, it turns out that repairs will cost a small amount. When you disassemble the starter, the first thing you will need to do is install new brushes. If the old ones are less than 12 mm long, then they have already become unusable.
Cleaning the slats is also impossible without it. First, clean the gaps between adjacent contacts from dirt, then arm yourself with polishing paste and rub the metal surface. Upon completion of this procedure, rinse with solvent. You should not use sandpaper, as it will make the surface of the lamellas abrasive, resulting in rapid wear of the starter brushes. And at the last stage you replace both bushings. One is located in the rear cover, and the second is located in the clutch housing. When making repairs, replace both, otherwise the rotor alignment will be disrupted. And there will be no contact between the battery negative and the rotor. As a result, you will get that the VAZ-2110 starter simply does not turn.
Starter repair VAZ 2101, 2102, 2103, 2104, 2105, 2106, 2107
Repairing such a vehicle element as the VAZ 2101, 2102, 2103, 2104, 2105, 2106, 2107 starter is a rather painstaking process. The driver must have good self-control and strictly follow certain instructions. Then repairing the starter yourself will go smoothly.
So, it is necessary to repair the starter in the following sequence:
- Remove the old starter from the engine.
- Using a key set to “thirteen”, loosen the nut securing the wiring, which contains the traction relay.
- Disconnect the cable end.
- Apply a voltage equivalent to twelve volts to the relay output.
We supply 12 volts to the starter - Change the housing pole to a negative value. As for the ohmmeter, this device should be connected to contact-type bolts. At the same time, if the solenoid relay is repaired, the armature pulls the so-called “overrunning clutch” into the window of a special cover, which is located in front. But the contact type bolts must be closed.
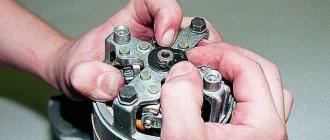
- Taking a Phillips screwdriver, you need to unscrew the 3 screws.
Unscrew the bolts of the retractor relay - We dismantle the traction relay.
- We free the relay body from the rod, which is equipped with a spring.
- We install a new traction type relay using the reverse sequence.
- To continue further disassembly of the starter using a Phillips screwdriver, unscrew 2 screws.
- It's time to remove the cover.
- In order to check the current condition of the brushes, we use a slotted screwdriver. It unscrews the fastening screw that secures the contact wire.
- When the spring is released, you need to remove the brush. The same method is used to remove the 3 remaining brushes. If the latter have wear of up to 12 mm or less, then they need to be replaced.
- Next, you need to connect the ohmmeter one by one to the terminals of the stator windings. They are checked for short circuits. You should also make sure that the separately located winding terminals do not come into contact with the housing.
Checking the short to body - Use a screwdriver to pry up the retaining ring and remove it.
- We remove the washer from the axle.
- Using a ten key, remove the 2 coupling nuts.
- Then we remove them.
- We disconnect the starter body and remove it from the insulating tubes of the tension type bolts.
- We take a quick look at the commutator and windings. You should never leave charred windings. If the collector has been slightly burned, it is necessary to clean the existing plates with abrasive sandpaper. When severe burning has occurred and serious wear has occurred, it is recommended that the anchors be replaced. As for scuffing and enveloping of bronze relating to the bearings on the special neck of the armature shaft, they are removed using fine-grained sandpaper and are subsequently polished.
- Next, we take the ohmmeter again and check the armature winding to ensure there is no short circuit. A damaged anchor must be replaced.
Checking the armature windings - We release the drive cover from the rubber seal.
- Remove the adjustment washer from the armature axis. During the assembly process it must be returned to its original place.
- The lever axis is being uncoiled.
- You need to use a special bit to select the axis.
- We remove both the anchor and the drive.
- We pry it up with a screwdriver and remove the overrunning clutch drive lever.
- As for the gear, it must make rapid rotational movements in one direction and not move in the opposite direction. Also, it should not be accompanied by chips or nicks that may appear in the leading area of the teeth. When the gears are worn out or the clutch is faulty, the assembly requires replacement.
- Having placed the anchor axis, using a block of wood for these purposes, using a key set to “thirteen” we knock the limiter off the locking type ring.
- We pry it up with a screwdriver and remove the retaining ring.
- We free the axle from the limiter and the overrunning clutch assembly. The drive gear is also dismantled.
- Having replaced the coupling assembly, we return the locking ring to its original place and attach the limiter with part of the conical groove to the winding part of the armature.
- The limiter must be pressed onto a locking ring. To do this, use a hammer to strike. We also use the key for “thirteen”.
- Using compressed air, we remove the coal dust that has accumulated in the body and brush holder. As for the wiring ring and the plastic surfaces in contact with it, they must be treated with Litol-24. Lubricant number 158 is also suitable. In this case, we use engine oil, which is necessary for processing the rotor bushing, screw splines of the armature shaft and hubs touching the overrunning clutch.
- Further assembly is carried out in the opposite order to disassembly.
DIY connection instructions
So, if you decide to install a new mechanism, then first you will need to dismantle the old one.
How to properly remove and install a new device, what its connection diagram is, read below:
- To begin, turn off the engine and turn off the ignition. Then open the engine compartment and disconnect the battery. All repair work related to the electrical part must be carried out with the vehicle's electrical network de-energized. If the battery is not disconnected during removal, this may result in voltage surges in the system, which can lead to failure of the starter mechanism or other electrical equipment.
- When the battery is disconnected, you will need to dismantle the crankcase protection of the power unit. To do this, crawl under the bottom of the car and unscrew all the bolts that secure the protection, then remove it, and put the bolts nearby so as not to lose it.
- Now you can begin dismantling the element. To do this, first find where the device is located. First of all, you need to unscrew the nut of the upper mechanism lock. Unscrew it with a wrench and set it aside.
- The next step is best done under the bottom of the car. Reach under the vehicle and disconnect the cable that connects to the traction relay terminal. If the connection is bad, there are traces of rust or oxidation on it, then at the same stage, clean the contacts; for this you can use a construction iron brush.
- After these steps are completed, you need to unscrew the nut and disconnect the cable that is connected to the contact screw of the traction relay.
- Next, all you have to do is unscrew the nut, which is located on the lower mechanism lock. Now you can dismantle the starter device and replace it with a more functional and efficient one. Further installation is carried out in reverse order, do not forget to connect all the nuts and bolts. Before connecting wires, check the quality of the contacts to prevent possible problems in the future.
Main malfunctions and their symptoms
The most common breakdowns that occur in the starter are as follows:
- The electric motor of the device does not rotate. A short circuit has occurred on the stator windings, the rotor has become soured in the support bushings, or the contacts have oxidized;
- The electric motor spins, but at insufficient speed and low power. Either the graphite brushes are worn out or a short circuit has occurred on one of the windings;
- The starter works as it should, but rotation is not transmitted to the crankshaft. Bendix wear or breakdown;
- The starter starts the engine, but does not turn itself off. The retractor relay mechanism has oxidized or the return spring has burst.
If you notice one of the above signs on the starter, it should be dismantled and a detailed diagnosis should be carried out already in the removed state.
Summarize
By gathering together knowledge about the structure of a car starter and the principle of its operation, you can understand the principle of its operation.
- Retractor, retracts the anchor, pressing the plate to the heels and throws out the bendix.
- By closing the power bolts, current is supplied to the winding of the electric motor, which rotates its shaft with the bendix.
- He, in turn, spins the flywheel of the internal combustion engine crankshaft to a speed sufficient to start it.
- A running engine rotates the flywheel at high angular speeds, this unlocks the Bendix overrunning clutch and it rotates freely in the opposite direction.
- The driver, having released the key, de-energizes the windings, and the entire car starter circuit returns to its original state.
If you have any questions, ask them in the comments. Good luck to everyone on the roads.
Catalog number and cost of a good starter for VAZ 2112
Since there are a large number of defects among branded VAZ 2112 starters, and the components themselves do not show high quality, experienced car owners recommend buying analogues from third-party manufacturers. Among the alternative options, there are a lot of low-quality products, but there are also very worthy examples. The best brands that produce starters for the VAZ 2112, which have proven themselves well and sell their units at an attractive price, are presented in the table below.
Table - Good analogues of the original VAZ 2112 starter
| Manufacturer | vendor code | Approximate cost, ruble |
| Bosch | 986014950 | 7300-8900 |
| As-pl | S9008 | 1700-2500 |
| Startvolt | LST0115 | 2550-3150 |
| Eldix | ELDST2108 | 2600-3500 |
| Unit | 1100351 | 3200-4100 |
Which starter is better?
If a unit on your car fails, then you will have to either repair it or replace it with a functional one. If you make a replacement, you will probably be faced with the question - which starter is better to install? Today, “tens” can use two types of devices - with and without a gearbox. The gear unit is a device with a small electric motor and lower current. It differs from conventional mechanisms in its higher starting torque and power, its weight is much higher, and its starting ability is better (the author of the video about repairing the device at home is the CompsMaster channel).
In addition, gear units are less demanding to maintain, and as practice shows, their service life is longer. Mechanisms of this type allow the crankshaft to rotate even if the car’s battery is discharged. But it should be noted that long-term use of such a starter unit can lead to its more accelerated failure. One of the “diseases” of gear units is the rotating gear, which, as a rule, fails before other elements.
If we talk about traditional starter mechanisms without a gearbox, then in this case the unit itself transmits translational motion to the gears. Such devices have a simpler design and can be easily repaired in case of breakdown; this advantage is considered the main one when compared with gear mechanisms. However, experts still recommend choosing gear units, since they are more durable and generally work more reliably.
Required Tools
In order to carry out repairs yourself and replace the starter on a VAZ 2112, you need the tools from the table below.
Table - Tools required to replace the front strut
| Name | Note |
| open-end wrench | "at 13" |
| Spanner | "at 13" |
| Head | "at 15" |
| Ratchet | With extension |
| Rags and wire brush | To clean dirt |
| Penetrating lubricant | For example, WD-40 |