The starter is an electromechanical DC motor, which is combined with an electromagnetic traction arm.
On VAZ 2106 cars it is supposed to install two brands of starters: on early models of the car there was ST-221, and on cars of later production - 35.3708. In terms of their technical characteristics, they are almost identical, so both are interchangeable.
The ST-221 starter with a cylindrical commutator differs from the 35.3708 starter in the design of the rear part and the starter rewind, which consists of two pairs of coils (two shunt and two service). And for starter 35.3708, the winding design includes one shunt and one series.
Advantages of a gear starter
In order to improve the quality of a domestic car, but not replace it with another model, motorists have found a solution - replacing spare parts.
If the VAZ 2106 is geared, then the car owner’s dream of a quick and trouble-free engine start becomes a reality. The replacement will result in the following changes to your vehicle:
- Quick engine start;
- Repairing a spare part requires much less frequent attention;
- A gear starter is smaller in size and weight, but has more power and energy consumption.
Car enthusiasts confirm that replacing a classic with a gearbox results in the engine starting equally easily at any battery charge level and even when it is almost empty. In addition, the advantages of a gear starter are that the battery is saved, the car engine starts easily even at low ambient temperatures, this part is more reliable and lasts much longer.
Preliminary work
We install wheel chocks
Performing a few simple steps related to preparing the VAZ 2107 for repair work will significantly save your time, improve the quality of maintenance and will guarantee the safety of your health.
- The place where the machine will be serviced must have good and uniform lighting. In some cases, this can only be achieved through the use of additional lighting.
- Due to the fact that the starter in the VAZ 2107 is located in the lower part of the engine, work on its dismantling should be carried out on an overpass or inspection hole. It is not possible to remove the starter from the top.
The machine must be securely secured using the parking brake or wheel chocks. Otherwise, there is a possibility that the vehicle will start moving spontaneously.
Reasons for starter failure on a VAZ 2101 and ways to solve problems
If one day you got behind the wheel of your car and could not start it, most likely the problem is that the starter does not turn. There can be many reasons for this “behavior”. The problem does not always lie in the device itself:
- low battery charge;
- poor contact at the junction of power wires.
It is important to note that in order for the starter bendix to rotate, a voltage of at least 11.0 V is required. If the battery cannot maintain this value at the moment of starting, then the car simply will not start. As a result, it’s simply not possible to go anywhere
If the engine does not start, then first of all you need to check the presence of voltage at the battery terminals
As a result, it’s simply not possible to go anywhere. If the engine does not start, then first of all you need to check the presence of voltage at the battery terminals.
If it is normal, you need to make sure that it is present on the incoming wires. This can be done using a multimeter. If there is voltage and there is no break, the problem may be in the electrical part of the starter:
- the solenoid relay does not work;
- The carbon brushes have failed.
You can check the relay without removing the starter itself. It will be enough just to close the contacts directly. This can be done using a screwdriver or insulated wiring with exposed contacts. After closing the contacts, the relay must click - this indicates its operation. If there are no such sounds, then the relay has simply failed. There is no point in repairing it; you just need to replace it.
Another common problem is that the carbon brushes have failed and the stator winding has short circuited. But these faults can only be determined after removing the starter from the car. As well as mechanical failures:
- Bendix failed;
- bearings are worn out;
- The starter fork is broken.
The main working mechanism of the starter is the bendix. It connects the engine flywheel and the starter shaft - which allows torque to be transmitted. The bendix itself is a shaft with a gear at the end. It is its splines that engage. Over time they wear out. The situation can only be resolved by replacing the Bendix.
Bearing wear is also a common problem. You can check their condition without removing them. It is enough to try to rotate the shaft with the starter removed. If it rotates with force or is completely jammed, then the bearings definitely need to be changed. The starter shaft must rotate freely, without applying any force.
During prolonged intensive use of the car, the fork often fails. Figuring out where this component is located is not difficult. You need to remove the starter and disassemble it. This will allow you to determine all the problems that exist in it, what problems there are. In some cases, you will even need a special sdend.
Diagnostics of faults in the VAZ 07 model starter
- no rotor rotation;
- clicks when trying to start;
- extraneous sounds when the device is operating.
Starter won't start
The electric motor does not work due to battery discharge or winding failure. When the battery is discharged, the lighting devices do not turn on or the lamps glow dimly, and when you try to start the engine, a click is heard, after which the indicators go out.
Crackling sound when starting the starter
A cracking sound indicates a breakdown of the solenoid relay, which cannot engage the rotor gear with the flywheel ring. The repair consists of checking the wiring and measuring the resistance of the windings. A damaged relay must be replaced.
The starter clicks but does not turn over
The defect indicates insufficient voltage in the power supply due to battery discharge or oxidation of the contact pads. When the battery is low, the clicking sound is accompanied by a decrease in the brightness of the lamps. The defect is observed when there is poor contact between the battery contacts and the wiring terminals.
The starter hums but the engine does not start
The reason for the hum is that the bendix is jammed; the relay cannot move the gear to the flywheel. To check it is necessary to remove the electric motor. After cleaning the starter from dirt, performance is restored.
The starter turns the crankshaft with difficulty, as if the battery is dead
With this malfunction, the starter may work “every other time”; in warm weather, the car starts normally. But even in the mildest frost, problems begin: it is with great difficulty that the engine cranks, and the load on the battery is enormous (can be seen on the voltmeter). There may be two reasons - wear of the bushings and the armature touching the stator. The second is interturn short circuits and other damage to the armature winding. In both cases, the starter begins to “slow down” itself. Most often, such a starter is replaced entirely, since repairs can be more expensive.
Removing the VAZ 2107 starter
If you are of a thin build, then you can complete all the work without much difficulty and without the use of a pit, overpass, or lift. On a VAZ 2107 car (especially if an injector is installed or even an LPG), removal is problematic. The lower nut is difficult to unscrew; even the service instructions for classic cars say that it is necessary to use a 13mm socket with a universal joint and an extension. But if this is not the first time you are removing it, then most likely the lowest nut was not tightened at all.
First, disconnect the negative terminal of the battery to de-energize the entire power supply system. As mentioned earlier, there is no short circuit protection in the power circuit. Now you can carry out repairs
Please note that it is advisable to do this on a cold engine - there is a risk of burns near the exhaust manifold. Then, using a key set to “13”, you need to unscrew the nut from the upper bolt of the solenoid relay and disconnect the power wire. That's all, now unscrew the three fastening nuts and carefully remove the starter to carry out its complete or partial disassembly
That's all, now unscrew the three fastening nuts and carefully remove the starter to carry out its complete or partial disassembly.
Lada 2110 PhiX › Logbook › Repair and replacement of VAZ 2110 starter
Hi all. Recently the starter has started to work poorly. Sometimes it didn’t work the first time, the retractor shoots, but the starter doesn’t turn. Sometimes it would turn with a crunch.
I decided that it was the Bendix, but it turned out that it was not the problem, it was perfect.
To begin with, I sentenced the retractor. Although it worked, the contact of the supply pin was burnt. The pin got so hot that it melted the attachment point. It is clear that this is most likely not a cause, but a consequence.
Further disassembly of the starter revealed a broken planetary gear. It is plastic, burst and crumbled. Now it’s clear why the starter jammed.
The cost of a new metal gear is 150 rubles. The cost of the assembled gearbox is 750 rubles. There is no point in taking it as a collection, because... All other parts of the gearbox are in excellent condition. I also purchased a tool to remove the retaining ring for RUR 170
I assembled the gearbox with a new metal gear. Lubricated it with CV joint.
I put the starter in place, and a miracle happened: the car started up normally.
But it was too early to rejoice; after driving for a couple of days, the problem partially returned. The starter sometimes jammed and in general began to turn noticeably slower. I had to take it off again. This time, I was not lazy and disassembled it completely. It turned out that the magnets had fallen apart.
Most likely, this happened as a result of the starter jamming on an old, broken gear and its subsequent overheating.
As a result, I didn’t bother with further repairs and bought a new, factory, KZATE gear starter for 3200 rubles.
Now it starts just fabulous. The new starter spins like a hurricane. I should have not been too lazy right away and disassembled the starter completely, it would have saved money and time. But there is also a plus: I gained interesting experience in repairing gear starters.
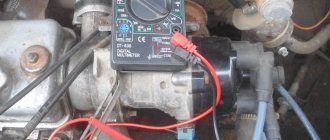
How to check the starter for functionality without removing it from the car
First, check the battery charge level: frequent clicks when turning the ignition key most often indicate a low battery. Then find the starter in the engine compartment “wilds” and find a thick wire in an insulating braid, screwed to the solenoid relay. The second end of the cable is connected directly to the positive terminal of the battery (it is advisable to recharge it in advance). Followed by:
- you will need a tester that needs to be switched to voltage measurement mode;
- Place the negative probe of the device on any metal part of the body or engine that is not covered with paint;
- plus touch the contact with the thick wire on the starter;
- ask an assistant to turn on the ignition;
- the device should show at least 12 V.
If the tester shows "0", check the integrity of the fuse and the thick wire. You should also make sure that it is securely connected to the positive terminal of the battery and the solenoid relay (tighten the nuts, clean the contacts). If the voltage on the device is less than 12 volts (assuming the battery is fully charged), then to determine the condition of the starter it will have to be dismantled and checked further.
How to check the solenoid relay without removing the starter
If the voltage is normal, but the starter is still on strike, you should proceed to further actions:
- prepare a screwdriver with a long blade and a thick plastic handle;
- check the ignition: it should be turned off;
- Use a screwdriver to close a pair of contacts on the traction relay to allow current to flow directly to the starter windings.
If the engine crankshaft begins to rotate, then the solenoid relay is at fault.
How to replace the starter on a VAZ 2101-VAZ 2107?
Note! Before you start replacing this unit, be sure to make sure that its performance is not due to other reasons, for example, the battery is discharged, or its terminals are oxidized, or the wiring that goes to the starter is not working properly!
And also take into account the fact that the starter must be replaced in an inspection ditch, otherwise it will be inconvenient and very problematic to remove from the car!
Removal: 1) First, loosen the clamp that secures the warm air supply hose to the air filter housing.
2) Then loosen the clamp that secures the hose to the air intake itself.
3) And then remove this hose from the car engine.
4) Next, loosen the lower nut that secures the air intake.
5) Next, unscrew the top nut that secures the same air intake.
6) And then remove this air intake from the car engine.
7) Now remove both nuts that secure the heat shield to the engine.
And then, using an extension joint with the socket head, unscrew the remaining bolt that secures the heat-insulating shield to the right engine mount bracket. (For information on how to unscrew the remaining bolt that secures the heat-insulating shield to the bracket, see the very bottom of the article in the “For Beginners!” section)
9) After unscrewing the bolt, remove the heat insulation shield from the engine.
10) Next, unscrew the bottom bolt that secures the starter.
11) Then unscrew the remaining two upper bolts, which also secure the starter.
12) Moving the starter a little forward... (Continued in point 13)
13) Disconnect the wire block from the starter traction relay terminal on the starter.
14) Then unscrew the nut that secures the wire to the upper contact of the traction relay.
15) And then disconnect the wire from the upper contact, and also remove the bolt and nut that held this contact.
16) Next, remove the starter from the car engine.
Installation: 1) Installation of a new starter is carried out in the reverse order of removal.
Important! 1) Before starting work, disconnect the negative terminal from the battery! (For information on how to disconnect this terminal, see the article: “About the battery”). For newbies! Question: How to unscrew the bolt securing the heat-insulating shield to the bracket of the right engine mount Answer: Using an extension joint with the socket head “2”, unscrew the bolt “1” securing the heat-insulating shield to the bracket of the right engine mount
For newbies! Question: How to unscrew the bolt securing the heat-insulating shield to the bracket of the right engine mount. Answer: Using an extension joint with the socket head “2”, unscrew the bolt “1” securing the heat-insulating shield to the bracket of the right engine mount.
Additional video: To understand in more detail how to replace the starter, watch an interesting video in which the replacement process will be described in detail:
Removal
Well, the check showed that the starter needs to be repaired. Therefore, the first thing we do is dismantle it.
- Secure the car stationary by turning on the handbrake and placing stoppers under the wheels.
- Move the negative terminal from the battery to the side. This will deprive your car of power.
- Disconnect the wire connector from the starter solenoid relay terminal.
- Unscrew the fastening nut from the relay contact bolt and remove the wire.
- If there is a crankcase guard, remove it. Here all the bolts are simply unscrewed.
- The 2 starter fixing nuts are unscrewed from the bottom of the engine compartment. But the third one is more conveniently removed from inside the engine compartment.
- Having removed the fasteners and disconnected the wiring, you can safely remove your starter from the clutch housing.
Before starting work, be sure to clean the device from accumulated dirt so that it does not get inside the structure and reduce all repair efforts to nothing.
Cleaning nickels from carbon deposits on the solenoid relay
All this is best done on a removed part, which you can read about here. After this, you need to use a deep socket and a wrench to unscrew the three nuts securing the cover to the body, as is clearly shown in the photo below:
When all the nuts are unscrewed, you need to press on all the bolts from the same side and pull them out from the back:
Now carefully fold back the relay cover, but not all the way, as the wire will get in the way:
Pay attention to the central copper plate: it will definitely need to be cleaned of plaque and carbon deposits, if any. Also, you need to unscrew the nickels themselves (two in total) by unscrewing the two nuts on the outside of the cover:
And then you can take them out from there with your hands, from the back side:
Also clean them thoroughly with fine sandpaper until shiny:
After completing this simple procedure, you can put everything back in place in the reverse order. If the problem was precisely the burnt nickels, then it will definitely disappear!
Repair
Next, you have to check the condition one by one and take appropriate measures to eliminate problems with the following components of the starter:
- Brushes;
- Anchor;
- Overrunning clutch;
- Traction relay;
- Bushings.
Now let's talk about everything one by one.
Brushes
First, assess the current condition of the brushes. In most cases, they are the source of problems with the starter.
- Remove the pair of screws that hold the protective cover in place. The cover is now easy to remove.
- Use a screwdriver to remove the retaining ring from the shaft, and don’t forget about the adjusting washers.
- Unscrew 2 more tie rod nuts. Remove the manifold side cover.
- Use a screwdriver to press out the springs and remove the brushes from the holder.
- Measure the brushes with a caliper or ruler. If the height is less than 12 millimeters, the brushes must be replaced.
- It is also better to replace elements if there are chips, cracks and other defects on the surface.
Anchor
If all is well with the brushes, the next suspect is the anchor.
- Remove the housing with the starter.
- At the anchor, look at the condition of the commutator, check whether the winding is intact.
- If there is carbon deposits on the collector or signs of breakdown, clean these areas with fine sandpaper.
- Check the armature and stator windings using a multimeter in ohmmeter mode.
Overrunning clutch
Parallel checking of the overrunning clutch with the armature will allow you to replace the latter at the same time.
To gain access to the clutch you will have to remove the armature from the front cover. At the same time, change it if necessary.
- Remove the retaining ring located near the overrunning clutch.
- Remove the restrictor ring.
- Remove the plastic lever stop, which will allow you to reach the anchor.
- Remove the intermediate support from the shaft.
- Check the condition of the gear teeth. If there are defects, the unit is replaced with a new one.
Traction relay
Replacing the traction relay is necessary if, when voltage is applied to its terminals, the overrunning clutch does not extend. Sometimes the VAZ 2109 is equipped with collapsible relays. But it’s still better not to repair it, but to replace it with a new relay.
- To remove the relay, unscrew the two screws located on the front;
- Lift the relay, disconnect the armature from the lever;
- Remove the relay from the housing, grabbing the spring and armature. All elements are changed if necessary.
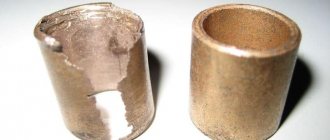
Bushings
Excessive wear on the bushings often impairs the performance of the starter. This is due to the material from which they are made - brass, bronze or copper. Contact with stronger metal causes wear.
- In the case of the VAZ 2109 starter, we have one bushing located in the rear cover, as well as a second one, which you will find in the clutch housing.
- The presence of defects can be determined visually. If the elements have chips, cracks, burrs, or other defects, this indicates wear.
- Try moving the starter shaft transversely. If there is noticeable play, the starter bushings are worn out and need to be replaced.
- When planning to replace the rear bushing, it is recommended to simultaneously change the cover itself.
- The front bushing is removed from the crankcase using a tap of the required size. Tighten the tap like a thread, and resting it against the bottom of the hole, the sleeve will gradually begin to move out of its place.
- Before installing a new bushing, treat the inner surface of the seat with engine oil.
When putting the starter back together after repair, the most significant advice is to clean the surfaces from contamination. This will significantly extend the service life of the repaired unit and avoid breakdowns in the near future.
Be prepared for the fact that attempts to repair the starter will not give the expected effect. In this case, it is better to replace it completely or contact a trusted car service.
How to remove the starter with your own hands?
In order to replace the VAZ-2107 starter or repair it, you will need to completely remove it.
To do this, you need to prepare keys for 13 and 10. The order of work is as follows:
- Using a 10mm wrench, unscrew the nut that secures the negative terminal of the battery. It is necessary to de-energize the car, since the power supply circuit of the starter is not protected by anything - a thick stranded wire is simply stretched from the positive of the battery to the solenoid relay of the VAZ-2107 starter.
- Unscrew the nut that secures the positive wire to the solenoid relay.
- Remove the power wire from the solenoid relay coil.
- Remove the three bolts securing the starter housing to the clutch block. To unscrew the bottom one, you need to use a socket, a ratchet and a universal joint with an extension. But if you get to the fastening point from below, you can do all the work with spanners. True, you will have to turn it a quarter turn, or even less.
- Remove the starter.
As you understand, all work will be carried out in close proximity to the exhaust manifold, so you must first wait until the engine has completely cooled down.
Replacement
- socket wrench 10;
- socket wrench with extension 13;
- screwdriver.
Work order
- We place the car on a viewing hole or overpass and secure it with the parking brake.
- Open the hood and disconnect the ground wire from the battery.
- Using a 10mm socket, unscrew the bolt of the lower fastening of the starter heat shield.
- We dismantle the air filter housing and the warm air supply hose (for injection units, remove the fastenings of the intake pipeline).
- Using a socket wrench with a 13 mm extension, unscrew the 3 bolts securing the starter housing. It is better to unscrew the bottom bolt from the inspection hole.
- Using a 13mm wrench, unscrew the nut (on the injection engine there are two nuts) securing the starter shield. Let's take it out.
- Using a socket wrench with a 13 mm extension, unscrew the 3 bolts securing the starter housing. It is better to unscrew the bottom bolt from the inspection hole.
- Using the same tool, unscrew the nut securing the tip of the wire going to the “+” battery.
- Disconnect the start relay wire.
- We remove the starter from the rear wall of the engine compartment.
- We install a new starter in its place.
- We carry out installation work in reverse order.
Is the design of the “seven” starter complicated?
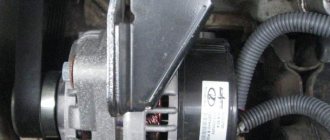
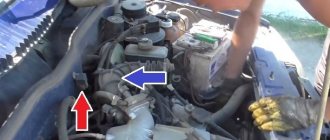
The starter is responsible for starting the engine. This is an electric motor with 4 poles and the same number of brushes. It is located in the lower part of the engine compartment on the right side of the cylinder block, as shown in the photo from under the hood. Fixation on the clutch housing is carried out using three bolted connections.
This element is not designed for long-term operation; its only function is to provide the engine with the required torque. Having completed the task, the part returns to a state of rest. So any major fault will result in vehicle failure. The design of the VAZ 2107 starters and other models of this line is the same. If there are some differences, they are insignificant.
It is important to know that the starter can be geared, then the circuit will be a little more complicated, but for the issue under consideration we will not touch on this
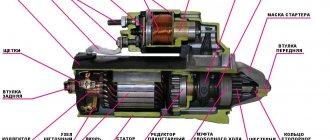
The starter device includes more than 40 small elements from which the main parts are assembled - a DC electric motor, a bendix and a traction relay. They are easy to find in the photo. The functions of the motor include transmitting torque to the crankshaft through a gear transmission. Thanks to the retractor relay, the movement of the bendix is ensured. In addition, the relay is also responsible for closing the contacts of the electric motor. Bendix is a small part, but it performs a very important task - it ensures coupling between the shaft and the flywheel crown. And only after this is it possible to rotate the crankshaft.
Design and technical characteristics of the VAZ 2106 starter
On the VAZ 2106, the manufacturer installed two interchangeable types of starters - ST-221 and 35.3708. They differ slightly from each other in design and technical parameters.
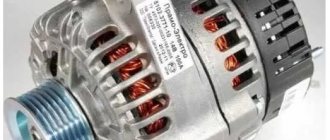
The first VAZ 2106 were equipped with ST-221 type starters
Technical characteristics of VAZ 2106 starters
Until the mid-80s of the last century, the manufacturer installed an ST-221 starter on all classic VAZ cars. Then the starting device was replaced with model 35.3708, which differed from its predecessor in the design of the collector and the fastening of the cover to the body. Its technical characteristics have also changed somewhat.
Since the mid-80s, starters 35.3708 began to be installed on the VAZ 2106
Table: main parameters of VAZ 2106 starters
| Starter type | ST-221 | 35.3708 |
| Rated power, kW | 1,3 | 1,3 |
| Current consumption at idle, A | 35 | 60 |
| Current consumption in braking state, A | 500 | 550 |
| Current consumption at rated power, A | 260 | 290 |
VAZ 2106 starter device
Starter 35.3708 consists of the following elements:
- stator (housing with field windings);
- rotor (drive shaft);
- front cover (drive side);
- rear cover (collector side);
- traction electromagnetic relay.
Both covers and the starter housing are connected by two bolts. A four-pole stator has four windings, three of which are connected to the rotor winding in series, and the fourth in parallel.
The rotor consists of:
- drive shaft;
- core windings;
- brush commutator.
Two cermet bushings, pressed into the front and rear covers, act as shaft bearings. To reduce friction, these bushings are impregnated with special oil.
The design of the starter 35.3708 is practically no different from the design of a conventional electric motor.
A drive consisting of a gear and an overrunning clutch is installed in the front cover of the starter. The latter transmits torque from the shaft to the flywheel when the engine starts, that is, it connects and disconnects the shaft and the flywheel crown.
The traction relay is also located on the front cover. It consists of:
- housings;
- core;
- windings;
- contact bolts through which power is supplied.
When voltage is applied to the starter, the core is retracted under the influence of a magnetic field and moves the lever, which, in turn, moves the shaft with the drive gear until it engages with the flywheel crown. This closes the contact bolts of the starter, supplying current to the stator windings.
Video: principle of operation of the VAZ 2106 starter
https://youtube.com/watch?v=d0jmNq4Vz80
Gear starter
Despite the low power, the standard starter of the VAZ 2106 copes with its tasks quite well. However, it is often replaced with a geared analogue, which differs from the classic one by the presence of a gearbox, which significantly increases the power of the device. This allows you to start the engine even with a discharged battery. Thus, a gear starter for classic VAZ models produced (Belarus) has a rated power of 1.74 kW and is capable of spinning the crankshaft up to 135 rpm (usually 40–60 rpm is enough to start the power unit). This device works even when the battery is discharged to 40%.
The gear starter has a special gearbox that significantly increases the power of the device
Video: gear starter VAZ 2106
Choosing a starter for VAZ 2106
The starter fastening device for classic VAZ models does not allow installing a starting device from another domestic car or foreign car on the VAZ 2106. Adaptation of such starters is very labor-intensive and expensive (the exception is the starter from the VAZ 2121 Niva). Therefore, it is better and easier to purchase a new starting device. A stock starter for a VAZ 2106 costs 1600–1800 rubles, and a gear starter costs 500 rubles more.
Manufacturers are recommended to give preference to well-established brands:
- "Elektromash" (Kherson, Ukraine);
- KZATE (Samara, Russia);
- "Atek" (Vitebsk, Belarus).
starters lesson
There are two main types of starters, which differ in design and efficiency:
- simple, also known as gearless or classic. This is the first design in which the motor armature and bendix are placed on one shaft;
- Geared. It differs from the classic one in that a gearbox with a planetary gear is installed on the armature shaft, which drives the bendix.
The classic unit has certain disadvantages, which at one time forced engineers to reconsider its design. The main one is low maximum power. As the volume of automobiles grew, so did the engines and the need for more power to power them. To get it running, you would have to increase the size, therefore, of the starter, its weight and cost.
Read Adjustment: also valves VAZ 2109, 2108
The gearbox design allows you to “squeeze” more out of the unit while maintaining the power of its compact dimensions and small For. The weight of its effective operation requires less energy, which means that even a “slightly damaged” battery will not become a serious problem.
Design and operating principle
To understand the features of the repair, you must first study the design of the starter and understand how it works for the benefit of your car.
Let's start with the design. It includes four main nodes.
| Knot | Peculiarities |
| Electric motor | It transmits direct current through four brushes |
| Freewheel with gear | A clutch or bendix drives the flywheel of your car's engine. |
| Traction relay | Serves to extend the bendix with gear when turning on the electrical appliance |
| Bushings | Ensure easy rotation of the clutch, rotor, and gear. One bushing is located inside the starter, and the second is in the clutch housing. |
Having familiarized yourself with the starter diagram, you can discuss the principle of its operation.
The operating principle is to convert an electrical signal into the rotational movement of a drive gear. Current is transmitted through the brushes to the poles of the electric motor. At the same time, the clutch extends and the gear is connected to the flywheel ring. To start the engine you need a quick but easy rotation of the starter. When the engine starts, the clutch returns to its original position.
Replacing the starter on a VAZ 2101-VAZ 2107
Welcome! Starter - after all, but without it it would be difficult, because if this unit does not exist, then who will start the car? Of course, you can get out of the car, push it a little and turn on the speed and it will start, but why are such difficulties necessary? That's why a starter was invented, thanks to which the car can be started only by turning the ignition lock cylinder. But over time, this unit breaks down and therefore it has to be replaced with a new one, but not everyone knows how to replace it, and therefore we have especially prepared for you instructions in pictures on how to replace the starter on cars of the “Classic” family.
Note! To replace, you will need to stock up on: A basic set of “10” and “13” wrenches, and you will also need to take with you a screwdriver, a “10” socket and an extension for this head!
When should you replace the starter? It needs to be changed if:
- It began to turn very poorly and therefore he began to start the engine of the car for a long time. (In this case, the starter can also be repaired; for information on how to repair it, see the article entitled: “Repairing a starter on a VAZ”)
- It also needs to be changed if it has stopped starting the car’s engine altogether and thus it is no longer subject to repair.
Starter VAZ 7 models (from 01 to 07)
The commutator-type electric motor used to start the engine is located on the side of the crankcase of the power unit. The parts are connected to each other by bolts with a hexagonal head. Power is supplied from the battery.
The power of the device is sufficient to rotate the crankshaft at air temperatures down to -35 ° C (without preheating the oil). The appearance and design of the device are shown in the photo in the spare parts catalogues.
Removing the starter and protective screen
To repair the starter, it must be removed from the car. If the car is relatively new and the starter has not yet been removed, then the heat-reflecting protective screen is in its rightful place. It will prevent you from removing the starter, so you need to remove it first.
The protective screen is attached on top to two studs with 13 nuts and on the bottom with a 10 head bolt. And if the nuts can be unscrewed with a simple wrench, then to unscrew it you will need a long thin socket wrench. Many, having removed the protection, do not put it back in place, but it is better to do it anyway. Without it, the starter gets very hot from the exhaust manifold, especially in summer in traffic jams.
Starter guard and bottom bolt location
Video of starter removal
Purpose
The device is designed to force the engine crankshaft at startup. The product is equipped with a special Bendix clutch, which engages with a ring gear mounted on the flywheel of the power plant. The electric motor is controlled remotely using a contact group in the ignition switch through an additional relay.
Starter electrical connection diagram
There are 2 types of electric motors for starting the power plant:
- On cars with a carburetor, a standard starter is used; torque is transmitted directly from the rotor to the ring gear.
- On some carburetor cars and VAZ 07 with an injector, a gear type drive was installed. By using a planetary gear, the current in the power circuit is reduced and the torque is increased.
Detailed installation process
In order to correctly install the starter, you must adhere to the following points:
1. Conduct a visual inspection of the device. 2. Installation of the device in its original place. First fasten with a long bolt, and then with two short ones. 3. Install the wire terminals and tighten the nuts. 4. Replace the battery. 5. Connect the terminals on the battery. 6. Install the braces coming from the intake pipe or air duct and air filter. 7. Replace the mudguard (if equipped).
After everything is done, you should start the engine. If everything works as expected, then the starter connection is made correctly. If the engine does not start, you should look for where the error was made.
Dismantling process
Removing the starter on a VAZ 2107 begins with the fact that you need to detect it. This point concerns beginners, because experienced drivers know where the starter is located. Located near the bottom of the power unit. It will not be possible to remove it while on the ground. You need to drive the car either into a pit or onto an overpass. In fact, awkward placement is the biggest problem in the removal and installation process. Otherwise, everything is very simple and convenient.
The actual dismantling process is as follows:
1. First of all, you need to remove the battery terminals. 2. Some 7 models have a mudguard, it is installed under the engine. It needs to be dismantled. 3. Remove the battery. 4. Unscrew the clamp of the wiring harness going to the starter. 5. Remove the wires from the traction relay. 6. Remove the stretch marks that come from the inlet pipeline. 7. The starter itself is removed.
The dismantling process is completed, and now you can take the starter for repairs, or replace it with a new one.
The above describes the process that is performed on cars with an injection power system. Do not forget that there are VAZ 2107 models with a carburetor installed. In such cars, the dismantling process has minor differences. The carburetor model does not have an intake pipe or stretch marks from it. This means you need to do this:
— Remove the wires from the traction relay. — Remove the air duct and the air filter. — Remove the starter.
Actually, the difference from the injector is only in one point, as you can see. As for the malfunctions that may occur, most often drivers are faced with the fact that the starter does not turn. In this case, it is better to install a new one, but you can send the old one for repairs, in the hope that a good repairman will come across who can fix everything.
Checking the VAZ 2107 starter
If the engine of a VAZ 2107 does not start, usually check the starter first. This is done as follows.
- The starter is removed from the body and cleaned of dirt.
- The output of the traction relay is connected by a separate wire to the battery positive, and the starter housing to the negative. If the working starter does not start to rotate, the test continues.
- The back cover of the device is removed. Brushes are checked. The coals should not be erased by more than a third.
- A multimeter measures the resistance of the stator and armature windings. The device should show 10 kOhm, otherwise there is a short circuit in the circuit. If the multimeter readings tend to infinity, there is a break in the coil.
- The contact plates are checked with a multimeter. One probe of the device is connected to the body, the other to the contact plates. The multimeter should show a resistance of more than 10 kOhm.
During the process, the starter is checked for mechanical damage. All faulty and damaged elements are replaced with new ones.
Starter circuit for VAZ 2101, 2102, 2103, 2104, 2105, 2106, 2107
First, let's take a closer look at the VAZ 2101, 2102, 2103, 2104, 2105, 2106, 2107 starter circuit.
VAZ "classics" starter circuit
Deciphering the starter circuit for VAZ 2101, 2102, 2103, 2104, 2105, 2106, 2107:
- — drive side cover;
- — retaining ring;
- — restrictive ring;
- — drive gear;
- — overrunning clutch;
- - drive ring;
- — rubber plug;
- — drive lever;
- — relay anchor;
- — holding winding of the traction relay;
- — pull-in winding of the traction relay;
- — relay coupling bolt;
- — contact plate;
- — relay cover;
- — contact bolts;
- — collector;
- - brush;
- - armature shaft bushing;
- - cover on the collector side;
- — casing;
- — shunt coil of the stator winding;
- - frame;
- — stator pole fastening screw;
- - anchor;
- — armature winding;
- - intermediate ring.
Starter connection diagram for VAZ 2101, 2102, 2103, 2104, 2105, 2106, 2107
Deciphering the starter connection diagram for VAZ 2101, 2102, 2103, 2104, 2105, 2106, 2107:
- — generator;
- - accumulator battery;
- — starter;
- ignition switch;
P1 - pull-in winding of the traction relay;
P2 - holding winding of the traction relay.
Lada Largus
Remove the cover (if equipped) of the electronic control unit (ECM) by releasing the two fasteners (flat-head screwdriver). Unscrew the 2 nuts (No. 1) securing the expansion tank (No. 2) (10mm wrench). Remove and move the expansion tank to the side without disconnecting the hoses.
For configurations with JR5 gearbox:
- disconnect the hinges (No. 1) of the gear selection and shift cables from the gearbox (flat-head screwdriver);
- press the clamps on both sides and disconnect the stoppers of the sheaths of the selection and shift cables from the gearbox bracket.
For configurations with JH3 gearbox:
- remove the cover (No. 1) of the gearshift drive rod joint;
- Unscrew the bolt (No. 2) securing the gear shift rod, remove the spacer sleeve and disconnect the rod (10mm wrench).
Unscrew the 3 bolts (No. 1) securing the starter (head “13”).
Raise the car and unscrew the nut (No. 2) securing the bracket (No. 4) to the intake manifold (No. 3) (head “13”). Unscrew the bolt (No. 6) securing the bracket (No. 4) to the cylinder block (No. 5) (head “17”). Remove the bracket (No. 4) that mounts the intake manifold (No. 3).
Unscrew the nut (No. 2), Figure 3-7, and disconnect the harness (No. 1), Figure 3-6, of the ignition system wires from the starter (No. 3) (head “10”).
Unscrew the nut (No. 4), Figure 3-7, securing the starter wire (No. 5) ("10" head). Disconnect the starter wire. Unscrew the nut (No. 3) securing the starter electromagnetic relay wire (No. 5) (head “8”). Remove the starter.
The process is also shown in the video:
Payment via PayPal
After selecting payment via PayPal, the PayPal payment system will launch, where you need to select the payment method: bank card or PayPal account.
If you already have a PayPal account, then you need to log into it and make a payment.
If you do not have a PayPal account and you want to pay using a bank card via PayPal, you need to click on the “Create an Account” button - shown with an arrow in the picture.
PayPal will then prompt you to select your country and provide your credit card information.
After specifying the information required to make the payment, you must click on the “Pay Now” button.
Official website of the PayPal payment system https://www.paypal.com
Repairing a starter on a VAZ 2107 with your own hands - your eyes are afraid, your hands are repairing
Hello, dear car enthusiasts! We will continue to master the features of operation, diagnostics and repair of the main components of domestic cars. In principle, this material is also suitable for those who own foreign cars. At least to understand the essence of the problems.
After all, no matter how you twist the starter. but on a foreign car and in a Zhiguli or Lada, it is almost the same. The difference may be insignificant in design, and a new principle of operation of the starter for production cars has not yet been invented.
Therefore, we will consider the technology for repairing the starter on the VAZ 2107. Repairing the VAZ 2107 starter, first of all, consists of performing actions aimed at identifying and eliminating possible problems. Typically, such repairs do not cause any difficulties and are quite feasible even for a novice auto mechanic.
Possible malfunctions of the VAZ 2107 starter and methods for eliminating them
Malfunctions of the VAZ 2107 starter cannot be called fundamentally different from malfunctions of starters of other Zhiguli models. However, when starting to diagnose the condition and repair the starter, it is necessary to have a clear understanding of possible problems in its operation.
For example, do you know what actions you should take when the VAZ 2107 starter turns poorly or does not turn when you turn the key in the lock? In this situation, first of all, pay attention to the warning lights. If they light dimly or go out periodically, your problem can be considered solved - most likely your battery is simply discharged
Of course, a low battery charge cannot be the only reason for poor starter performance. For example, the starter armature will not rotate if the battery pole terminals and wire tips are heavily oxidized. Clean them and apply Vaseline. And if the tips are loose, tighten them more.
If there is an interturn short to ground or a break in the relay's pull-in winding, you will have to change the relay - there is no other way to change the situation.
To eliminate breaks in the relay power supply circuit and in the power supply circuit of the turn-on relay winding, check the wire connections in the circuit.
Sometimes, when the starter is turned on, the traction relay is activated, but does not turn. the anchor either does not rotate at all or rotates very slowly. In this case, these may be symptoms of burning of the collector, which will only need to be cleaned.
The reason for this situation may also be wear or sticking of the brushes. In this case, the brushes must be replaced.
It happens that after turning on the starter, only the armature rotates, while the flywheel remains stationary. Such a breakdown can be caused by slippage in the movement of the freewheel, rupture of the clutch ring, or slipping along the axis of the clutch engagement lever. In such cases, the clutch and engagement lever must be replaced.
An uncharacteristic sound made by the starter when the armature rotates may indicate a weakened fastening of the starter, its fastening is skewed, damage to the teeth of the flywheel drive gears, or wear of the bearing bushings.
How to check the VAZ 2107 starter yourself?
It cannot be that you are not interested in the question of how to check the VAZ 2107 starter yourself, without resorting to the help of specialists from the service center?
We suggest that you familiarize yourself with a sequential methodology, following which you can get an idea of the condition of the starter of a VAZ 2107 car:
- Remove the starter from the car and clean its outer surface of dirt.
- Connect the terminals of the solenoid relay and the battery (in this case, the starter housing must be connected to its negative terminal)
- To check the armature and stator windings, remove the starter rear cover and disconnect the brush assembly
- Using an ohmmeter, check that the windings are not shorted to the housing. If there is no short circuit, the minimum readings of the device will be 10 kOhm
- Check the windings for breaks. To do this, connect the ohmmeter probes to the terminals of the windings. If you notice the ohmmeter readings tending to infinity, regard this as a winding break.
- Make sure that the armature is not shorted to ground - attach the ohmmeter probe to the body, and alternately connect the second one to the contact plates. If there is no short circuit, the ohmmeter reading will be at least 10 kOhm.
Only at first glance, the work associated with repairing a starter may seem complicated. But having done it at least once, you can easily diagnose and fix most breakdowns of the Zhiguli starter of the seventh model.
Malfunctions
Considering that the starter is a complex electrical device, malfunctions in it can occur quite often, but most of them can be eliminated through repair. Malfunctions that cannot be repaired and require replacement of the entire assembly include:
- damage to the commutator due to brush wear or other reasons;
- short circuit or break in the stator winding;
- short circuit or break in the armature winding;
- complete wear of the armature bearing bushings.
If the above faults are detected, it is better to replace the starter with a new one. Otherwise, your car will either not start at all, or serious problems may occur in the on-board electrical circuit of the car.
The catalog number of the original “seven” starter is 2107.3708010-01. Its price is approximately 2500-3000 rubles. You can also purchase improved models - starters with a built-in gearbox, which are very popular today.
Their advantage is that even if the battery is partially discharged, the starter, due to the gearbox, provides a sufficient number of flywheel revolutions to start the engine. The price for such models starts from 3,500 rubles. The cost of replacing a starter at a service station averages 500-600 rubles.
Mechanical problems
If you suspect that the problem is mechanical, you need to check spare parts such as the buffer spring, clutch ring, flywheel ring, lever. Typically, a driver can conclude that there has been a failure in the mechanical system if an unusual sound is heard while the starter is operating. Then it is recommended to look at it from the engine compartment. Such noise may indicate that the following elements have broken:
- bearing;
- starter mounting bolts;
- pole fastening.
In addition, the teeth may be damaged. A malfunction often occurs when the starter continues to spin without turning off. This occurs due to sticking of the traction relay drive lever or wear of the ignition switch return spring.
Starter performance check and repair
First of all, you should clean the starter housing from dirt, which inevitably accumulates on it during the operation of the car. Then connect the mechanism to the battery: the “negative” wire to the starter housing, the “positive” wire to the contact of the traction relay. A characteristic click should follow, and a drive gear will appear in the front “cutout” of the casing. Now use an ohmmeter and check the armature windings for opens and shorts. To do this, you need to open the cover at the back of the starter and remove the brush holders with brushes.
Then connect the ohmmeter with one end to the armature body, and the other - alternately to the sectors of the winding. If there are no short circuits or breaks, the instrument needle will fluctuate from a minimum value of 10 kOhm and above.
Now comes the integrity check of the stator winding (in other words, located inside the housing, along the walls of the cylinder). Here you simply connect the ohmmeter contacts to the copper wire terminals. The arrow of the measuring device should “lie” in the area of the highest value if there are no problems. If there are breaks or short circuits in the windings of the starter or solenoid relay, there is no point in bothering with repairs if you have never dealt with electromechanics and have not encountered the technology of manufacturing electric coils. It is best (and easier) to purchase a complete starter and install a new starter.
Checking the integrity of the stator winding
An operation that can really be called a repair is replacing brushes. You can easily find out that they are erased during diagnostics. It is enough to turn the starter on its side when it is connected to the battery and turns properly. If the unit immediately stalls, brush wear is to blame. Replacing parts is simple and accessible even to a beginner. It was already mentioned above that it is enough to remove the cover at the rear of the starter. When the brush holder is removed, the springs in it will themselves push out the brushes, which will hang on the wires. Replacement is a matter of minutes.
The main thing is to never allow oil or fuel to come into contact with brushes or wire windings. Electrics do not tolerate moisture or grease. Therefore, during any operations with starter parts, especially when assembling it, act carefully and, if possible, stay away from liquids and fuels and lubricants.
There is one rare malfunction when the starter turns on, but nothing turns. In this case, the bendix is to blame - a device that prevents the teeth of the drive gear from sharply hitting the flywheel. Its main malfunctions are wear of the rollers, the gear itself, weakening of the pressure spring or unsuitability of the lubricant. This part is inexpensive, changes quickly, and therefore there is no point in bothering with repairs. It is better to purchase it in a store; replacement is done on the “return” when the starter is being assembled.
Sometimes the armature bushings need to be replaced, but this is extremely rare because they are made of very reliable material and wear only appears after a really long period of use. There are only two of them - in the toe and back cover. The process of knocking the bushings out of their seats is usually confusing, but by choosing the right attachment, you won’t ruin anything. Next, a part of the required diameter is lubricated and pushed into the hole. If things get tight, don’t use more force; it’s better to sand the bushing body and try again, otherwise the socket may simply burst.
Advantages of the gear mechanism
The gear starter on the VAZ-2107 has the following advantages over the old product:
- ensures faster engine starting;
- significant increase in product service life;
- increasing the power of the mechanism with reduced energy consumption;
- reduced size and weight.
The main advantage of the updated device model is its increased energy efficiency parameters. Thanks to these parameters, starting the engine is possible even with a dead battery. Starting the engine can be done not only in hot weather conditions, but even in severe frosts, when starting a car with a conventional starter is almost impossible.
The gear-type mechanism allows you to save battery charge, so this type of product is much better than older designs. The service life of such a product depends on the number of engine starts, but in any case it will last longer than the old modification of the device.
Design and operating features
To find out why the product is effective and reliable, you should consider the design of the gear starter. The main difference between a gear starter is the presence of a gear located between the armature and the bendix. The effectiveness of the device is due to the fact that the product is equipped with a reduction gearbox, through which the torque can be increased. The most proven starters are those based on a planetary gearbox design.
Features of the functioning of the gear unit on the VAZ-2107 are no different from the usual:
- A voltage of +12V is supplied to the terminals of the solenoid relay.
- An electric current begins to flow in the winding and armature of the device.
- The retractor relay moves the gear along the armature shaft and engages it with the motor flywheel, at the same time the starter itself begins to rotate.
- The flywheel rotates and the engine starts.
- As soon as the power at the terminals disappears, the relay returns the gear mechanism to its original position, and the starter is turned off at this time.
The gearbox used in the design of a modern device will increase its efficiency by 50%, making it more efficient and reliable. Thus, the load on the battery is significantly reduced.
Features of installation of a gear starter
If the old starter is constantly bothering you, then now is the time to replace it with a more modern model. To replace a VAZ 2107 you will need to use a standard set of tools. The replacement process is very simple and does not require special skills. The new unit is installed to replace the old one without any modifications.
- Initially, be sure to disconnect the negative terminal from the battery.
- Using a wrench set to “13”, it is necessary to unscrew the bolts securing the product, as well as the power cable bracket.
- The plug is removed from the control wire.
- Now you can dismantle the old product.
- The new product fits perfectly into the place of the old one, despite the significant discrepancy in size.
- We proceed to tighten the bolts securing the product.
- Don’t forget to reinstall the power wire and then secure it with a nut.
- Now you can connect the battery and start starting the engine.
VAZ 2109 starter - how to assess problems and fix them as well as a mechanic?
For owners of domestic cars, self-repair or assembly of vital mechanisms is familiar and accessible; in this article we will try to improve our skill level and replace the VAZ 2109 starter with our own hands.
Starter circuit and purpose
On all cars, without exception, and therefore on the VAZ 2109, the starter is responsible for starting the engine, or rather, spinning the crankshaft. Essentially, it is a small electric motor. The VAZ 2109 starter device includes a movable rotor, two windings, and a bendix with a set of brushes. How does it all work? Magnetic fields of opposite values are created around the starter and rotor windings, which drives the moving element into dynamics. It is quite easy to apply voltage to the starter, but for the rotor you need an intermediary - brushes consisting of graphite and copper.
What about the Bendix starter of the VAZ 2109, this element transmits movement to the flywheel. The part consists of the following parts: a fork connecting the mechanism to the retractor relay, an overrunning clutch that ensures movement in one direction, and a gear. Many motorists are familiar with the situation when this part is erased. The slipping of the Bendix is clearly audible and indicates that the installation of a new kit is inevitable. And although the cause is often contamination of the mechanism, cleaning it is not recommended. Due to dust and soot, Bendix is subject to wear, often unevenly, and even after washing it will no longer perform its function at the proper level.
There is a gear starter and a simple one. The scheme for transmitting torque to the flywheel is excellent. The gear starter has an additional element between the armature and the bendix. Many consider this design to be more productive and less voracious. True, the gear unit is more difficult to repair.
Starter mechanism malfunctions
If any difficulties arise with starting the car, this unit is the first to be suspected, but now, knowing the design of the VAZ 2109 starter, you will quickly figure out where to look. Various sounds similar to metal grinding should also alert you; it is quite possible that your VAZ 2109 will need to disassemble the starter. The reason may lie in the flywheel, and its crown will need to be replaced. In this case, the car will most likely start, just not right away.
But if the car does not start and there are no alarming sounds, then you may have to replace the clutch. Disassemble the starter and dismantle it, try turning it in both directions. If it rotates freely, then calmly throw away the failed part. You can understand that it is necessary to remove and replace worn starter brushes installed on a VAZ 2109 by a characteristic click, after which the expected engine start will not take place.
Removing and connecting a new starter
In absolutely any of the cases described above, you will be faced with the need to take a closer look at the device. It should be noted that with the release of the VAZ 2109, the question of how to remove the starter became more easily resolved, because in this model the arrangement of components under the hood is much simpler. So, you will need socket and socket wrenches and an inspection hole. Now, regardless of whether it is necessary to replace only the bushings or the entire VAZ 2109 starter, it must be removed. First of all, all the wires of the traction relay are disconnected, after which the block is dismantled. Don't forget to remove the high voltage wire from the battery.
The next step is to dismantle the engine crankcase protection; to do this, simply unscrew the mounting bolts. Then the approach to the mechanism of interest to us is cleared. To remove it, you need to unscrew three nuts - two on the block and one in the engine compartment. The connection diagram for the new VAZ 2109 starter is the same, only it is in the reverse order, so it will not cause any difficulties.
Disassembly begins with the fact that you need to carefully knock down the locking and restrictive ring, and then, unscrewing the fasteners of the back cover, remove it. Now we get to the graphite brushes, stator and armature. It should be noted that there may not be a gearbox in this part, in which case the stator is taken out after the armature. If the design still includes this element, then you need to act somewhat differently. Although it is not difficult to remember how to disassemble the gear starter on a VAZ 2109 if it fails. The scheme will just work in reverse - the stator itself is pulled out first, then the armature, and the gearbox comes last.
Now you can imagine how to remove, assemble, install and connect the VAZ 2109 starter; you no longer need to bother the mechanic with such issues.
VAZ 21043 starter repair
VAZ 21043 (2104). Dima Korniev. SubscribeSubscribedCancel subscription. VAZ 2104 starter repair in your own garage
Repair of the VAZ-2107 starter, overhaul of the VAZ starter https://www.vazdriver.ru/remont_startera/remont_startera_vaz2107.html In this manual we will look at a comprehensive repair of the VAZ-2107 starter with a complete overhaul of it and the elimination of all faults at once. Electrical diagram of VAZ-21043.
VAZ - Do-it-yourself car repairshttps://nind.ru/category/vazRepair and replacement of the starter on a VAZ 2107. Installation and replacement of a gas tank on a VAZ 2104, 21041, 21043. Repair and replacement of a rear hub on OKA, VAZ 1111, 1113. Replacing a lamp low beam on VAZ 2106.
Starter VAZ 2106 photo https://photodomik.ru/starter-vaz-2106-foto.htmlVAZ 21043 see starter repair. source. VAZ 2106 starter repair, disassembly. source. Photo Analogs Info. source. Removal and installation article about removal and source.
Starter on the classic VAZ 21043 - Repair and operation https://auto.mail.ru/forum/topic/starter_na_klassike_vaz_21043/Forum Rules. Repair and operation. November 5, 2011. Starter on a classic VAZ 21043. Today my car itself crashed into another. The damage is not severe, but we still haven’t figured out the reasons!
starter VAZ 21043 -Maintenance and repair | Forum https://Kyron-clan.ru/forum/index.php/topic/5867-%D1%81%D1%82%D0%B0%D1%80%D1%82%D0%B5%D1%80-% D0%B2%D0%B0%D0%B7-21043/Hello everyone! I have such a problem! I started to start my car but it wouldn’t start without waiting for the starter to stop completely, I turned the key again, after that the problem is this: it doesn’t light up on the dashboard
Removing the starter on a Zhiguli. VAZ 21043 (2104)https://chinimavto.ru/show/iUb-8eeZfNk/snyatie_startera_na_jigulyah_vaz_21043_2104.htmlPavel Makarov. We start the VAZ 21043 in frost -30 degrees. Vladimir Lyashuk. Repairing a VAZ 2104 starter in the garage with your own hands. Tips from a car mechanic. Do it yourself. Repair auto parts.
Starter device for VAZ 2107, VAZ 2105, VAZ 2104, repairhttps://www.VazClub.com/vaz/2104-2105-2107/remont/elektrooborudovanie/starter/replacement of traction relay for VAZ 2107, starter repair, VAZ 2105 starter assembly, check VAZ 2104 starter. Diagram
VAZ 21043 starter malfunctions look at the video https://tuning-vazov.ru/videos/remont-inomarok/zapusk-vaz-21043-s-krivogo-startjora.htmlStarting a VAZ 21043 from a crooked starter. Starter repair (repair of non-separable starter retractor relay). Repair #19 Bendix Starter VAZ 2101. replacement of starter; replacement of bendix
VAZ 2105, starter repair, - for the sake of subtleties https://avtogid.co.ua/remont/143-vaz2105-remont-startera.html Here are instructions for repairing the VAZ 2105 starter! Removing the VAZ 2105 starter It is important to repair the starter, which first needs to be removed from the car.
Auto electrics. / autoelectrica.com.ua//www.google.com.ua/search?ie=UTF-8hl=ruq=%D1%80%D0%B5%D0%BC%D0%BE%D0%BD%D1%82 %20%D1%81%D1%82%D0%B0%D1%80%D1%82%D0%B5%D1%80%D0%B0%20%D0%B2%D0%B0%D0%B7%2021043Starters , generators, air conditioners, ignition coils, fuel pumps, sensors
Prevention
To significantly increase the service life of the starter, carry out diagnostics in a timely manner. Detect oxidation of terminals and wires, breaks and short circuits! Follow the mandatory operating instructions. In particular, do not turn the electric motor for more than 7 seconds when starting the internal combustion engine. And restart it no earlier than after 30 seconds. If the engine does not start after three times, proceed to troubleshooting the ignition or power system.
After the engine has started, the ignition key must be immediately returned to the position for checking the warning lights (released). If the key contact group is faulty, the cylinder may become stuck in the START position. Therefore, the driver must return it to the conditional ON position himself. Prolonged rotation of the flywheel drive gear is a common cause of electric motor failure.
For an experienced “six” owner, removing, checking and repairing the starting device will not present any practical difficulties. And following the instructions will significantly speed up the work. Sometimes repairing a starter becomes a long and thankless task. Therefore, if possible, it is better to immediately replace the part with a new one from the store.
Video: VAZ-2106 starter repair
User reviews
| Rubin-63 | In general, this is the problem: I started it normally in the morning, warmed it up, drove home, left for 10-15 minutes, went out and started starting (the engine is hot), the retractor works, but the starter does not turn (it feels like the battery is completely dead) it’s good that I parked the car downhill , started it, went on business, turned off the car during the day but it stood for a long time (the engine had cooled down completely), got ready to go home, started it normally (the engine is cold), stalled accidentally at a traffic light, started to start it for nothing, the retractor works, but the starter does not turn, stood for minutes 20 in the middle of the road, everyone looked at me with an unkind look, then somehow I started it. And the same garbage happened a couple of days later, in the same morning the engine started up fine on a cold engine, got to the gas station, turned it off, and had to push it. What could it be, rip off all the wiring to clean the contacts, or what, how to check??? |
| Pysh | remove the starter, disassemble it, clean it thoroughly, especially the brush assembly and contact group. clean all contacts on the starter |
| Rubin-63 | I actually want to install a new retractor, and at the same time I’ll look and clean the starter, but some wires need to be removed and looked at from the relay, maybe some have come loose or this won’t happen from the relay? |
| Serg DP | There is a car 21063 of the 91st year. The other day the starter stopped working. From the factory it was BOSCH completely black. From the ignition switch +12V comes to the retractor (checked with a tester). We removed the starter and connected the starter directly to the battery past the retractor, it works. There is a cat on the retractor. BOSCH catalog number 0 331 303 025 I can’t find the same retractor for replacement in stores, so there are 2 options: 1) repair of the retractor, but even if it works, how long will it last? The starter itself is in perfect condition, it seems that it never worked at all, although the mileage is 230 thousand and 20 years of trouble-free operation. 2) replacing the retractor with something else, but which one? I can’t find information anywhere about which starter is used for the retractor for this Bosch starter? There is information floating around on the Internet that you can somehow use the Bulgarian language for 2108. |
| Soldering iron | If it works out, it will last for a long time, but will it work out, if memory serves, the retractor is not collapsible, that’s the problem. I honestly haven’t heard about the idea of doing something else. But let's try the following first. You need to check the ground on the engine, the wires from the battery to the starter, the condition of the connectors and terminals. Then, with the starter removed, apply a plus to the top contact (where the wire from the battery is connected), then to the male connector, where the wire from the lock is connected, also apply a plus. It is clear that the starter housing needs to be “set” to minus. The retractor should work and the starter should work. If the retractor does not work, first check the starter brushes. Because there are two windings in the retractor and the output of one of them takes the ground through the brushes and the starter winding. This is a power winding, it is needed for the retractor to work and turns off after the starter spins. Those. If there is some problem with the brushes, the retractor will not work or will work sluggishly. If the traction rod works, but the starter does not turn, bridge the two power contacts (bolts) on the retractor, when it works, the starter should turn. If everything is so, then the contacts of the retractor were really burnt inside. Trying to sort out his lost cause. It's better to look online or in stores. |
| Serg DP | PS I was in a car shop today, they were selecting a retractor, which is used instead of the original one, it came up (as they wrote on the Internet) from 2108 from a Bulgarian starter, only the core needs to be left original, because they differ a little. If dancing with a tambourine with the old one doesn’t give anything, then I’ll try to put on a Bulgarian retractor. I am reporting the results of replacing the retractor on the Bosch starter. I changed the retractor from the Bulgarian starter, everything is fine, it almost became like my own. The only jamb was with the fastener holes, they did not coincide quite a bit, about 0.5 mm. All this was cured by drilling out the guide to 6mm and then it fit like a glove. The spring and core were left in the original version, but it looks like it would have fit from Bulgarian. In any case, now everything works without jamming, distortion, etc. Let's see how this symbiosis will manifest itself further, but I think there will be no problems. z.y. The Bosch starter is a real thing, after 21 years its condition is perfect, the Bendix and bushings are like new, the brushes are worn out about 50% and rotates perfectly. This is a permanent magnet starter with a gearbox. It's surprising that VAZ put these on the assembly line in 1991. |
| MobiDick | Sometimes it began to refuse to start with the key, I turn the key - the lights dim and everything, even the retractor, does not click. When I release the key, there is sometimes a faint clicking sound. I don’t understand why, but all these “sometimes” happen more often when the engine is hot. The battery is new and alive, I changed the contact pad in the ignition switch - zero results. You have to crawl under the hood, disconnect the red cable to the retractor and connect directly to the battery - this way it starts normally. Tell me where to dig - starter, retractor, or something else that might be acting up? |
| Varvar-S | It might be worth looking at the starter relay as well. what kind of starter relay? It seems to me that there is a wire directly from the battery and from the ignition switch. |
| SwatSV | There was a problem with the starter. Cheboksary gear starter. I’ll make a reservation right away. that this happens at a temperature of about 0 degrees (-1, +1), i.e. not frost and not heat. So, in the morning it started without problems, warmed up to 50 degrees. and went to work, stopped at a gas station on the way, and filled up. I turn the key to start - the retractor clicks, the starter does not turn. After 5 attempts, I tried to turn it with a lot of tension, as if the battery had died (I didn’t pay attention to the lights going out; I can’t say whether it was there or not). Then there are clicks again, the starter does not turn. It took about 30 attempts and started up. After work it started on the 2nd try. I drove it like this for a couple of days - the retractor clicks several times, the starter does not turn - then it starts up normally. Yesterday in the morning the picture was the same, but in the evening it started with half a turn, came home and turned off, started again with half a turn, and so on 5 times. Here is a floating defect that appears both on a cold engine and on a warm one. What is: -Battery is charged. — battery terminals and starter power contacts are cleaned. Now where will I dig: - engine ground wire; — clean the terminals on the solenoid relay. — ignition switch (I’ll install a relay at the same time) — although the retractor clicks clearly. - retractor - possible carbon deposits, rod jamming, does not close the circuit. I think it is necessary to inspect the brushes and bushings, although I don’t want to touch the bushings - I have never done this and there is no reamer. |
How to replace the starter on a VAZ 2101-VAZ 2107?
Note! Before you start replacing this unit, be sure to make sure that its performance is not due to other reasons, for example, the battery is discharged, or its terminals are oxidized, or the wiring that goes to the starter is not working properly!
And also take into account the fact that the starter must be replaced in an inspection ditch, otherwise it will be inconvenient and very problematic to remove from the car!
Removal: 1) First, loosen the clamp that secures the warm air supply hose to the air filter housing.
2) Then loosen the clamp that secures the hose to the air intake itself.
3) And then remove this hose from the car engine.
4) Next, loosen the lower nut that secures the air intake.
5) Next, unscrew the top nut that secures the same air intake.
6) And then remove this air intake from the car engine.
7) Now remove both nuts that secure the heat shield to the engine.
And then, using an extension joint with the socket head, unscrew the remaining bolt that secures the heat-insulating shield to the right engine mount bracket. (For information on how to unscrew the remaining bolt that secures the heat-insulating shield to the bracket, see the very bottom of the article in the “For Beginners!” section)
9) After unscrewing the bolt, remove the heat insulation shield from the engine.
10) Next, unscrew the bottom bolt that secures the starter.
11) Then unscrew the remaining two upper bolts, which also secure the starter.
12) Moving the starter a little forward... (Continued in point 13)
13) Disconnect the wire block from the starter traction relay terminal on the starter.
14) Then unscrew the nut that secures the wire to the upper contact of the traction relay.
15) And then disconnect the wire from the upper contact, and also remove the bolt and nut that held this contact.
16) Next, remove the starter from the car engine.
Installation: 1) Installation of a new starter is carried out in the reverse order of removal.
Important! 1) Before starting work, disconnect the negative terminal from the battery! (For information on how to disconnect this terminal, see the article: “About the battery”)
For newbies! Question: How to unscrew the bolt securing the heat-insulating shield to the bracket of the right engine mount Answer: Using an extension joint with the socket head “2”, unscrew the bolt “1” securing the heat-insulating shield to the bracket of the right engine mount
For newbies! Question: How to unscrew the bolt securing the heat-insulating shield to the bracket of the right engine mount. Answer: Using an extension joint with the socket head “2”, unscrew the bolt “1” securing the heat-insulating shield to the bracket of the right engine mount.
Additional video: To understand in more detail how to replace the starter, watch an interesting video in which the replacement process will be described in detail:
Instructions for removing and installing the starter:
1. First of all, disconnect the wire from the battery at the “–” terminal.
2. Dismantle the crankcase on the engine.
3. Next, from the top of the engine compartment you need to unscrew one nut that holds the starter mount.
4. The wire must be disconnected from the traction relay terminal at the bottom of the machine.
5. Unscrew one nut from the contact bolt of the traction relay and disconnect the wire.
6. The starter is secured from below with one nut, which should also be unscrewed.
7. Now calmly remove it and do the repairs. A new or repaired starter should be installed in the same way as it was removed, only in the reverse order.
Where does the repair begin?
All work starts somewhere. And this one is no exception. First, you need to understand what is wrong and only then think about what can be done and how to fix the problem.
Troubleshooting.
To correctly determine, you first need to think and see what the cause of the problem may be:
- If, after turning the key in the ignition, the engine does not start, check the lights on the display. Extinguished or weakly burning and fading light bulbs indicate a malfunction in the battery: it is discharged, or the terminals are not tightened properly. Every driver has a tester in his car that allows him to check the voltage and capacity of the battery without removing it.
- If the battery has nothing to do with it, you need to check the position of the speed switch and, if necessary, put it in the “P” position.
- Next, you need to find out whether power even reaches the starter from the ignition switch?
Advice! The easiest way to do this is on the red wire connector connecting the starter and the unloading relay.
This work can be done in two ways:
- Method 1: - take a copper wire with a cross-section of 2.5 mm2 and insert it into an open connector. One end to the battery terminal and the other to the starter. In this way, ignition is simulated.
- Method 2: - here you need two people: one turns the key in the ignition switch, and the second uses a control probe to touch the tip of the wire coming from the unloading relay. If the warning light comes on, it means there is no damage to the ignition switch or the relay.
Causes of malfunction
Any part can fail. But it’s not enough to just do it. We also need to find out what caused the malfunction and prevent it from happening again. After all, the reason may not be in the part itself, but for example, the fault may be hidden in a circuit that is located even before it. Let's think about the reasons for the malfunction. There may be several of them:
- One of the reasons may be wear on the commutator brushes and their loose fit. In this case, check how freely they move in the brush holder. The price of a new brush is low; drivers often prefer to simply replace them.
- Often the cause of a starter malfunction is the relay: the winding burns out or the contacts burn out. Sometimes corrosion of the anchor causes it to jam. In the case when, when starting the engine, the starter rotates along with the flywheel, the relay is also at fault. These malfunctions are most typical for the starter solenoid relay - repairing a VAZ 2107 is rarely complete without replacing it.
- If the starter turns the engine, but very slowly, the generator is most likely to blame. Its diagnostics are carried out on a stand, where the voltage, which should not exceed 14.5V, and the generator turn-on current are determined. Be sure to check the tension of the drive belt. If it slips, the generator cannot develop full power, which inevitably drains the battery.
- The most common breakdown occurs: there is a break in the circuit supplying power to the relay winding. Then you need to check the connection of the wires, tighten the bolts that secure the wire going to ground and check the starter control connector, the so-called 50 pin. The connector may need to be replaced.
Advice! In case of a problem with the contact, crimp the wire with a round copper tip and, together with the fastener, screw the ground to the relay. This will be the simplest solution to this problem.
After making sure that both the relay and the ignition switch are in order, when repairing the VAZ 2107, the starter is carefully examined. To do this, you need to remove it and perform a visual inspection of the contacts on the solenoid relay. Sometimes the cause of poor contact is loosely tightened nuts. In this case, the terminals heat up and burn. How to determine the working capacity of the solenoid relay?
Advice! It’s easier to do this this way: take a piece of wire with a cross-section of 8-10mm2 and connect it to the positive terminal. Place the starter on the battery, resting its body against the negative terminal. Touch the other end of the wire to the terminal on the solenoid relay.
Attention: If after such manipulation the starter starts working, then the cause of the problem is in the relay. If there is no reaction, we can assume that the problem lies in the brushes
There is one more problem for all cars, not just the VAZ 2107: the starter, which needs to be repaired, has excessive energy consumption. This may be indicated by a strong decrease in instrument panel lighting and lamp brightness. There are three possible problems that may arise here:
- Insufficient wire contact
- Increased mechanical resistance
- Low resistance.
Advice! If cleaning the external contacts of the electrical circuit does not help eliminate the breakdown, you need to check the contacts inside the starter, as well as the brush units.
There are also mechanical reasons that prevent the smooth operation of the starter:
Wear of the bushings promotes short circuits between the windings and jams the moving elements.
- Resistance of the crankshaft due to an error in the selection of bearings or incorrectly filled, too viscous engine oil.
- Break in the armature winding. This defect contributes to sparking at the collector. The electric arc that forms at the rupture site is capable of burning through steel, not just insulation. You can see similar videos on the Internet. In case of desoldering the winding, you only need emery, solder, and a soldering iron.