Today we will look at the location of fuses in VAZ cars of the tenth family, namely models 2110, 21102, 21103, 2111, 2112. We will also show where the fuses and relays are located on the diagram and talk about the purpose of each of them and how to replace the fuses with your own hands. We will also touch on the most common problems with fuses among owners of these cars, diagnostic methods and replacement.
I would like to say that car electrical systems, in particular fuses and relays in the VAZ 2110, 21102, 21103, 2111, 2112, are quite reliable. The service life depends on operating conditions and timely diagnosis and replacement with high-quality components.
Let's figure out why fuses are needed in a car. First of all, they are responsible for the safety of the wiring and other systems of the machine. It is important to understand that each specific fuse is responsible only for its task and in the event of a short circuit or failure, a fire is practically excluded. A specific fuse blows and this does not cause a chain failure of other systems.
Depending on the problem of failure of any component or part of the car for which the electrician is responsible, you need to understand whether the car can be operated with this malfunction or not. The traffic rules contain a list of faults that you cannot operate a car with. If you discover, for example, that the headlights have failed or the wipers are not working at all, you should immediately correct the problem. Well, you can drive a car with non-working power windows. By the way, if someone suddenly needs a high-quality website for business, then these guys make good websites WebFormata.ru
Fuse layout diagram for VAZ 2110, 2111, 2112
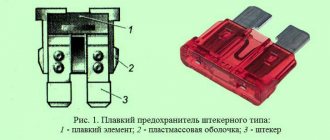
The photo shows fuses for VAZ 2110, 2111, 2112
As you can see, each fuse is numbered with a corresponding index. In the above illustration, the unit is located on the left side of the steering column and is integrated into the instrument panel. Below are the values of the specific fuse in this mounting block.
The starter relay performs an important function on any vehicle, regardless of model. If this device fails, the car will not start. Drivers who independently repair a vehicle need to know where the VAZ-2112 starter relay is located and how to repair it if any malfunction occurs.
Starter connection diagram 29.3708 for VAZ 2108, 2109, 21099 cars: 3 comments
Checking and replacing the VAZ 2107 starter relay
In this article, we will be much more interested in the second relay, which is responsible for the operation of the starter, namely the retractor. Also look at how much charge the battery has. And now he saves 35 rubles a year on gasoline!
Replace the core. Register on the site 2.
We conducted a little investigation and came to the following conclusions, yes, from the factory on VAZ cars, a starter relay was installed.
If the starter does not turn off, then the relay is missing. Most often, such a start indicates wear of the teeth on the Bendix gear or the teeth of the engine flywheel.
To understand why a starter solenoid relay is needed, let’s look at the engine’s operation schematically. Other possible schemes are no different from the one described.
We conducted a little investigation and came to the following conclusions, yes, from the factory on VAZ cars, a starter relay was installed.
The problem is not constant, this can happen once a week, maybe every other day. VAZ starter relay wiring diagram. SOLVING THE PROBLEM WITH THE IGNITION SWITCH VAZ 2110 2111 2112
What is a starter relay
The mechanism is designed to supply power to the electric starter motor. At this moment, charge is transferred from the battery. Simultaneously with the supply of energy, it performs the function of pushing out the bendix, while the element engages the flywheel. The starter relay on the VAZ-2112 determines whether the main mechanism will start and the engine will fire or not. If suddenly this device fails and does not turn on, you need to diagnose and repair it. To do this, you should study the detailed operating instructions and find out where the starter relay is located on the VAZ-2112.
Required Tools
In order to carry out repairs yourself and replace the starter on a VAZ 2112, you need the tools from the table below.
Table - Tools required to replace the front strut
| Name | Note |
| open-end wrench | "at 13" |
| Spanner | "at 13" |
| Head | "at 15" |
| Ratchet | With extension |
| Rags and wire brush | To clean dirt |
| Penetrating lubricant | For example, WD-40 |
Device
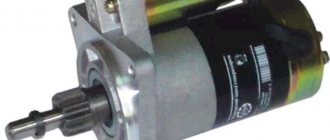
The part looks like a small square box with four connectors. It consists of an armature in a housing containing an electromagnet with a winding. Its operation is ensured by electrical contacts and return springs.
The electromagnet is represented by two independent coils with holding and retracting independent parts. The first of the devices is docked with the housing and connected to the control input. The retractor coil goes to the control terminal and communicates with the starter motor.
Principle of operation
The relay is necessary to start the engine system, so it was built into the fuel pump. When power is applied to a contact communicating with the control, electromagnetic induction appears inside the coil. This occurs under the influence of current, through this process a magnetic field is created. The attraction of the armature contributes to the compression of the return spring.
At the same time, the bendix is pushed out, which connects the engine and starter using a flywheel. The positive terminal supplies power to the pull-in winding. In this case, the contacts are closed to each other. At this time, the armature is located inside the coil, in which the magnetic field ceases to be generated. When the power plant starts, the power is turned off, and the armature is sent to its original position using the return force. The contacts open. During this process, the bendix stops interacting with the flywheel.
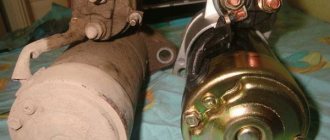
Structural features
Drivers call a device such as a starter a starter, as it helps to start the car. It is practically no different from similar mechanisms. However, if you need to purchase a starter relay for a VAZ-2112, then you need to remove the part from the car and take the store with you. This element differs from similar ones in size. You can purchase a device from the VAZ-2111 or 2110 models, as it is completely identical.
On the twelfth model of the Zhiguli, the installed starter is of modest size. However, this small device is very functional. The technical documentation describes how the structure of the mechanism differs and where the VAZ-2112 starter relay is located. In the photo you can see the main and additional blocks.
These cars were equipped with injection power units with 16 valves. To prevent electrical current fluctuations, a relay is used. When the electrical circuit is turned on, this device passes current, gradually equalizing the voltage to a value of 80-340 amperes. This scatter of indicators is explained by the fact that the relay produces the first parameter in a resting state, and the second in operating mode. As soon as the vehicle stops, this circuit opens and the circuit shuts down.
Replacement
In fact, it is theoretically possible to repair the relay. But in reality this is rarely justified in terms of financial and time costs.
A much simpler and more rational solution is replacement. The procedure will not take much time, but the unit will definitely work properly and reliably. It is unknown what the result of the repair will be.
If the relay is incorrectly repaired, this can lead to blocking the start of the power unit. The cost of repairing such a problem is much higher than buying a new high-quality relay.
Replacing and installing a new solenoid relay will not be a problem, since the procedure is performed in the reverse order of disassembly.
Proceed with caution, keeping an eye on each item you take apart and put back together. Clean some contacts, if necessary, tighten loose fasteners. Whatever one may say, as the car is used, it shakes violently and vibrates, which leads to the banal loosening of nuts and bolts. What's most interesting is that this often leads to a whole range of problems. Therefore, make sure that each individual fastener is securely fastened.
Didn't find the information you are looking for? on our forum.
If you find an error, please select a piece of text and press Ctrl+Enter.
We recommend reading:
How to change a VAZ windshield with your own hands? Step-by-step instructions How to remove the immobilizer on a VAZ 2114 Stop lights on a VAZ 2111 do not light up reasons Which box is suitable for a VAZ 2106, device, replacement and installation Replacing thresholds on a VAZ 2107 VAZ 2109 to a cold carburetor troits - causes of automatic transmission malfunction on a VAZ 2110 with your own hands How to install a panel from a Priora on a VAZ 2110
Where is the VAZ-2112 starter relay located?
In order to diagnose or repair this mechanism, you need to find a small cover at the bottom of the torpedo. There is a special button for fixing, which folds down. You can study the diagram attached to the instruction manual. It is marked there where the VAZ-2112 starter relay for 16 valves is located. If you are going to remove or replace this element, you need to carry out the repair and then install all the spare parts in the reverse order. It is recommended to use the instructions from this block.
Looking at the VAZ-2112 starter relay in the photo, you can see that additional safety devices were installed on top of the block. They were intended to protect a specific group of devices. However, the default starter relay is on the right side second in line when viewed from above.
Scheme for dismantling and disassembling the starter of the 12th VAZ model
Any owner of a V12 can independently disassemble and remove the device in question when it does not turn and requires repair. This process is best carried out on an overpass (car pit). Unscrewing the fasteners from the engine compartment is inconvenient. The dismantling sequence is as follows:
- to ensure the safety of the work, remove the negative wire from the battery;
- remove the control wire from the relay;
- unscrew the nuts (top and bottom) that secure the starter.
After this, we remove the middle part of the mechanism from the tie rods, the main gear from the armature shaft, and then remove the back cover with a Phillips screwdriver. Underneath there is a brush holder, which can be removed without the slightest difficulty. Now we can remove the armature from the stator and remove the support of the latter, which will allow us to use an ohmmeter to visually assess the condition of the armature winding.
If there are marks from bearings on the anchor shaft (they are called enveloping), they should, firstly, be cleaned with fine-grain sandpaper, and secondly, polished. Abrasive can also be used to clean out minor burnout phenomena of the collector. In situations where the brushes show severe wear, it is recommended to replace the entire brush holder.
After this, you can continue disassembling the starter in order to determine why it does not turn. To do this, we dismantle the gears of the planetary gearbox and especially carefully check the ring gear for cracks. If any, the gear needs to be changed:
- first we dismantle the bendix;
- on the drive shaft, using a hammer and a “13” wrench, remove the clip (outer) of the locking element in the form of a ring;
- remove the ring from the shaft using a screwdriver (you will have to try, since it is recessed on the shaft in a special recess);
- remove the drive and the cage, and then remove the retaining ring from the shaft (it must first be loosened).
After removing the washer and drive shaft support, we are presented with a gear that needs replacement.
Home →
Device →
Electrical system →
Starter →
How to check device operation
When any devices on the car stop working, the driver should first check the serviceability of the fuses or the relay circuit. After a complete diagnosis has been carried out, it will be possible to draw a conclusion about what exactly has become faulty and how to fix the problem. Diagnostics are performed in the following order:
- Take two small wires 35-45 cm long and connect them to the battery
- Directly connect the wire coming from the negative terminal of the battery to the relay, taking into account the polarity. Do the same with the wire that comes from the terminal with a positive charge.
- After connecting the VAZ-2112 starter relay, make sure that the relay has retracted the core, and a characteristic click should be heard
- If retraction does not occur, then the relay is faulty.
When the diagnosis has been completely carried out and the cause of the breakdown has been identified, you need to replace the old relay. In this case, it is recommended to inspect the starter and perform its maintenance for preventive purposes. To do this, unscrew the back cover after all the dirt has been cleaned from it. Then the condition of the Bendix brushes and forks is determined. Experts advise inspecting the starter regularly so that it does not fail somewhere along the way.
The fuel pump does not work, the relay turns on.
Checking relay power.
In the case when the fuel pump relay turns on when the ignition is turned on, but the pump itself does not work, you need to check the power at terminal 87 of the fuel pump relay. To do this, touch terminal 87 of the relay socket with the output of the control lamp connected to the vehicle ground, and the lamp should light up. If the lamp does not light, it means the fuse has blown or there is a break in the wire.
If there is power at terminal 87, you should remove the relay from the socket, and instead place a jumper between pins 87 and 30. In this case, if the pump and connecting wires are working properly, the pump should start working and if this happens, the relay should be changed. If the pump does not start working, then, without removing the jumper, you need to touch the power wire on the fuel pump with a test lamp connected to the vehicle ground.
Checking the fuel pump power circuit.
If a submersible pump is installed on the car as part of the fuel module, you need to remove the connecting connector and touch one of the thick wires. When you touch one of them, the indicator lamp should light up. If the lamp does not light up on any of the wires, then it is necessary to eliminate the break in the wire from the fuel pump relay to the module connector or the pump itself, if the pump is of a remote type. One of the reasons for the break may be the anti-theft blocking of an installed non-standard alarm system.
In the case when the test lamp lights up on one of the thick wires of the connector or one of the terminals of the remote pump, you need to connect these terminals with a test lamp to each other. In this case, the control lamp should light up. If the lamp does not light, it is necessary to eliminate a break or poor contact in the wire connecting the pump to the vehicle ground.
If, when checking the wires and relay for turning on the fuel pump, no malfunction is detected, the electric motor of the fuel pump or its connection to the module connector is faulty. It is not difficult to find the cause by removing the fuel pump module from the tank. If there is poor contact with the connector, melting of the plugs will be visible. If melting is not noticed, then to check the pump itself, you can connect it to the battery. It should be taken into account that operating a submersible pump without liquid will damage the pump. A faulty pump should be replaced.
Additional fuses and relays are located to the right of the center panel. Unscrew the screws and remove the cover:
How to repair a fuel pump on a VAZ 2112?
Note! Before you say with certainty that it is the pump that has become unusable, you should check whether your fuel filter is dirty and not the pump but the filter itself needs to be replaced, or due to dirty injectors, in principle, all the same symptoms may occur, so to If the pump is more likely to be at fault, first check the pressure in the power system and finally, thanks to this check, you will be able to identify the malfunction! (You can learn about how to check the pressure in the article called: “Checking the pressure in the fuel rail on a VAZ”
Disassembly: 1) Before you begin disassembling, you will need to remove the pump itself; for this you will need wrenches and one screwdriver; for more detailed instructions on how to remove this pump, see the article: “Replacing the fuel pump on VAZ cars”!
Note! Don’t forget to look into the car’s tank when you remove the pump, there is just a storage cup at the very bottom of it, you can still see it in the large photo below, it can be disconnected from the pump module and remains in the tank, so you will need to remove it from there and install it back on the pump in its place (It is held on by clamps), but you are going to disassemble the pump, so you do not need to install it, and if it remains on it, then by pulling it down, disconnect it and thereby remove it!
2) Now that the pump is removed, take the screwdriver in your hand again and use it to unscrew the two side screws (Indicated by arrows in the photo below) that secure the fuel level sensor to the pump module. After unscrewing, you can remove the sensor from the module and put it aside. (A float is installed at the end of the sensor; you can see it in the small photo below, so take a look at this float; it must be intact and free of wear, otherwise, for example, if there is a hole in it, then this sensor will no longer correctly indicate the fuel level will be and you will have to replace it with a new one)
Note! Also, do not deform the sensor itself and be careful with the rod that holds the float, because if it breaks, the fuel will also not be displayed, and if it bends, the fuel level will not be displayed correctly, so be careful with the sensor!
Causes of breakdowns
The most important reason for the malfunction of the VAZ-2112 starter relay is the burnout of the contact plates located inside. Other breakdowns that also often occur in this mechanism include:
- short circuit of the negative terminal;
- clogged contacts
- malfunction of the armature on the solenoid relay;
- winding burnout;
- broken wiring.
These relay malfunctions occur due to the use of low-quality consumables. They quickly fail and wear out. Experienced drivers already determine by the sound of the engine when a breakdown occurs. For example, after turning the key in the ignition, the starter continues to rotate, but the engine is idling, or with a characteristic buzzing sound when the engine develops medium speed, but the starter does not turn off.
Examination
To make checking more convenient:
- Take two wires 30-40 centimeters long and then connect these wires to the battery
- Then you need to directly connect the wire that comes from the negative terminal to the corresponding terminal on the relay, then connect the wire that connects to the positive terminal
- The relay should retract the core with a characteristic click.
- When this does not happen, then the cause of the problem is really the relay, install it back, you can screw the starter back
- When replacing a relay, it is definitely worth performing preventive maintenance for the starter itself.
- Unscrew the rear cover, having first (if necessary) cleaned the dirt from it, and inspect the condition of the brushes, except for the Bendix fork
- If you find that the brushes or fork need to be changed, then it is best to do it right away, otherwise soon you will definitely have to remove the starter again and repair it
How to remove
In order to remove the VAZ-2112 starter relay, you need to disassemble the entire system. Therefore, this mechanism is removed along with the starter. On the other hand, this is even better, because at the same time as repairs, you can prevent starter breakdowns. To remove the starter, you need to drive onto an overpass or inspection hole. Further removal of the part is carried out in this order:
- Disconnect the battery, thereby de-energizing the vehicle.
- Remove the mudguard or other protection
- Find the nut at the bottom of the starter and unscrew it
- Disconnect the terminal located on the solenoid relay
- Remove the top nut that holds the starter in place.
- Unscrew the tape with a flat-head screwdriver and remove the relay by pulling lightly on the housing.
If this block is removed with force, then you need to lift it a little to unhook it from the fasteners. You need to be careful not to lose the spring located inside the mechanism. Often she jumps out and gets lost. Now that the device is disconnected from the starter, you can perform troubleshooting and find out why it broke.
Required tools and procedure for removing the relay
As mentioned earlier, to diagnose and replace the retractor, you will need to remove the starter from the car, since the relay is located in the same housing with it.
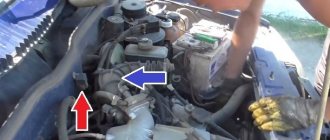
To dismantle the product we will need keys 8, 13 and 15.
The starter is located in the lower left (if you are sitting in the car) under the hood, closer to the gearbox. Successful dismantling will require a little skill, since one of the fastening bolts is located in an inconvenient place to unscrew. But in general, everyone copes with the task; you just need to show patience and perseverance. Dismantling steps:
- Disconnect the battery by disconnecting the negative cable.
- Remove the air filter.
- Disconnect the wires going to the relay.
- Using a 13mm wrench, unscrew the nut that secures the power wire.
- Using a 15mm wrench, unscrew the two nuts that secure the starter to the car body.
- Carefully remove the starter from the engine compartment.
- Using a size 8 wrench, unscrew the bolts securing the relay to the starter.
All work on installing the spare part in place is carried out in reverse order.
Repair
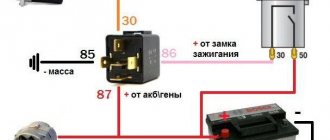
When you already know where the VAZ-2112 starter relay is located, you can begin to repair it. It is not necessary to immediately buy a new part; experienced drivers will try to fix it first. The device has only three outputs that are needed to connect wires. The first is designed to supply electricity to the ignition switch. When the key is turned, the contacts close and the required voltage is transferred to the relay coil.
Other outlets have a larger diameter. They are designed to connect to the starter and battery. Most often, the contacts on the coins become clogged or oxidized. To fix the problem, you need to unscrew the bolts and remove the nut and washer, which is located at the relay output.
After this, you need to disconnect the outputs from the winding using a soldering iron. Soot and other blockages on the heels are removed using fine sandpaper. If the wear of these elements is too severe, then it is better to replace the VAZ-2112 starter relay. There is no need to replace the device if the electrical wiring is broken. In this case, you just need to replace the wires, and the relay will work properly again.
Measures to increase operational reliability
The complication of the electrical control circuit of the starter is inevitably accompanied by the introduction of new elements into its composition and an increase in the number of connections. To paraphrase a well-known rule, we state that electrical engineering is the science of contacts. When installing a relay, we take special measures to ensure that the circuit it implements works flawlessly for a long time. To achieve this, the process of upgrading the circuit and making the connection requires:
- tighten the fastening nuts tightly;
- do not allow contamination of the relay contacts on which the tips of the connecting wires are placed;
- use wires of minimal length without forming loops;
- It is advisable to form the circuit wires in the form of a bundle with fastening with clamps at the maximum length;
- the resulting bundle is placed in a corrugated hose to protect it from mechanical damage;
- It is advisable to protect the relay contacts from splashing water with heat-shrinkable tubing and/or electrical tape.
This is interesting: Necessary tools and equipment:
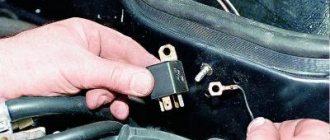
Additional starter relay
To make the starter last longer, an additional VAZ-2112 starter relay is installed. This is necessary for the controller responsible for the proper operation of the car. When the crankshaft accelerates to 500 rpm, the controller commands an additional relay to turn on the starter. This operating mode prevents accidental starting of the starter and prevents engine overheating even during prolonged operation.
Also, an additional relay for the VAZ-2112 starter is needed in order to prevent accidental sintering of the contacts from the ignition switch. This often occurs due to wear of parts. In addition, an additional element turns off the starter power in a timely manner if the power plant is already running and the key is in the “starter” mode. In this way, the ignition switch contacts are relieved and the engine is not damaged.
This device was not installed on all models. Nowadays, when purchasing VAZ-2112 cars, car service technicians recommend first checking whether it fits on the car. To do this you need:
- Inspect the mounting block. This is a plug-in type relay, so it can be easily seen among other fuses.
- Start purge of cylinders. If there is an additional relay, the starter will turn on automatically.
If this element is not on the car, you can install it yourself. However, experienced repairmen claim that there is no urgent need for it. Moreover, manufacturers of modern domestic and foreign cars often abandon this mechanism.
solenoid relay and starter fuse for VAZ 2110 and Priora
Owners of domestic “ten”, when faced with the problem of starting the engine, first of all believe that the solenoid relay has failed, and not the starter. And his search under the hood turns out to be fruitless - the starter relay cannot be found.
The thing is that the design of the starters of the VAZ 2110-2115 family, including the Lada Priora car, has an interesting feature - the retractor relay is located inside the starting device. The starter starts when the traction relay gear engages with the drive, which, in turn, engages with the crankshaft flywheel. In other words, if the solenoid relay does not work for some reason, then the engine will not start.
In addition, the traction relay also performs another important function - when its contacts are closed, power is supplied to the starter windings from the battery. It is controlled directly by turning the key in the ignition switch. Over time, unclear operation of the starter or its slow rotation appears, as the contact group of the relay wears out due to increased starting currents. In this case, it is necessary to repair the VAZ starter with replacement of the traction relay.
Where is the starter and solenoid relay located?
The relay is located in the starter housing; to remove it for replacement, you must perform the following operations:
- remove the negative terminal from the battery;
- remove the air filter;
- under the filter there is a block of wires that need to be disconnected;
- disconnect the power cable;
- unscrew the starter bolts and dismantle it;
- disconnect the wires and remove the traction relay, having previously unscrewed the mounting bolts.
After replacing the solenoid relay, the assembly procedure must be performed in reverse order.
Where are the fuses and starter relay located?
To check the integrity of the fuses and the functionality of the starter relay, you need to press the latch on the left side of the steering wheel, at the bottom of the dashboard, and lower the unit cover down. Above the fuse boxes, on the right is the starter relay. The relay and ignition fuse are located in a different place - to access them, you need to unscrew two screws in the side trim of the console and remove the additional electrical equipment unit.
The integrity of protective devices, the operability of the relay and starter windings can be checked with an ohmmeter if you have the skills and minimal experience in diagnosing electrical equipment.
If you have any difficulties in identifying a malfunction of the starting device in your car, we recommend contacting specialists at the StarterPro car service, where they will quickly and efficiently identify all faults and eliminate them at minimal cost. In addition, finding a starter, relays, fuses and other equipment can be difficult due to design changes in the arrangement of devices, depending on the year of manufacture and modification of the car.
A few words about the additional block
In addition to the main unit, there are several protective devices and relays in the additional unit. The designers placed it inside the car on the right side. To get to it you need to unscrew two screws on the side trim of the instrument panel.
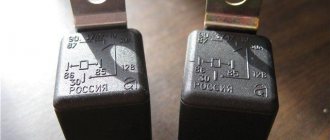
This device has three fuses, as well as three electromagnetic relays:
- No. 1 protects the ignition system controller;
- No. 2 refers to sensors that control air flow, oxygen, speed;
- No. 3 is designed to protect elements of the fuel system, pump, injectors, relays;
- No. 4 to turn on the fan;
- No. 5 connection of the fuel pump;
- No. 6 relates to the ignition system.
The devices are blue, which means they are designed for a current of 15 amperes.
Before installing a new device, you should carefully check the protected circuits for short circuits. If this is not done, the installed device will burn out. If you try to install a jumper wire instead, the electrical wires may catch fire or the electronic equipment may fail.
Stories from our readers
“Fucking basin. "
Hi all! My name is Mikhail, now I’ll tell you a story about how I managed to exchange my two-wheeler for a 2010 Camry. It all started with the fact that I began to be wildly irritated by the breakdowns of the two-wheeler, it seemed like nothing serious was broken, but damn it, there were so many little things that really started to irritate me. This is where the idea arose that it was time to change the car to a foreign car. The choice fell on the melting Camry of the tenth years.
Yes, I had matured morally, but financially I just couldn’t handle it. I’ll say right away that I am against loans and taking a car, especially not a new one, on credit is unreasonable. My salary is 24k a month, so collecting 600-700 thousand is almost impossible for me. I started looking for different ways to make money on the Internet. You can’t imagine how many scams there are, what I haven’t tried: sports betting, network marketing, and even the volcano casino, where I successfully lost about 10 thousand ((The only direction in which it seemed to me that I could make money was currency trading on the stock exchange, they call it Forex. But when I started delving into it, I realized that it was very difficult for me. I continued to dig further and came across binary options. The essence is the same as in Forex, but it’s much easier to understand. I started reading forums, studying trading strategies. I tried it on a demo account, then opened a real account. To be honest, I didn’t manage to start earning money right away, until I understood all the mechanics of options, I lost about 3,000 rubles, but as it turned out, it was a precious experience. Now I earn 5-7 thousand rubles a day. I managed to get the car buy after half a year, but in my opinion this is a good result, and it’s not about the car, my life has changed, I naturally quit my job, I have more free time for myself and my family. You’ll laugh, but I work directly on the phone)) If If you want to change your life like me, then here’s what I advise you to do right now: 1. Register on the site 2. Practice on a Demo account (it’s free). 3. As soon as you get something on the Demo account, top up your REAL ACCOUNT and go to REAL MONEY! I also advise you to download the application to your phone, it’s much more convenient to work from your phone. Download here.
- The controller controls the on/off of the additional starter relay depending on the crankshaft speed and the time the starter cranks the engine.
- After setting the ignition key to the “Starter” position and the crankshaft rotation speed not exceeding 500 min1, the controller sends a signal to an additional relay and thus turns on the starter.
- After being turned on, the starter will work until the ignition key is in the “Starter” position for no more than 20 seconds, provided that the “correct” password has been received from the immobilizer and the crankshaft speed has not increased to 500 min1. This prevents the starter from turning on when the engine is running and its overheating during prolonged cranking.
In other words, why do you need an additional starter relay:
- To protect the starter from accidental (due to wear, prolonged starting) sintering of contacts in the ignition switch;
- In order to turn off the power to the starter when the engine has started, but the key, for some reason, continues to be in the “starter” mode;
- Relieves the load on the ignition switch contacts.
How to check the additional starter relay, is it installed in the “ten”?
- First, check the presence of an additional starter relay in the mounting block. This relay is mounted and is indicated by an arrow in the photo.
- Secondly, you can check its operation as follows: turn the starter in the cylinder purging mode, after 12-13 seconds the starter should turn off automatically.
Installing an additional starter relay
By the way, stores have a kit of additional starter relays for self-installation. For example, a kit from Avtoelektronika, which contains everything necessary for installation, however, the circuit included in the kit turned out to be unfinished. For the additional relay to operate correctly, it was necessary to add a 1A direct current diode to the circuit (1N4000-1N4007 or the Russian analogue KD243(A-Zh)).
The absence of an additional starter relay does not mean that there is an urgent need for it. For example, many foreign cars do not install such a relay either. And car enthusiasts whose relay has failed do not see the difference after dismantling it, so it makes sense to devote time to other modifications to the car’s electrical system.
What else you should know
The main and additional fuse blocks of the VAZ 21124 do not protect all electrical circuits of the car. If you look closely behind the open main mounting block, you can see a separately located fuse to eliminate problems in the fog lights. There, behind the mounting block in a separate plastic box, there is a fuse that protects the central locking.
But that's not all. Depending on the configuration, in addition to the fact that there is already a fuse block on the VAZ 21124 with 16 valves, there may be protective devices installed in the equipment, for example, in a car radio or alarm system. All this should be taken into account when looking for problems in the vehicle's electrical system. We also recommend watching a video on this topic:
Main unit
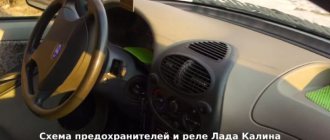
The main block with fuses and relays is located in the cabin, on the left side, under the control panel. To access, press the latch switch.
Photo - diagram Option 1
Scheme Option 2
Scheme Option 3
Description of fuses
p, blockquote 15,0,0,0,0 —>
| F1 | 5A Lamps for license plate lights. Instrument lighting lamps. Side light indicator lamp. Trunk light. Left side marker lamps |
| F2 | 7.5A Left headlight (low beam) |
| F3 | 10A Left headlight (high beam) |
| F4 | 10A Right fog lamp |
| F5 | 30A Electric motors for glass door lifts |
| F6 | 15A Portable lamp |
| F7 | 20A Electric motor of the engine cooling system fan. Sound signal |
| F8 | 20A Rear window heating element. Relay (contacts) for turning on the heated rear window |
| F9 | 20A Recirculation valve. Windshield, rear window and headlight cleaners and washers. Relay (coil) for turning on the rear window heating |
| F10 | 20A Reserve |
| F11 | 5A Starboard side marker lamps |
| F12 | 7.5A Right headlight (low beam) |
| F13 | 10A Right headlight (high beam). High beam warning lamp |
| F14 | 10A Left fog lamp |
| F15 | 20A Electric seat heating. Trunk lock lock |
| F16 | 10A Relay - turn signal and hazard warning light switch (in hazard warning mode). Hazard warning lamp |
| F17 | 7.5A Interior lighting lamp. Individual backlight lamp. Ignition switch illumination lamp. Stop lamps. Clock (or trip computer) |
| F18 | 25A Glove box lighting lamp. Heater controller. Cigarette lighter. |
| F19 | 10A Door locking. Relay for monitoring the health of brake light lamps and side lights. Direction indicators with warning lamps. Reversing lamps. Generator excitation winding. On-board control system display unit. Instrument cluster. Clock (or trip computer) |
| F20 | 7.5A Rear fog lamps |
Fuse number 18 at 25A is responsible for the operation of the cigarette lighter.
The fog lamp fuse is installed separately in the instrument panel niche behind the main unit.
Relay purpose
p, blockquote 19,0,0,0,0 —>
- K1 - lamp health monitoring relay
- K2 - windshield wiper relay
- KZ - relay-breaker for direction indicators and hazard warning lights
- K4 - relay for low beam headlights
- K5 - headlight high beam relay
- K6 - additional relay
- K7 - rear window heating relay
- K8 - rear fog lamp relay