When is it necessary to replace and remove the exhaust manifold on a VAZ-2114
Huge temperature changes are the main problem faced by the exhaust manifold and the gasket, for which it is removed. The collector itself is made of a special grade of cast iron; it can withstand high temperatures (up to 800-900 degrees) , however, these are critical values, after which the collector may warp or crack.
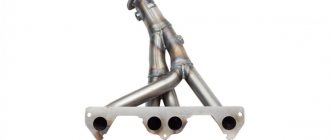
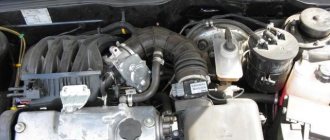
Exhaust manifold VAZ-2114
Its main task is to collect exhaust gases and distribute them into the exhaust pipe of the muffler.
Replacing or dismantling the VAZ-2114 exhaust manifold is necessary in the following cases:
- Mechanical damage to the collector.
- Warping and loss of tightness at the junction with the cylinder head.
- Burnout of the gasket between the head and the manifold.
- The appearance of cracks as a result of engine overheating.
- Replacing the collector with a device of a different configuration, adapted to a more severe operating mode.
In the event that we are not going to participate in high-speed races for the prize of the head of the regional traffic police, replacing or dismantling the collector may be necessary in a number of cases.
Tools and materials for dismantling
There are a number of symptoms that will indicate that you need to prepare to remove the exhaust manifold:
- increased noise level in the engine compartment , the engine produces a characteristic, loud sound in any operating mode;
- breakthrough of exhaust gases into the engine compartment and sometimes into the cabin;
- reduction in engine power due to a mismatch between the exhaust gas outlets in the cylinder head and in the manifold.
Many people decide to replace the standard manifold with a “tuning” one, made of stainless steel and having a different configuration, thereby wanting to increase engine power and reduce the resistance that the standard manifold provides to exhaust gases. As a rule, the most common reason for dismantling a unit is gasket burnout .
Exhaust manifold gasket
The manifold gasket on the VAZ-2114 is made of pressed reinforced asbestos and is designed to ensure a tight connection between the block head and the manifold flanges. Asbestos is used to correct the coefficient of thermal expansion of the aluminum alloy from which the head is cast and the cast iron from which the manifold is cast. At high speeds and under prolonged loads, the gasket may burn out. Then its replacement and dismantling of the collector are inevitable.
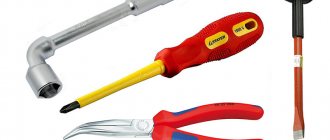
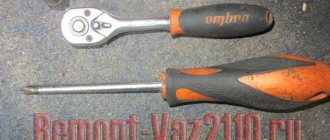
To dismantle the manifold, you will need a standard set of tools, a set of sockets with extensions, and WD-40 penetrating lubricant or its equivalent. In case of broken studs, a stud extractor, drill, drill bits and a set of taps will be useful. A day or two before dismantling the collector, it is worth moistening all the fasteners several times, this will significantly simplify the removal procedure .
For ease of operation, remove the battery from the car.
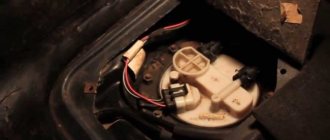
We remove the windshield washer reservoir from the bracket without disconnecting the wire tips from the electric pump terminals and the hose from the pump connection.
We move the tank to the side, placing it on the platform under the battery.
We remove the receiver (see Removing the receiver) and the fuel rail (see Removing the fuel rail and injectors, checking the injectors).
Using a 13mm wrench, unscrew the bolt securing the front support bracket to the inlet pipe.
Using the same tool, loosen the nut securing the front support bracket to the stud of the right power unit support bracket.
Remove the front support bracket.
Using a 13mm wrench, unscrew the bolt securing the rear support bracket to the intake pipe.
By loosening the upper starter mounting bolt (see Removing the starter).
...move the rear support bracket away from the intake pipe.
Disconnect the exhaust pipe from the exhaust manifold (see Replacing exhaust system parts).
Using the “13” head, unscrew the nut securing the “mass” wire and the front eye of the power unit.
We remove the tip of the “mass” wire from the cylinder head stud...
...and rome.
Using a “13” wrench, unscrew the two nuts of the upper fastening of the intake pipe (1) and the two nuts of the common upper fastening of the intake pipe and exhaust manifold (2).
Using a high “13” socket with an extension, unscrew the two nuts of the lower common fastening of the intake pipe and exhaust manifold.
We unscrew the two nuts and the bolt securing the starter shield and remove the shield from the exhaust manifold studs (see Replacing the starter).
Carefully bending it with a screwdriver, remove the coolant drain pipe bracket from the exhaust manifold stud.
Using a high “13” head, unscrew the nut of the front fastening of the exhaust manifold.
Using a 13mm socket with a cardan joint, unscrew the rear mounting nut of the exhaust manifold.
Remove ten washers from the mounting studs.
In the four joints between the intake pipe and the exhaust manifold, thick washers are installed on studs.
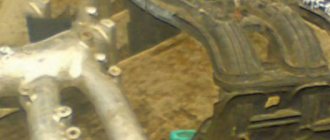
Moving the exhaust manifold away from the cylinder head...
...remove the intake pipe from the cylinder head studs.
Removing the exhaust manifold...
...and the sealing gasket of the intake pipe and exhaust manifold.
Holes for the studs for the general fastening of the intake pipe and exhaust manifold
Before installation, we clean the mating surfaces of the cylinder head, intake pipe and exhaust manifold from the remains of the old gasket and carbon deposits.
Having replaced the gasket with a new one, we carry out the installation in the reverse order. Apply graphite lubricant to the cylinder head studs.
Signs of a burnt gasket
The easiest way is for the owner of a car with an injection engine, the operation of which is monitored by an ECU (electronic control unit). It sends a signal about a gasket failure to the dashboard, where the Check light comes on. This means that the lambda probe, which is usually equipped with the manifold, detected a change in the volume of oxygen in the exhaust, informing the ECU. The engine begins to operate in emergency mode until the defect is eliminated.
“Symptoms” of a burnt gasket:
- the engine is unstable;
- makes an uncharacteristic sound during operation;
- The cabin smells like exhaust gases.
ATTENTION! The fact that the exhaust manifold gasket has burned out is indicated by a recognizable chirping sound created by gases that break through the seal. Motorists often say that the engine “cuts.”
Exhausts through ventilation and heating systems quickly penetrate into the cabin, which is fraught not only with a deterioration of the microclimate, but also with negative consequences for health. This is why replacing the exhaust manifold gasket becomes a forced but necessary measure.
Muffler replacement
Using the example of replacing this component, we will show that it is not difficult to repair the exhaust system and dismantle its components. To work, you will need to install the car in the garage above a pit or drive it onto an overpass. Disassembling this node is not so difficult:
- disconnect the main and additional muffler;
- bend the hooks of the hanging straps;
- remove the brackets;
- remove the main muffler, which is mounted on the cushions.
After this, you will need to reassemble in the reverse order, only instead of the old spare part, hang the new one on the cushions. If the fastenings of the clamp connecting the resonator and the muffler pipe are dirty, clean them with a metal brush.
Before assembling the system, clean the gasket ring thoroughly. You can coat it with heat-resistant sealant to reliably seal the exhaust gases inside the system. The above method of replacing a muffler can also be used in cases where you want to tune your car.
Many car enthusiasts install sports mufflers on their VAZ-2115, which have a qualitatively different sound. In this case, you don’t have to wait for a malfunction to appear. Also, the new muffler can improve the environmental characteristics of the car, that is, after replacing this component, it will release less exhaust gases into the atmosphere. Remember that sport or upgraded mufflers will cost more than the stock replacement part.
If you want to tune your car, get ready to spend a lot of money. Buy only new imported spare parts. You should not try to turn an ordinary spare part into a sports modification using welding. This homemade product will not last long. For the same reason, we recommend replacing entire parts of the exhaust system rather than trying to repair them if malfunctions occur.
What does a faulty collector affect?
There are many stories about the rupture (and even explosion) of a cracked manifold while the car is moving.
Of course, none of them are true, but nevertheless, a leaky manifold is a very serious problem that requires an immediate solution, and here’s why: through burnouts and cracks, air can enter the exhaust system, diluting the exhaust gases.
As a result of this, the lambda sensor will incorrectly determine their composition and incorrectly adjust the composition of the fuel-air mixture injected into the engine, which will lead to tripping, a drop in speed and carbon deposits on the spark plugs.
These same cracks will affect the crankcase ventilation, disrupting it. This will lead to timing problems and increased valve wear. And finally, exhaust gases escaping through the burnouts will enter the engine compartment and, partially, into the interior, causing unpleasant odors and discomfort during trips.
A severely burnt manifold gasket can lead to exactly the same consequences as cracks on the part itself.
Exhaust system design
All parts of the gas exhaust system of the VAZ-2115 car can be easily disassembled, which allows you to replace them yourself, without the involvement of specialists.
Main parts of the gas outlet unit:
- Bracket mounting of the exhaust pipe.
- A gasket located between the pipe and the intake manifold.
- The clamping part of the bracket (represents a plate).
- Pipe for receiving gases from the engine.
- Metalgraphite gasket in the form of a ring.
- Catalyst.
- Rubber mounting pad.
- First (additional) muffler.
- Main muffler.
- Rear mounting cushion.
- Fastening clamp (often called brackets).
The location of most of the listed spare parts is under the bottom of the car, which makes them vulnerable to mechanical damage.
The cause may be not only external damage (most often caused by falling into holes or difficult to navigate places), but also exposure to chemical reagents or the influence of climatic conditions.
Direct exhaust system
Almost all the elements of the exhaust system were purchased by me in the first year after the start of the car modification project. The very first of them was purchased an exhaust manifold ( spider 4-2-1
) in the online store stinger-shop in April 2013. I was originally looking for a stainless steel manifold in the budget price range but couldn't find anything. Although, probably, I didn’t really bother, that’s why I stopped at the stinger store website. Moreover, this particular brand was especially widespread among exhaust systems at that time; I had never even heard of STT at that time, and sites like tuningsport, clubturbo, meta-s acted only as speculators. At least that's how it was in my mind. At the time of ordering, I did not find a section for manifolds made of stainless steel, so I put in the cart “Exhaust manifold / spider 4-2-1 (SPORT) 16 V “Stinger” for cars VAZ 2108, VAZ 2109, VAZ 2199, VAZ 2113, VAZ 2114, VAZ 2115” made according to the description from steel 08 ps. It cost 1800 rubles. Before paying for the order, I asked the store manager about the possibility of making the selected manifold from stainless steel. The answer was yes. After which I paid for the order in the amount of 2800 rubles.
Next, I would like to touch on the issue of the quality of workmanship of the purchased product. Here, as always, I was dissatisfied. Although, if judged objectively, the collector is more likely to correspond to the price-quality ratio.
I had to build a device to install the collector on the grinding machine, which was later used when milling on a milling machine.
Replacing VAZ 2109 pants with your own hands
Skoda Octavia RS Logbook Thermal gasket for the intake manifold
Appearance of VAZ 2109 pants
VAZ 2109 pants are replaced extremely rarely, since it is an all-metal unit. The gasket is changed more often, since the effect of hot exhaust gases on it is very strong. But to tell the truth, over the life of the car of 10-15 years, there is a possibility that the metal pipe of the VAZ 2109 pants will burn out.
And the reason is that hot gas, leaving the exhaust manifold, enters the exhaust pipe. Moreover, its metal has a relatively small thickness, and the result is the formation of cracks on its surface and the pants can simply fall off the bar. An example of such burnout is clearly visible in the photo; their service life was exactly 15 years.
How to remove the intake manifold
The intake manifold ensures the entry of the air-fuel mixture into the combustion chambers of the cylinders and its uniform distribution in them. As a result of proper operation of the intake manifold, the best performance of the car engine is achieved. For this reason, routine technical inspection of this unit and its timely repair are the most important procedures. In this case, in most cases, it is necessary to first remove the intake manifold, and only then carry out all the necessary measures.
Watch the video below: “How to remove the receiver and intake manifold of a VAZ 2112, 2110, 2111.”
The intake manifold also contains other parts of the engine: the fuel supply system (injectors), the carburetor, and the throttle valve.
In addition, a vacuum is formed in the manifold, which makes the window cleaners, brake booster, cruise control and a number of other mechanisms work.
What most often breaks in the intake manifold?
FLAP
As a rule, dampers break (in Mercedes cars this is one of the sore spots). As a result, the engine loses power, begins to “eat” more fuel, and has poor performance. And all that remains is to remove the intake manifold to find out the reasons for its unstable operation.
Causes of collector flap failures:
- Abnormally high temperature;
- Cheap and low-quality damper material;
- Condensate has an oily consistency.
FLAP VALVE
In addition to the damper itself, the valve that controls the operation of the damper may also break. The result of such breakdowns is oil entering the collector, and, as a result, a significant increase in its total consumption.
PLASTIC PARTS
The manifold components, made of plastic, cannot withstand high temperatures and fail faster than other parts. A frequent breakdown here is the detachment of the tube coming from the swirler, which is accompanied by various noises and crackling sounds while the engine is running. Also, sometimes excess air is sucked in, which affects the reduction in engine power and provokes the appearance of various noises.
All of the above breakdowns are relatively easy to fix, so drivers often do the repairs themselves. At the same time, before removing the intake manifold, it is established that the cause of unstable engine operation is in the manifold.
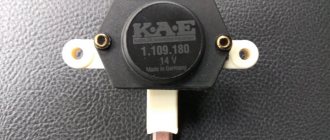
This is done by measuring the pressure in the manifold using a special sensor. The same sensor controls the process of formation and combustion of the fuel-air mixture. The failure of the collector is immediately reflected in the operation of this sensor, which goes into emergency mode. In this case, it happens that the sensor itself breaks down, although this happens extremely rarely.
Intake manifold removal process
- Remove the fuse from the fuel pump;
- Turn on the engine;
- We wait until the engine stops on its own so that the pressure in the system is completely released.
- Disconnect the battery, remove the casing from the engine;
- We dismantle the air filter pipes, after which we dismantle the filter itself;
- We twist the throttle assembly (do not touch the throttle valve fasteners!).
That's it, access to the collector is open, and all that remains is to find out the reasons for its malfunction.
If a delamination of a square-section plastic tube is detected, you need to drill two holes with a diameter of 4 mm in the collector body. This is done in order to subsequently fix this tube using screws screwed into the drilled holes.
If the dampers or the valve that controls them are faulty, then they cannot be repaired; you will have to buy new ones.
If the sensor for monitoring the operation of the collector is broken, it must be replaced. So, we looked at how to independently remove the intake manifold in case of malfunctions in it.
Video: How to remove the receiver and intake manifold of VAZ 2112, 2110, 2111
Main causes of malfunction
The engine exhaust manifold is a part that operates under high loads.
During the operation of the car, it is affected by such negative factors as:
- high temperature transmitted to it from exhaust gases;
- exposure to gasoline vapors caused by the fact that the VAZ 2114 intake manifold and exhaust manifold have a common gasket;
- exposure to exhaust gases;
- exposure to vibration transmitted from the motor.
All this leads to the fact that almost all cars that are more than 7 years old (with the exception of those whose owners drive a couple of times a year) have a badly worn manifold that requires replacement.
It is immediately worth noting that many car repair shops offer services for argon-arc welding of cracks in worn-out collectors. Such a service, as a rule, costs several times more than a new part, and the durability of such repairs in most cases does not exceed one year, after which new cracks appear.
It is for this reason that you should not think about possible repairs - if the collector fails, it needs to be replaced.
Another problem, which, for obvious reasons, occurs even more often, is a burnt-out manifold gasket 2114. With very active use of the car, it can fail almost every year. You can also replace it with your own hands, and the replacement procedure itself is no different from replacing the collector (its sequence will be discussed below).
How to notice a node malfunction
It is not difficult to determine that it is time to change parts of the exhaust system on a VAZ-2115 with an 8-valve engine. Even a novice car enthusiast can cope with this, since the main signs are the appearance of a strong smell of exhaust gases in the cabin and an increased noise level. Most often, faults are hidden in the additional or main muffler, as well as in the gaskets between the connections, which can burn out over time.
The classification of the most frequently occurring faults is as follows:
- mechanical damage to the muffler;
- burnout of gaskets;
- corrugation burnout;
- loosening of connections at joints;
- cracks in the system pipes.
Problems can be spotted by visual inspection. Experienced specialists recommend removing gas exhaust units for these purposes. This way you can examine them from all sides and notice the slightest damage. After you conduct a visual inspection of the system, you need to buy spare parts and begin repairs. It's easy to do it yourself.