How to remove the exhaust manifold? We do it in 3 steps
Every VAZ owner needs to know how to remove the exhaust manifold, and these difficult movements have to be done in order to change the gasket on the car - that is, quite often.
However, if you do not pay due attention to it, the gasket will burn out, the exhaust will rush under the hood, and the sound of the engine will become loud and intrusive (of course, some may even like this, since the engine begins to roar abruptly, and the power of the engine itself, at first , increases slightly). If you continue to ignore the gasket burnout process, you can expect poisoning right in the driver’s seat. And how “glad” your passengers and those standing next to you in a traffic jam will be “happy” to the growl of the engine! Colleagues, as a rule, tend to call such unfortunate drivers the worst possible words - cultural and not quite.
Lada Kalina from ZR park
Lada Kalina 2 from the ZR park
Lada Kalina 2 from the ZR park
Are there any volunteers?
Armed with theory, we will repair the intake system on the editorial Kalina. The composite plastic path of the 1.6 naturally aspirated gasoline engine (106 hp) leaks around the perimeter of the wells for the ignition coils. Apparently, these are the consequences of frequent tests on the Smolensk Ring race track, in which the car and especially its engine were driven to the limit of their capabilities.
Content
How to remove the exhaust manifold? This part of the process is quite simple, but before you begin, you will have to remove additional components. After all, the designers of some models tried very hard: sometimes, in order to reach something in the car, you have to disassemble half of the car. So, let's proceed directly to the process itself, described in stages.
silicone sealant
Universal silicone sealant.
Most of these tubes are equipped with a convenient nozzle. By cutting off part of the spout, you can select the desired diameter of the hole so that the sealant fits well into the joints. Universal silicone sealant. Most of these tubes are equipped with a convenient nozzle. By cutting off part of the spout, you can select the desired diameter of the hole so that the sealant fits well into the joints.
Part 1: Removing the air filter
Without this you won't be able to get to the exhaust manifold. The good news is that the removal process itself is not too difficult or troublesome. If the engine is a carburetor, 3 holders on the filter cover snap off, the screw located in the center is unscrewed, and the cover is removed. The air filter itself is removed and set aside. 4 nuts are unscrewed from the body, it is raised - and you get access to further work.
On an injection engine we proceed differently: unscrew the screws (4 pieces), remove the cover. If she is stubborn and doesn’t want to leave, you will have to disconnect the mass air flow sensor connector
. The filter is pulled out, the fasteners are unscrewed from the housing, it is removed - move on to the next step.
Part 2: carburetor removal
Those who have an injector can immediately proceed to the last stage. Owners of carburetor engines, after removing the air filter, plug the holes with a dry rag - to prevent foreign objects from falling into them (in particular, loose nuts and other small things - then there will be no trouble if something falls there). The wire from the EKXX valve is disconnected, the clamps are unscrewed and both fuel hoses are removed. The suction cable is loosened and removed. The end of the spring is removed from the throttle control rod, after which it is completely removed.
Afterwards, the throttle valve itself is disconnected, the power plugs and the screw sensor are disconnected, and the carburetor heating hoses and vacuum tube are removed. Next, the crankcase ventilation hose is dismantled, the fastening nuts (connecting the carburetor to the intake manifold) are unscrewed, and the carburetor is smoothly and accurately, without jerking, pulled up from the studs.
Since we've removed the throttle valve, it wouldn't hurt to clean it.
Device
Although from the outside the intake manifold appears to be just a pipeline of a specific shape, in fact a whole team of engineers works on its geometry, calculating the cross-section, length and volume.
Plus, it includes:
- Throttle valve;
- Supply chamber;
- Air filter;
- Inlet valve;
- Discharge chamber.
For engines with distributed fuel injection, injectors are additionally installed in the intake manifold, due to which the mixing of fuel and air masses occurs directly in the discharge chamber.
The pipeline itself can combine from 2 to 12 channels, depending on the number of cylinders in the engine block. At the same time, for a 4-cylinder engine, a manifold with three pipes is sometimes used.
It is also worth noting that most modern intake manifolds over the past 5 years have been made from special high-temperature plastic, while the exhaust manifold can still only be made from metal.
Part 3: Removing the Exhaust Manifold
At this final stage, 4 nuts are screwed off the exhaust manifold, with which it is attached to the pants (that is, the exhaust pipe). The said pants are carefully removed from the heels and moved a little to the side. The 3 nuts remaining in place are unscrewed. The exhaust manifold is retracted; at the same time, it slides off the pins holding it.
You can do what it was dismantled for: actually replacing the gasket. If it has managed to stick to the cylinder head, pry it off with something thin (screwdriver, knife) and remove it without any residue. Burn marks are removed with a special compound, which is applied to the collector for a quarter of an hour.
Source: autoflit.ru
FakeHeader
Comments 34
So today it fell off at the welding site, in BB 1900r, tomorrow I’ll buy it, install it and fuck with the studs! Tough!
Take any! For what there is money! Everything will die at the welding site! This is the weakest point of any node!
Bet on the grant, it's stainless steel. I've been riding for five years, like new if I wash it)
Auto analysis! I bought it there from a new car, the donor muffler had 500 km of mileage and the price was 500 rubles...
How much do you expect to pay for the item and when do you plan to sell the car?
I'm not thinking about selling yet. There is a money crisis. And I try to buy consumables that are reliable, even if they are more expensive. That's why I'm asking here.
What is the specific amount? will you travel for two years? or more?
My big 21-year-old son also drives it. He will get it and let him learn how to repair it.
if you learn how to repair, fret image, excellent geometry, price is about 1 tr per element, service life is about 2 years.
if there was anything to get, then an avtovazagregat, about 3 tr per element
I think I'll buy a stainless steel Datsun.
this is the autovaza unit, the recommended retail price is 5500 for a resonator, for example. aluminized 3, Chernyaga 1500, but the supplier is different
if you learn how to repair, fret image, excellent geometry, price is about 1 tr per element, service life is about 2 years.
if there was anything to get, then an avtovazagregat, about 3 tr per element
AVTOVAZAGREGAT no longer produces mufflers. The last remnants are on sale. The original ones - "Eberspächer" - go to the assembly line.
Eberspächer is also an avtovasagregat
The supplier for the assembly line and Lada-Image is Eberspächer-AvtoVAZagregat Exhaust Systems LLC
budget range of exhaust for spare parts (Lada Image) - robola LLC
I mean that AVTOVAZAGREGAT, as an independent production, will most likely close completely in August, and will not produce any products itself. The joint venture you wrote about does not produce mufflers under the AVTOVAZAGREGAT brand.
And there are a lot of budget muffler lines, and Robola produces mid-range mufflers, like many non-conveyor manufacturers.
Eberspächer-AvtoVAZagregat Exhaust systems works at the Ava site with the same employees who worked at Ava, with the corresponding quality of the output product. It is quite logical to put an equal sign between the products of Eberspächer-AvtoVAZagregat Exhaust systems and AvtoVAZagregat, these are the same pieces of hardware from the same place and from the same ones as before.
Well, firstly, the line of Ebersper mufflers for the same models is quite different in appearance. Secondly, the “ava platform” is no longer the same. Without water and sewerage, with empty workshops (ava) due to almost completely sold out equipment and laid off/fired people. According to information from a month ago, Eberspächer has already found where to move. That's it.
For consumers, they will remain an autovaza unit for another twenty years, even if they move to the gas site in Nizhny Novgorod. because then
The Ava trademark is not applied to Eberspächer. So that)))
Is the ava trademark widely known to consumers? no one will see this point blank
That is, what the seller called “ava” is “ava”? Don’t tell me))) There are fools and people who don’t care, but not so many of them...
Source
How to remove the exhaust manifold
Many VAZ car owners repair and maintain their vehicles themselves. One of the most common problems when operating a car in heavy conditions is burnout of the gasket between the exhaust manifold and the cylinder head, clogging of the catalyst, and deposition of combustion products on the walls of the exhaust system. All these problems negatively affect the removal of exhaust gases from the combustion chamber. The removal of gases from the combustion chamber is an important point; their return into the chamber reduces the quality of the fuel-air mixture, which means a decrease in vehicle power will be observed. In addition, if the gasket burns out, burning gases will escape into the engine compartment, which can cause a fire in the engine compartment. The sound during such work will be quite loud and annoying to others.
Elimination of all of the above malfunctions will involve disassembling the exhaust gas removal system. How to remove the exhaust manifold and whether it is possible to do this in a garage without contacting a service center is of interest to many VAZ Priora owners who have not encountered such work.
Replacing the exhaust manifold with your own hands will require work to remove additional elements, after which it will be possible to get to the fastening elements of the exhaust system. If the repair work is not related to the burnout of the gasket, then it still needs to be replaced with a new one.
Tools
For work you will need the following tool:
- open-end or socket wrench for 8, 10, 13.
- the head is 13 deep.
- cardan and extension for the head.
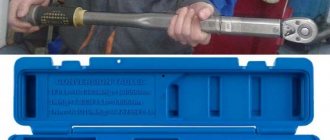
- ratchet.
- slotted screwdriver.
- WD liquid.
Removal of the exhaust manifold should be carried out with the engine cool to avoid burns. The car must be placed above the pit so that there is free access to the engine compartment from below. For safe work, remove the battery terminal.
Disconnect the air pipe
It is more convenient to remove the exhaust manifold from above. To do this, it is necessary to remove the components and parts that prevent free access to it:
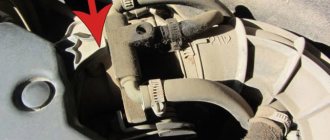
- The engine is protected from above by the screen. To remove it, you must first release the clamp of the wire block, which secures them to the canister purge valve. Using a screwdriver, pry up the valve along with the hoses and move it to the side. The oil cap is unscrewed. The protective cover is removed by moving upwards from the clamps.
- Disconnect the air pipe. It can be easily removed after loosening the clamps and disconnecting the crankcase ventilation hose.
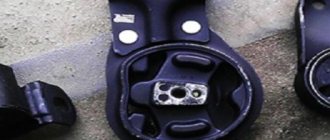
- Disconnect the additional muffler pipe from the catalytic collector. This work must be carried out under the car. Use a screwdriver to bend the edges of the plates to gain access to the pipe fastening nuts. Using a 13mm socket with an extension, unscrew the three nuts. The collector thermal shield is removed. The lower nut of the clamp connecting the main and additional muffler pipes is loosened, and the upper one is completely unscrewed. The clamp is completely removed and the additional and main mufflers are separated. Don't forget to remove the rubber seal. The pipe flange of the additional muffler and the sealing gasket are pulled off the studs of the catenary collector.
- Disconnect the ignition module. Use a wrench to unscrew the module mounting nuts. Before removing the module, it is necessary to disconnect the high-voltage wires and wire blocks.
- Disconnect the wire connectors from the oxygen concentration sensor and the control sensor. We press out the antennae of the wire holders for the sensors and disconnect the wires from the heat shield of the steering mechanism.
- Remove the throttle assembly. To do this, you will need plugs to plug the hoses from which coolant may leak. We release the clamps of the throttle position sensor and idle air control. Loosen the clamps on the hoses going to the throttle assembly and remove them. Disconnect the throttle valve drive cable and unscrew the two bolts securing the assembly to the intake manifold studs.
- Remove the intake manifold. To do this, disconnect the wiring harnesses of the ignition coil and injectors. Unscrew the front and rear brackets. Loosen the clamps of the crankcase ventilation system pipes and disconnect the hoses. Unscrew the fastening of the oil indicator guide bracket and remove it. Unscrew the nuts and bolts securing the inlet manifold and remove it.
- Remove the heat-insulating shield of the steering mechanism by first unscrewing the three nuts.
- Remove the exhaust manifold. First, disconnect the bracket for the water pump supply pipe by unscrewing the two fastening nuts. We unscrew the bolts securing the catalytic collector to its mounting bracket. Unscrew the eight nuts securing the manifold to the cylinder head. The collector is removed by pulling it off the studs.
Preparation stages
To replace the manifold or its gasket, in any case you will have to dismantle the VK. But before you get to the element you are looking for, you will first need to go through some preparatory steps. Namely, tighten the fasteners, and then remove the air filter and carburetor if the first stage does not help.
Stage of work
Your actions
Often, loose manifold fastenings caused the entry of contaminants, which disrupted the performance of the exhaust system. If the tightening did not give any result, then the gasket is definitely burned out or the collector itself is damaged, which is less likely
Removing the air filter
Removing the carburetor is carried out in the following sequence:
- Disconnect the coolant supply hose to the engine starting device from the fitting. To do this, unscrew the clamps;
- Be sure to drain the coolant into a prepared container;
- Disconnect the exhaust pipe that comes from the exhaust manifold and the BC bracket;
- Disconnect the throttle cable bracket. To do this, you need to remove one end of the spring from the damper control rod, and then remove the entire spring. Now loosen the nut on the bracket, which will allow you to remove the cable from the engagement;
- Disconnect the EPH sensor from the power plug;
- Disconnect the vacuum tube and a pair of hoses from the carburetor heating unit;
- Remove the engine crankcase ventilation hose;
- Remove the four mounting nuts holding the carburetor and intake manifold;
- Remove the carburetor carefully without yanking. It must be gradually removed from the studs.
All dismantling work must be carried out only on a cold engine. To make it easy to unscrew all fasteners, you can pre-treat them with WD40, several hours or even a day before the repair begins.
When is it necessary to replace and remove the exhaust manifold on a VAZ-2114
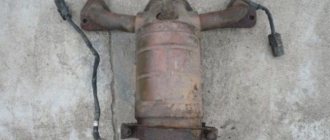
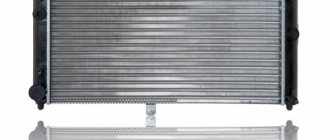
Huge temperature changes are the main problem faced by the exhaust manifold and the gasket, for which it is removed. The collector itself is made of a special grade of cast iron; it can withstand high temperatures (up to 800-900 degrees) , however, these are critical values, after which the collector may warp or crack.
Exhaust manifold VAZ-2114
Its main task is to collect exhaust gases and distribute them into the exhaust pipe of the muffler.
Replacing or dismantling the VAZ-2114 exhaust manifold is necessary in the following cases:
- Mechanical damage to the collector.
- Warping and loss of tightness at the junction with the cylinder head.
- Burnout of the gasket between the head and the manifold.
- The appearance of cracks as a result of engine overheating.
- Replacing the collector with a device of a different configuration, adapted to a more severe operating mode.
In the event that we are not going to participate in high-speed races for the prize of the head of the regional traffic police, replacing or dismantling the collector may be necessary in a number of cases.
Tools and materials for dismantling
There are a number of symptoms that will indicate that you need to prepare to remove the exhaust manifold:
- increased noise level in the engine compartment , the engine produces a characteristic, loud sound in any operating mode;
- breakthrough of exhaust gases into the engine compartment and sometimes into the cabin;
- reduction in engine power due to a mismatch between the exhaust gas outlets in the cylinder head and in the manifold.
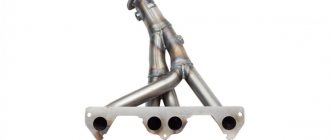
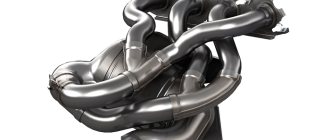
Many people decide to replace the standard manifold with a “tuning” one, made of stainless steel and having a different configuration, thereby wanting to increase engine power and reduce the resistance that the standard manifold provides to exhaust gases. As a rule, the most common reason for dismantling a unit is gasket burnout .
Exhaust manifold gasket
The manifold gasket on the VAZ-2114 is made of pressed reinforced asbestos and is designed to ensure a tight connection between the block head and the manifold flanges. Asbestos is used to correct the coefficient of thermal expansion of the aluminum alloy from which the head is cast and the cast iron from which the manifold is cast. At high speeds and under prolonged loads, the gasket may burn out. Then its replacement and dismantling of the collector are inevitable.
To dismantle the manifold, you will need a standard set of tools, a set of sockets with extensions, and WD-40 penetrating lubricant or its equivalent. In case of broken studs, a stud extractor, drill, drill bits and a set of taps will be useful. A day or two before dismantling the collector, it is worth moistening all the fasteners several times, this will significantly simplify the removal procedure .
Why do you need to wrap?
There are several theories here, and all of them appeal to tuning enthusiasts.
- Exhaust sound. If you are redoing an exhaust pipe, then you often install homemade systems (for example, the same SPIDERS or resonators). If you do something not according to the rules (it’s trivial not to calculate it), then the exhaust sound, instead of deep bass, will be “ringing”. To remove this effect, they often wrap the pipe with thermal tape, then the ringing actually decreases, often turning into bass. It’s like if you throw a ball into a metal basin, there will be a ringing sound, but if you lay a rubber mat (or fabric) the sound will be absorbed
- Adding power. As we already know, the exhaust system inhibits exhaust gases (diameter, catalyst, resonators). And if we move them faster and easier, then the motor will not need any effort to push them through the entire pipe. Exhaust gases exit and collide with the cold pipe of the exhaust manifold, thereby cooling and compressing them - their ability to pass through decreases. And as we know from the 8th grade physics course, at high temperatures, the volume of gas is greater for the same mass. It follows from this that heated (not cooled) gas will move faster through the exhaust system. And the faster it is retracted, the power increases slightly.
Engine compartment temperature. Another “killed hare” by thermal tape is the low temperature in the engine compartment. A really big plus for many plastic parts in the summer, also for the battery.
BUT it should be noted that TUNERS are mainly concerned with the FAST REMOVEMENT of the exhaust gas flow in order to increase power, that’s all.
Manifold dismantling procedure - step-by-step instructions
The dismantling process itself is not so complicated; access to some nuts is difficult, so it is advisable to carry out the work on a lift or in an inspection pit. The algorithm of actions for the injection VAZ-2114 in this case looks like this:
- Remove the negative terminal from the battery or turn off the mains switch.
Remove the terminal from the battery
Drain the coolant from the system
Removing the fuel pipes
Disabling the throttle position sensor
Disconnect the muffler exhaust pipe from the manifold
Auspuff Reparatur by Liqui Moly
Autochemical compositions of this brand rightfully occupy leading positions in various categories. In this case, the company offers a comprehensive solution for protecting the exhaust pipe, eliminating the risk of the formation and development of existing cracks with small holes on the surfaces of the structure. The sealing paste is resistant to elevated temperatures, does not require complex installation operations such as welding, and does not contain harmful chemical ingredients. In particular, the applied coating retains its performance at 700 °C. Treatment with Liqui Moly car exhaust system sealant can be carried out in typical garage conditions without connecting special equipment, which is also an attractive advantage when choosing.
How to remove the manifold on a VAZ 2114
How to remove the exhaust manifold
Many VAZ car owners repair and maintain their cars without outside help. One of the most common problems when a car operates in slow mode is the combustion of the gasket between the exhaust manifold and the cylinder head, blocking of the catalyst, and deposition of combustion products on the walls of the exhaust system. All these obstacles negatively affect the removal of exhaust gases from the combustion chamber. Removing gases from the combustion chamber is the main point; their return to the chamber reduces the quality of the fuel-air consistency, which means a decrease in vehicle power will occur. In addition, burning the gaskets releases flammable gases into the engine compartment, which can cause a fire in the engine compartment. The sound during such work will be quite loud and annoying to others.
Elimination of all of the above defects will be associated with an analysis of the exhaust system. How to remove the exhaust manifold and whether this can be done in a garage without contacting a service department is of interest to many VAZ Priora owners who have not encountered such work.
Replacing the exhaust manifold With your own hands, it will require removing additional parts, after which you can get to the fasteners of the exhaust system. If the repair work does not involve the burner gaskets, they should still be replaced.
To work you will need the following tool:
- wrench 8, 10, 13
- deepest head at 13 years old.
- gimbal and head extension.
- ratchet.
- slotted screwdriver.
- liquid WD.
Malfunctions
Like any other mechanical part, the intake manifold is susceptible to failure. Given the simplicity of the design, there are not many options for malfunctions.
Basic:
- Violation of tightness. Vibrations, pressure and high temperatures destroy seals over time. Depressurization affects the quality of the fuel mixture, loss of traction and speed. The problem is solved by replacing the gaskets, after which engine operation should return to normal;
- Collector contamination. Plaque accumulates on the walls, gradually reducing the cross-section of passing air masses. Requires disassembly and cleaning of tubes, throttle and discharge chamber;
- Mechanical damage. If the collector is made of plastic, it is only a replacement. If it is made of aluminum and the damage is small, argon arc welding will help;
- Excessive temperature in the manifold. There are a lot of reasons and you need to look for them in the cooling system, clogged radiator, damaged sensor, ECU error. Also, high temperature occurs due to the banal heat outside;
- "Clap." When forming the fuel mixture, the system must be sealed. If there are disturbances in the ignition system, the gas distribution mechanism, problems in the fuel mixture formation chamber, or the tightness of the intake manifold itself is broken, you can hear those same pops. It is worth looking for reasons in all of the above places.
In the latter case, of course, it is easier to rely on the errors reported by the ECU or sign up for a comprehensive diagnostic service.