The exhaust manifold is a unit that is responsible for ride quality, without which comfort is impossible. This is silence and the absence of exhaust smell under the hood, which can be drawn into the cabin through the hole in the cabin filter. Fixing a leak in the exhaust manifold of a VAZ 2114 is a necessary repair. Fortunately, it is not urgent; you can prepare in advance and choose a convenient moment.
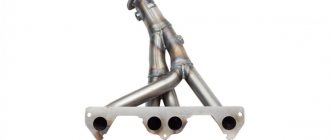
Exhaust manifold for VAZ 2114
When is it necessary to replace and remove the exhaust manifold on a VAZ-2114
Huge temperature changes are the main problem faced by the exhaust manifold and the gasket, for which it is removed. The collector itself is made of a special grade of cast iron; it can withstand high temperatures (up to 800-900 degrees) , however, these are critical values, after which the collector may warp or crack.
Exhaust manifold VAZ-2114
Its main task is to collect exhaust gases and distribute them into the exhaust pipe of the muffler.
Replacing or dismantling the VAZ-2114 exhaust manifold is necessary in the following cases:
- Mechanical damage to the collector.
- Warping and loss of tightness at the junction with the cylinder head.
- Burnout of the gasket between the head and the manifold.
- The appearance of cracks as a result of engine overheating.
- Replacing the collector with a device of a different configuration, adapted to a more severe operating mode.
In the event that we are not going to participate in high-speed races for the prize of the head of the regional traffic police, replacing or dismantling the collector may be necessary in a number of cases.
Tools and materials for dismantling
There are a number of symptoms that will indicate that you need to prepare to remove the exhaust manifold:
- increased noise level in the engine compartment , the engine produces a characteristic, loud sound in any operating mode;
- breakthrough of exhaust gases into the engine compartment and sometimes into the cabin;
- reduction in engine power due to a mismatch between the exhaust gas outlets in the cylinder head and in the manifold.
Many people decide to replace the standard manifold with a “tuning” one, made of stainless steel and having a different configuration, thereby wanting to increase engine power and reduce the resistance that the standard manifold provides to exhaust gases. As a rule, the most common reason for dismantling a unit is gasket burnout .
Exhaust manifold gasket
The manifold gasket on the VAZ-2114 is made of pressed reinforced asbestos and is designed to ensure a tight connection between the block head and the manifold flanges. Asbestos is used to correct the coefficient of thermal expansion of the aluminum alloy from which the head is cast and the cast iron from which the manifold is cast. At high speeds and under prolonged loads, the gasket may burn out. Then its replacement and dismantling of the collector are inevitable.
To dismantle the manifold, you will need a standard set of tools, a set of sockets with extensions, and WD-40 penetrating lubricant or its equivalent. In case of broken studs, a stud extractor, drill, drill bits and a set of taps will be useful. A day or two before dismantling the collector, it is worth moistening all the fasteners several times, this will significantly simplify the removal procedure .
Exhaust system
The main elements of the exhaust system on these cars are the exhaust pipe, additional and main mufflers, as well as a converter. The exhaust pipe on the VAZ 2114 is connected to the converter using a special hinge. A similar design was already used on the VAZ 2109.
To ensure a more reliable and tight connection, there is a graphite ring between the flanges. In order to prevent the car body from heating up, engineers provided a special gasket above the neutralizer. It plays the role of a heat sink element.
VAZ developers installed a special oxygen sensor at the inlet part of the neutralizer. Car enthusiasts know it as a lambda probe. What functions does it perform? Everything is quite simple here. This part is needed in order to determine as accurately as possible the amount of oxygen in the exhaust gases.
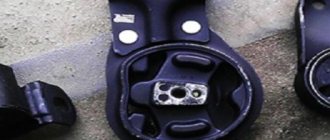
So, the information received from this sensor is fed to the ECU and is then used to quickly adjust the amount of fuel that will then flow into the cylinder block. As in many other VAZ models, the mufflers are securely fixed to the underbody of the car. For this, engineers used special suspensions.
The vibration that accompanies the release of gases is significantly reduced with the help of these suspensions. This ensures silence in the car interior.
Manifold dismantling procedure - step-by-step instructions
The dismantling process itself is not so complicated; access to some nuts is difficult, so it is advisable to carry out the work on a lift or in an inspection pit. The algorithm of actions for the injection VAZ-2114 in this case looks like this:
- Remove the negative terminal from the battery or turn off the mains switch.
Remove the terminal from the battery - Drain the antifreeze from the system.
This point should not be neglected, despite the fact that the factory does not oblige you to empty the cooling system of liquid. Drain the coolant from the system - Disconnect the fuel pipes.
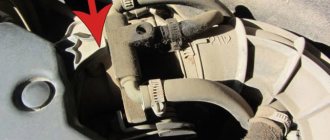
Removing the fuel pipes - We find the throttle position sensor, idle speed sensor and remove the wires from them.
Disabling the throttle position sensor - We remove the crankcase ventilation hoses and the hose from the vacuum brake booster.
Unscrew the pipes - We dismantle the receiver, disconnect the injector wires and remove the fuel rail assembly. We dismantle the receiver. We disconnect the electrical connector of the fuel rail. We dismantle the fuel rail.
- We get full access to the collector.
We dismantle the thermally reflective screen. Removing the thermal shield - Unscrew the muffler exhaust pipe from the manifold.
Disconnect the muffler exhaust pipe from the manifold - Unscrew the manifold mounting nuts from the studs in the block head.
Dismantling the exhaust manifold mountings - We dismantle the collector.
Removing the exhaust manifold
Replacement of gaskets and installation of manifold
After dismantling the manifold, it is rarely possible to remove the gasket intact. It changes in any case , but parts of the destroyed gasket will definitely remain on the mating plane on the head side and on the manifold side. They must be carefully removed.
Changing the manifold gasket
To do this, you can use a special spray that softens the gasket residues; you can carefully remove them with a blade. In this case, the plane must not be damaged, otherwise the tightness of the connection will be broken.
Also, when installing new exhaust manifold gaskets, it is not recommended to use sealants . They can be of different quality, and during crimping they can form particles that get into the crankcase, which is extremely undesirable.
Video about replacing the exhaust manifold gasket on a VAZ-2114
Pad
As already mentioned, the VAZ manifold gets very hot during operation. Heating sometimes leads to thermal stress. The consequence of this is the movement of the surface of the part along the surfaces of the cylinder heads. To ensure that the connection between the manifold and the cylinder head is airtight, AvtoVAZ engineers used a manifold gasket. Sometimes the gasket may need to be replaced, and sometimes the manifold needs to be replaced entirely.
The gasket is an important part that serves as a seal. The correct operation of the exhaust manifold depends on its condition. If replacement is not made, the vehicle's performance may noticeably decrease.
The gasket is located between the exhaust manifold and the cylinder head. Its task is to under no circumstances allow gases to enter the space under the hood. The gasket is the weakest link of this assembly. She has to perform her functions in particularly difficult conditions. It is these gaskets that car enthusiasts often have to replace.
When should you change the gasket? Today, seals are made from compressed asbestos, and then they are reinforced with steel. But even such a high-strength material one day becomes unusable. How do you know when it's time to change the gasket? When the vehicle moves, the motorist will hear noise and a clearly distinguishable smell of gases.
In addition, the car will start every once in a while, and from under the hood you can hear sounds that are unnatural for a car. To replace the gasket, you need to remove the air intakes, then you will need to remove the VAZ exhaust manifold. Sometimes this requires dismantling the thermal screen. Now you need to unscrew the bolts that connect the exhaust manifold to the engine.
Next, the VAZ exhaust manifold is removed. Immediately below it you can see the remains of the gasket. It will be necessary to work hard, because what is left of the gasket is strongly stuck to the cylinder head. First you need to remove the carbon deposits, and then clean the area where the VAZ manifold is adjacent to the cylinder block. Next, you need to apply a special graphite lubricant to the surface, and then you can install a new gasket.
The main signs and causes of failure of the VAZ 2114 intake manifold
- The main symptom of a failed intake manifold is a sudden loss of car engine power.
- at the same time, there is an increase in fuel consumption , with a deterioration in traction and a drop in engine performance.
It is important to determine the cause of the breakdown and eliminate it in time.
- Often a problem is indicated by a missing stud in one of the manifold flanges. It simply comes off when the collector goes “screw”, that is, due to temperature changes, for example in winter, or over time (average service life is 7 years), the collector begins to bend along the plane, and the pin simply “spits out”, pulls out .
- Due to the fact that the manifold has “leaded,” a crack may form and, as a result, exhaust gases from the engine escape, and the manifold must be replaced. Before changing the gasket, make sure that all the studs are in place. When you remove the manifold, you also need to check the flatness of the exhaust manifold, because often these areas require grinding or replacing the entire part.
- Manifold flaps often fail. This happens for several reasons: low-quality material used to make these dampers, too high a temperature, the presence of oil condensate. A sign that oil consistency has entered the intake manifold is its increased consumption.
- The control valve for these dampers may also fail.
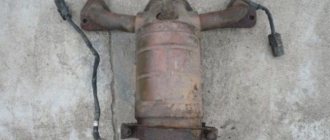
Lada 2115 Double two in Quartz color › Logbook › Replacing the catalyst with a Stinger 4-1 insert
After buying the car, I decided to get rid of the catalyst, since it tends to get clogged and replacing it is not cheap. Previously, on cars they stood where the resonator is and such a catalyst costs 3,000 thousand rubles. And now they have started to install them on the exhaust manifold (spider, pants, in general, whoever likes it more) and such a catalyst costs almost 10,000 thousand. Well, why do you need one like that, I thought and bought myself a replacement insert - a 4-1 spider from Stinger. The spider itself I thought for a long time whether to change it at the service center or change it myself, because there is nothing complicated, and the service center will take a lot of money, so I decided to do this during the holidays. I arrived at the dacha, made myself a mini overpass to make it easier to get under the car, and then started disassembling it. I dismantled almost half the car to get to this catalyst, removed the intake manifold, unscrewed all the hoses, screwed all the intake and exhaust manifolds with 13 nuts, so there are at least 30 of them screwed in there. When I got to the catalyst, I was thinking, will I put it all back together and won’t I have anything left over, as always? In general, an hour later I got to it and removed it. Here it is in comparison with the new spider. I put the whole thing back together, the work took about three hours. According to the first sensations, the car began to accelerate faster and the consumption was on average per 100 km. became 6.5-7 liters, but did not notice any significant changes. But what does the catalyst itself consist of? Even after installation, the wire that comes from the lambda probe was a little short and I decided to fix this problem and make an extension cord, for this I bought two connectors (male/female) and twisted them together Oh yes, after installing the spider, The check on the dashboard lights up very rarely, almost never lights up and the on-board computer writes an error that the neutralizer is weak.
Tips for replacing the intake manifold
Also, do not neglect the procedures for repairing and cleaning the intake manifold. The stability of the VK is very important for the normal functioning of the car. A certain vacuum is formed in the intake manifold, which is the source of drive force for many systems: cruise control, windshield wipers, vacuum brake booster. In the event of a collector malfunction, this threatens the failure of one or more of the above systems.
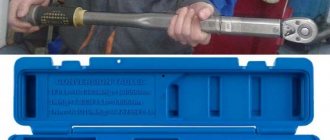
To avoid the appearance of cracks and distortions, you must use a torque wrench to tighten the nuts on the manifold and follow the tightening order of 20.9-25.8 (2.13-2.63) N_m (kgf_m). As a rule, it is recommended to start tightening the nuts from the center and gradually move towards the periphery, alternately tightening the nut on one side or the other.
When installing the receiver, it is necessary to replace the sealing gasket.
To work on removing and replacing the VAZ 2114 intake manifold on an 8-valve engine, we will need:
- keys “for 8”, “for 10”, “for 13”, “for 17”;
- “cardan” type nozzle and socket heads “17”, “19”;
- magnetic screwdriver;
- screwdrivers, pliers;
- new intake manifold.
By the way, the price for an intake manifold from a VAZ (article 21110100801420) will be 1,350 rubles.
The cost is indicated for spring 2022 in Moscow and the region.
1
Loosen the clamp and disconnect the crankcase ventilation hose.
2
Drain the coolant. Remove the hose from the cylinder head cover pipe.
3
We remove the air filter housing from the car by disconnecting the mass air flow sensor.
4
Remove the supply hose to the vacuum fuel pressure regulator.
5
Unscrew the two nuts securing the fuel pipe bracket to the receiver and remove the bracket.
6
Disconnect the vacuum booster hose from the receiver.
7
In order not to confuse the connection of the fuel pipes, we mark one of the fuel lines with a marker.
8
Using two 17mm wrenches, unscrew the fuel line fittings.
9
We unscrew the six nuts securing the receiver to the intake manifold and the stud on the receiver, and then remove the receiver itself.
10
Disconnect the wiring harness connector from the crankshaft position sensor.
11
Unscrew the two bolts and remove the fuel rail.
12
We unscrew the seven nuts in front securing the manifold to the thermal shield...
13
... and one at the back.
14
Unscrew the two nuts securing the thrust rods, first on the left side...
15
...then on the right side.
16
To avoid losing the washers from the manifold studs, remove them using a magnetic screwdriver.
17
Let's remove the intake manifold and replace it with a new one. We assemble everything in reverse order.
Content
An element such as the exhaust manifold is a very important part of the exhaust system of a car. It is responsible for the removal of exhaust gases, the absence of exhaust and gasoline odors in the cabin, and also indirectly affects the correct operation of the engine. Today we will tell you how it works, as well as how to correctly replace the VAZ 2114 manifold.
Exhaust manifold VAZ 2114
Preparation stages
To replace the manifold or its gasket, in any case you will have to dismantle the VK. But before you get to the element you are looking for, you will first need to go through some preparatory steps. Namely, tighten the fasteners, and then remove the air filter and carburetor if the first stage does not help.
We recommend: Oil change in Audi
| Stage of work | Your actions |
| Tightening the fastenings | Often, loose manifold fastenings caused the entry of contaminants, which disrupted the performance of the exhaust system. If the tightening did not give any result, then the gasket is definitely burned out or the collector itself is damaged, which is less likely |
| Removing the air filter |
|
| Removing the carburetor | Removing the carburetor is carried out in the following sequence:
|
Dismantling the unit
All dismantling work must be carried out only on a cold engine. To make it easy to unscrew all fasteners, you can pre-treat them with WD40, several hours or even a day before the repair begins.
Main causes of malfunction
The engine exhaust manifold is a part that operates under high loads.
During the operation of the car, it is affected by such negative factors as:
- high temperature transmitted to it from exhaust gases;
- exposure to gasoline vapors caused by the fact that the VAZ 2114 intake manifold and exhaust manifold have a common gasket;
- exposure to exhaust gases;
- exposure to vibration transmitted from the motor.
All this leads to the fact that almost all cars that are more than 7 years old (with the exception of those whose owners drive a couple of times a year) have a badly worn manifold that requires replacement.
Damaged exhaust manifold gasket
It is immediately worth noting that many car repair shops offer services for argon-arc welding of cracks in worn-out collectors. Such a service, as a rule, costs several times more than a new part, and the durability of such repairs in most cases does not exceed one year, after which new cracks appear.
It is for this reason that you should not think about possible repairs - if the collector fails, it needs to be replaced.
Another problem, which, for obvious reasons, occurs even more often, is a burnt-out manifold gasket 2114. With very active use of the car, it can fail almost every year. You can also replace it with your own hands, and the replacement procedure itself is no different from replacing the collector (its sequence will be discussed below).
Features of the neutralizer
Now let's look at the work and functions performed by the catalyst in VAZ cars. It is also called a catalytic converter. This device is one of the most basic parts of the exhaust system of these cars. It is designed to reduce as much as possible the toxicity of exhaust gases that will be released into the atmosphere.
The design of the device consists of a housing, a heat-insulating block and the block itself with the carrier. Special mention should be made of the block carrier. It is this component of the catalyst on the VAZ, and on many other cars, that is equipped with ceramic carriers that are not subject to deformation when operating at high temperatures and with increased vibrations.
The design of this element consists of several longitudinal honeycombs, which are designed to increase the area of work with exhaust gases. Special substances are used to reduce the toxicity of exhaust gases in cars. Platinum, palladium or rhodium are mainly used for these purposes.
Neutralizer device
These chemicals are designed to significantly speed up the reactions that take place in the neutralizer. These substances work in the oxidation of hydrocarbons. The reaction produces ordinary water vapor. Rhodium acts as a catalyst in reduction reactions.
Its main role is to reduce nitrogen oxides into as harmless substances as possible. The block in which these substances are located is placed in a special oblong-shaped housing, and a heat-insulating layer is located between it. Also located in this housing is an oxygen sensor.
Practice has shown that at the operating temperature of the exhaust gases, the catalyst can reliably retain more than 90% of all toxic gases. So, this part has significant efficiency.
What does a faulty collector affect?
There are many stories about the rupture (and even explosion) of a cracked manifold while the car is moving.
Of course, none of them are true, but nevertheless, a leaky manifold is a very serious problem that requires an immediate solution, and here’s why: through burnouts and cracks, air can enter the exhaust system, diluting the exhaust gases.
As a result of this, the lambda sensor will incorrectly determine their composition and incorrectly adjust the composition of the fuel-air mixture injected into the engine, which will lead to tripping, a drop in speed and carbon deposits on the spark plugs.
Bent valves due to incorrect valve timing
These same cracks will affect the crankcase ventilation, disrupting it. This will lead to timing problems and increased valve wear. And finally, exhaust gases escaping through the burnouts will enter the engine compartment and, partially, into the interior, causing unpleasant odors and discomfort during trips.
A severely burnt manifold gasket can lead to exactly the same consequences as cracks on the part itself.
How to make a replacement
In order to replace the exhaust manifold yourself, you will need the following tools:
- slotted screwdriver;
- open-end wrenches for 17, 13, 10 and 8;
- pliers (pliers);
- socket heads for 19 and 17;
- head knob.
A few days before the expected replacement of the exhaust manifold, all fasteners should be treated with VD-40 or its analogues 2-3 times a day.
Having selected the necessary tool, you should figure out how to remove the VAZ 2114 manifold. The first thing you will need to do is to process all the bolts and nuts with VeDeshka again (before the replacement itself), after which you can begin dismantling, which is performed as follows:
- Remove the negative terminal from the battery.
- Disconnect the cable from the throttle valve.
- Disconnect all fuel line connections.
- Disconnect the throttle position sensor.
- Disconnect the idle speed sensor.
- Remove the brake booster pipes and crankcase ventilation pipes.
- Remove the receiver.
- Disconnect injection control wires.
- Remove the fuel rail (there is no need to remove the injectors themselves).
- Remove the thermal shield protecting the collector.
- Remove the exhaust pipe.
- Disconnect the intake manifold and remove it.
- Unscrew the exhaust manifold fasteners.
- Remove the exhaust manifold.
- Remove the exhaust manifold gasket.
Removing the exhaust manifold
Installation of a new gasket and a new manifold, as well as reassembly, should be performed in exactly the same order, but in reverse order.
It is imperative to replace the gasket when replacing the exhaust manifold - even if it does not look very worn.
In conclusion, it is worth saying a few words about which gasket is better to install instead of a burnt one, because their choice in car dealerships is quite wide. In addition to the original manifold gasket (catalog number 21083-1008081), Trialli GZ 102 0013 and AJUSA 13065200 gaskets have proven themselves to be good.
Exhaust manifold gaskets
All of them are produced in Russia and have an extended service life. In turn, the manifold gaskets from the Bogdan company that are often found on sale have an affordable price, but are designed for only 20,000 km.
That is why they are not the best option - it is better to purchase more expensive gaskets, but they require replacement much less often.
Published November 18, 2019Contents
An element such as the exhaust manifold is a very important part of the exhaust system of a car. It is responsible for the removal of exhaust gases, the absence of exhaust and gasoline odors in the cabin, and also indirectly affects the correct operation of the engine. Today we will tell you how it works, as well as how to correctly replace the VAZ 2114 manifold.
Exhaust manifold VAZ 2114
What tools and parts are needed
To remove the exhaust manifold on a VAZ 2114 in order to replace the gasket or entire part, you will need the following tool:
- open-end and ring wrenches for 8, 10, 13, 17;
- wrench with heads 17, 19;
- screwdrivers, pliers.
It is also a good idea to have tools such as a Dremel, nut saw or nut pick on hand. As a rule, the fasteners on the exhaust system parts stick tightly.
A few days before your planned repair, begin treating accessible nuts with WD-40 or another penetrating lubricant. Repeat the operation 2-3 times. This will make the task of removing the manifold a little easier.
The question often arises: is it worth using a sealant after removing and replacing the gasket? Experts believe that if you apply sealant to the gasket, it should only be high-quality silicone. A bad sealant can bring a lot of trouble to a VAZ 2114 engine: when it burns out, it turns into “pellets” that are pulled into the crankcase. And this is unnecessary contamination of the piston system.
Main causes of malfunction
The engine exhaust manifold is a part that operates under high loads.
During the operation of the car, it is affected by such negative factors as:
- high temperature transmitted to it from exhaust gases;
- exposure to gasoline vapors caused by the fact that the VAZ 2114 intake manifold and exhaust manifold have a common gasket;
- exposure to exhaust gases;
- exposure to vibration transmitted from the motor.
All this leads to the fact that almost all cars that are more than 7 years old (with the exception of those whose owners drive a couple of times a year) have a badly worn manifold that requires replacement.
Damaged exhaust manifold gasket
It is immediately worth noting that many car repair shops offer services for argon-arc welding of cracks in worn-out collectors. Such a service, as a rule, costs several times more than a new part, and the durability of such repairs in most cases does not exceed one year, after which new cracks appear.
It is for this reason that you should not think about possible repairs - if the collector fails, it needs to be replaced.
Another problem, which, for obvious reasons, occurs even more often, is a burnt-out manifold gasket 2114. With very active use of the car, it can fail almost every year. You can also replace it with your own hands, and the replacement procedure itself is no different from replacing the collector (its sequence will be discussed below).
Types of elements
Today two types of exhaust manifolds are produced:
- whole;
- tubular.
Solid parts have shorter channels, which are then combined into one chamber. Material: heat-resistant cast iron. The part has low gas removal efficiency. This is because the shorter manifold passages act as a barrier to gas pulses from the cylinder block.
Most parts are produced for mass use, and their quality often suffers. Such collectors do not have a vacuum zone. If they get too hot and then cool, the cast iron can crack. Then you will need to remove the VAZ 2114 exhaust manifold and replace it.
For sports and extreme use, a large number of exhaust manifolds are produced with various shapes and methods of connecting pipes. They are made of stainless steel. Car enthusiasts call these parts spiders. There are short spiders and long ones.
For example, on a 4-cylinder engine, the pipe system is represented by the formula 4-2-1. So, each cylinder has its own pipe. Then these pipes are connected into two, and then into one. This system is used in tuning. It allows you to increase the car's power and torque. The short 4-1 system is used in sports.
What does a faulty collector affect?
There are many stories about the rupture (and even explosion) of a cracked manifold while the car is moving.
Of course, none of them are true, but nevertheless, a leaky manifold is a very serious problem that requires an immediate solution, and here’s why: through burnouts and cracks, air can enter the exhaust system, diluting the exhaust gases.
As a result of this, the lambda sensor will incorrectly determine their composition and incorrectly adjust the composition of the fuel-air mixture injected into the engine, which will lead to tripping, a drop in speed and carbon deposits on the spark plugs.
Bent valves due to incorrect valve timing
These same cracks will affect the crankcase ventilation, disrupting it. This will lead to timing problems and increased valve wear. And finally, exhaust gases escaping through the burnouts will enter the engine compartment and, partially, into the interior, causing unpleasant odors and discomfort during trips.
A severely burnt manifold gasket can lead to exactly the same consequences as cracks on the part itself.