Print this article Font size 16
In simple terms, the cooling radiator is designed to remove excess heat from the power unit. That is, it serves to protect against engine overheating and does not allow the engine to fail.
But over time, under even the most gentle operating conditions, the radiator can fail. Some are trying to repair it, although in fact the repair will only give a temporary effect, allowing them to get to the service station under their own power. The best option is replacement.
Design
Diagram of the engine cooling system
The structural elements of the cooling unit being considered today are:
- Two body parts;
- Pipes;
- Cores;
- Drain valve located at the bottom of the housing;
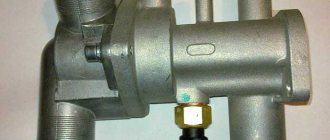
- Filler plug at the top of the housing with two valves (inlet and outlet).
Also in fairness, it is worth including a thermostat and an electric fan in the cooling system, which play an important role in cooling the engine.
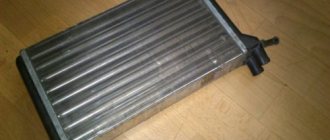
- The housing consists of two tanks with adjacent pipes through which coolant passes.
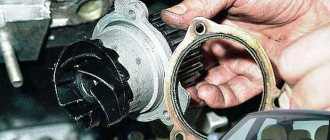
- The core is a series of brass tubes that are soldered to the cooling fins. They can be found inside the case.
- The fill plug allows coolant to be redirected to the radiator, and the drain valve allows the coolant to drain when needed.
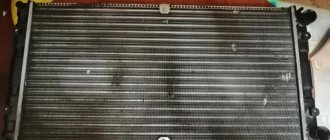
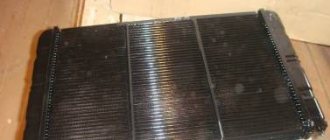
Radiator is a vulnerable car part
The radiator itself is a rather vulnerable part of the machine, because it has a brass body that is subject to numerous loads. And this part is thin in design, and if you take into account the huge number of soldered joints in it, then a quick failure becomes understandable. The radiator is located in front of the car and a pebble from the road or a tree branch that accidentally hits it can become a fatal bullet. Even the smallest foreign objects that get into the radiator can destroy soldering and resistance welding points.
In addition, the mutual influence of the elements of the car in this case plays a cruel joke. Long-term use of chemicals, like it or not, weakens the contact zone, disrupts the operating mode of the pump, increases the temperature, etc. In addition, if the radiator cap valve gets stuck, it will not allow the pressure to be released in time, which will ultimately lead to the appearance of many spots leakage.
Why does the engine overheat?
The engine on a VAZ 2110 can overheat for various reasons. The first priority is a decrease in the efficiency of the cooling system. Why does it stop working properly?
- The cooling system pipes may become clogged. Today such a situation is rare. Mainly provided that very low-grade coolant is used for CO. There is only one way out - change the pipes and use normal coolant.
- Various smudges and leaks lead to a decrease in the coolant level. Here you will have to replace all the components that are causing the leak.
- The housing is dirty. Over time, debris, dirt, leaves, insect corpses, and so on accumulate on the radiator housing. This negatively affects work efficiency. Therefore, be sure to periodically clean the exterior of the housing.
- Radiator leak. In such a situation, you will have to remove it, assess the extent of the damage and decide whether to repair it or replace it with a new one.
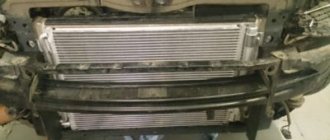
Replacing the cooling system radiator
Replacing the cooling system radiator
The radiator must be replaced if a coolant leak is detected in it.
WARNING
Remove the radiator only when the engine is cold.
You will need: a 10" wrench, pliers, a flat-blade screwdriver.
1. Disconnect the wire from the negative terminal of the battery.
2. Drain the coolant (see Replacing the coolant).
3. Remove the hood lock (see Removing, installing and adjusting the hood lock).
4. Remove the air intake (see Removing and installing the air filter housing).
5. Remove the top panel of the radiator frame (see Removing and installing the front bumper).
6. Press the clamp of the wiring harness block...
7. ...and disconnect the block from the additional fan resistance.
8. Remove the steam removal hose from the expansion tank plug nipple.
9. Squeeze the clamp ears with pliers, slide the clamp along the hose...
10. ...and disconnect the hose from the upper radiator pipe.
11. In the same way, disconnect the hose from the lower radiator pipe.
12. Remove the two bolts securing the left radiator mounting bracket.
13. Remove the left radiator mounting bracket.
14. Similarly, remove the right radiator mounting bracket.
15. On vehicles equipped with air conditioning, disconnect the condenser from the radiator (see Replacing the condenser).
16. Lift the radiator and remove the lower brackets for its fastening from the holes in the radiator frame.
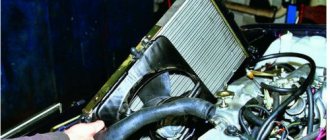
17. Remove the radiator assembly with the electric fan from the engine compartment downwards.
Choosing something new
Before removing the cooling radiator from your VAZ 2110, you need to think about what unit will be in its place. There are not many options, but the choice should be made wisely.
Kraft model
For the domestic “ten” there are two types of cooling devices - aluminum and copper . And here it is important to think about what exactly you want - reliable, long-term operation, or minimal financial costs for its purchase.
- Aluminum. They are light in weight and quite cheap. Prices directly depend on the manufacturer. But such radiators have poorer thermal conductivity and do not cool the engine as effectively. Plus, aluminum units are characterized by the appearance of corrosion after a short period of operation. Among the most popular models, we note two: Luzar. Its cost is now about 1000 rubles;
- Pramo. You will have to pay about 1600 rubles for it.
Reasons for removing a cooling system element
When a car breaks down, some reasons lead to the need to remove the radiator. The main ones:
- various types of mechanical damage;
- individual radiator tubes are clogged with dirt, deposits in the form of scale and rust;
- getting a car into an accident.
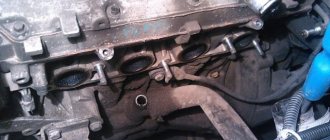
To eliminate the malfunction or replace it, you will need to dismantle the device. You need to take this work very seriously and do it carefully. In order for the process to be carried out efficiently, you need to at least briefly know what parts the radiator assembly consists of. It includes:
- device body;
- expansion tank;
- Electrical engine;
- engine casing;
- impeller (fan);
- rubber cushion;
- drain plug;
- various hoses;
- a pump that is powered by a drive belt.
Cooling system: 1 – expansion tank plug; 2 – expansion tank; 3 – radiator supply hose; 4 – hose from the radiator to the expansion tank; 5 – radiator outlet hose; 6 – left radiator tank; 7 – aluminum radiator tubes; 8 – sensor for turning on the electric fan; 9 – right radiator tank; 10 – drain plug; 11 – radiator core; 12 – electric fan casing; 13 – electric fan impeller; 14 – electric motor; 15 – pump gear pulley; 16 – pump impeller; 17 – camshaft drive toothed belt; 18 – heater radiator outlet pipe; 19 – pump supply tube; 20 – hose for supplying fluid to the carburetor starter; 21 – carburetor heating block; 22 – exhaust pipe; 23 – heater supply pipe; 24 – hose for draining fluid from the carburetor heating unit; 25 – thermostat; 26 – hose from expansion tank to thermostat
The cooling system does not work well, causes and solutions
- Clogged radiator pipes. This phenomenon, today, is very rare, and only when using low-quality coolant. In this case, the pipes should be replaced.
- Low coolant level as a result of cracks in the pipes or leaks at their attachment points.
- Housing contamination. One small detail should be taken into account here - the whole car, the radiator in particular, needs care. Do not allow it to become overgrown with fallen leaves, dirt and other debris, as this will significantly reduce its efficiency.
- There is another reason for the failure of the cooling system - the appearance of a leak in the radiator. Dismantle it so that, based on the location of the leak, its size and the general wear and tear of the device, you can decide whether it needs replacement or repair.
Installation of continuous and blind plugs
Blind plugs are used if it is necessary to close further passage of the coolant.
The grouping of sectional collectors is completed by installing bushings in the required combination, which depends on the layout. Traffic jams can be either solid or through. Blind elements do not have through holes, and external threads do not differ from through threads.
Pass-through products are distinguished by a central hole. Both types are available with left and right threaded turns, since the battery section has two corresponding inputs. You can turn the bushing on a lathe from steel, cast iron or brass.
Materials used
If the joints of the pipes and radiators do not match, you can use a corrugated hose.
Galvanized steel pipes are used to change the system or extend the connections to heating accumulators. They are joined with threaded connections; welding is not used. The melting point of steel is +1400°C, and zinc is +900°C. The zinc completely evaporates in the weld area.
Required components:
- blind and straight radiator bushings;
- two shut-off valves;
- paired locknuts when installed on squeegees, their size corresponds to the diameter of the connections;
- brackets for fixing the convector on the wall.
Sometimes stainless steel corrugated pipes are used. Durable products are bent; compression fittings are used for connection, installed with adjustable wrenches.
Recommendations
Please note, when changing the radiator of a VAZ 2110, replacing the antifreeze (completely), then you also need to drain the coolant from the engine block. The fact is that draining the liquid only from the radiator is not enough to completely replace the antifreeze.
In general, washing comes down to the following:
If, when draining the flush, it is noticed that the drained liquid is very dirty, the flushing procedure must be repeated. This will extend the service life of the filled coolant (TOSOL or antifreeze), increase the efficiency of the cooling system, and also increase the life of the cooling system parts (radiator, pipes, pump, thermostat, etc.).
Source
How to remove a heating radiator in an apartment - expert advice
Some models of heating radiators, especially aluminum ones, may have a complex internal structure. After draining the water, some volume may remain in them. Do not disdain rags and keep them ready.
When arranging heating for a private home, a coolant is often used. Over time, it decomposes and releases toxic products. Therefore, take precautions when working. Wear gloves, goggles, and a respirator.
Do not neglect safety measures; always have rags, rags and anything that can absorb liquid ready. It’s better to play it safe once than to pay your neighbors for new repairs.
With a side connection system, perform all work as synchronously as possible. This is especially true for aluminum heating radiators - they are more susceptible to deformation. Unscrew the coupling on one side one or two turns and move to the other side.
With bottom and saddle connections, the pipes pass through the floor covering. To give them additional movement, you can remove a couple of parquet boards or laminate. This will protect both the pipes and the coating.
Never, I repeat, never, tear the thread with force or jerking! You can miss the direction, and using too much force can break off the edge. After this, it will not be possible to fix the plugs properly. And if it does, it won’t be for long. Uniform force is the best option. If you don't have enough strength, use a lever.