Cars of the Kalina-2 family are equipped with a steering rack similar in design to the Granta rack. This part transmits force from the steering wheel to the front suspension links. If you feel a knocking sound from the rack while driving, it needs to be adjusted (tightened) correctly. The effect described here can be observed after 10-15 thousand kilometers, and more often it makes itself felt on uneven roads. Next we consider how this problem is solved in practice. And the solution comes down to turning one nut.
The role of the steering rack in the car control system and its design
Structurally, the steering rack looks like a steel form, on one side of which there are teeth that are tightly meshed with similar elements of the drive gear. Well, the drive gear itself is driven by the driver, who rotates the steering wheel. The steering wheel and drive gear are coupled through a shaft and a small cardan.
The upper part of the steering rack has fasteners to which rods are attached, which go further to the shock absorber struts and are secured there with tips and pins.
The driver, by turning the steering wheel, sets the steering shaft in motion, thereby transmitting force through the cardan to the drive gear. In turn, the gear rotates and moves the steering rack and, accordingly, the steering rods in the required direction. This is the simplest way to drive a car.
Of course, the design of the steering rack itself is not exactly the same as we described above. To ensure reliable operation of the rack, its design also includes the following important elements:
- column housing (case);
- corrugation (protective casing) with clamps;
- ball and needle bearings of the drive gear;
- support bushing (fluoroplastic);
- thrust nut;
- emphasis;
- various plugs, boots, fastening nuts, etc.
Causes of steering malfunctions
| Cause of malfunction | Remedy |
| Increased free play of the steering wheel | |
| Loosening the nuts securing the ball pins of the rods | Check the presence of the cotter pin, tighten the nuts and secure them |
| Increased clearance in ball joints of rods | |
| Wear of rubber-metal joints of rods | Replace the rods |
| Increased clearance between rack stop and nut | Replace worn parts and adjust the steering mechanism |
| Noise (knocking) in the steering | |
| Loosening the nuts of the ball joints of the rods | Check and tighten the nuts |
| Increased clearance between rack stop and nut | Replace worn parts, adjust the steering mechanism |
| Loose steering gear | Tighten the steering gear nuts |
| Stiff steering wheel rotation | |
| Damage to the upper suspension strut bearing | Replace the support |
| Damage to the support sleeve or rack stop | Replace damaged parts, apply lubricant |
| Low pressure in front tires | Set normal pressure |
| Damage to parts of ball joints of rods | Replace damaged parts |
| Damage to parts of the suspension shock absorber strut | Replace or repair the suspension strut |
| The bearings of the upper steering column shaft are damaged | Replace bearings |
| Electric power steering is faulty | Replace the electric booster and shaft assembly |
- How to diagnose LADA electric power steering without a scanner
- How to get rid of a knocking steering shaft
- Do you need steering rod plugs?
Keywords: Lada Priora steering wheel | Lada Kalina steering wheel | Lada Granta steering wheel | steering mechanism Lada Priora | steering mechanism Lada Kalina | Lada Granta steering gear
4
Found an error? Select it and press Ctrl+Enter..
Steering wheel play
If such a malfunction is identified, we advise you not to despair; it is likely that this problem will be resolved by carrying out minor repairs. Let's immediately figure out how to identify play and how to properly tighten the rack to get rid of this malfunction.
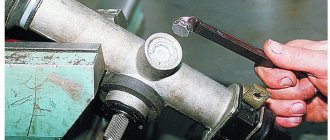
So, to deal with this problem, you need to open the hood and determine the installation location of the steering rack. Next, dismantle all engine elements that clearly interfere with free access to this part. Now grab the rods with both hands and try their movement to the right - to the left. If during such actions you find play, you can eliminate it by adjusting the thrust nut.
This rack adjustment is a simple process, but to carry it out you will need a special key No. 17 with an octagonal head. Without such a specific key, you don’t even have to start adjusting. Well, if the key is prepared, then move under the car and be sure to remove the engine protection. Now look around and determine how best to get to the steering rack. Now remove the existing plug from the thrust nut. Insert the wrench and start screwing this nut into the housing. We recommend that you first turn the nut about fifteen degrees and then check the change in backlash. If the need for adjustment remains, then turn the nut to the same angle. Note that it is better to tighten the nut a little at a time so as not to overtighten it, as then the steering wheel will be difficult to rotate. We also advise you to check the reliability of the fasteners on the rods. If necessary, tighten the mounting bolts.
A little theory: front suspension design
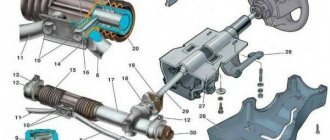
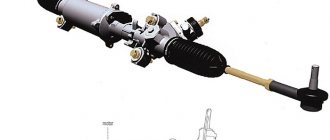
Before attempting to fix any problem, there is a tendency to look at the blueprints or repair manual. It is known that the VAZ-2192 parts catalog contains the following object:
This is what the steering rack looks like in the drawing
Whether the knock will remain in the steering rack of Kalina-2 depends on the following: how accurately element “14” is adjusted. The adjusting nut, marked “14”, looks almost invisible here. But first impressions are deceiving. In the catalog, by the way, the element is called “Stop Nut”.
It is important to know that the thrust nut has external threads. And it spins clockwise. And the words “tighten the rack” mean screwing in the specified nut, and nothing more.
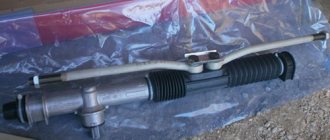
Now let's move on to practice and see what the node in question looks like in reality:
If you remove the rail, it looks like this
The nut has a non-standard notch, and it can only be rotated with a special tool. By the way, the recess will be closed with a cap. In the catalog it is designated by the number “15”, and now, let’s look at the appearance of the special key:
Rack adjustment key
The thrust nut is turned at small angles. We are talking about values of 10-15 degrees. What happens if you overdo it with tightening the rack? The knocking noise will disappear, but the steering wheel will turn with difficulty. Therefore, if necessary, the nut can be pulled back.
Removing the steering column
If adjusting the nut does not help and the play remains, you will have to completely disassemble the rack and repair it. True, first you still need to dismantle it, which is also not easy. There are two methods: with removing the steering rods and without removing them. Preferable and easier, of course, is the method without removing the steering rods, since it takes less time. Before starting dismantling, you need to jack up the front of the car. This is done in order to completely relieve the steering rods, otherwise you simply will not be able to dismantle the steering rack. So, let's start disassembling. Inside the car, where the pedal block is located, find and unscrew the steering shaft cardan bolt. Next, move to the engine compartment and there you will find the mounting bolts on the rods and unscrew them. Don't forget to bend the locking plate first. After this, unscrew the four fixing bolts that secure the steering column to the car body. All fasteners are unscrewed, carefully move the steering column and remove it through the opening under the left wheel arch.
Power steering and power steering: do-it-yourself installation
The electric booster first appeared on Kalina, then on Grant and on the new Priora. You can drive a car without an ESD. But if a car owner previously owned a car equipped with a hydraulic or electric booster, then, at a minimum, he will experience great inconvenience. On the Lada Granta in the minimum configuration, the manufacturer does not install electric power steering, so many owners of such cars decide to install the power steering themselves. This procedure is not the easiest, and the unit is not cheap. But its presence means a comfortable ride, maneuverability and safety.
Installation does not require any special knowledge or skills; minimal experience and a set of tools are sufficient. If, nevertheless, the question arose about installing electric power steering on the Lada Granta, then when purchasing an electric power steering unit, you should pay attention to its number.
The set of numbers contains a definition of the place of production, these are the last two digits:
- 00 – made in Makhachkala (not the highest quality, has many negative reviews);
- 04 – Korean amplifier, you can buy it in a store, a rare copy at auto wrecking yards;
- 02 – made in Kaluga, a good medium option.
To install the amplifier you will need a set of wrenches, screwdrivers and an angle grinder (grinder). Before proceeding with installation, the steering wheel, all steering column switches, the ignition switch, and the steering column with cardan must be removed. The further algorithm of actions is as follows.
- Knock out the bolts from the removed bracket in the form of a plate and cut off about 3 cm from the top with a grinder.
- Drill holes in the plate to mount the electric amplifier.
- Fix the cardan to the EUR.
- Place washers under the bracket (where the electric booster is mounted), and you can use them to adjust the steering wheel.
- Attach the electric booster, and then install the cardan into the rack.
After this, all that remains is to connect the EUR to the wiring according to the electrical diagram supplied with the amplifier. Using washers you need to adjust the steering wheel deflection in different positions. No further maintenance of the electric amplifier is required. Those who decided to replace the electric power steering with a hydraulic booster should understand that this idea is pointless. Firstly, the power steering is much more technologically advanced and modern, and secondly, installing the power steering on the Grant is a labor-intensive and expensive process that has no practical advantage.
The steering mechanism of the Lada Granta is reliable and simple to use. With timely diagnosis of faults and periodic maintenance of mechanisms, the rack and other components will last a long time without any serious problems.
Self-repair of the steering column of a VAZ car
As with any other work, you first need to prepare the necessary tools. To repair the steering rack, you will need two special wrenches: octagons No. 17 and No. 24, as well as special pullers for existing bearings. I would like to immediately note that repairing the steering rack involves replacing worn parts. These parts include bearings, stop, bushings, retaining rings, seals and drive gear boot. You can purchase all the necessary elements in repair kits. Thus, the automotive market currently offers three types of repair kits for the steering column:
- a minimum kit, which includes retaining rings, seals, a boot and a support sleeve;
- standard kit, which includes all elements of the minimum kit and bearings;
- complete package with all consumables and new rail.
A suitable repair kit should be purchased only after disassembling the column, as well as its complete troubleshooting.
Causes of backlash and detection methods
There are four main reasons for the appearance of play in the steering. They arise as a result of wear and tear of parts during long-term use of the vehicle. For example, over time, gaps form and increase in the steering rod joints of the front wheels. Their presence and size can be determined visually or tactilely by probing with your fingers the parts that are connected by these hinges. In this case, someone must turn the steering wheel sharply, either left or right. Both parts must move synchronously. Check alone by moving the steering rod in the longitudinal direction with your hands. There is no play if it moves with the bipod. If there is even a small gap, the hinge must be replaced.
The second reason is increased wear or misalignment of the engagement of the roller and the “worm”. When turning the steering wheel sharply, a knock is heard in the steering mechanism. The defect is also detected when shaking the steering gear bipod with your hands. Action: adjust or replace parts.
Knocks and squeaks when turning the wheels, as well as when rocking the pendulum arm up and down, indicate wear on the bushings or the axle of this very pendulum arm. Try tightening the nut on the axle. Worn parts require replacement.
Finally, the fourth reason is that the fastening of the pendulum arm bracket or crankcase has become loose. You just need to tighten the appropriate nuts and bolts.
It remains to add that with proper operation of the car and care for the steering elements: periodic lubrication, timely detection of defects and elimination of emerging play, all mechanisms will last a long time and will not require unexpected costs for their replacement.
Steering is an integral part of any car. Thanks to this unit, the vehicle can change the direction of its trajectory. The system consists of many elements. The main component is the steering rack. Its backlash is unacceptable. About malfunctions and signs of breakdown of this mechanism - further in our article.
Disassembling the steering column
The first step in disassembling the column is to remove the protective casing; to do this you need to cut the plastic clamps. Next, take a special key No. 17 and unscrew the thrust nut, carefully remove the installed retaining rings, then the spring. After this you can knock out the rack stop. Remove the boot and the existing seal installed on the drive gears. Take the second special wrench No. 24 and unscrew the nut that holds the ball bearing - carefully remove the gear.
There is now nothing holding your rack in the housing, so you can carefully remove the right side. Having freed up some space for yourself, try to remove the drive gear bearing. This can be done using a prepared puller. Be sure to check the removed bearings for play. If there is one, then the bearings must be replaced. It is imperative to replace the support sleeve - it has a cylindrical shape and is located in the steering housing. It is quite easy to get it out - take a screwdriver and pry it off.
Diagnostics, repair and reassembly
Before determining why there is a knock in the steering, you should completely disassemble the rack and carry out diagnostics for wear, destruction of components and connections. Disassembly is carried out in this order. Secure the steering rack in a vice, having previously installed spacers made of soft metal or other material. Unscrew the nut securing the mechanism crankcase pipe. The crankcase tube is removed. Remove the clamps securing the pipe bushings and remove them.
Unscrew the adjusting nut. Here you need to use a special 24mm wrench, which has external edges for unscrewing. Sequentially remove the rack stop spring, the sealing ring and the rack stop. Remove the crankcase cover. After removing the bearing cage and sealing ring, remove the rack. The second element of the steering mechanism pair - the gear shaft - is dismantled.
Now you can diagnose the condition of the bearings and sealing rings. After thorough cleaning, the wear of the gear sectors and the condition of the surface of the rack and shaft are assessed. After all, this is where the reason lies that causes the knocking that appears. If necessary, select the necessary parts and replace them.
Before reassembly, all critical connections are lubricated with a special compound. Very often, it is the insufficient amount of lubricant that leads to rapid wear of loaded parts, which violates the previously established clearance. Therefore, even a recently installed rack knocks again.
Assembling the steering mechanism is carried out in the reverse order. For correct and easy installation of dismantled bearings, you should select the required diameter of pipe cutting, which will help to correctly install the bearings in place. The assembled steering mechanism must be adjusted, since the size of the gap can also determine whether a knock will appear after reinstallation.
Steering column assembly
This process should begin by installing a new needle bearing. Before installation, generously lubricate the seat with Fiol-1 grease. Next, press the ball bearing onto the drive shaft. The next element is the support sleeve. Install it into the control unit housing. After this, you need to fill the inside of the column with lubricant and you can insert the steering rack into it.
Mount the drive gear, secure it with a nut and do not forget about the retaining ring. Put on a new boot. After this, all you have to do is install the stop in place and secure it with a locking ring and nut. OK it's all over Now. After these steps, all you have to do is adjust the entire control unit and then put on the protective cover.
Steering wheel tuning on Lada Granta
There are few options for upgrading the steering wheel on the Lada Granta. The most popular of them is installing a sports version. Such a steering wheel will not only make the interior more attractive, but will also increase the comfort of control, especially if it is selected correctly. You can install a multi-steering wheel, but only if the configuration is maximum, in other cases there will be nothing to control with its help.
The sports version must be injury-proof, that is, in the event of an accident it must be deformed without causing damage to the driver. Among the shortcomings, it can be noted that although there is an airbag in the standard steering wheel, the sports one does not have it. You can also modify the steering wheel by installing braid. More advanced ones install a heating thread under it.
To install the sports steering wheel, you will need to carry out the following operations.
- Align the front wheels straight (you can drive a little forward and back so that the trajectory is straight).
- Disconnect the battery terminals by de-energizing the vehicle's on-board network.
- The airbag control module must be disabled (if the Granta equipment is equipped with it). If you do not turn it off when removing the factory steering wheel, it may shoot out.
- Remove the steering wheel and install a horn on the adapter. The wiring must be stored in the adapter; to do this, carefully inspect all contacts.
- Connect the adapter to the shaft, but do not secure it with a nut.
- A sports steering wheel is installed on the adapter and secured with special screws.
You cannot throw away or sell the factory product; the sports version will raise questions when passing inspection.
Replacing the steering rack
In some cases, although very rare, the usual replacement of consumables is not enough. The steering rack, although made of reliable steel, still does not last forever and can wear out a lot over time. Often, the culprits in the rapid wear of the steering rack are the owners themselves, who do not monitor the condition of the steering mechanism. In addition, the steering rack may require replacement in a car after a traffic accident. Replacing the rack in a VAZ car occurs according to the scheme described above, only taking into account the fact that you will have to buy a complete repair kit, which includes a new rack.
Lyrical digression
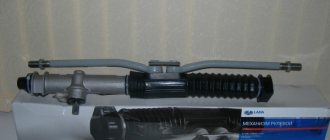
In Lada Kalina, the steering rack never makes a knock when we are talking about a new car. This is also true for the break-in period. Let's say in your case this is not done. Then, do not try to repair anything, but go straight to the dealer. According to reviews, the defect in question is covered under warranty, and most car dealers do this: the steering rack assembly is replaced with a new one.
This is what the replacement unit looks like, the rack assembly
There is a logic here. At the factory, adjustments are made correctly (this is true in 99.9% of cases). If a defect appears, the dealer replaces the assembly without expecting that adjustment will solve the problem. The owner does not need to hope for this either. The choice is yours.
Useful tips for motorists
In conclusion, I would like to give a few tips that will help the steering rack and other elements of the control system serve you for a long time and reliably:
- visit a service station once every three months or check the condition of the steering yourself;
- constantly monitor the condition of the protective casing installed on the steering rack;
- try to drive on road irregularities to a minimum, especially when driving at high speed;
- do not wear out the steering rack by sudden starts with the wheels turned all the way;
- If play appears, make adjustments immediately;
- If you notice signs of malfunction, carry out repairs immediately, without waiting for the condition of the steering system to deteriorate.
How to dismantle the steering mechanism?
When knocking occurs, owners are faced with the need to dismantle the rack and pinion mechanism. This work will become much more convenient if the car is hung on a lift. In general, knocking and eliminating it is a very important topic.
To successfully remove the rack you will need to stock up on the following necessary set of tools:
- a socket wrench or a head of identical size (at “13”);
- a wrench, a flat-profile screwdriver and a knife;
- a specialized 24-size wrench for tightening the rack;
- hexagon "6" size and a wrench.
- When starting to carry out the actions, do not forget to first disconnect the battery from the on-board network.
- We align the wheels straight and loosen the bolts securing them to the hub.
- We hang the Lada Granta car with a lifting device.
- We disconnect the steering shaft cardan assembly from the gear shaft, which “enters” the rack and pinion gearbox housing. This manipulation is carried out in the cabin, so a high lift of the car is not required.
- We release the rods by disconnecting them from the levers located on the housings of the front shock absorber struts.
- Now we begin the actual dismantling of the steering rack.
- Using the key set to “13”, we unscrew the nuts and remove the clamps that hold the steering rack to the body.
- We remove the mechanism assembled with rods.
Having placed the rail on a convenient surface, we proceed to its immediate disassembly. This involves freeing the assembly from the entire list of present covers and anthers. The specified clamps holding these elements are cut off, since they will definitely be replaced with new analogues. When there is a knock and eliminating it happens in this way.
Air filter Grant
Replacing the fuel filter Lada Granta
Changing the oil in the automatic transmission of Lada Granta
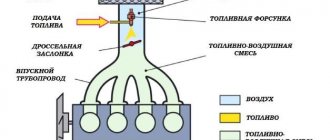
What is the function of the steering rack?
Steering racks can be driven by hydraulic, electric or mechanical. Most vehicles are equipped with hydraulic racks. This design ensures fast and accurate steering at high speeds, optimal entry and exit from parking lots, and also allows you to make turns in limited areas. To reduce the forces exerted on the drive wheel, the mechanism is equipped with a hydraulic booster.
As is already clear from the examples given, the steering is also responsible for the convenience and even safety of driving, along with other vehicle systems. It is in our interests to keep it in working order and listen to problems. All steering rack repair work is carried out using special equipment that allows for optimal restoration and adjustment. Let's figure out what can expect us?
Signs of backlash
If, while driving your car, you begin to notice such unpleasant phenomena as knocking, excessive vibration, spontaneous deviation from the trajectory, this may be the cause of play in the steering. According to traffic rules, the total play of a working car should not exceed 10 degrees. But even smaller values create certain inconveniences and discomfort. Even the smallest backlash tends to develop into a big one. Agree, it’s not normal when on an almost flat road you have to constantly turn the steering wheel left and right. With a large backlash, this is already called “catching the road.”
How to tighten the steering rack and is it possible to prevent play?
Most often, steering rack malfunctions occur as a result of regular driving on dusty and uneven roads. Speed bumps, which are not always installed according to technology, have especially become a pressing problem in urban conditions; sometimes the entry to them is sharp, sometimes the height is high, and the car suffers. The longer this mode of operation continues, the faster the rack knocking will occur. This is the most pronounced symptom indicating its malfunction.
In order to repair the steering as little as possible, it is necessary to slow down if irregularities are clearly visible on the road. You should drive through them at very low speed.
Other causes of malfunctions are frequent collisions with curbs, a sharp increase in speed when the steering wheel is in the extreme position. In this regard, the load on the gearbox and other components of the steering rack increases. Under such conditions, even the car’s power steering can fail. Rack malfunctions are very similar to other breakdowns, so in some cases it requires complete disassembly for accurate diagnosis.
Summarize
The occurrence of malfunctions in the steering unit, if the steering rack is faulty, usually occurs due to untimely preventive checks. When the owner neglects this action, leaks may occur in the future due to loss of tightness of the seals in the rail. Such a scenario will inevitably cause knocking, and, as a result, the need for repair of the rack and pinion assembly. Carry out timely diagnostics of the mechanism and, if repairs are required, do not put it off until later.
Installing a minespring
I noticed that when driving on gravel or crushed stone at 60-70 km/h, the steering rack began to tap (barely audible, but still). This knocking is not particularly annoying yet, but I started looking for a solution to the problem in advance. As usual, I turned to the great and mighty...Internet. The main cause of knocking is the so-called “disc spring”. The original one is of not entirely satisfactory quality and over time, under the influence of loads, it flattens. It is recommended to install a disc spring SS-20. I asked the consultant for a spring for the steering rack of the VAZ 2110 of the new model (it is the same as the Grantovskaya and Kalinovskaya ones), he hands me a box and it says “SS-20 Belleville Spring”. I look up at him in surprise, and he says: the best, they say.
Photo of the minesweeper spring:
It is placed on the interior side. There are 2 hex bolts.
The knocking began to gradually increase and it was already starting to irritate. In addition, a barely noticeable rattling of something metal appeared in front of the car (the rattling was heard only on bumps and then barely, I was just used to listening to any knocks or clatters of the car and easily caught it). Over time, the rattling began to increase, but I could not understand what exactly was rattling: I shook the entire suspension, checked all the engine mounts, the gearbox trapezoid, the gearshift lever, looked through all the pipes, engine protection, etc. — nothing rattles and cannot make similar sounds (the sound is very specific).
But after traveling 10,000 km, my gearbox began to howl, the differential began to bite, I had to urgently change the gearbox to a completely new one. Having decided that this rattling noise was coming from the gearbox, I thought that replacing it would solve the problem. But Alas, the rattling noise remained with the new gearbox. What can make such sounds? With this question, I went around a bunch of forums, each offering their own ways to solve it, even to the point of insanity. Everything turned out to be in vain. I decided to just ignore this ringing.
But then I was finally finished off by a rattling sound in the steering rack when overcoming bumps. I was already in the mood to replace the steering rack and was mentally saying goodbye to 4500 rubles when I remembered the SS 2 disc spring I bought six months ago. I decided to try my luck, so to speak, and install it (it certainly couldn’t be worse).
I bought 2 hex keys to loosen the bolts.
These 2 bolts are hexagon
I crawled under the panel, deciding to first rip off these bolts and only then, if they come loose, unscrew the steering cardan. But the bolts categorically did not want to turn away - the keys were just plasticine! They crumple, bend, lick off. Is there no normal metal left in our country at all? Then I remembered a set of star keys that I recently purchased:
Adjusting the steering rack - how to do it in your garage?
Very often the question arises of how to tighten the steering rack yourself and make other adjustments. In this case, it should be remembered that simply tightening it may not completely solve the backlash problem or not solve it at all. This is due to the fact that the transmission pair, which includes a rack and pinion, has a degree of wear that is unknown to anyone in advance. The adjustment work itself is not particularly difficult and can be done by any driver who knows how to handle the tool.
The unknown degree of wear does not allow an accurate diagnosis to be made without opening the steering rack. In this case, you will have to contact specialists. For regular adjustments and tightening, you will need a partner, a garage with a pit and a wrench to adjust the steering rack. After preparation, you must perform the following actions in compliance with certain rules:
- Before you begin tightening, the vehicle must be securely secured and the wheels must be straight. Using a backlash meter (a special mechanical device for determining the gap), it is necessary to measure the backlash of the front wheel (if it is responsible for steering), which should not be more than 10 degrees.
- To tighten it, there is an adjusting screw located in the end cover of the steering mechanism, find it. If you have to look for it for the first time, then arm yourself with the car’s passport, because the location of the screw is different for each model. He should pull himself up slowly. It is necessary to constantly check the steering wheel travel, the amount of play and the presence of knocking in the column.
After adjustment, it is necessary to carry out sea trials. If the drive wheel travel is heavy, the adjusting screw will need to be loosened a little. Thus, steering rack adjustment work will be considered successful when the knocking or play has completely disappeared and the wheel freely returns to its normal center position.
Making adjustments yourself
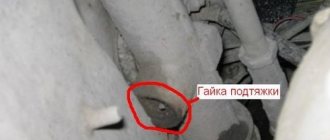
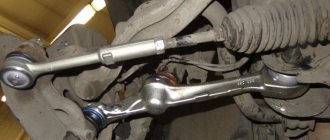
You can access the adjusting nut from the engine compartment, but to do this you will need to remove the battery, as well as the battery mounting pad. It is better to drive the car into a pit and then remove the crankcase protection (engine mudguard). If you look from under the bottom, the required element is immediately visible:
You need to turn this nut
And when you open the hood, you can feel the nut, but not see it. Its location is marked in the figure:
To make adjustments, place the key here
Before adjustment, remove the rubber cap from the recess. Its appearance is shown in the photo:
Remove the cap and install the key
If it is not entirely clear what exactly needs to be done, it is better to contact the service. The key is installed in the recess and then rotated 10-15 degrees.
When looking at the rack from above, turning the key clockwise corresponds to unscrewing it. The handle of the key comes from the center of the car - which means tightening is being done. By the way, the latter is true provided that the handle faces forward.
Symptoms of a problem
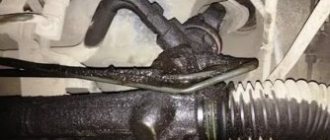
How to determine that the steering rack is faulty? Backlash is not the only sign. So, when turning the steering wheel, the driver applies more effort than required. Of course, there are some nuances here (after all, there are drives with and without an amplifier). So, on a hydraulic steering system, you will notice a characteristic pump hum. Sometimes this is accompanied by leakage of working fluid from the tank. As for mechanical drives, the turning sound will remain the same. However, the steering wheel will become noticeably tighter. This is the first sign that the steering rack has failed. Play during wheel rotation can occur on both types of drive - mechanical and hydraulic. Another reason is a leaking rack seal. In this case, characteristic streaks will be visible on the assembly, as in the photo below.
Characteristic
The steering has several functions:
- Increases the effort applied to the steering wheel.
- Transmits torque to the wheels through the drive.
- Automatically returns the steering wheel to the neutral position.
The main component of this mechanism is the gearbox. It has its own gear ratio (this parameter is different for each car). At the moment, a rack and pinion steering mechanism is used. Previously, manufacturers used a worm and screw assembly.