Published: 10/30/2020
- Exhaust system "Lada Kalina"
- How often does a muffler need to be repaired?
- How does a resonator work and its functions?
- Main malfunctions and the order of work to replace the muffler
- Roar, shooting, condensation and other reasons to look under the car
- Replacing a part at a service center
- Main malfunctions and the order of work to replace the muffler
- Replacing the cabin filter and oil
- Muffler replacement process
- How to replace the Lada Kalina muffler with your own hands
- Muffler replacement
- Downloading a book
- Muffler replacement process
- Possible faults
- Mufflers VAZ 2108-2115 (Lada Samara)
- Conclusions TheDifference.ru
Exhaust system "Lada Kalina"
After processing the air-fuel mixture, residual substances must be released from the engine cavity. An exhaust system is used for these purposes. Without it, operating any car is simply impossible.
The exhaust system of the Lada Kalina car consists of several elements:
- an exhaust manifold;
- exhaust pipe;
- main muffler;
- additional;
- catalytic converter.
All parts of the exhaust system not only allow you to safely and quickly remove exhaust gases from the engine, but also reduce noise levels. And the neutralizer serves to reduce carbon monoxide emissions, that is, it reduces the toxicity of exhaust on the Lada Kalina.
It should be noted that the mufflers for Lada Kalina sedans, hatchbacks and station wagons will be slightly different. Thus, the device labeling must fully comply with the VAZ labeling. For example, VAZ-1117 (Lada Kalina hatchback) requires model 1117, and VAZ-1118 (Lada Kalina sedan) requires muffler 1118. For the Lada Kalina station wagon modification, a device marked 1118-1200010 is installed.
Part cost
The cost of the main muffler for Lada Kalina varies from 800 to 3 thousand rubles. In order to protect yourself from counterfeits, it is better to buy an original one, produced by AvtoVAZ (AVTOVAZAGREGAT), and not some analogue.
For reference, catalog numbers:
- muffler Kalina station wagon and sedan: 1118-1200010;
- muffler Kalina hatchback: 1119-1200010.
The original will last much longer, although it is significantly more expensive. And the weight of the original muffler is significantly greater than the analogue one. Craftsmen who love a quiet engine sound select a resonator from foreign cars based on dimensions, which significantly reduces the sound.
How does a resonator work and its functions?
As mentioned above, the exhaust system includes a resonator. In a resonator, each of the constituent components has its own role. The main purpose of this unit is to dampen low-frequency sounds generated during the intensive movement of the exhaust gas stream inside the muffler circuit. Sounds of this nature occur for the following two reasons:
- from the effect of gas expansion;
- due to vibrations of components in the muffler line.
An important function of the resonator unit is reducing the speed of movement of the gas jet. Here physical fundamental laws come into play, indicating the inevitable damping of speed during the transition of a gas mass from a thin pipe into a volumetric cavity
It is precisely to achieve this effect that the design concept of the resonator is designed.
In the exhaust gas circuit, the resonator component is located in front of the main muffler, thereby being the primary link in the chain of damping low-frequency sounds.
Structurally, the product assumes the presence of a perforated section of pipe inside the metal body, where there is a throttle-type hole, designed to effectively dampen vibrations arising from the movement of the gas jet. The internal space of the housing has partitions that are oriented transversely to the perforated pipe. Now you have an idea of what an exhaust system is.
In comparison with the resonators in the exhaust circuits of other models, this unit in the Lada Kalina has a corrugated element. The design necessity is due to the tendency of the device to move during the heating of the gas exhaust jet.
The manufacturer makes all resonator components only from high-quality steel. Otherwise, the car's exhaust system would constantly require repair work. But sometimes it is still necessary to replace the resonator, and in some cases, replace the muffler.
Main malfunctions and the order of work to replace the muffler
The main malfunctions of Lada Kalina mufflers include:
- muffler corrugation burnout;
- catalyst malfunctions;
- gasket burnout;
- breakage of rubber fasteners, etc.
However, the main and defining defect remains muffler burnout. Therefore, we will study the issue of replacing the Lada Kalina muffler with our own hands, having previously prepared plumbing tools and the car itself for this. When preparing a vehicle for repair, we select a platform without slopes and install the car in the parking brake mode and first gear engaged.
The order of work when dismantling the muffler on the Lada Kalina:
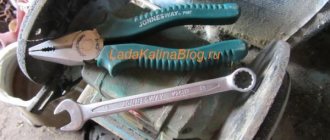
- Having prepared the necessary tools for the repair, we dismantle the clamp that tightens the muffler pipe at the junction with the resonator. This operation is carried out using a pair of keys set to “13”; for convenience, you can select a head with a knob and a ring wrench.
- It happens that the nuts securing the plug are stuck to the base and are very difficult to unscrew even with the help of special liquids. When there is no longer any hope of safely dismantling the product, it is easier to prepare new fasteners, and the old nuts must be cut off with a grinder.
- After dismantling the tightening clamp, it is necessary to apply several gentle blows with a mechanic’s hammer along the circumference of the muffler bend to facilitate complete removal of the product. After this, use your hands to press the muffler in the direction opposite to the direction of travel of the vehicle.
- Then remove the rubber fasteners on the sides of the product.
- We dismantle the “glushak”, set the unusable part aside and install a new part, and do everything according to the “reverse” principle.
The technological operation takes only a couple of hours, after which the car is ready for use again.
Typically, mufflers can withstand quite a long service life. In my memory, there were many cars, and almost all of them had the same muffler service life. For example, on the Twelfth we replaced it at about 50,000 km, and on the Seven the resonator recently burned out when the mileage was 60,000 km. So far I have driven a little more than 40 thousand on Kalina, but thank God, so far everything is fine and there are no signs of burnout.
I’ll say right away that I didn’t want to remove and put it back using Kalina as an example, I’ll just show from previous experience how this procedure is performed, but with photographs using the example of my station wagon. I’ll just show you clearly what needs to be removed and unscrewed and where.
So, to perform this repair, you will need:
- WD-40 lubricant or its analogues, such as all kinds of liquid wrenches
- Keys size 13, preferably a socket and a head with a knob
- Hammer (may not always be needed)
First, I’ll show you where the clamp connecting the resonator and muffler is located, since it is this that will need to be unscrewed.
First of all, be sure to apply lubricant to the bolts and nuts securing the clamp, since they stick thoroughly and in some cases it is simply impossible to unscrew it. After 10 minutes, unscrew the nuts. On one side you can completely, and the other just slightly unscrew.
After this, we move the clamp to the side and now you can knock it off the junction with the resonator with small knocks on the bend of the muffler. Often there are no problems with this step and it can be easily knocked down or even removed without any extra effort.
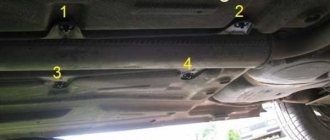
After this, you need to free the muffler from the fasteners and remove it from the rubber bands that hold it. There are two of them in total. The first is located near the rear beam. Shown more clearly in the photo below:
And the second is in the back of the car, almost at the exhaust pipe. Its location is also shown in the picture:
After these steps, you can safely and without any obstacles remove the muffler and replace it with a new one. Installation occurs in the reverse order of removal. The price of this part in auto parts stores is approximately 1050 rubles.
Roar, shooting, condensation and other reasons to look under the car
It's easy to spot muffler problems. It is difficult not to notice extraneous sounds coming from under the car, or a sharp change in the tone and volume of the response to pressing the gas. It is not uncommon to notice fluid leaking or even splashing from the exhaust pipe. All these are signs of malfunctions, but do they all indicate problems in the exhaust system?
Fluid in the muffler
Fluid dripping from the exhaust pipe is a common occurrence. However, it is worth distinguishing what kind of liquid it is. If it's water, there's nothing wrong with it. When the ambient temperature changes, moisture from the air condenses on the surfaces of the muffler. If a steel muffler is used, this can lead to corrosion, but usually the Priora exhaust system uses aluminized steel or stainless steel, which means that damage from water will be minimal. In cases of heavy accumulation of water, experienced motorists usually drill a drainage hole in the “barrel” of the muffler.
If there is excessive accumulation of water in the muffler, in winter you may encounter icing of the exhaust pipe
If antifreeze drips from the exhaust pipe, the fault should be looked for not in the muffler, but in the engine. The reason may be wear of the cylinder head gasket, as well as depressurization of the block itself. Antifreeze in the exhaust pipe is a symptom of serious problems, and if it is detected, you should immediately diagnose the engine.
Pops and shots from the exhaust pipe
Popping noises coming from the muffler indicate a malfunction. However, this is also a malfunction of the engine, not the exhaust system. Shots or pops from the exhaust pipe indicate that the mixture of air and gasoline does not burn out in the cylinder block, which means that when you hear them, you should check the spark plugs and spark plug wires, as well as the serviceability of the gas distribution mechanism. Problems with combustion of the mixture are not a symptom of a muffler failure, but they can be its cause.
Article on the topic: What is tiptronic in a car
Video: this is what pops from the muffler sound like
Knocking from under the car
A knocking sound from under the bottom of the car while driving or rattling from vibrations is an unpleasant phenomenon. The muffler may touch the gas tank or the underbody. There are several possible reasons for this.
- First of all, check the rubber muffler hangers. Their wear leads to loosening of the entire exhaust system. These mounts are sold at most auto parts stores. Their price usually does not exceed 100 rubles per piece. Replace the suspension with new ones and the knocking will stop.
- It is worth checking whether the clamp connecting the main muffler and the additional muffler is loose. If necessary, replace the fastening bolts and nuts. For replacement, it is best to use fasteners made of heat-resistant materials.
- Using the wrong model of muffler with pipe bends that differ from the original spare part can lead to contact between the exhaust pipe and various components of the car: the body, the gas tank and even the suspension. Be careful when choosing a muffler.
Lowered the car - the muffler is knocking
When installing a short-travel suspension on a Priora, tuning enthusiasts often encounter a situation where the suspension beam, which has moved closer to the body, begins to touch the muffler. This problem can be solved by replacing the muffler hangers with new ones of a more suitable shape.
Loud roar at revs
If a vehicle's exhaust system loses its seal, it cannot effectively reduce the volume of exhaust emissions. In this case, the exhaust often takes on a “pseudo-sports” sound. Therefore, if the muffler growls, you should look for a gap in it. It can be on the muffler body or on the pipes. It makes sense to check the connections and their fastenings. If the metal from which the muffler is made is of low quality, the exhaust pipe may burn out due to temperature. Time, corrosion and the quality of domestic roads cause damage to the exhaust system.
Pressure and temperature can cause holes
A burnt or broken muffler is easiest to replace. If depressurization occurs at the joints, you can limit yourself to replacing the sealing ring and the necessary fasteners.
Exhaust system
Exhaust gases are discharged from the engine through exhaust pipe 1, Figure 22, of the muffler with neutralizer assembly, additional muffler 8 and main muffler 10. A sealing gasket 20 is installed between the flanges of the exhaust pipe and the additional muffler. There is a vibration compensator on the pipe of the additional muffler. The pipes of the main and additional mufflers are connected to each other by flared ends using a clamp 13 with an intermediate ring 14. The gas exhaust system is attached to the car body using muffler suspension cushions 9 and 11.
Figure 22 — Exhaust system:
- muffler intake pipe with neutralizer assembly
- washer 8
- M8 nut
- oxygen concentration sensor
- exhaust pipe bracket clamp
- washer 8
- M8 nut
- additional muffler
- muffler suspension cushion
- main muffler
- muffler suspension cushion
- bolt M8x65
- connecting clamp
- ring sealing
- washer 8
- M8 nut
- muffler mounting nut
- locking plate for the nuts securing the exhaust pipe of the muffler
- lower exhaust pipe screen
- muffler flange gasket
- bolt M8x16
- spring washer 8
- washer 8
- exhaust pipe bracket assembly
- gas pipeline laying assembly
Removal
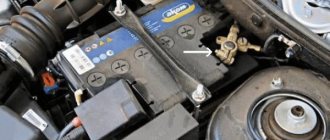
Place the vehicle on a lift and apply the parking brake. Open the hood and disconnect the negative terminal from the battery (electrohydraulic lift type PV-3-T-SP, lifting capacity 3 tons, wrench 10).
Disconnect the sensor harness connectors 4, Figure 22, oxygen concentration.
Unscrew the upper oxygen sensor on the exhaust pipe 1 of the muffler with the neutralizer assembly (wrench 22).
Raise the car to a height convenient for work, unscrew two nuts 16 bolts 12 of the clamp 13 connecting the main muffler with the additional one, remove the clamp and sealing ring 14 (ring wrench 13, wrench 13).
Remove the muffler suspension cushion 9 from the front bracket of the main muffler and remove the main muffler 10 (using a flat-head screwdriver).
Unlock and unscrew three nuts 4, Figure 23, of the studs securing the additional muffler 5 to the exhaust pipe 1 with the neutralizer assembly, remove the nut locking plate and the lower exhaust pipe shield 2 of the muffler (flat screwdriver, replaceable head 13, extension and ratchet wrench).
Replacing a part at a service center
When replacing a muffler, you need to be especially careful, since there are many types of the device depending on the car model. The desired option is selected in accordance with the dimensions and mounting locations. If problems arise during independent work or you are not confident enough in your actions, it is better to replace the device at a service center. To do this, you will need to prepare a certain amount of money.
Replacing the muffler is a simple operation. Its price should be appropriate - no more than 1500-2000 rubles (excluding the cost of the device itself). If the cost exceeds this threshold, it may be a scam. But if they ask for 200 rubles for the work, you shouldn’t expect high-quality repairs.
The resonator may need to be replaced. The resonator is the second important part of the muffler. It performs the same functions as the main muffler, but additionally protects the device from sparks and flames. In case of malfunctions, it must be urgently replaced.
Replacing the Lada Kalina resonator is done in exactly the same way as replacing the muffler. If problems occur, it is better to contact the service center.
Important points when replacing the resonator
We do not recommend delaying the replacement of the resonator, since its role in the exhaust system is quite important, and the cost is not capable of causing a financial fiasco for the owner of the LADA Kalina (1-4 thousand rubles).
Despite the insufficiently impressive number of resonator offers on the market, finding a truly high-quality product is very difficult. Let us remind you that for LADA Kalina sedan or station wagon, resonators are offered with a corrugated component. We recommend choosing a product made of stainless steel.
Experts recommend replacing the resonator every 20 thousand km. As a rule, at this point the product exhibits operational problems associated with the beginning of unwanted low-frequency sounds entering the cabin. And if everything starts up, then the muffler will need to be replaced.
Now we warn owners against the temptation to purchase cheap options of dubious origin. Such resonators can upset after 1000-1200 km.
Main malfunctions and the order of work to replace the muffler
The main malfunctions of Lada Kalina mufflers include:
- muffler corrugation burnout;
- catalyst malfunctions;
- gasket burnout;
- breakage of rubber fasteners, etc.
However, the main and defining defect remains muffler burnout. Therefore, we will study the issue of replacing the Lada Kalina muffler with our own hands, having previously prepared plumbing tools and the car itself for this. When preparing a vehicle for repair, we select a platform without slopes and install the car in the parking brake mode and first gear engaged.
The order of work when dismantling the muffler on the Lada Kalina:
- Having prepared the necessary tools for the repair, we dismantle the clamp that tightens the muffler pipe at the junction with the resonator. This operation is carried out using a pair of keys set to “13”; for convenience, you can select a head with a knob and a ring wrench.
- It happens that the nuts securing the plug are stuck to the base and are very difficult to unscrew even with the help of special liquids. When there is no longer any hope of safely dismantling the product, it is easier to prepare new fasteners, and the old nuts must be cut off with a grinder.
- After dismantling the tightening clamp, it is necessary to apply several gentle blows with a mechanic’s hammer along the circumference of the muffler bend to facilitate complete removal of the product. After this, use your hands to press the muffler in the direction opposite to the direction of travel of the vehicle.
- Then remove the rubber fasteners on the sides of the product.
- We dismantle the “glushak”, set the unusable part aside and install a new part, and do everything according to the “reverse” principle.
The technological operation takes only a couple of hours, after which the car is ready for use again.
Typically, mufflers can withstand quite a long service life. In my memory, there were many cars, and almost all of them had the same muffler service life. For example, on the Twelfth we replaced it at about 50,000 km, and on the Seven the resonator recently burned out when the mileage was 60,000 km. So far I have driven a little more than 40 thousand on Kalina, but thank God, so far everything is fine and there are no signs of burnout.
I’ll say right away that I didn’t want to remove and put it back using Kalina as an example, I’ll just show from previous experience how this procedure is performed, but with photographs using the example of my station wagon. I’ll just show you clearly what needs to be removed and unscrewed and where.
So, to perform this repair, you will need:
- WD-40 lubricant or its analogues, such as all kinds of liquid wrenches
- Keys size 13, preferably a socket and a head with a knob
- Hammer (may not always be needed)
First, I’ll show you where the clamp connecting the resonator and muffler is located, since it is this that will need to be unscrewed.
First of all, be sure to apply lubricant to the bolts and nuts securing the clamp, since they stick thoroughly and in some cases it is simply impossible to unscrew it. After 10 minutes, unscrew the nuts. On one side you can completely, and the other just slightly unscrew.
After this, we move the clamp to the side and now you can knock it off the junction with the resonator with small knocks on the bend of the muffler. Often there are no problems with this step and it can be easily knocked down or even removed without any extra effort.
After this, you need to free the muffler from the fasteners and remove it from the rubber bands that hold it. There are two of them in total. The first is located near the rear beam. Shown more clearly in the photo below:
And the second is in the back of the car, almost at the exhaust pipe. Its location is also shown in the picture:
After these steps, you can safely and without any obstacles remove the muffler and replace it with a new one. Installation occurs in the reverse order of removal. The price of this part in auto parts stores is approximately 1050 rubles.
Replacing the cabin filter and oil
For dismantling you will need a set of screwdrivers and a TORX wrench. First, pry off the plug, then unscrew the bolts. The hood is opened and the grille is removed. The cabin filter is located under the grille. The lid slides to the right and the filter is removed.
If necessary, clean the seat with a vacuum cleaner. Install the new filter by performing the steps in reverse order. It will take no more than 20 minutes to dismantle and replace this part. Upon completion of the repair work, turn on the heating unit. Foreign odors should disappear.
An equally important process is changing the oil in the Lada Kalina engine yourself. This process is carried out using a 17 key. For engines of 1.6 and 1.4 volume, about 3.5 liters of new oil will be required. First, open the hood of the vehicle. Then unscrew the filler cap. This is necessary to depressurize the corresponding system. Under the car body there is a drain plug, which must be unscrewed using a 17 key. A container is installed under the car into which the waste substance will drain.
Oil level control
The next step involves removing the oil filter. It must be removed carefully, placing some container under it. Then enough oil is poured into the new unit to keep it full. If the waste liquid leaves the system, you can tighten the drain plug. Install a new filter. After pouring oil into the system, check the fluid level. A probe is used for this. If necessary, add liquid. The process of changing the oil and the corresponding filter on Kalina takes 30 minutes. Upon completion, you need to start the engine and wait until the oil sensor lamp goes out.
Do-it-yourself repair of a Lada Kalina car is also required due to the uncomfortable interior. In this case, the trim is replaced and the vehicle is tuned. To eliminate creaking and engine noise in the cabin, you will need to lubricate the doors and check the engine's performance. It is a rigid structure, so to improve or replace it, you will need a car repair manual.
Technical features of the insert for Lada Kalina 8V
The industry offers two types of tuning inserts, the design of each of them depends on the location of the pipes. Moreover, each design is designed for a specific power unit:
- Insert 4-1 is installed on forced engines with a speed range from 5,000 to 10,000 rpm. structurally suitable only for 16-valve engines.
- The 4-2-1 insert operates over a wider range and is considered a "low-end" insert. It is possible to increase engine power by about 3-5%. This is the model most often installed on the VAZ 1118.
Since it will not be possible to install a preliminary flame arrester , you will have to carefully approach the issue of choosing an insert. The installation process of the part will not take much time if you follow all the recommendations.
Muffler replacement process
It is necessary to prepare the car for work, for this we select a flat area, and then simply put the handbrake on and engage first gear. The procedure for carrying out operations when removing the muffler on Grant:
- Using a mechanic's tool, remove the tightening clamp located between the muffler and the resonator. To remove the clamp, you need to have two “13” wrenches in stock; for convenience, we use a head with a wrench and a “13” socket-type wrench. It should be noted that the muffler fasteners are located in a zone of thermally unstable temperatures; they are periodically subject to heating and cooling. Therefore, unscrewing such fasteners can sometimes be quite a difficult undertaking.
- After releasing the clamp from the two fasteners, it is necessary to move the Lada Granta muffler in the direction of the exhaust gas outlet, having previously tapped the bend of the product with a plumber's hammer.
- Next, we unfasten the muffler one by one from the rubber hangers with which it is attracted and fixed to the bottom of the car.
- We remove the muffler from the car and put it to the side, because it is necessary to install a new damper.
Installation of a new product is carried out in the reverse order.
"Doctor Muffler" - urgent and inexpensive repair of the Lada Granta muffler in St. Petersburg. Low prices for Lada Granta repairs, 1 year warranty on work, 6 services in St. Petersburg!
- repair of mufflers, or complete replacement of the resonator and main muffler of the Lada Granta using the manufacturer’s technology. This is determined by exhaust system diagnostics.
- catalyst repair: replacement with an original, alternative, or even a universal catalyst. If necessary, we install and replace the lambda probe. For “older” Lada Granta cars, we offer an effective replacement of the catalyst with a flame arrester. In this case, for proper operation of the exhaust system, a lambda probe is installed.
- Replacing the corrugation: the corrugation cannot be repaired, but replacing it with the original or even tuning the corrugation will significantly reduce the vibrations of the exhaust system. When installing the corrugation, the muffler catalyst and exhaust pipe must be diagnosed. If necessary, repair the leaking manifold, replace the muffler gaskets.
- For lovers of a spectacular exterior and a noble “roar”, within the permissible sound level, we offer muffler tuning: exhaust pipe routing, direct-flow mufflers, nozzles.
Model range Lada Granta
How to replace the Lada Kalina muffler with your own hands
Before we talk about replacing the muffler, you need to choose the right model. The device is matched to the car body. At the same time, it is best to purchase “Glushak” not at car markets, but in specialized stores. You can buy a model on the market for 500 rubles, but it is unlikely to last long. When in a car shop you can pick up an aluminum or stainless steel muffler housing for 1000–1500 rubles and be sure of its long service life. Typically, original exhaust system elements last for 50 thousand kilometers.
To successfully complete all procedures, it is best to immediately prepare the following tools:
- WD-40 lubricant;
- two open-end wrenches for 13;
- hammer;
- flat blade screwdriver.
Dismantling procedure
Removing the resonator and plug can be considered the most labor-intensive part of the entire replacement procedure. The complexity is determined by the fact that it can be very difficult to disconnect the elements of the exhaust system from each other:
- The first step is to jack up the rear of the car or drive it into a hole.
- Then you will need to find the connecting clamp that connects the muffler and the resonator. It will be difficult to remove the clamp, since the bolted connections stick to the metal structures due to constant heating.
- It is best to first lubricate all connections with lubricating fluid and then proceed with removal.
- After dismantling the resonator, you need to remove the muffler itself.
- It is usually easily removed, since it is attached to the bottom of the car using rubber hangers.
It is recommended to immediately remove all stickers and wrapping from a new product.
Therefore, removing the muffler may take about 20-30 minutes, depending on how difficult it is to remove the resonator bolts. In this case, all connecting elements and seals must also be removed - their further use on the new device is impossible.
How to change seals, rubber bands and corrugation
There are usually no problems when it comes to changing o-rings and rubber bands on the muffler. All components can be purchased along with the device and rubber bands can be put on in place of the old ones.
The rubber band for the silencer is inexpensive and can be changed in a minute.
Replacing the corrugation is considered a more complex procedure. In addition, the car owner does not always have a welding machine at hand and knows how to operate it.
To change the corrugation on a still working muffler, you must perform the following steps:
- Using a grinder, cut off the remnants of the old corrugation (of course, the muffler will need to be removed before doing this).
- On the new corrugation, neat cuts are made in those places to which the pipes will be joined.
- The corrugation is pulled into place and must be fixed on both sides with clamps.
- “Glushak” is installed under the bottom.
This simplified method of replacing the corrugation is considered quite practical, although, of course, welding work would make the replacement more durable.
Corrugation element increases muffler service life
Finalization of the resonator
Lada kalina
Problem
: secure the resonator partitions.
- Cut out two windows at the bottom of the resonator using a grinder (white dotted lines). The size of the window may vary depending on the nozzle of the welding machine.
- Weld the partition to the resonator body and the pipe to the partition (red lines). It is not necessary to weld along the entire perimeter; it is enough to make good points (at least 10 mm).
More details on the video:
The price for such a modification at a service station is about 1,000 rubles. After such an upgrade, resonator chatter will no longer appear.
Let us remind you that another reason for the appearance of extraneous noise in the exhaust system of a car can be the muffler corrugation. You can get rid of this hum with a simple modification.
The resonator usually burns out second after the muffler, if we consider the timing of replacement of these exhaust system parts. And for Grants this rule will not be an exception; first, the muffler is usually replaced, after 3-5 years, depending on the mileage of the car, and then it’s time for the resonator, since its metal is also not eternal.
Muffler replacement
The exhaust system operates under conditions of high humidity and constant heat load, as a result of which metal elements are eaten away by rust. Usually, after 2-3 years of operation, even a high-quality unit is not able to perform its task, and the noise in the cabin increases sharply. The strong roar of the engine creates discomfort for the driver and passengers, so the problem must be solved immediately.
Welding work is not the best option. After such repairs, the muffler will not last long. It is better to replace it with a new one as soon as the first signs of malfunction are noticeable. In addition to loss of power and roaring exhaust pipe, this could be knocking on the underbody or fuel tank.
To ensure correct installation of the unit in its original place, it is better to contact a service center or sports tuning company for dismantling and replacement. Removing and installing a resonator (muffler) in car services costs 550-2000 rubles, the exhaust pipe - from 1000 rubles.
Which muffler should I put on the Priora?
The need to repair the exhaust system arises for any car. The action of high temperatures, high humidity, reagents and salt on the roads in winter, all this leads to the destruction of the metal from which the exhaust parts are made. Let's take a closer look at the questions: which muffler to buy for a Priora (VAZ 2170 - VAZ 2172), which resonator to install on a Priora, how many parts does a muffler on a Priora consist of, and how much does the exhaust system on a Priora cost in current realities?
There are options for cheap Ukrainian-made mufflers, there are spare parts that are more expensive than foreign ones, and you can install a direct-flow (sports) exhaust. If you are faced with the problem of repairing the exhaust, we will look at how to replace the muffler on a Priora below in various possible variations.
What parts does the Priora exhaust system consist of?
The exhaust system of a Priora car (VAZ 2170 - VAZ 2172) consists of the following components:
collector pipe: as standard, it has a catalyst or particulate filter, which allows it to meet the environmental safety requirements of the car Euro - 3, and later, in the latest models, Euro - 4; the collector is connected through flanges to the resonator
The resonator is equipped with an integrated corrugation, which allows you to reduce the level of vibration in the exhaust, this is important for Priora; the resonator is connected to the muffler through a clamp, this allows you to quickly remove the Priora muffler if it needs to be replaced; from the rear of the car, from the outside, you can see the muffler exhaust pipe, which many motorists decorate with an aesthetic nozzle; all the main components of the Priora exhaust system are connected using pipes into a single, closed and sealed system.. It has become quite common to replace the manifold with catalyst with a regular spider (exhaust pipe) familiar to classic VAZs.
In this case, environmental standards are not complied with absolutely, but the catalyst does not “strangle” the engine. By reflashing the electronics, you get an increase in power and better vehicle dynamics at certain engine operating modes
It has become quite common to replace the manifold with a catalyst with a regular spider (exhaust pipe) familiar to the classic VAZ. In this case, environmental standards are not complied with absolutely, but the catalyst does not “strangle” the engine. By reflashing the electronics, you get an increase in power and better vehicle dynamics at certain engine operating modes.
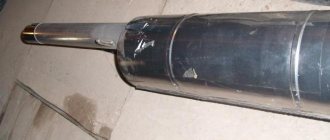
A method for making a muffler for a car yourself
To make a homemade device, you will need an outdated automotive powder fire extinguisher. This model of a homemade muffler is not only effective, but has also been tested many times, so it deserves attention. For work, in addition to a fire extinguisher, you will need the following materials and tools:
- two-inch (inner diameter) steel pipe or two sections of it;
- some elements of the old muffler;
- electric welding machine;
- welding electrodes (1.5-2.5 mm);
- small grinder with cutting wheels for metal.
Further work is carried out in this order:
- The head of the fire extinguisher is turned away and the remaining powder is poured out. The hole is expanded to such a size that the prepared pipe fits tightly enough.
- On the other side of the cylinder you need to prepare the same hole, but shifted towards the wall of the fire extinguisher.
- On the final sections of pipes (12-15 cm), those that will be located inside, round holes or through cuts should be made using a grinder.
- The prepared sections are inserted into the cylinder. In this case, it is calculated that the perforated areas are approximately in the center and opposite each other. We weld the connections on both sides of the cylinder in a circle, being careful not to burn through the metal of the fire extinguisher.
- We cut off the fastening devices from the used muffler and weld them onto a homemade product, calculating and marking with chalk the place of attachment to the car.
- To check the reliability and tightness of the welds, you can plug one of the pipes with a reliable plug, turn it over and fill it with water. There should not be even minimal leaks.
- After draining the water and blowing the product with a compressor (to completely remove any remaining liquid), you can install a self-made muffler on the car.
A plugged tube is welded into the fire extinguisher; it has 70 holes with a diameter of 5 mm. In this way, spending a minimum of resources and a little time, you can solve the problem of how to make a muffler with your own hands. A car equipped with such a reliable device will operate more quietly, and you will not have to spend money on purchasing a new exhaust system every year.
Recently, more and more car enthusiasts are making and repairing mufflers with their own hands. But why are they trying to do it themselves if the car markets are overflowing with a wide range of spare parts? It all comes down to cost. Cost is the main barrier for car owners. Therefore, today we will look at how to make a VAZ muffler with your own hands.
Downloading a book
After successfully completing the payment (by any method) and returning to the KrutilVertel store from the payment system website, you will be taken to the successful payment page:
The book you purchased will be in your personal account, from where you can always download it.
Please note that after making the payment, you need to return back from the payment system website to the KrutilVertel website. If for some reason you did not return back to the site and closed the payment system tab with a message about the successful completion of the payment, please let us know - we will send you a letter indicating access to download the book
If for some reason you did not return back to the site and closed the payment system tab with a message about the successful completion of the payment, please let us know - we will send you a letter indicating access to download the book.
Muffler replacement process
So, in order to replace the muffler on Kalina, you will need tools, namely: a 13mm wrench or socket and VD-40. Now that everything is prepared, you can proceed directly to the repair:
- We drive the car onto a pit, overpass or lift.
- We find the clamp of the middle part of the exhaust system and muffler.
- Using 2 13mm wrenches, unscrew the bolts that hold the clamp.
- We dismantle the clamp and disconnect the pipes.
- Remove the muffler from the 2 rubber mounts.
- Carefully pull out the pipe.
- Assembly is carried out in reverse order.
Now the new muffler is installed, and you can enjoy a quiet and silent ride.
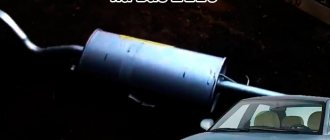
Comparison of a used muffler and a new one for Kalina
Reasons for failure
There are not many reasons for the failure of a viburnum muffler, but every owner needs to know them. So, let's look at the main ones:
- Damage to the element structure due to corrosion damage.
- Rupture or deformation of the muffler after an accident.
- Damage to the lower part of the muffler due to collision with an obstacle.
These are all the main reasons that contribute to the fact that the unit requires replacement.
The result of the work
In order for the muffler to last a couple of thousand km longer, before installation it is necessary to fill it with a special liquid that prevents corrosion from forming. The muffler must be twisted in different directions so that the liquid completely lubricates the internal space.
As a result of replacing the muffler, the sound of a running engine will not frighten passers-by, alarm drivers or infuriate traffic police inspectors. And comfort.
Replacing a muffler on a Kalina is a routine procedure. On average, it lasts 2-3 years, after which it becomes unusable - it either burns out or rots. Our mufflers are often made from ordinary iron, which is susceptible to corrosion. Plus, constant condensation and high temperature accelerate this process.
Let's take a closer look at how to replace the muffler on the Lada Kalina. My muffler was “dying” slowly, but, as they say, surely. First, the lower shell completely rotted away, then the knee completely fell off - it simply rotted away at the site of the weld. The muffler was left hanging idle.
From personal experience I will say that you can change the muffler without an inspection hole or jacking up the car. We lay down the bedding in the area of the rear left door, lie down and get excellent access to the clamp. Also, if desired, you can reach the far fastening rubber band. The main muffler (11.61) is attached to the additional muffler (11.60) with a clamp. We need to unscrew it. To do this you will need 2 13mm wrenches (preferably with a ratchet). To simplify the unscrewing procedure, first moisten the nuts with a bucket.
After removing the clamp, you can remove the muffler itself. The muffler on Kalina is suspended on 2 suspensions. You need to remove both hooks from the elastic bands one by one. If it becomes difficult to get out, you can help yourself with a screwdriver.
Now you need to install the new muffler in reverse order. First we hang it on the hangers, then put on the clamp. Don’t forget to knock out the O-ring from the old muffler, which is inserted at the joints of the 2 muffler pipes.
Before tightening the clamp, make sure that the muffler hangs level and does not touch the bottom of the car with its knee. The clamp must be tightened at an angle of 45 degrees.
This is how you can easily replace the muffler on Kalina. Moreover, you can do this with your own hands, even in the field.
Possible faults
The following signs indicate a muffler failure:
- a growling sound is heard from the engine;
- Exhaust gases enter the vehicle interior.
The main reasons for the malfunction of the Kalina-Universal muffler:
- water entering the muffler structure, which in the future leads to corrosion;
- the appearance of condensation due to sudden temperature fluctuations;
- mechanical damage to the part;
- disruption of connections due to car shaking on the roads;
- muffler burnout.
When breakdowns occur, a problem arises - replacement of the part or repair? In any case, action should be taken
If this is not done, the powerful roar of the car will disturb others and attract the attention of State Traffic Inspectorate workers.
Mufflers VAZ 2108-2115 (Lada Samara)
Lada Samara can be roughly divided into 2 generations:
- VAZ 2108-21099 – first generation
- VAZ 2113-2115 – second generation
- With the first generation everything is simple. The chisel in the hatchback body is equipped with a VAZ 2108, 2109 muffler, and in the sedan body there is a VAZ 21099 muffler.
In the second generation of Lada Samara, there is also a principle of division into 2 body types: hatchback - muffler VAZ 2113, 2114 and sedan - muffler VAZ 2115. But in each type there are 2 more subtypes: new
and old style
. I’ll say right away that in terms of interchangeability, they are absolutely the same.
In old-style mufflers, the exhaust pipe has an additional pipe bend; in new-style mufflers there is no such bend. Why was the extra bend removed? Perhaps in order to reduce the cost of production. Why it was there in the first place, unfortunately, is unknown to me.
As for the interchangeability of the first and second generation Lada Samara mufflers, both generations are completely identical in terms of fastenings. But if you buy a cheaper muffler from the first generation to install it on the second, you will have to bend the tail of the exhaust pipe. If you are going to do the opposite, then you are an extraordinary person, and on your car the muffler from the second generation will look ridiculously extraordinary.