Carrying out replacement work yourself
Before replacing the lamp, a number of preparatory operations are required. In particular, during the work you will need:
- the lamps themselves (one or two);
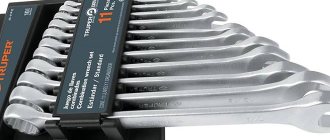
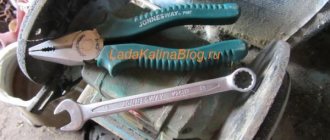
- hand tools (set of wrenches, pliers, screwdrivers);
- thin, clean work gloves;
- a bottle of alcohol or vodka and a piece of clean cloth.
The car itself should also be prepared before changing the lamp.
It needs to be installed on a level area with the handbrake on, and chocks placed under the wheels to prevent possible rolling of the car.
The car, of course, must be turned off.
When all operations have been completed, you can open the hood and disconnect the power from the negative terminal of the battery. This is done to prevent a short circuit from occurring. When low beam, in this case it will be necessary to dismantle the headlight washer reservoir.
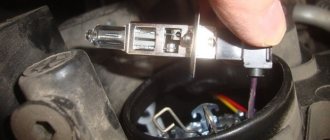
The lamp can be changed with or without removing the headlight from the car. When you decide not to remove the entire block, you first need to pull any petal of the rubber plug that secures the lamp in the headlight. The order in which the wires fit to the lamp must be remembered or sketched. Next, you need to carefully remove the spring clamp of the lamp itself by pressing on it and disengaging it. This must be done carefully, otherwise it may fall into the lighting fixture itself, which will entail dismantling the entire headlight unit. The lamp that requires replacement must be removed and a new one put in its place.
Installation of a new lamp must be carried out with gloves, otherwise the grease marks that will remain on the lighting device will reduce its service life. When contact does occur, the lamp must be wiped with a cloth soaked in an alcohol solution. The remaining operations to replace the lamp are carried out in the reverse order of disassembly.
When the assembly is completed, you can start the car and check the functionality of the low beam.
Recently I encountered a problem. When I turned on the low beam at night, I was surprised to find that it was simply not there. Before that, I traveled to Russia, where it is mandatory to turn on the lights during the daytime. Therefore, when the low beam disappeared and what caused it, I did not know.
The electrical circuit for turning on the low beam in Kalina is extremely simple. Along the path of electric current from the power source (battery or generator) to the low beam bulb there are fuses, a lighting unit, and a low/high beam switch.
The search began with the simplest thing - checking the fuses. They turned out to be fine. After two more causes have been ruled out (the lighting unit and the headlight switch), it is time to check the low beam lamps.
What can I say, this is a very, very inconvenient matter, especially if you are doing it for the first time and do not know all the design subtleties.
IMPORTANT! Everything stated below is my personal experience. It is not a fact that the technology described is correct. Therefore, the author does not bear any responsibility for any possible damage caused as a result of the actions described below.
I started with the right headlight. In order to get to the lamp, I had to remove the windshield washer fluid reservoir. It turned out to be quite simple. In order to remove the windshield washer reservoir you need to:
- Remove the terminals from the motor contacts (two motors, in the case of a station wagon or hatchback), first remembering how they are connected;
- Unscrew the front bolt securing the tank, which is located above the headlight;
- Loosen the nut that clamps the rear reservoir mount near the shock absorber strut;
- Carefully remove the tank without spilling its contents.
After this we get completely normal access to the headlight.
Procedure for removing the low beam headlight:
- Remove the rubber cover to access the headlight;
- Carefully remove the two headlight power wires, remembering their location;
- Gently press and slightly lift the iron latch;
- After the bracket is removed from the grooves, move it to the side;
- Carefully remove the low beam lamp by the contacts.
The procedure for installing the low beam lamp is reversed. IMPORTANT! Under no circumstances should you touch the glass part of the lamp with your hands, because... When turned on, it will immediately burn out. If this happens, you should thoroughly wipe the glass part of the lamp with alcohol and let it evaporate completely.
Procedure for installing low beam headlights:
- Install the low beam lamp so that its protrusion on the base fits into the corresponding groove on the lampshade, thereby securely fixing it.
- After this, the most difficult part of replacing the lamp is performed - you need to carefully fix the lamp with a latch, falling exactly into the grooves, and you need to make sure that the lamp itself does not rotate in the lampshade. To do this, the latch is wound up a little from the top, then pressed lightly and lowered down.
- If everything went well, you should definitely check the reliability of the lamp so that it is securely held by the latch and does not rotate around its axis.
- Connect the wires, observing polarity;
- Close the hole to access the lamp with a rubber cover;
- Reinstall the windshield washer reservoir, securing it and connecting the wires.
After this, if necessary, you can proceed to replacing the left low beam lamp. Access to this lamp is much worse, because... It is almost impossible to remove the coolant reservoir without draining the antifreeze. Therefore, you have to dodge and act by touch.
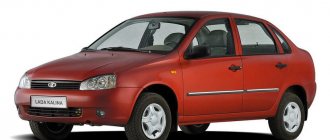
Several years ago, the government approved a law according to which during the daytime it is necessary to drive a car with either low beam headlights or DRLs (daytime running lights). As a result, car low beam lamps began to burn out much more often. The first generation Lada Kalina is no exception. Those who do not want to drive with low beam headlights install daytime running lights. Kalina 1, unlike the second generation model, does not have DRLs, so you have to drive with low beam headlights. From our instructions you will learn how to replace the lamps in the front headlight unit, as well as the reasons why these lamps may not work.
The lamp is not fixed
But then other problems arose. There are latches on the base that help it stay in the socket and not fall out. They are also located as on a glass light bulb. But when you insert it into the cartridge, then, apparently, the contacts are not pressed somewhere. The lamp for Kalina 2 only worked for daytime running lights; it did not light up on the side lights. It is not clear what this is connected with.
When you start to pull it out with the lights on, somewhere at the end it lights up. You insert it back - there is no contact, it’s unclear.
How to tune Lada Vesta headlights?
The latches are slightly different, and this is enough to prevent contact. You can, of course, sharpen, adjust and ensure that everything functions as expected. But somehow I don’t want to buy new light bulbs and then tinker with them and redo them.
How to connect a DVR in a car with your own hands?
This lamp for Kalina 2, as well as for Granta in DRL mode, works well, the light is bright. But they don’t work without soldering - they don’t have the same polarity as standard light bulbs. You need to take this into account, resolder it, and everything will be fine. I'm happy with the LEDs, except for the base. Was it really impossible to do a normal fixation? After all, now Chinese goods are not all bad - many good things can be ordered from China for your car.
Lada K alina 2 . REPLACING LAMPS - PART 2
To replace the turn signal lamp
do the following.
1. Open the hood and place it on the stop.
5. Install a new turn signal lamp into the headlight unit.
To replace the side light bulb and daytime running light bulb
do the following.
4. Install a new side light and daytime running light bulb into the headlight unit. To replace the fog lamp bulb, perform the following steps.
Replacement of left headlight bulb shown
. The lamp in the right headlight is replaced in the same way.
1. Remove the front fender liner (Removing and installing mud flaps and wheel liners”, p. 246).
USEFUL ADVICE The fender liner does not need to be completely removed; just unscrew the screws of its front fastening and bend the edge of the fender liner enough to gain access to the lamp.
6. Install the new lamp in the reverse order of removal.
To replace a rear light bulb
perform the following operations. The work is shown using the example of a turn signal lamp; other lamps are replaced in the same way.
4. Install the new lamp into the taillight and all removed parts in the reverse order of removal.
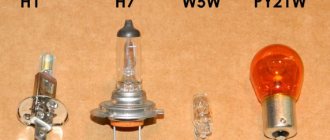
Any electric lamp, excluding xenon, contains an incandescent filament in its design. This filament burns out over time, and the lamp has to be replaced. The text lists the types of lamps installed in optics, as well as in the illumination modules of Kalina-2 cars (VAZ-2192/2194). For station wagon and hatchback, the kits are slightly different.
Before you start repairs
Before changing the low beam lamp on Kalina, you need to check the integrity of the on-board network:
- When understanding the causes of failure of any component of electrical equipment, you should first make sure:
- the fuse is in good working order;
- look at the circuit connectors, which should be well secured;
- Often the causes of electrical equipment malfunctions are the oxidized ends of the pads; their terminals should be cleaned.
- Take a good look at the places where the car is connected to ground. Often, due to the lack of reliable fastening, disturbances in the functioning of electrical equipment occur, so replacing low beam lamps on Kalina may not always help with the problem.
- the equipment will help to find faulty places in the electrical circuit;
- is a combined electrical measuring device.
There are several types of such devices:
- digital, equipped with a liquid crystal display;
- analog;
- universal models, characterized by the presence of a liquid crystal screen and a dial indicator.
Multimeter
During repairs, we recommend using a digital device (in other words, a multimeter), which is small in size.
To check de-energized circuits, the device should be switched to ohmmeter mode:
- if you need to measure very low resistance (for example, within a few Ohms), you should enter a clarification - from the obtained indicator we subtract the internal resistance, the electrical resistance of the probes and multimeter wires (within 0.07 Ohms);
- to determine a more accurate value, the device is switched to the mode for measuring low resistance values (up to two hundred Ohms), then the ends of the probes should be short-circuited.
To check live circuits, the multimeter should be switched to voltmeter mode (the limits of permissible measurements are up to twenty volts). The device is capable of measuring the current consumed by electrical equipment of vehicles (up to ten amperes).
In cases where the task is to find out whether or not there is voltage in a certain section of the circuit, without resorting to measuring the value, you can use a special indicator light designed for twelve volts. You can also use a test lamp.
You can make it yourself:
- you will need a car lamp with a power of up to 4 W;
- take 2 two wires, the length of which is from 500 mm;
- solder them to the lamp.
The car is equipped with 2 headlights, in which halogen lamps are mounted. There are two screws on each to adjust the light beam. They make it possible to change its direction in the vertical and horizontal planes.
Adjusting the headlight beam
Correctly adjusting headlights can only be done in a service station. However, let's look at how this operation is performed by experienced craftsmen.
Kalina-2 block headlight, correct adjustment of the beam direction
There are two adjustment screws on the back wall of the unit called the headlight unit. The first of them, located closer to the radiator, allows you to deflect the light beam “up and down”, and the “horizontal” direction is adjusted with the second screw. Ideally, this should happen: when the car is 5 meters from the screen, the border of the light spot touches line “2” (see figure). Line “1” is spaced from the ground at a distance equal to the height of the centers of the headlights. The second line is drawn 65 mm lower.
When making adjustments, the corrector switch is moved to position “0”. Of course, you only need to turn on the low beam. We also note that the headlights are adjusted one by one (the “excess” light source is covered with a cloth).
Here are a couple more tips that will be useful:
- The centers of the beams should be on lines AE, BE;
- Line “0” has the following meaning: it intersects with line “1” at one point, so the border of the spot should pass exactly through this point;
- The caps of the plastic adjustment screws are compatible with a hex screwdriver. However, a Phillips screwdriver will also work.
Instructions for replacing lamps on Kalina 2
Low beam
Carefully remove the rubber boot from the low beam (it is larger in size)
Disconnect the block from the lamp
Next, press the spring clamp and remove it from the clamps to the side and move it away
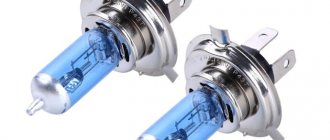
We remove the burnt out one and install a new lamp. The H7 Osram lamp is installed from the factory; if you want to install brighter lamps, you can choose the Philips H7 +30.
We reassemble in reverse order.
High beam
Remove the rubber boot from the high beam
Disconnect the block from the lamp (Only the + wire is attached to the lamp)
Press the spring clamp of the lamp and move it to the side
We take out the old lamp and install a new one. Be careful when installing, it can only be installed in one position.
We also perform assembly in reverse order.
Replacing DRL lamps
Take the cartridge and turn it counterclockwise.
Next, remove the socket from the socket, take out the old lamp and install a new one. Toshiba lamps are installed from the factory; it is impossible to buy them in retail stores, so we choose an analogue.
Replacing the turn signal lamp (PY21W)
- turn lamp socket 4 towards you until it stops;
- remove the lamp socket from the headlight housing;
- press and turn the lamp counterclockwise until it stops;
- remove the lamp from the socket.
Installing a new lamp is carried out in the reverse order.
By the way, do you know that the mode of operation of the low and high beam headlights may differ depending on the configuration of the Kalina 2?
The daytime running light bulbs have burned out. They served for 2.5 years, I think this is a good period. For comparison, I have already changed the low beam several times. It so happened that 2 lamps burned out with an interval of a week. So, I bought 2 Philips W21/5W W3x16d (12V 21/5W) light bulbs for 115 rubles each. The right lamp is much easier to change than the left one, since the ABS control unit does not interfere there.
Replacing low beam lamps with your own hands
Changing them in headlights is one of the simplest procedures, which is quite accessible to a beginner. The only thing that needs to be taken into account are some nuances. They depend on the modification of the car.
Instructions for replacing low beam in Kalina 1
Changing such a part is very simple. First you need to open the hood and turn off the power to the on-board network by disconnecting the terminals from the battery. To make it easier to change, it is recommended to dismantle and move the reservoir with windshield washer fluid to the right. Next, you need to remove the protective cover of the headlight and pull out the desired lamp. To remove it, just slightly squeeze the latch and then remove the terminal.
When installing a new lamp, do not touch it with your fingers. Otherwise, greasy marks will cause a decrease in resource. If this happens, you can wipe the glass flask with alcohol.
Replacement in Kalina 2
Everything is simple here too. It is enough to remove the rubber boot and disconnect the terminal from the lamp contacts, then press the latch and remove the lamp. Installation is carried out in reverse order.
Installation of LEDs in headlights (DRL) Kalina 2
| According to the new rules, AvtoVAZ began installing daytime running lights (DRLs) on the latest cars. Kalina 2 also has DRLs, and they have regular lamps installed. Do you know how to install diodes in DRLs? |
Have you decided to buy LED lamps for Kalina 2? Don’t rush into buying, but first find out what pinout the DRL base has. If you install 2 diodes in Kalina that have the wrong pinout, then the fuse will blow.
Pinout (diagram) of the DRL base of the new Kalina:
Currently, LEDs are sold on the market that have pinouts that are not suitable for Kalina 2:
LEDs for Kalina 2 are marked W21/5W, P27/7W (3157, 7443), abbreviated SRCK and have the following pinout:
Thus, in order to install LEDs in Kalina 2 headlights, you need to buy suitable diodes, or modify those that are not suitable, for this:
- We find the plus on the LED lamp (we connect the battery to the pluses and minuses of the lamp, if it is correct, it will light up, if not, it will not light up).
- We do not touch end No. 2, but bend end No. 1 so that it does not come into contact with the others, and extend it (gray in the photo).
- We connect ends No. 3,4 on the other side together.
- We install a modified LED lamp in the Kalina 2 DRL.
As a result, the diodes in the Kalina 2 DRLs look like this:
By the way, do you know how the headlights of the VAZ 2192 shine compared to the VAZ 1119?
Photo source:
Keywords:
Similar materials
xn—-8sbabr6ahc3e.xn--p1ai
How the work is carried out
Let's figure out how to replace the low beam light bulb on Kalina with your own hands, the process is quite simple and, by and large, does not require any special devices, you only need your hands. But still, the tool may be needed at the preparation stage.
Preparation
It is important to ensure a comfortable and safe working environment, so remember the following:
- The work can be done anywhere - even in the yard near the house, but it is advisable to go to the garage. There you can not be afraid of precipitation and, if necessary, find this or that tool.
- First of all, the hood is opened and the terminal is removed from the battery. We remind you of this in every review. Therefore, make it a habit to de-energize the system when working with electrical equipment to prevent short circuits and electric shock.
- Further preparation depends on what engine is installed in your car, you need to provide access to the rear of the headlight housing, and for this you need to disconnect the expansion tank on the left, and the options on the right may be different. Therefore, be guided by the situation and decide for yourself. What needs to be removed and what should not be touched.
How to replace the lamps yourself
Changing a light bulb in Kalina yourself is not difficult. The time spent on the work depends on the skill of the driver and the size of the hands. Some owners change light fixtures in 15-20 minutes without removing the headlight, while others suffer for more than an hour and ultimately dismantle the optics.
When replacing, cloth gloves are used. This helps protect the skin on your hands and also prevents contact with the bulb. When touched, fingerprints remain, which heat up when the light is turned on and after a while burn through the thin glass.
During work, the battery terminal is unscrewed to avoid a short circuit, which will lead to burnout of the fuse link in the fuse box.
Far module
Replacing the high beam lamp is easier than in the low beam module, since the cover is located closer to the radiator grille.
To perform the operation you will need:
- Turn off the Kalina engine.
- Open the hood lid.
- Remove the protective boot on the back of the flashlight.
- Carefully disconnect the plastic chip.
- Open the latch.
- Pull out the lamp.
Assembly is carried out in reverse order. When installing the terminal, you need to check the contacts and, if necessary, clean them using a flat-head screwdriver, sandpaper or a special chemical spray.
Low beam
Replacing a low beam lamp on a Lada Kalina depends on the experience of the owner and is divided into two types:
- Without removing the headlight.
- With module dismantling.
Most Kalina owners cannot replace the lamp in the left headlight due to limited space. In this case, you will have to ask a more dexterous friend or dismantle the lighting device yourself for convenience.
To change lamps on installed optics:
- Unscrew the filter housing near the left headlight and move it towards the engine.
- Disconnect the washer motor terminal, remove the screws and move the reservoir to the side.
- Open the light module seals.
- Remove the block with wires.
- Remove the spring clip.
- Remove the part.
Tail lights and lamps
The following elements are used as brake light lamps in Kalina-2: lamps with a P21W socket and a transparent bulb. Replacing such an element will not be difficult.
Brake light bulb, VAZ-2192/2194
The rear turn signals are equipped with the same bulbs as discussed above. Their bulb is colored yellow (type PY21W).
The reversing light in the hatchback is provided by a lamp of the following standard size - R10W. If we talk about the station wagon, they use lamps of a different type - W16W. They do not have a metal base.
These are the reversing lamps
In conclusion, we note the following: the light of the side and fog lights in the rear lights is provided by a combination lamp. Its standard size is P21/4W. Good luck with your choice!
It is important to know! When performing any actions with electrical equipment, you must first disconnect the negative terminal of the battery. The terminal fastening is unscrewed with a 10 mm wrench.
Guide to removing and installing rear lights on Lada Kalina
The second bolt is on the plastic panel at the top, unscrew it completely, since the casing is located under this fastener, and below we take out the piston, which also secures the upholstery. In the photo below these elements are marked with arrows:
This is what it should look like after the work has been done, as shown in the picture below:
Now that we have free access to all fasteners and electrical wiring, we can begin removal. To do this, take a head with a ratchet size 8 and unscrew the three nuts securing the rear light, which are marked with yellow arrows, and immediately insert the rubber seal of the wiring harness inside, marked with an orange arrow in the picture:
Now disconnect the rear light wiring plug by pressing the latches on both sides:
After which you can safely begin to remove the rear light of our Kalina, simply by pulling it from the outside, since nothing else holds it.
We install the rear lights in the reverse order of removal. This manual is suitable for all owners of Kalina in a Station Wagon or Sedan, although for the Hatchback there are no fundamental differences in dismantling, all work is done by analogy - the only difference is in the mounting locations of the headlights themselves.
It may be necessary to remove the rear light of the Lada Kalina 2 in case of its breakdown, replacement of lamps, or for modification and tuning of the light. The process is not complicated and will not take more than 20 minutes.
You will need: an 8" socket wrench.
Procedure for the Lada Kalina 2 hatchback car:
- Open the trunk door and unscrew the 2 bolts securing the light.
- Pull the light back, removing the two clips from the holders on the body.
- Remove the lamp sockets from the lamp body by turning them counterclockwise.
Procedure for the Lada Kalina 2 station wagon:
- Open the hatch in the trunk trim.
- Disconnect the block with the tail light wires.
- Unscrew the 3 fastening nuts.
- Pull the flashlight back, disengaging it from the lock.
- Remove the lamp sockets from the lamp body by turning them counterclockwise.
Connection via 5-pin relay
Now it's time to learn how to connect running lights via a five-pin relay. The scheme is the most universal, and was assembled to eliminate the disadvantages of previous options. First, about connecting the relay for DRLs:
- 30 – to the positive terminals of LED modules;
- 85 – to the positive wire of the side lamp;
- 86 – on the car body;
- 87a – to “+” from the ignition switch;
- 87 – do not connect (isolate).
The circuit with a five-contact relay works as follows. When you turn the key, +12 V is supplied to the DRLs, thereby turning them on. If you turn on the side lights or headlights, the relay will open contact 87a and close inactive contact 87. As a result, the DRLs will go out and the side lights will turn on. The circuit fully complies with the requirements of GOST and traffic regulations and can work with side lights even based on LEDs.
However, the circuit still has one negative point - the DRLs will turn on immediately after turning the ignition switch. That is, if you turn the key in the ignition but do not start the car, the DRLs will light up.
Despite the existing drawback, the circuit is quite successful, but in order to correctly connect the DRL via a five-pin relay, you will need to supplement the circuit with a voltage stabilizer.
This switching option is interesting because the path of current flow through the running lights is independent. This allows you to install light sources of any type and power in headlights and DRLs.
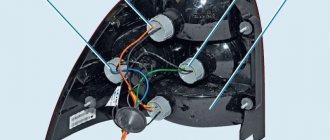
Review of block headlights Lada Kalina 2
Above is a photo of the left headlight, everything on the right is identical. 1 - ventilation tube; 2 — low beam section cover; 3 — cover of the high beam section; 4 — light beam regulator in the vertical plane; 5 — lamp socket for side light and daytime running light; 6 - electrical connector; 7 — regulator of the light beam in the horizontal plane; 8 - turn signal lamp socket
All about Lada Kalina lamps
In our material, we tried to collect the most important information about the lamps that are used in the Lada Kalina model, popular among domestic car enthusiasts. This will primarily be useful to know for those owners who, for various reasons, have to choose and purchase lamps for installation in the lighting fixtures of their cars.
Today, a retail network of goods of the relevant type is able to offer a lot of options for lighting components, where even a professional, not to mention a beginner, can get confused. LED sources are becoming especially popular, considered by the owners of Lada Kalina 2 as an alternative to standard lighting elements.
1.
Let's touch on the headlights.
These devices contain three lamps with different purposes. Let's make a reservation right away: direction indicators don't count.
1.1.
A traditional lamp with an “H1” socket is responsible for the high beam. If there is interest in the LED analogue, then its marking is “4456”. Note that a standard lamp is preferable due to more correct beam formation through the optics reflector.
1.2.
Low beam is provided by using an “H7” type bulb. An analogue is the LED source “3528”. In this case, the halogen device has advantages, since the Chinese LED product is not able to provide the required level of illumination.
1.3.
Side light. There is a light component “W21/5W” here. The source implies a combination of traditional side lights and running lights. In this case, it is very difficult to select similar LED lighting equipment, since its pinout type is “7443” or “3157” (you can get confused).
2.
Stern lighting fixtures.
2.1.
The most common components here for the rear of the Lada Kalina 2 car are brake light sources. These are “P21W” type bulbs. As an analogue for use, let’s use the LED device “1156”. When installing the lamp, you will need to achieve a beam dispersion angle of 360°.
2.2.
Lamps responsible for reverse gear. Their type is "R10W". The products are small-sized and have a similar base as that of the “P21W” sources. They differ only in length. The overall dimensions of the lamp considered here should not exceed 3.75 mm.
Care must be taken when selecting an LED emitter as the alternative "1156" component must meet the specified size limitation.
2.3.
Lamps used for reversing the universal version of the body. Here we have a “W16W” source, which can rightly be considered a baseless analogue of the “P21W” lamp. Would you like to use an LED lamp? Look for the “T15” option with a 360-degree dispersion angle.
2.4.
Side lighting element and daytime running light. Here the manufacturer used a dual “P21/4W” design. The lamp has two filaments and a base identical to the “P21W” device.
Attention! The last one has two contacts! Don't get confused!
If you are interested in the LED option, purchase the “1157” device.
3.
Turn signals.
These important elements of periodic lighting in Lada Kalina 2 are “P21W” lamps. Their flasks are endowed with yellow color. LED analogues are “1156” sources, which have a similar color.
4.
Side repeaters.
Here the manufacturer uses common “W5W” type lamps.
A similar device with LED technology is the “T10” product.
5.
Anti-fog optics.
If you become the owner of a “Luxury” Lada Kalina, you will have to install (when replacing) the well-known “H11” type lamps in the designated headlights.
When the owner of a Lada Kalina likes LED devices, then you should find lamps of a similar type (“H11”) on sale, but it is desirable that the scattering angle be equal to the same 360 degrees.
6.
Other sources of Kalina.
At the end, it remains to “walk” through some more lamps.
6.1.
Lighting of the salon space. “C10W” elements are used. The length of the device does not exceed 41 mm. We pay attention to this aspect!
6.2.
The registration number is illuminated by W5W lamps.
6.3.
Luggage compartment and glove compartment. Here we decided to combine the categories, since identical sources are used to illuminate both spaces - “C5W”.
6.4.
Lamps used to illuminate the interior space near the front seats. The element "T4W" is used. Its length is 26 mm, which is also important at the time of selection.
For what reasons does the low beam disappear?
Among the malfunctions of the head optics, there are several factors, but most of them lead to the banal burnout of the lamps.
In Lada Kalina 2, the situation with the failure of the light source in the lamp can be periodic. Burnout may occur once every one or two months.
Experience has revealed the following reasons:
- Loss of headlight housing seal. At the same time, dirt, dust, moisture and other harmful factors penetrate into the working area. Gradually, these “artifacts” accumulate on the lamp bulb, causing it to overheat and, as a result, burn out.
- Instability of on-board voltage. Jumps in the direction of increasing the indicator from the nominal value also lead to inevitable burnout of the element in the lamp.
- The fuse that protects the power supply circuit of the head optics is faulty.
- Insufficient contact on the lamp plugs and supply wiring. A common cause of this phenomenon is the usual oxidation of contact groups.
When and why to change
The factory light is adjusted during the production process, at the time of passing technical inspection. In the new car, the modules shine with maximum power and at the peak of their capabilities. The need for replacement is determined by the following main criteria:
- Reducing light intensity.
- The appearance of yellowness and cloudy areas on the cut-off strip.
- Complete shutdown of one of the light modules.
- Increased brightness after the suspension hits a pothole or has mechanical contact with the headlight.
Kalina lamps installed on the conveyor last no more than 4 years. Cloudiness, deterioration of visibility and the appearance of unlit areas appear after the filament burns and the bulb smokes. In this case, the light does not pass through the dirt well and does not reach the desired areas of the reflector. There are yellow spots of light and darkened areas on the road.
The thickness of the light module filament is calculated by production engineers. When struck, the lamp shakes and the spiral becomes thinner. An external examination reveals a large increase in beam power. This indicates that the halogen lamp will soon fail, since the thin filament heats up above the set temperature and begins to melt. The service life of a damaged part ranges from one minute to several hours.
Heading optics contains 4 lamps
Let's look at how the directional optics, that is, the front headlight, is designed. The block contains four compartments, each of which contains one element:
- High beam lamp (H1);
- Low beam lamp (H7);
- Combined lamp for running lights and “dimensions” (W21/5W);
- Turn signal lamp (P21W yellow - PY21W).
The standard size of the element is indicated in parentheses.
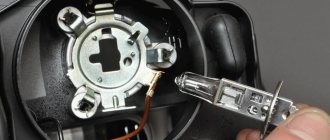
If we talk about low and high beams, standard power lamps (55 watts) are installed from the factory. It is not recommended to greatly exceed this value. Lighting fixtures of sizes H1-H7 look like this:
H1 – high beam, H7 – low beam
When making a purchase, the main thing is not to confuse an H7 lamp with a halogen lamp of a similar size (H4). Also, some companies produce 24-volt lighting devices.
When replacing halogen light sources, adhere to the following rules: do not touch the glass with hands without gloves; it is recommended to degrease the lampshade before installation. “Secunda” is suitable as a cleaner.
The following text shows the side and running lights:
There will be two filaments in the headlight bulb and DRL
Its standard size is W21/5W. Well, the turn signal bulbs in the directional optics use standard ones. They are equipped with a metal base, their standard size is P21W (PY21W).
The yellow lampshade looks like orange
Which lamps are best to use in Kalina
To find out which lamps are installed in Kalina during assembly, you need to remove the cover and pull out the part. The name, model and type of spare part are printed on the case. AvtoVAZ uses products from Philips as the main light. However, some models contain parts from Osram.
When searching for light bulbs in Kalina, you should be guided by proven options:
- number on the Kalina body or in the vehicle passport;
- a burnt-out sample previously removed from the lantern.
The body number is entered into a special window that pops up when you visit online resources with catalogues. Such systems independently determine the year of production, configuration and type of lighting equipment and offer a list of original spare parts and replacements for Kalina.
The number is provided to the seller in the store to accurately determine the part code. A simple and reliable way is to remove the lamp from the base and buy a new one based on the sample. In this case, you avoid purchasing the wrong part and having to go back to the store for an exchange.
The Kalina hatchback and sedan use the same lighting devices. The type of spare parts is no different for the station wagon.
When choosing a light bulb, it is important to adhere to the recommended parameters from the Kalina manufacturer. Installing a light with a higher power will lead to melting of the internal parts of the optics and damage to the contact group. After installing cheap substitutes, damage is possible due to poor quality assembly of the part and even explosion of the bulb.
Running lights for Kalina: installation method, connection
Nowadays, the question of which running lights is best for Kalina is quite relevant. Since November 2010, all vehicles are required to drive with low beams or fog lights on during the daytime. In accordance with the changes made to the traffic regulations, daytime running lights (DRLs) can be used. After the adoption of this resolution, car owners encountered certain difficulties. In the first place was the problem of forgetfulness: people did not turn on the lights due to lack of habit. Sometimes they forgot to turn them off.
And if in the first case, traffic police officers initially tactfully reminded about the rules, then in the second, discharged batteries caused extremely negative emotions among vehicle owners. When changes were made to the rules and daytime running lights were allowed for use, some car owners of Lada Kalina and other brands attempted to resolve the issue using homemade devices, various lamps and components from commercially available LEDs.
A variety of homemade devices of various types and qualities have appeared. But the changes made to GOST strictly regulated the requirements for DRLs. Manufacturers of lighting devices for motor vehicles did not miss their chance, and a variety of daytime running lights from various companies appeared on sale.
Basic criteria for choosing headlights
The popularity and demand for running lights is increasing over time. The various types of such lamps offered by manufacturers can not only ensure traffic safety, but also diversify the appearance of the vehicle. When choosing, you should carefully read the markings on the lamps.
Automotive lighting devices must be marked to permit their use on the territory of the Russian Federation. You should not choose devices based on the lowest cost. In addition to their low operational reliability, such lighting devices may be rejected during the next technical inspection. Then the car will be unusable until the causes are eliminated.
Markings must be clear, not exposed to external influences and located in a visible place. They must contain the country of origin code in accordance with EU requirements. The presence of a reflective element is also necessary. The selling organization is required to have a certificate for the product offered.
Parts manufactured by Hella, Philips, and Osram meet these requirements. Many of them can be installed on Lada Kalina. The cost of the kit ranges from 2,000 to 15,000 rubles. and depends on the manufacturer, design, performance characteristics and completeness.
To study the variety of shapes and lighting options when selecting daytime running lights for Kalina and preliminary evaluate design solutions, you can view photos presented in sufficient quantities in specialized magazines and on the Internet. Kits designed for self-installation are available for sale. These sets include:
- mounting brackets;
- connecting cable;
- connector;
- set of fasteners, bolts, nuts, latches;
- set of lighting fixtures.
The kit may contain a special device that, according to the rules, turns on and off the running lights when starting and stopping the engine. When purchasing such a kit, a connection diagram must be available. When installed on Kalina, running lights designed for foreign cars must be adapted to specific operating conditions.
Method of installation of lighting devices
The installation of DRLs on Lada Kalina cars, like on all other cars, can be done at a car service center or independently. There are no restrictions in this regard either in the rules or in GOSTs. The main requirements for the location of daytime running lamps are:
- The distance between the closest inner sides of the lamps must be at least 60 cm. If the overall width of the car is less than 130 cm, a distance of up to 40 cm is allowed.
DRL installation diagram for Lada Kalina
- The distance from the outer side of the lamp from the overall edge of the car should be no more than 40 cm. The lamps can be located at a maximum height of 150 cm, at least 25 cm from the surface of the roadway.
- In terms of length, the lamps are installed on the front side of the engine compartment, observing the height clause.
- The correct installation is considered to be the position when the light reflected in the rear and side mirrors of the car driving in front does not interfere with its driver. Angles of deviation from the axis of movement of the vehicle are allowed up to 20° in both directions horizontally and 10° vertically (down or up).
- In addition to observing the installation dimensions of fluorescent lamps, GOST regulates the brightness and size of the area illuminated by the devices. Basically, homemade devices do not pass testing based on these parameters.
The process of installing DRLs on the Lada Kalina must begin by removing the upper and lower grilles. If you decide to install lamps in the bumper, you need to remove it too. But the optimal place is the bottom grill, since it can use existing holes.
In the selected places, it is necessary to make markings according to the shape and size of the lamps, and carefully check for compliance with GOST requirements. Then use a regular knife or any other suitable tool to cut or widen the holes for the devices. It is advisable to be careful when working and not to exert much force to avoid damaging plastic parts.
After adjusting the holes for the devices, you need to secure them with standard fasteners from the purchased kit, lay and secure the wires along the grille. After this, the parts can be installed in place. It is not advisable to secure the lower grille or other part with fixed lamps thoroughly until the devices are fully checked after connection.
Connection to Kalina's on-board network
There are no restrictions or rules regarding the connection diagram in GOST. But turning on and off daytime running lights must obey certain rules. The running lights should turn on automatically when the engine starts and turn off when the engine stops. When you turn on the high or low beams, the DRLs should turn off. Sometimes Kalina car owners want to additionally turn off the daytime lights when the engine warms up.
This option is possible with certain knowledge and skills in working with automotive wiring. When installing daytime running lights on Kalina in the factory version with a diagram and instructions for connecting to the control device, usually no problems arise. The mentioned device is a relay with five terminals numbered 85-87, 87a and 30. To connect it to Kalina, you need to find any power wire from the low beam headlights and the positive wire from the ignition switch.
All these wires need to be installed with a female terminal with a small piece of wire, carefully insulating the connection points. Wires of the required length are also connected to the relay terminals, but with male terminals. Next, the wire from terminal 86 of the relay must be connected to the car body under any mounting bolt. It is advisable to immediately connect the wire marked “minus” from the DRL here.
The wire from the relay terminal with number 87a must be connected to the “plus” from the ignition switch. Wire 85 must be connected to the wire from the low beam headlights. You need to connect the positive wire from the running lights to terminal number 30. Relay terminal 87 is not used.
After installation is completed, you can check the operation of the lamps on the Lada Kalina car. To do this, you need to turn on the ignition. When the engine is running, the daytime running lights should light up. Next, you should turn on the low-beam headlights, the DRLs should go out, and the low-beam headlights should light up.
When switching to high beam, the situation should remain the same. Next, you need to turn off the high and low beams, and the running lights will light up. Then turn off the engine and the daytime running lights should go out.
How to replace a low beam lamp on a Lada Kalina
In the daytime, every car enthusiast relies on daylight, his vision and reaction. However, when darkness falls, everything changes. At this time, you need to be especially careful, since often accidents due to negligence occur precisely when visibility is poor. To prevent this from happening, the headlights must be in good working order. If they do not work, then no movement can be carried out. Even if you want, you won’t be able to, because visibility will be zero. Therefore, it is very important to keep your flashlights clean and shining brightly.
Disconnect the wiring harness block from the lamp terminals.
By pressing the spring clamp of the lamp, we disengage it from the hooks of the reflector and move it to the side.
Replacing low beam devices in Lada Kalina: instructions
So, immediately before replacing the light bulb, you will need to place the machine on a level area. Next, turn on the parking brake. The next step is to disconnect the ground wire from the battery.
The order of dismantling the left and then the right light bulb. The approach to the right one is blocked by the windshield washer reservoir. To extract it you need to perform some manipulations:
- remove the power terminals for the electric washer motor (Kalina hatchback and station wagon have 2 motors installed);
- unscrew the bolt securing the washer reservoir located above the headlight;
- unscrew the nut securing the reservoir from the rear to the body next to the right shock absorber strut;
- remove the tank
Important! When removing the reservoir, act as carefully as possible to avoid washer fluid from spilling. With open access to the headlight, the low beam bulbs (right and left) are removed in the same way when dismantling
To match the left bulb, the equipped expansion tank will interfere. Dismantling the latter without loss of coolant is difficult. To remove the lamp on Kalina you will need to perform a number of steps:
With open access to the headlight, the low beam bulbs (right and left) are removed in the same way when dismantling. To match the left bulb, the equipped expansion tank will interfere. Dismantling the latter without loss of coolant is difficult. To remove the lamp on Kalina you will need to perform a number of steps:
- remove the rubber cover, thereby providing access to the headlight;
- remember the placement of 2 power wires connected to the headlamp, disconnect them;
- press the latch bracket (steel), lifting it;
- remove the latch bracket from the grooves, moving it to the side;
- remove the low beam bulb, carefully grasping it by the contacts.
Important! When dismantling a new light bulb, contamination should not be allowed when the bulb and fingers come into contact. Therefore, it is better to carry out the process with clean cloth gloves.
If dirt or foreign particles get in, wipe with a cloth, first moistened with alcohol.
Dismantling of lamps is carried out in the following order:
- You need to insert a new light bulb into the headlight unit. Turn the base so that the protrusion is aligned with the groove in the lamp.
- Secure the light bulb with the latch bracket. Attach the latter to the grooves, making sure that the lamp does not spin and that the protrusion of the base does not move relative to the groove.
- Carefully inspect the strength of the latch fastener.
- Connect the power wires, being sure to observe the polarity.
- Screw on the rubber cap.
If the washer reservoir was removed, you need to put it in its original place, connecting the wires to the motor.