I have long wanted to replace the license plate light bulbs on my Kalina with LED ones, but I haven’t had the time. And then, finally, it happened - one of the lamps burned out. I bought a couple of LED ones at the market, came home and got to work.
As it turned out, the work is very simple and straightforward; you don’t even need to unscrew any bolts. This example is suitable for owners of Kalina sedan, station wagon and hatchback.
Debugg
Of the possible malfunctions listed above, the average motorist cannot eliminate all of them. It is unlikely that in the middle of the road you can replace a rotten lampshade with something. Not everyone can repair a damaged wiring harness. Therefore, we will not consider such cases in this article.
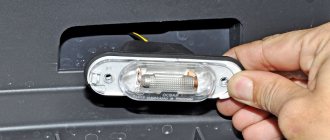
Having discovered a malfunction of the backlight, let's start by removing the lampshade. It is fastened either with self-tapping screws, or with plastic latches, or with a “screw + latch” combination. All these methods have both pros and cons - plastic latches are easy to break, but a soured self-tapping screw with rolled-up slots is by no means a gift.
On a number of cars, you can unscrew the lamp socket from the lampshade from the inside of the trunk lid, for example, on a Priora. This is often preferable to trying to press the plastic clips of the backlight from the outside, although it is less convenient.
After removing the courtesy light or the backlight bulb socket, first inspect it. A dark bulb or visible damage to the lamp filament is a clear indication for replacement. As a rule, W5W (pictured below) or C5W lamps are used to illuminate the license plate. They do not take up much space in the car, and it is advisable to have them with you just in case.
You can often observe the following situation: a C5W type lamp (cylindrical with end contacts) is installed in the backlight. It may be absolutely fine, but the contacts themselves are oxidized. In this case, it is enough to clean the contacts and bend them slightly to fix the light bulb more securely - sometimes the license plate light does not light up simply because the lamp has jumped out of the spring contacts.
It is worth paying special attention to the rubber seal of the license plate lamp. If it is damaged or not pressed tightly during installation, moisture will gradually get inside and lead to corrosion of the contacts inside the lamp.
In this case, fixing with self-tapping screws provides better compression of the seal than plastic latches.
Does it make practical sense to replace incandescent lamps with LEDs? In fact, the gain can only be obtained in greater brightness of lighting. As for the resource, most of the LED lamps offered on the market are made of frankly poor quality and without meeting the requirements necessary for the durability of LEDs. In particular, instead of stabilizing the supply current, a simple current-limiting resistor is used, which leads to frequent failure of the diodes due to voltage surges in the on-board network, especially since the characteristics of cheap LEDs can differ markedly even in the same assembly.
Replacing the license plate light with LED
Forum member
DeBandito
Experienced
Hello! All Octavias have incandescent lamps in their license plate lighting by default. When installing lamps other than incandescent lamps, the on-board computer will display an error. There are options to get around the error: 1) Try installing a light bulb with a blende. It’s unlikely that it will work, but you might get lucky (it’s better to ask someone who has already installed just such a light bulb). 2) Disable the license plate backlight check via the diagnostic cable. But not all octavias have this option. Then, not every owner would like to disable the light bulb check. 3) The only effective option so far will require skills in handling a soldering iron. It is necessary to solder standard light bulbs to the diodes. There are some drawbacks: the design can get hot.
On later octavias everything is simpler; you can replace the backlight without tricky manipulations with a standard lamp, number 3AF 943 021 A
. The cost is about 1000 - 1300 rubles per piece.
Mark Icons
DD - Drifter in DUsha
These will not fit on the Octavia a5, even on the latest modifications; they can be installed on the Octavia A7 or Rapid. There is an alternative catalogue. 000 052 110
and then the lamp will cost 300-400 rubles:
Experienced
At one time we were faced with the fact that rust was creeping out from under the license plate light bulbs, and in addition to touching up the trunk lid itself, we also had to repair the wiring: change connectors, lampshades and plugs (pins) - everything was rotten. At the same time we installed Philips LED lamps.
Rear additional lights for Lada Largus
LADA LargusDaytime running lightsLED running lights
One of the most popular Russian-made family and truck cars is the Lada Largus. This car is an adaptation of the famous Dacia Logan MCV model, which has been produced in Romania since 2006.
The Lada Largus (RF-90) rolled off the assembly line for sale in 2012. Today it can be found in 3 versions: a passenger station wagon with 5 seats, a station wagon with increased capacity (7 seats), and a cargo van.
To improve the illumination of the road surface by optics at the rear of the body, as well as to add effectiveness and improve the overall appearance of the Lada Largus, additional rear lights can be used. As you know, the cover for the pre-installed rear lights in this car model is represented by a black plug.
It, according to many motorists, does not fit very harmoniously into the overall appearance of the optics. For this reason, many owners of this car replace the plug with additional lighting (most often LED, as it is durable and quite bright).
To replace the plugs on the lights, you will need to dismantle it, and then connect the new optics to the wiring according to the diagram described in the instructions.
Rear additional lights of Lada Largus
Where can I buy additional lights?
Purchasing additional optics for the Lada Largus is a necessity due to increased driver safety while driving. With additional lights, the car will be much better visible to road users at night in any weather.
The material of the products is made from foreign high-quality ABS plastic, glass from German PMMA, and the lighting is provided by high-quality LEDs. The lights on the Laga Largus operate in 2 modes: brake light and side lights. The set weighs about 2 kg. It is also possible to change these operating modes to another scheme. The kit includes a pair of lights (left and right), wiring harnesses, installation and connection diagram. The installed optics will fit perfectly with the pre-installed ones, and the exterior of the car itself will look complete. In addition, installing additional lights will perfectly highlight the dimensions and brake lights.
Rear additional tuning lights for Lada Largus
In addition, there is a company on the market engaged in tuning domestic cars and supplying spare parts for them - TuneAvto. It also sells LED rear auxiliary lights made of ABS plastic. The product can operate in 3 modes at once, such as:
- dimensions;
- brake signal;
- dimensions + brake signal at the same time.
The product comes with a six-month warranty. The product weighs 1.8 kg. It is fully compatible with standard optics and is not subject to fading due to exposure to sunlight. Gives a complete look to all rear optics.
Installation instructions
To remove the plug and install additional rear lights instead, perform the work in the following sequence:
- Remove the main light from the rear of the body. To do this, you will need to unscrew 2 fasteners and then disconnect the block.
- After the lamp is removed, remove the upholstery inside the car, located on the rear pillars.
- Remove 3 fasteners holding the trim on the outside, and 1 fastener on the inside of the car. Remove the cover itself. If you have a 7-seater Lada Largus station wagon, you will need to remove the window fasteners, pistons, and mounting bolts for seat belts.
- Remove the pin from the trim. It will need to be screwed into a similar place in the trim on the additional lamp.
- Attach additional optics to the place of the lining using nuts.
- After connecting the wiring and checking the operation of the additional lighting, put the main optics in their original place.
Additional tail lights for Lada Largus
To connect the Lada Largus optics according to the diagram, you will need:
- Disconnect the terminal from the ground conductor and the battery.
- Connect the wiring of the new optics to the wiring harness of the main lighting. In the additional light, the black wire is ground, the yellow wire is the side light, and the red wire is the brake signal. The wiring of the pre-installed optics has an orange, blue and black wire (brake signal, parking lights, ground, respectively).
- Carefully insulate the wiring connection.
- To check whether the attached additional optics works on the Lada Largus, connect the battery. After this, turn on the dimensions and press the pedal that activates the brake light.
Replacing low beam lamps
The standard replacement of the low beam bulb on a Lada Kalina is quite simple. The procedure does not require deep knowledge of auto electrics or the presence of specialized tools.
To perform the procedure correctly, you must prepare all the tools and follow the sequence of actions.
Place the car on the handbrake and remove the terminals from the battery. It is recommended to drive the car into a well-lit garage or leave it outside, this will make it easier to see small parts and fasteners. Remove the plastic block cover. Here you can tighten the element by hand without using tools. In some configurations, the plug can be made of hard rubber (what it depends on is unknown)
It is important to consider that the element often dries out and cracks. Therefore, you need to buy it in advance
The replacement of the low beam bulb of the Lada Kalina 1st generation continues, at the stage of disconnecting the wiring
The contact group often gets stuck, which forces the master to tense up a little. By rocking the block from side to side, you will need to pull it off its seat. In this case, you need to hold the device body so as not to damage the element. If a part is broken, it cannot be repaired - the entire unit is replaced. Next, remove the lamp retaining spring from the hook. Then you will need to move it to the side so that it does not interfere.
Important! You should not completely pull out the latch - it will be extremely difficult to install it in place. The bar simply slides out so that the light bulb can be removed
Next, the light bulb itself is pulled out of the socket. You only need to support the emitter by its metal elements; you should not even touch the glass part of the lamp. Installation of the new part is carried out in the reverse order
At the same time, it is important to check the reliability of the device. If there is increased vibration, the lamp may fall out of the socket, which can cause an accident. Replacing a 2nd generation Lada Kalina light bulb is performed in the same way
The headlights of the cars are almost identical in design
Replacing a 2nd generation Lada Kalina light bulb is done in the same way. The headlights of the cars are almost identical in terms of design.
Replacement of lamps and tail light housings of Lada Vesta
Replacing lamps
To replace the side light bulb on the interior light located on the trunk lid, you must:
— remove 10 buttons 2, Figure 4, upholstery fastenings and remove upholstery 3 of the trunk lid;
— turn socket 1 counterclockwise and remove it from the seat assembled with the lamp;
— remove the lamp from the socket by pulling it towards you.
To replace the reverse lamp on the interior light 2, Figure 2, located on the trunk lid, you must:
— remove 10 buttons 2, Figure 4, upholstery fastenings and remove upholstery 3 of the trunk lid;
— turn socket 1 counterclockwise and remove it from the seat assembled with the lamp;
— remove the lamp from the socket by pulling it towards you.
Install new lamps in the rear interior lights in the reverse order of removal. The type of lamp installed must comply with the table.
| content .. 70 71 72 73 74 75 76 77 78 79 80 .. Lada Vesta. Replacing lamps - part 2 Rear fog light Light-emitting diodes are used as light sources in the rear fog lamp. The design of the lantern is non-demountable. If 2 or more light sources fail, the rear fog lamp is completely replaced at a specialized service station. Side turn signal in the rear view mirror Light-emitting diodes are used as light sources for the side turn signal, If the side turn signal light sources fail, the rear view mirror is completely replaced at a specialized service station. Additional brake signal Light-emitting diodes are used as light sources for the additional braking signal. If 2 or more light sources fail, the additional brake signal is completely replaced at a specialized service station. License plate light To replace the lamp in the headlamp, remove it from the vehicle. The flashlight is held in the mounting socket by a spring latch 3 and a latch 4 (Fig. 14). To remove the flashlight, you must: - using the left side of the flashlight, for example, with the blade of the ignition switch key, carefully move it to the right and disengage the lock 4 (Fig. 14); — using the blade of the key to operate the spring latch 3 on the right side of the lantern, carefully move it to the left and remove the lantern from its seat (Fig. 15); - turning cartridge 1 (Fig. After replacing the lamp, assemble and install the license plate light in the reverse order. Rice. 14. License plate light Rice. 15. Seat for license plate light Anti-fog headlight To access the fog light bulb, turn the front fender flap hatch 1 clockwise to replace the left fog light bulb (counterclockwise to replace the right fog light bulb). Turn lamp socket 2 counterclockwise and remove the lamp. Disconnect the socket from the lamp. Install the lamp in the reverse order. |
Light control
All cars that come off the assembly line have light bulbs installed to help you see the license plate from the rear. Typically, a pair of instruments is located in the lower trunk saber. Traditionally, problems do not arise for the first few years, but over time the lamp may burn out, so it is necessary to periodically monitor the condition of the backlight on cars with high mileage.
Almost every motorist can cope with the replacement. You don't even need special equipment for this.
The license plate light bulb can be replaced in the following sequence:
disconnect the battery from the on-board power supply to prevent possible contact shorting; Using a screwdriver with a thin tip, we disassemble the lamp shade; We show maximum care when unscrewing the lamp, since many people damage the socket due to carelessness; in place of the burnt out lamp we install a similar lighting device with LEDs or a classic incandescent lamp; The next step is to install the lampshade, but we recommend degreasing it first.
After all the manipulations, we check the functionality of the node. To do this, we connect the battery to the network. Each car model has its own procedure.
Hyundai Solaris
Minor repairs on one of the most popular car models in Russia are not difficult. Before you replace the license plate light bulb in this car, you need to know that there are two lights there. They are located on the trunk lid under the trim.
The rear lighting fixtures on Solaris are interconnected. Dismantling begins with removing the trim on the trunk lid. There is a cover in the handle that needs to be lifted with a flat-head screwdriver.
Now use a Phillips screwdriver to unscrew the screws holding the handle, after which you can remove it. Using the same tool, we unscrew the pins that the manufacturer uses to secure the casing in the lid. The upholstery is removed after removing the pistons.
The cartridge is unscrewed clockwise until it stops. Next, we lightly squeeze it and unscrew it from the housing along with the lamp, which is easily removed by the glass bulb.
Assembly is carried out in the reverse order of disassembly. You should not use excessive force to avoid damaging the housing.
Lada Kalina"
Three to four years later, Kalina car owners are faced with the problem of illuminating the license plate from the rear. The license plate light bulb may oxidize in the area of contact with the socket or burn out.
Disconnect the wiring from the battery. To replace, use the algorithm:
- press lightly on the lantern on the right, while moving it slightly in the same direction (it can be easily dismantled);
- Together with the wiring, the lampshade is removed outwards, which greatly simplifies further work with the unit;
- slightly lift the plastic clamp up and install the plug that provides power;
- carefully unscrew the lamp housing;
- to remove the light bulb, move it slightly to the side;
- install a new classic or LED light;
- We carry out the assembly in the reverse order.
We return the wiring to the battery. We check the functionality of the lighting. Owners of the Lada Priora carry out similar operations to restore the unit’s functionality.
Nissan Qashqai
On popular foreign cars, license plate lighting also often fails. Car owners can replace the lamps themselves. As in other cars, first of all we unplug the cable from the power source.
Next, the lampshade is dismantled; in this case, you can get by with one screwdriver. You can simplify the operation by applying slight pressure on the lampshade, while swinging it slightly left/right, and then remove it outward.
As soon as the lamp cover is removed, we unfasten the connector and remove the light bulb, replacing it with a working one. Assembly is carried out in reverse order. Next, we return the connection of the on-board electrical system to the ABK and check the functionality of the unit.
TOYOTA Corolla
When working with the rear lamp of the Corolla, you must lower the lamp diffuser. This will allow easy access to the lamp. To do this, press lightly on the tongue, which will allow the diffuser to move down.
It is necessary to unscrew the lamp socket counterclockwise to make everything easier to remove. Next, unscrew the screws holding the backlight mount so that you can lower the backlight. When removing the lamp holder, unscrew the thread also counterclockwise, and then remove the lamp. All that remains is to put everything back together in reverse order.
Tips for motorists
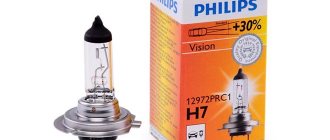
The most common malfunction associated with the cessation of operation of one or both low beam headlights of a Lada Kalina passenger car is the failure of halogen lamps, brand H7. Moreover, on some cars, this happens quite often, the light bulbs last for literally a couple of months. There are several possible reasons for lamp burnout. One of them is associated with the headlight not being sealed, as a result of which dust gets inside it. Dust settling on the bulb of a halogen lamp causes it to overheat and fail.
The second reason for low beam lamps burning out may be due to increased voltage in the vehicle's on-board network. To find out what voltage the generator produces, you will need a tester. It is desirable that the voltage at its terminals, with the engine running, does not exceed 14.4 volts. If the voltage is higher, you can try to replace the relay regulator, but when purchasing it, no one guarantees that its parameters will be within normal limits.
Changing burnt-out lamps in the headlights of a Lada Kalina car is not very convenient, since access to them is difficult due to the closely located windshield washer reservoir (right headlight) and the expansion tank of the engine cooling system (left headlight). If you do not remove them from their mounting points, then all operations to replace the low beam lamp will have to be done by touch. At the same time, you must remember that the halogen lamp should only be grasped by the base; touching the glass bulb with your fingers will lead to its rapid failure.
Heading optics contains 4 lamps
Let's look at how the directional optics, that is, the front headlight, is designed. The block contains four compartments, each of which contains one element:
- High beam lamp (H1);
- Low beam lamp (H7);
- Combined lamp for running lights and “dimensions” (W21/5W);
- Turn signal lamp (P21W yellow - PY21W).
The standard size of the element is indicated in parentheses.
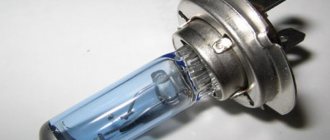
If we talk about low and high beams, standard power lamps (55 watts) are installed from the factory. It is not recommended to greatly exceed this value. Lighting fixtures of sizes H1-H7 look like this:
H1 – high beam, H7 – low beam
When making a purchase, the main thing is not to confuse an H7 lamp with a halogen lamp of a similar size (H4). Also, some companies produce 24-volt lighting devices.
When replacing halogen light sources, adhere to the following rules: do not touch the glass with hands without gloves; it is recommended to degrease the lampshade before installation. “Secunda” is suitable as a cleaner.
The following text shows the side and running lights:
Its standard size is W21/5W. Well, the turn signal bulbs in the directional optics use standard ones. They are equipped with a metal base, their standard size is P21W (PY21W).
The yellow lampshade looks like orange
Changing a light bulb is easy
If your license plate light does not work while driving, traffic police officers may have questions for you. Most likely, you will not be given a fine if you were noticed with such a malfunction for the first time, but you will still receive an unpleasant reprimand. Therefore, when this malfunction is first detected, we advise you to immediately replace it, especially since you can easily do this yourself at any time and anywhere.
This repair option will be much faster and much cheaper, because service stations often greatly increase the prices for spare parts. To carry out the work, you simply need to stock up on the necessary tools, and you will also need to set aside a little time to familiarize yourself with the arrangement of the car. After this, you can safely begin repair work.
Ceiling lamp
All illumination of the room is carried out by the lampshade into which the lamp is directly installed. It is the lampshade that scatters the light and fully illuminates the license plate of the car. It happens that when dismantling or in the process of replacing lamps, the lampshade may break. If this happens to you, then do not panic, lampshades are sold at any auto parts store.
Catalog number of the Priora lamp: 2170-03717010-00;
Its price is: from 100 to 200 rubles;
You should also not forget about the lampshade gasket; it is necessary to protect against moisture getting into the interior.
Gasket catalog number: 2170-03717012-00;
Cost of laying: from 20 rubles;
The lampshade is the same for all Lada Priora models.
Penalty for blue lighting
Many car enthusiasts use blue lights as tuning to brighten the appearance of their car.
Blue lamps can be installed in headlights, side lights, daytime running lights or in the backlight of the rear registration plate, as additional lighting under the bottom of the car.
A violation of the rules under which the operation of a vehicle is prohibited is the installation of certain colors of lighting devices that are not on the permitted list:
- Only white, yellow or orange lights can be installed at the front of the car.
- Only red, yellow or orange lights can be installed at the rear of the vehicle.
- As for the backlight and reversing lights, only white is allowed.
The Code of Administrative Offenses does not provide for a fine for blue backlighting of license plates. The driver will immediately be deprived of the opportunity to drive a car for a period of 6 to 12 months.
Information about this violation was not widely publicized, unlike the installation of xenon. Therefore, sometimes you can see cars on the roads with the specified offense.
It is important for every driver who is going to install blue or cyan lights to understand what they are risking. If, when purchasing a car, you discover a blue backlight for the license plate, then you need to replace the lamps with standard ones as soon as possible
If, when purchasing a car, you discover a blue backlight for the license plate, then you need to replace the lamps with standard ones as soon as possible.
The same punishment threatens when installing lighting fixtures of other non-standard colors, although it is much less common:
- green;
- purple;
- brown.
It is important to remember that you can also lose your rights for using the following:
- Red lights on the front of the vehicle.
- The lights are white at the rear of the car, except for the license plate light and the reversing light.
- Multi-colored lamps, in addition to white, in the rear license plate illumination and reversing lamp.
There are cases when the design of the car does not provide for illumination of the rear license plate. If the owner of the car has a valid technical inspection ticket, then the traffic police officer does not have the right to impose penalties.
For the first violation, you can simply receive an official warning. The fine is not very large, but the very fact of its presence is not pleasant, in addition, the price of a new light bulb is much cheaper.
Therefore, if such a malfunction is detected, it is better to immediately eliminate it in the daytime. This will not be difficult, but it will help to avoid an unpleasant situation when stopped by a traffic police officer.
Main reasons
Consider in detail the most basic reasons for such a breakdown.
Fuses blown
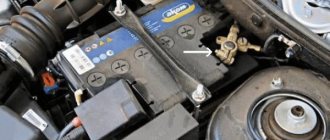
The fuses in the mounting block have burned out (F12 - right side, F13 - left side). Their rating is 7.5A.
F12 - left headlight, F13 - right headlight
The fuses in the photo are marked with an arrow. (top - left headlight, bottom - right headlight)
In this case, the voltage regulator may be faulty. As a result, a power surge occurred and both fuses were blown. It is necessary to check the voltage of the electrical circuit under load.
If you are on the road at the time of a breakdown, you can install a “bug” instead of fuses.
Carefully insert a piece of wire into the fuse connectors, preferably one, the left fuse. In this case, do not put the cover of the mounting block back on, as you will have to conduct a visual inspection; the wire may begin to heat up.
Low beam bulbs burnt out
“Right low beam” burned out
The low beam bulbs burned out, both of them at once, either a coincidence, or a short one, or the low beams were not turned on at idle. At high speeds, the current is greater, so both can burn out at once. The voltage regulator may also be faulty.
The low beam contact relay is broken
Location of the contact relay in the mounting block
The low beam may not turn on due to a broken contact relay. This breakdown is a very common reason. Due to the design of the relay and its low cost, the contact group may become stuck.
- Open the fuse box (mounting block).
- We take out the relay number K9.
- It is advisable to take a known good relay for a test drive. Or you can lightly tap the old relay with a key or coin.
- Reinsert the contact relay.
- Checking the low beam operation.
Light control module failure
Light control module on Grant
This fault should be checked last. The cost of a new part is about 900 rubles, so the easiest way is to replace the module with a known good one, for example, take it from another car.
If your high beams also do not work, then check whether voltage is coming to the MUS.
Addition block
It is located on the bottom right of the instrument panel, near the heater air duct, and is also covered with a lid. The cover is attached to a screw; to remove it, you need to unscrew this screw. To dismantle the relay block itself, wrench No. 10 is useful.
The relay block is responsible for the following functions and components.
- Turn on the engine cooling fan (low and high speed).
- Main relay.
- Fan fuse.
- Fuel pump switch relay.
You need to know which guards protect which elements. This is especially true if one of them is responsible for two or three nodes. For example, if you discover that the cigarette lighter does not work (usually some device is connected through it, for example, a DVR), you should check the radio. If it does not turn on, then it is necessary to replace fuse F20. You can replace the damaged element yourself. There is no need to contact a car service, since after replacing the fuse everything should work.
If any fuse or relay malfunctions, you must remove the blown element and put a new one in its place. The blocks must be restored or assembled in the same sequence as they were disassembled.
The Lada Kalina fuse box is located in the cabin, on the left side, under the cover where the light control switches are located. If something doesn’t work for you electrically, I recommend that you first check all the fuses responsible for a particular power circuit; in most cases, the culprit is a blown fuse, and only then look for the problem in the components themselves.
We attach photographs of the Lada Kalina fuse box, which were recently installed on Kalina:
So, let's look at which fuses and relays are responsible for what in our Kalina.
Circuits protected by fuses F1 - immobilizer control unit, hazard warning switch, instrument cluster F2 - power windows F3 - hazard warning switch F4 - Windshield wiper F5 - Heater, electric power steering control unit F6 - Horn F7 - Instrument cluster, interior lighting F8 - rear heating glass F9 - Side lights (right) F10 - Side lights (left) F11 - Immobilizer control unit F12 - Low beam (right) F13 - Low beam (left) F27 - electric power steering control unit (large red 50 A) F28 - control unit ABS system (in this case, an empty space, since ABS is not installed) F14 - High beam (right) F15 - High beam (left) F16, F17 - Fog lights F18 - heated seats F19 - ABS F20 - cigarette lighter F21 - Reverse lock F22 - Electrical package control unit F23, F24, F25 - reserve F26 - ABS
Purpose of the relays installed in the block: K1 - headlight washer K2 - activation of the power window circuit K3 - activation of the starter K4 - additional (ignition relay) K5 - direction indicators and hazard warning lights K6 - windshield washer and wiper K7 - high beam K8 - horn K9 - front fog lights K10 - heated rear window K11 - heated front seats K12 - reserve
Please note that all fuses are colored differently depending on the amperage (Amps) they are rated for - it is important to respect these values to avoid short circuits. To replace, use tweezers that are inserted into the mounting block
Two types of mounting blocks were installed on Kalina, let’s look at each of them:
Relay and fuse box
The fuses in the Lada Kalina are located under the dashboard, in a block located to the left of the steering wheel. To get to it, you need to open the cover in which the headlight switch is built in. The lid has latches; if you pull it towards you by the upper part, it will open and fold down (its lower part is fixed on an axis).
F1 (10 A) - immobilizer, dashboard lamps and sensors, reversing light, turn signals. If any of the gauges on your dashboard stop working, or one or all of the warning lights stop lighting up, check that fuse, as well as the gauges or bulbs themselves. If the rear white light does not come on when you engage reverse gear, it could also be this fuse or the reverse switch.
The reverse switch is located on the transmission, to change it you will most likely need to remove the engine cover to get to it. Located on the left side in the direction of travel on the rear of the gearbox. If the turn signals do not work and this fuse is intact, also check relay K5, the turn signal control knob, its connector, as well as the turn signal lamps themselves.
F2 (30 A) - electric windows. If the power windows stop working, check this fuse, as well as relay K2. If the fuse and relay are good, there could be a number of reasons. First, try pressing the power window button and slamming the door. If the mechanism “bites” when the glass is raised, this may help.
Otherwise, you need to disassemble the casing and look at the mechanism. When disassembling, you need to check the serviceability of the gears and all components of the window lifter, including the motor brushes. It could also be a problem with the power window module. It is located in the left rear door; if there is something wrong with it, then most likely you will have to change this module to a working one.
F3 (10 A) - alarm.
If the emergency lights do not work and this fuse is good, check relay K5. If your left or right turn signals come on and are constantly on, even when you turn off the ignition, this is a factory defect. In this case, it is necessary to replace the body electronics control unit. This can be done in official salons.
F4 (20 A) - windshield wiper, heated rear window. If the windshield wipers do not work and this fuse is intact, also check relays K4 and K6. The issue may be in the windshield wiper motor or its mechanism. Check the wiper switch and its connector.
If the rear window heating does not work, check fuse F8, the heater terminals, their contacts, as well as the contacts of this fuse and relay K6. Another issue could be poor contact on the body. The wiring ground is connected to the body under the dashboard. If there is poor or oxidized contact in this area, it can also cause problems with the correct readings on the panel instruments.
F5 (25 A) - heater, electric power steering, windshield washer. If this fuse and relay K4 are intact and the stove does not work, the problem may be in its electric motor (brushes) or the power button, as well as its contacts. If the electric power steering does not work, this fuse and fuse F31 are intact, then it is better to contact a workshop, because it will be difficult to find and fix this malfunction yourself.
Power fuses
The main power fuses and the diagnostic connector are located under the cover next to the cigarette lighter.
I hope this article will help solve your electrical problem. Just in case, take with you spare fuses and, if possible, relays, then you won’t have to look for them at the most inopportune moment or during auto shop hours.
You can also read about Lada Granta fuses, if you have such a model in your fleet.
Interpretation of fuses in the center console
| Designation on the image | Current strength, A | Protected Circuits |
| F1 | Main relay circuits (winding of the cooling system electric fan relay, canister purge valve, air flow sensor, speed sensor, oxygen concentration sensor, ignition coil) | |
| F2 | Fuel pump, viburnum fuel pump fuse. | |
| F3 | Electronic control unit (constant power circuits) |
The system relays are assembled into a block and installed under the center console. The block contains a fuse for the electric fan of the engine cooling system.
Additional relays and a fuse are located on the right side at the bottom of the instrument panel.
To get there, you need to remove the right panel of the instrument panel console
And use a socket wrench to unscrew the nut securing the relay block
Then remove the block.
Designation of the engine control system relay block
1 — fuel pump activation relay; 2 — fuse for the electric fan of the cooling system (50A); 3 — relay for turning on the electric fan of the cooling system (low speed); 4 - main relay; 5 - relay for turning on the electric fan of the cooling system, high speed)
Fine for non-working rear license plate light
Good afternoon, dear reader.
In this article we will talk about the fine for non-functional illumination of the state registration plate.
Light bulbs are provided only for the rear license plate of the vehicle. This is due to the fact that the rear license plate of the car must be readable even in the dark. There are no such requirements for the front number.
Let's consider what fine will be imposed on the driver if one license plate light bulb burns out or all the backlight bulbs burn out at the same time. Let's get started.
First of all, I would like to note that driving a car with non-working external lighting devices is prohibited by paragraph 3.3 of the list of faults:
3. External lighting devices
3.3. External lighting devices and reflectors do not work in the prescribed mode or are dirty.
Light bulbs for illuminating state registration plates are classified as external lighting devices. Therefore, operating a car whose light bulb does not work is a violation of traffic rules. We are also talking about a situation where there are several light bulbs in the rear license plate, and only one of them does not work.
Fine for lack of rear license plate illumination
The lack of illumination of the rear registration plate makes it unreadable at night:
1. Driving a vehicle with unreadable, non-standard or installed in violation of the requirements of the state standard state registration plates, except for the cases provided for in part 2 of this article, –
entails a warning or the imposition of an administrative fine in the amount of five hundred rubles.
Note. A state registration plate is recognized as non-standard if it does not meet the requirements established in accordance with the legislation on technical regulation, and unreadable if at a distance of 20 meters it is not possible to read at least one of the letters or numbers of the rear state registration plate at night, and in daylight hours of at least one of the letters or numbers of the front or rear state registration plate.
This fine can only be imposed at night if, due to the absence of a light bulb(s), the number has become unreadable.
For example, if one of two bulbs has burned out and the first letter of the number is not visible from 20 meters away, then the number is unreadable and the driver will receive a warning or a fine of 500 rubles.
Another example. If one of the two bulbs has burned out, but the remaining bulb illuminates the number well and all its symbols are visible from 20 meters, then this fine cannot be imposed.
Fine for faulty license plate light bulb
Let me remind you once again that the rear license plate illumination is an external lighting device. Operating a vehicle with such a malfunction is prohibited. In addition, for this violation there is a fine under Article 12.5 of the Code of Administrative Offenses:
1. Driving a vehicle in the presence of malfunctions or conditions under which, in accordance with the Basic Provisions for the admission of vehicles to operation and the duties of officials to ensure road safety, the operation of the vehicle is prohibited, with the exception of malfunctions and conditions specified in parts 2 - 7 of this article, -
entails a warning or the imposition of an administrative fine in the amount of five hundred rubles.
Thus, a driver may receive a warning or a fine of 500 rubles for a non-working light bulb. Moreover, this fine, unlike the one discussed above, will be imposed even if the number remains readable after the backlight fails.
In 2022, the fine for non-working rear license plate lights is not very large - a maximum of 500 rubles. Nevertheless, it is very unpleasant to receive it, especially since the price of a new light bulb is much less.
"Lada Priora" - the people's car
"Priora" is a very popular and prestigious domestic model. This car is very common due to its low cost and prices for auto parts. Any car owner should know how to change the license plate light bulb on a Priora. There are two lamps in the niche of the rear license plate and you can replace the light bulb in them without removing the lamp. By the way, a W5W type bulb is installed here. To quickly and correctly replace, you need to do a couple of steps. Firstly, open the trunk, and secondly, carefully inspect the area where the license plate is located. After which we find the wires going to each of the lamps.
Now we will turn the light bulb counterclockwise, remove the socket and insert it into the light bulb. Reattach the cartridge by turning it clockwise.
The second replacement option is to pull the lamp out towards you, prying it off with a flat screwdriver
Do this carefully - the lampshade may be damaged
We figured out how to change the rear license plate light bulb on this car, but on others?
Recommendations for replacing license plate lights
By spending a few minutes of your free time, you will protect yourself from fines from traffic police officers. Remember that only those lights that emit a pale yellow or white color can act as backlight lamps for the Lada “Kalina” license plate. Drivers who decide to replace factory lamps with colored bulbs receive a fine of five hundred rubles. According to the law, such machines should not be allowed to operate. If the replacement of lamps was successful and the backlight is on, do not forget to monitor the cleanliness of the rooms.
To illuminate the license plate of Lada cars, two lights are installed in the trunk lid. During vehicle operation, the lamps inside may burn out. To replace them as quickly and simply as possible, we recommend using these instructions.
Before starting work, make sure that the vehicle lighting is turned off. On Lada Priora, Kalina and Vesta cars, the rear license plate light is located in the socket of the trunk lid lining. Screws are not used to hold it in place; clamps are used instead. To remove the lampshade:
- pry off the lamp on the left side (Fig. 13-1, No. 1) using a flat-head screwdriver;
- move it to the right, disengage the latch and remove the light from the socket in the trim (No. 2) of the trunk lid.
How to change the license plate light:
- disconnect the block with wires as desired;
- remove the socket together with the lamp (Fig. 13-2, No. 2), turning it counterclockwise;
- remove the lamp (No. 3) from the socket by pulling it towards you;
- Installing a new lamp in the license plate light is performed in the reverse order.
In practice, owners of Lada cars may have difficulties. For example, the length of the wires is not enough to remove the lamp from its seat. In this case, you will have to remove the trunk lid trim and unscrew several screws securing the rear trim (popularly “saber”). This process is shown in the video:
The room lamp uses W5W lamps. Many car enthusiasts are replacing standard light bulbs with LED ones. Do not forget that the lighting devices (including the license plate lamps) of the car are homologated (have the “E” sign) for compliance of the light, color characteristics and used light sources (lamps) with international safety requirements. The use of light sources other than those specified is not permitted, as it may lead to disruption of the operation of these devices and violation of safety requirements.
The same applies to the installation of DRLs in the form of angel eyes.
The license plate lights in LADA Kalina can be removed quite easily. To do this you need:
1. Pry off the lampshade with a slotted screwdriver from the lock side, because there is a short lock here;
2. As soon as it comes out of the hole, pull the lampshade towards the lock to release the long latch;
3. Disconnect the power connector and remove the base along with the lamp, turning it 90°.
It will be more convenient to remove the courtesy light if you open the trunk lid.
How to make a replacement
This light is located above the license plate in a small recess in the rear bumper, and you can get to it without any difficulty.
- We take a Phillips screwdriver and use it to unscrew the two screws that hold the lampshade lighting in place. If they are corroded and difficult to unscrew, they can be sprayed with an anti-corrosion agent, for example, WD40
- After the rust has corroded, unscrew the screws located above the license plate, then remove the lampshade from the hole and disconnect the power wire from it.
- When we have the element in our hands, carefully press the latch on it and slowly remove the diffuser
- We take out the old lamp from there, if necessary, clean the diffuser with the shade, and install a new light bulb there. The main thing is that everything is sealed and dust and moisture do not get inside, so if necessary, we coat everything with silicone sealant.
The stage of replacing the light bulb can be considered completed