Sooner or later, light sources burn out in any car. And Renault Logan 2 lamps are no exception. Depending on the availability of skills, each driver can go to a service station or correct the situation on their own . This article will discuss how to replace Renault Logan 2 light bulbs on your own .
Replacing the Renault Logan headlight bulb of the first generation
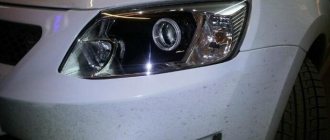
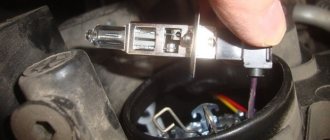
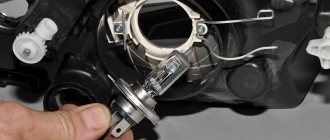
Remove the plastic cover (for clarity, the headlight mounting bolts are unscrewed and it is pushed forward). Disconnect the wire block from the headlight lamp. Remove the rubber sealing cover (shown on the removed headlight for clarity). By pressing the spring clamp of the lamp, we disengage it from the reflector hook... and remove the headlight lamp from the headlamp housing.
Attention! The headlight lamp is halogen. You should not touch its glass bulb with your fingers, as traces from them will lead to darkening of the lamp when heated
You can remove dirt from the flask with a clean rag soaked in alcohol. Install the new H4 headlight bulb in the reverse order.
Trunk lighting
To replace, you will need a flathead screwdriver and a small plastic spatula.
execution algorithm is as follows :
- Pry off the edge of the lampshade Logan 2, located in the rear parcel shelf amplifier, and remove it from the slot.
We move the lampshade, disengaging the stop - Separate the harness block postings.
- Carefully pry the lock with a screwdriver diffuser and remove the spare part from the lampshade.
- Remove the faulty lamp and replace it with a new one.
- Perform the manipulations in the reverse order of removal.
Valve adjustment Renault Logan (K7M)
Replacing the side light bulb for Renault Logan first generation
Before replacing the side light bulb, it is more convenient to first disconnect the wire block from the turn signal lamp socket (see above).
Turn the side light lamp socket clockwise (for the right headlight - counterclockwise)... ...and remove the lamp socket from the headlamp housing.
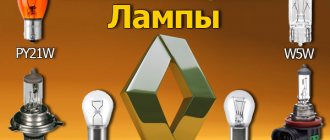
We remove the baseless W5W side light lamp from the socket and replace it with a new one. [How to save up to 6,500 rubles on Renault Logan/Sandero maintenance] [Renault Logan/Sandero maintenance for 15 thousand km] [Renault Logan/Sandero maintenance for 60 thousand km] [Renault Logan/Sandero maintenance for 90 thousand km of mileage] [Tools required for maintenance of Renault Logan/Sandero] [Lamps used in Renault Logan/Sandero]
Replacing lamps in a Renault Logan headlightReplacing lamps in a Renault Logan headlightReplacing lamps in a Renault Logan headlightReplacing lamps in a Renault Logan headlight
Error in the text? Select it with your mouse! And press: Ctrl + Enter Anton Dolgov
Advantages: Disadvantages:
Inexpensive, reliable, mass-produced, practical car. Inexpensive to maintain. Wear resistance of the interior. Noise and vibration insulation (by modern standards)
Fog lights
The factory equipment for PTF includes lights of class H11 12V 55W. The maximum service life of the optical element is 15,000 runs. Replacing a Logan fog light bulb is more difficult than changing the standard head optics or changing the dimensions.
The sequence for replacing the Renault Logan fog light bulb is:
- The protective cover (shield) on the bumper is removed.
- The connection wires are disconnected.
- The fog lamp is removed.
- A new consumable is installed.
For PTF, optics exceeding the technical specifications are not recommended: 12V 55W. This threatens to melt the plastic diffuser.
Fog lights are often replaced with LED lights. Such optics provide a stronger luminous flux in the yellow spectrum and have a longer service life, but their price is significantly higher compared to standard lights.
Of the entire Renault lineup, the best car for the budget segment is still Logan. Inexpensive special maintenance, simple repairs and quick replacement of mnemonics have made it the most popular in the domestic market.
Lamp type (H4)
And they are designed for both low and high beams, since they have two filaments. This type of lamp is convenient because for a complete inspection of the headlights in a car, it is enough to change only 2 lamps. But the most significant drawback lies in the price: such a lamp is more expensive than the “separate” H1 and H7.
Choosing a lamp manufacturer
The most popular and reliable lamps today are considered to be H4 lamps from Philips, Osram and Narva, but they are also the most expensive! Our portal has accumulated a considerable number of positive reviews about these manufacturers, so each car enthusiast must independently determine for himself and give preference to one or another manufacturer based on his financial capabilities and technical needs.
However, it is only worth noting that despite the absolutely identical power of 55/60 W on the lamps, some manufacturers indicate + 30\50% in the packaging. This means that this product is equipped with an increased luminous flux, which will require the most precise adjustment of the headlight itself so as not to blind drivers in oncoming traffic.
On a note!
The low and high beam lamps installed in the car are halogen. This suggests that touching their flasks before installation and operation is strictly not recommended.
Therefore, installation work should be carried out with gloves, and if this is not possible, then make sure that it is clean before installing the lamp.
Now you yourself know that in such a matter as replacing a light bulb, there is nothing complicated and the entire process from the beginning to the completion of all work was within 15-20 minutes, which allows you to carry it out simply in the parking lot near your home.
The following two tabs change content below.
I'm just sick of cars. I try to study in detail every car I have owned. I enjoy driving at night on city streets. I try to do my own repairs on my cars!
Tags: Renault Logan
Replacing the low beam lamp
So, we have figured out what lamps you need, then the process of replacing it directly follows. We will change the light bulb using the example of the left headlight, since replacement involves removing the battery. The light bulb on the right headlight changes in the same way.
First of all, we will need to remove the battery, for this we will need two keys 10 and 8 to remove the terminals from the “+” and ground, as well as a socket head 13 to remove the mount of the battery itself (if there is one). Particular attention should be paid to the fact that first the wires are removed from the “-” ground, and then only from the “+”.
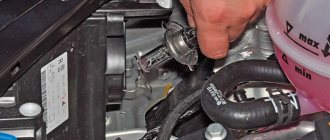
After the battery has been removed from its place, we see the headlight unit itself, in the center of which a plastic cover is installed, with a lock on top. To remove the cover and get directly to the light bulb, you need to press the thumb of one hand on a kind of tab (latch), and at the same time pull the cover towards you from below
Since plastic is quite pliable, no difficulties should arise in this process.
When we removed the plastic cover, we see a rubber seal and a block with wires that is connected to the light bulb. First, you should carefully remove the block, holding it only by the body, and then by the sealing cover itself.
The final touch remains. Before us is a spring clamp that fixes the halogen lamp, holding it securely in its tenacious paws. However, don't be afraid of this! You can remove the latch as easily as putting it in place; you just need to remove it from the “hook” with the reflector hook by pressing your finger on its upper part.
Next, we remove the lamp itself from the headlight unit, holding it by the metal legs and replace it with a new lamp, installing it in the reverse sequence similar to removal.
Replacing dimensions or turn signal
If you have a need to replace the front turn signal or replace the side light bulb, then it is worth saying that replacing them is much easier. The lamp socket that needs to be replaced simply needs to be turned counterclockwise and the burnt out light source removed.
Repair
If a specialist is involved in the matter, replacing low beam lamps on a Renault Logan takes only 10 minutes.
- Stop the engine and open the hood
- We remove the battery so that we can easily get to the light bulb on the left side. To do this, unscrew the wiring and unscrew the battery fasteners. If the master has refined hands, then the battery does not need to be removed
- We remove the plug. Press the top clamp (marked in the photo) and pull the plug towards you
- Pull out the block with the wires, and then pull out the seal
- Please note that the seal has straps on the sides. If you pull on any of the straps, the seal can be removed very easily and quickly. Such nuances can save valuable time when replacing low beam lamps on a Renault Logan
- Using your finger, press the spring bracket that secures the light bulb. That is, the staples need to be brought together and pulled out toward you. There is very little room for maneuvering, so it is better to entrust this work to someone with thin fingers
- We take out the light bulb
- Change the light source and reassemble in reverse order
We recommend: Shock absorber struts for Renault Logan
In fact, the work is not difficult. It is quite possible to save money on a trip to a car service center and service your Renault Logan yourself; you already know which low beam lamp is used. Such light sources are available in any auto parts store.
Replacing the low/high beam, turn signal, clearance lamp Renault Logan (2008-2010)
Let's start with the low/high beam lamp.
1. Press the tongue and remove the plug.
2. Disconnect the connector by simply pulling it towards you.
3. Remove the rubber boot. It fits tightly because it fits over the light bulb.
4. Press the spring clamp on both sides and move it to the center. The place to click is marked below.
5. Remove the lamp.
6. Install a new lamp. It is installed in only one position due to three guide antennae.
7. Snap the spring clamp of the lamp.
8. We put on a rubber boot. Make sure it fits well around the edges and on the lamp.
9. We put on the power connector.
I recommend checking the condition of the connector before putting it on. Sometimes the contacts inside burn out and the connector falls apart in your hands. In this case, it must be replaced.
10. We put on and snap on the cap. Make sure that the wires from the lamp power connector fall into the groove at the bottom of the plug.
Turn lamp
1. The power connector from the lamp does not need to be disconnected.
2. Turn the base counterclockwise and pull it out.
3. Press the lamp, turn it counterclockwise and pull it out.
4. Insert the new lamp and turn it clockwise.
5. Insert the base and turn it clockwise.
Dimension lamp
1. Turn the base counterclockwise 90 degrees and remove it.
2. Remove the light bulb from the base and insert a new one. The light bulb simply pulls up.
Also, make sure there is a rubber seal on the base; in our case there is none.
3. Insert the base with the lamp into the headlight and turn it clockwise.
Ways to get a light bulb
Since this is a fairly common problem, many solutions have been invented.
- The most common method is a vacuum cleaner. For this you will need a home vacuum cleaner; a car vacuum cleaner will not work because it does not have enough power. You need to attach a tube of such a diameter to the vacuum cleaner tube that it can fit into the hole in the headlight. IMPORTANT. Wrap it with electrical tape so that all the traction passes through the small tube. A flexible tube is inserted into the hole and placed in such a way that the light bulb fits into it. Then the vacuum cleaner turns on.
- Another way is to use wire. Double-sided tape must be attached to the end of the wire. The wire is inserted through the hole, this way you need to secure the light bulb. But there is a possibility that when pulling it out, the light bulb may get caught and fall off, then you will have to hook it again. Although this is one of the simplest methods, it can significantly damage the headlights. But there is a big drawback in this method. Marks may remain on the headlight glass, so this must be done with extreme caution.
- If you have a telescopic magnet, you can easily get the light bulb with it. This is perhaps the easiest and fastest way. Its cost starts from 1000 rubles. This method is the most effective, but also the most expensive, and buying a magnet only for this purpose is not profitable unless you do it constantly.
- You can try to get it out with tweezers. You just need a curved tool, and this does not guarantee that the procedure will be done quickly. IMPORTANT. It is worth tying the tweezers to a string in advance. Otherwise, it may fail, and then you will need to get not only the light bulb, but also tweezers.
- If none of the above is at hand, but there is only a tube of 15 millimeters in diameter and an old cable, then you can also get it with this, you just need to make a grip out of it. You need to cut off 3 centimeters of the tube, then insert the cable into it and secure it with electrical tape or tape. The tubes must be shaped into a cone. This invention is inserted through the low beam headlight and the light bulb comes out.
High beam
Conveniently, all the light on the Renault Logan - both high and low - is provided by one element of the headlight. The electronic control unit, having received a signal from the switch button, changes the lighting options.
In addition to the head light, side lights are installed here. Replacing dimensions step by step:
- The headlight housing is removed.
- The pad lock is released.
- The wire block is disconnected from the light bulb socket.
- The marker rotates clockwise for the left headlight and counterclockwise for the right headlight.
- The lamp in the socket is removed from the headlight unit and freed from the socket.
- The element is being changed to a new class PY21W.
- The cartridge is installed in the reverse order.
A rubber gasket is used as a seal for the cartridge. It is recommended to update it after each removal.
Side light circuit
It's very easy to replace the side light bulb yourself.
In order to save fuel and reduce the load on the generator, daytime running lights are now often included in this circuit, which makes it quite complicated.
You might be interested to know whether it is possible to use LED lamps in a car? Read more in this article
The standard wiring option is quite simple and consists of the following elements:
- circuit breakers;
- front and rear position lamps;
- central or key switch;
- Let's take a closer look at the first two elements.
Circuit breakers
Sometimes blown fuses are the reason why the side lights do not light up on one side or another.
There are usually two fuses in the circuit, for the left and right sides separately. Since the light bulbs consume little power (4-5 W each), the fuse rating is small, only 5-7.5 A.
Where are the side light fuses located?
In the same place as the others, in a single block. On most modern cars, this block is located under the instrument panel next to the steering column, or, more often, on the lower left, under a plastic trim.
In the latter case, it is enough to remove the cover protecting the unit, mounted on latches. On the back of the cover, as a rule, there is a sticker with information about which circuit this or that fuse protects, indicating its rating.
The biggest inconvenience in this case may be insufficient knowledge of the English language - it is in this language that inscriptions are usually made, even on Korean and Japanese cars.
Lamps
Externally, the headlight bulb is marked W5W, but today LED sidelight bulbs are increasingly used.
Their advantage over incandescent lamps is their greater durability, and the price of both largely depends on the manufacturer. The most famous products are Philips, Osram, Tesla.
What are the new generation 4Drive LED lamps? Find out now!
Watch the video about LED bulbs for side lights:
Moreover, as the “Behind the Wheel” test showed, expensive products do not always justify their price.
Also, quite often, the front dimensions are equipped with light bulbs with a metal base, but this, one might say, is a thing of the past.
For rear position lights, the most common lamp is with two spirals - 21 and 5 (or 4) W.
The 21 W coil lights up when you press the brake, i.e. In this case, the light bulb serves as a brake light, while the lower power spiral works as a side light.
Just as with any other lamps, purchasing a more expensive product does not guarantee any exceptional durability.
The reliability and safety of Renault Logan is beyond doubt, as is the operation of all its systems. Decent lighting equipment is available for maintenance, and after carefully reading the recommendations, you can easily replace head lighting equipment yourself, including side lamps.
What is fake news
There is no such concept in the law, but among the people, fakes are generally understood as anything unconfirmed.
This caused confusion. It seems that according to the new law, sites with any unverified information will be punished and blocked. Allegedly, if you write about an Orthodox holiday without clear evidence of the resurrection, ascension and other miracles, this is fake news. Not really. This is what information will be subject to the new law and may result in fines and blocking. These criteria must be present simultaneously:
- Unreliable, that is, it is a lie.
- Socially significant, that is, it concerns not one person, but the entire country or a large group of people.
- Distributed under the guise of reliable messages. There is no reservation that these are rumors or assumptions, but it is written that this is definitely true, and even fake evidence is given.
That is, even if the news is false or without evidence, but it is not socially significant, then the new law does not work here. It can only be punished under long-standing articles of libel or insult. And if there is a court decision. And fake news has nothing to do with it at all.
If you write that one of the show business stars allegedly cheated on his wife, this is also not socially significant information. Invasion of privacy and cause for action - yes, but not at all under the new law.
Here is what content the news that is subject to amendments may have:
- create a threat of harm to human life and health;
- may cause damage to other people's property;
- lead to riots;
- threaten public safety;
- may interfere with the operation of life support facilities, energy, industry, transport, communications, social institutions, and banks.
This is a closed list. There can be no other topics for fake news, for which they are fined and blocked under the new law.
The news that an official has dual citizenship will not lead to mass unrest. But the dissemination of information about an epidemic that does not exist, or that banks will close tomorrow, pensioners will no longer receive pensions, taxes will be doubled, and stores will issue food using cards is socially significant and can lead to panic and riots. Then the police, the prosecutor's office, Roskomnadzor and the court get involved.
Examples of fake news covered by the new law
| Not covered by the new law | May fall under the new law |
| Christ has risen - Orthodox Christians celebrate Easter, but there is no evidence of the reality of the event | A law was passed banning all religions except Orthodoxy and compulsory baptism for all Russians from birth |
| It seems that the cause of the house explosion could have been a terrorist attack, but the Ministry of Emergency Situations does not confirm: the official version is a domestic gas explosion | The authorities are hiding that hundreds of people died due to the fire in the shopping center. The corpses are carried out in bags, the number of victims is deliberately underestimated |
| Famous singer cheats on his wife | The head of the Central Bank removes gold reserves from the country |
| Due to the VAT increase, prices for some goods may increase by 10% | Retail chains secretly reported a food shortage: food will begin to be issued using coupons, and prices will triple |
| Judges are allowed to drive drunk | Cracks have appeared on the supports of the Crimean Bridge; it will collapse at any moment. Builders are forced to remain silent |
Christ is risen does not fall under the new law - Orthodox Christians celebrate Easter, but there is no evidence of the reality of the event
May fall under the new law A law has been passed banning all religions except Orthodoxy, and compulsory baptism of all Russians from birth
Not covered by the new law It seems that the cause of the house explosion could have been a terrorist attack, but the Ministry of Emergency Situations does not confirm: the official version is a domestic gas explosion
May fall under the new law The authorities are hiding that hundreds of people died due to the fire in the shopping center. The corpses are carried out in bags, the number of victims is deliberately underestimated
Not covered by the new law Famous singer cheats on his wife
May fall under the new law The head of the Central Bank is removing gold reserves from the country
Not covered by the new law Due to the VAT increase, prices for some goods may increase by 10%
May fall under the new law Retail chains secretly reported a shortage of food: food will begin to be issued using coupons, and prices will triple
Not covered by the new law Judges are allowed to drive drunk
They may fall under the new law. Cracks have appeared on the supports of the Crimean Bridge; it will collapse at any moment. Builders are forced to remain silent
This does not mean that any such news will definitely be fined. But this may give rise to a complaint, investigation and trial.
How to replace the left headlight bulb of a Renault Logan car with your own hands
1. To dismantle the battery, you will need two keys 8 and 10 to remove the terminals from the battery, and a socket head 13 to remove the battery mounting bar. Battery Keys for terminals Socket head2.
First, unscrew the ground terminal fastening with your own hands! And then remove the “+” terminal.
Ground terminal Unscrewing the fastening Terminal “+”3. Unscrew the battery mounting screw
Carefully remove the bar with the screw so that it does not fall into the hood. Remove the battery from the hood
Unscrewing the fastening Fastening bar The battery is removed4. A little life hack. Take a mirror - this will greatly speed up your work; by controlling your actions through the mirror, you can immediately do everything correctly.
5. After the last lamp change at the service center 2 years ago, I discovered that the protective cover was not latched and the wire of the hood closing sensor was broken, and the sensor itself had gone sour in the lower position. 6.
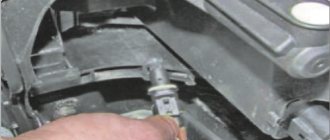
Remove the cover. We see a rubber seal and a lamp socket. We remove the socket.
The protective cover is not latched. The socket is removed. Rubber seal7. The most important moment is to remember how you remove the lamp. Take a close look in the mirror at this hook, which you won’t be able to immediately throw a spring on blindly. The mounting spring is removed by pressing on it from above and simultaneously moving it to the right, as seen in the photo.
Fastening the lamp with a spring Fastening the lamp with a spring The spring has been removed8. The pressure spring releases the lamp. We take out the lamp. We put on a glove. We take a new lamp and insert it into the socket. The base key will not allow you to make a mistake. We take the spring, press the base and move it slightly to the right, and then to the left until it engages with the hook. Monitor your actions in the mirror.
Burnt out lamp Take a new lamp Insert a new lamp Lifehack The lamp is fixed The seal is on9. We put on the rubber seal. We insert the socket. Close the socket with a lid.
The battery is connected. Place and secure the “+” terminal 10. Reinstall the battery. Screw on the “+” terminal. We screw the mass. We check the operation of the headlights. When screwing the terminals, check their condition just in case. We screw the battery mount with our own hands. We restore car clock readings and car radio settings.
The time spent on replacing a headlight is minimal compared to the need to travel to a service center, and money is saved.
How to replace
Removing the optics on Logan 2 varies depending on whether it is a left or right headlight. If you need to change the part on the left, you need to remove the battery. In some cases, car service technicians replace the lights on the left headlight without removing the battery.
Replacing the halogen on the right is carried out without removing the battery.
The replacement procedure can be described in stages:
- AB dismantling. The tools you will need are: a 13mm socket wrench and a 10mm and 8mm open-end wrench.
- Using keys, the wires are removed, first from the ground (the “-” sign), then from the positive. The socket head presses out the battery fasteners.
- There is a plastic cover in the center of the headlight unit, the lock is located on top. Press the latch with your finger, press the lid and pull it towards you.
- The power supply block with wires and the sealing cover are removed.
- By squeezing the hooks of the latch, the light bulb is removed from its regular place in the headlight.
- Installation of a new lamp is carried out in the reverse order.
The specified length of the bulb in this model is 82 mm. The headlight housing has standard recesses into which metal tabs located on the base should fit. This will ensure the optimal position of the part relative to the reflector and diffuser.
Which lamps to choose
The choice of low beam lamp directly depends on the financial capabilities and personal preferences of the driver. Philips and Osram lighting devices are considered more popular among drivers. Narva also has good reviews. These lamps are durable and reliable. However, they also have the highest price.
If you wish, you can choose cheaper analogues, but it is worth remembering that the working life of inexpensive copies is much less. Also, due to the design features, after installing such lamps, you will need to spend more time fine-tuning the light flow.
Before purchasing a light bulb, you should decide what type of lighting fixture will be used.
Incandescent lamps
The simplest and most unpretentious type of lighting elements. They consist of a sealed flask filled with an inert gas, a tungsten filament and electrodes. The lighting quality is quite poor. Almost the entire resource is wasted on heating the headlight. However, the cost of lamps is in the lowest category.
Halogen
A more advanced type of lamp. The main difference from the previous type is the halogens added to the inert gas. It is due to them that the efficiency of the device significantly increases. Such lamps illuminate the road much better while driving.
Xenon or gas discharge
They work without the use of a tungsten filament due to an electrical discharge between the electrodes. They have excellent light quality and serve the owner for a long time. They are very expensive and are prohibited by law (except for factory equipment). There is a fine for the driver for installing xenon lamps on his own.
LED
They combine the best qualities. The high level of illumination and long service life of the devices have brought them to a well-deserved first place among automotive lamps. The picture is spoiled by too high a price.
When choosing a low beam bulb, you should also pay attention to the manufacturer
Bosch
According to car owners, light bulbs produced by Bosch have all the necessary qualities and pleasantly please the driver. In terms of lighting quality, these lamps are 90% brighter than standard ones. Drivers note that this immediately catches the eye after installation.
High performance provides a powerful flow of light even with not very new and clean reflectors. The direction of the light beam allows you to clearly see even distant objects.
In addition, original Bosch light bulbs have a much longer service life than most standard fixtures. The luminous flux has a pure white light, which does not tire the eyes even when driving for a long time. Due to the quality of light, many drivers refuse to install xenon.
The main disadvantage, according to car owners, is the high cost.
Osram
Osram lamps have increased light output. They provide decent lighting quality even with not very good reflectors. Additional configuration is required during installation. Otherwise, the headlights will blind oncoming drivers, which negatively affects traffic safety.
The cost of the lamp is slightly higher than that of a standard one, but this is fully compensated by the quality of work. The main disadvantage is the short service life.
Philips
Lamps from this manufacturer are invariably bestsellers. Bright, clean light provides a greater viewing range while protecting the driver's eyes from fatigue on long trips. The lamp service life is several times longer than the average operating period of lamps from other manufacturers. High quality and great demand ensured the considerable cost of the devices.
NARVA
Excellent quality low beam. At the same time, the cost of the lamp is not too high. Not bad for drivers who drive within the city at night. High beam is significantly worse than that of more expensive analogues. This is one of the most significant disadvantages of lamps from this manufacturer.
Koito
Despite the lack of more or less clear information on the packaging (all labels are in Japanese), these lamps demonstrate good qualities during operation. They perfectly illuminate the road with low and high beams, do not dazzle oncoming drivers, and demonstrate a considerable service life.
Amplified lamps usually have higher quality illumination, but their lifespan is much lower than average.
Features and designations
Replacing rear brake pads on a Renault Logan car 1
The combination of practicality and ergonomics is the motto of the Renault Logan car line, regardless of its year of manufacture.
In models released at the very beginning (2006, 2007, 2008, 2009), in restyled versions (2010, 2011, 2012, 2013, 2014, 2022, 2016), as well as in the second generation (2014, 2022, 2022, 2022 ) the functionality of a unit operating on diesel and gasoline does not differ significantly.
The instrument panel contains the following equipment:
- Tachometer. The device has an electronic device and transmits information from the crankshaft sensor. The range of values varies from 0–70, with the price of one division being 2.5 units. To determine the true indicator, you need to multiply the value that the arrow points to by 100.
- Display. It displays several types of indications - icons showing the amount of fuel, car mileage and coolant temperature, as well as a clock.
- Speedometer. Indicates the speed of the vehicle. The division value is 5 km/h, and the maximum parameter is 200 km/h;
- A lamp indicating that the fog mechanism is turned on;
- Signal light indicating an open door;
- Reserve indicator;
- Rear fog lights indicator;
- Reset key for vehicle mileage per day. Its activation occurs with a longer press.
- A parking brake light, as well as a symbol indicating the technical serviceability of the brake system. The backlight may come on when the ignition is turned on when the brake fluid level in the system is very low;
- Reserve LED for diesel models;
- Motor overheat indicator;
- The circle sign indicates that the engine is blocked. It indicates a critical error in the engine if it does not go out three seconds after ignition.
- Turn signal bulbs;
- Fuel level indicator indicating a critically low fuel volume;
- Oil level indicator;
- A lamp indicating the battery charge level;
- Engine control lamp;
- Indicator of operation of the stove for heating the rear window;
- High beam indicator;
- Front passenger airbag performance lamp;
- Indicator indicating that the driver's seat belt is not fastened;
- Airbag service indicator;
- A lamp indicating the serviceability of the ABS;
- Low beam switch lamp.
Other features of the center panel:
- Setting the level of air supply from the air conditioner, ventilation system and heater is adjusted using standard knobs;
- The direction indicator has 4 positions: two for turns, one for dimensions and the second for turning on the lights (low and high);
- The large orange button is the car fire alarm switch;
We recommend: Renault Duster: technical specifications, dimensions - we tell you in detail
Basic elements and parts, such as the cigarette lighter and ashtray, have a standard combination that is typical for all Renaults.
Choosing a manufacturer
Phillips lighting fixtures are factory installed in Renault. Elements in a standard installation show a long service life - up to 40,000 km. After replacement, a similar part will last up to 10,000 km.
Among the companies specializing in the production of H4 type car lights are:
- Philips;
- Narva;
- Osram;
- Bosch;
- Koito;
- LynxAuto;
- Tesla;
- Lighthouse;
- Dialuch.
Halogen optics from these manufacturers are characterized by high quality and good lighting properties. For Renault Logan lamps, a power of 55/60 W is provided. A separate package may include a technical mark +30/50%. This marking indicates an increase in luminous flux by a certain percentage.