Nissan Qashqai is a popular crossover all over the world, produced from 2006 to the present. Produced by the Japanese concern Nissan, one of the largest in the world. Machines of this brand are highly reliable and easy to maintain. And also at an affordable price, combined with a stylish appearance. The car is also popular in our country. Moreover, since 2015, one of the factories in St. Petersburg has been assembling its second generation for the Russian market.
Brief information about the Nissan Qashqai:
It was first demonstrated as a new product in 2006, at which time mass production of the car began.
In 2007, the first Qashqais went on sale. By the end of that year, more than 100 thousand cars of this brand had already been successfully sold in Europe.
In 2008, production of the Nissan Qashqai+2 began, this is a seven-door version of the model. The version lasted until 2014, and was replaced by the Nissan X-Trail 3.
In 2010, production of the restyled model Nissan Qashqai J10 II began. The main changes affected the suspension and appearance of the car. Including, the optics have changed.
In 2011 and 2012, the model became one of the best-selling in Europe.
In 2013, the concept of the second generation of the J11 car was presented. The following year, a new version began to circulate.
In 2017, the second generation was restyled.
In Russia, production of the updated 2nd generation car began only in 2022.
Thus, there are two generations of Qashqai, each of which, in turn, underwent one restyling. Total - four versions (five if you take into account the seven-door version).
Despite the fact that significant changes concerned the appearance of the car, including its external optics, there are no fundamental internal differences. All models use the same types of lamps. The principle of replacing optics remains the same.
List of all lamps
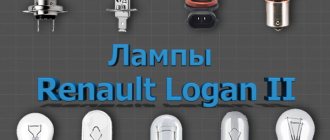
The following types of lamps are used in Nissan Qashqai:
| Purpose | Lamp type, base | Power (watt) |
| Low beam lamp | Halogen H7, cylindrical, with two contacts | 55 |
| High beam lamp | Halogen H7, cylindrical, with two contacts | 55 |
| Anti-fog | Halogen H8 or H11, L-shaped, two-pin with plastic base | 55 |
| Front turn signal lamp | Yellow single-pin incandescent lamp PY21W | 21 |
| Turn signal lamp, reverse lamp, rear fog lamp | Orange single-pin incandescent lamp P21W | 21 |
| Lamp for rooms, trunk and interior lighting | Single-pin small W5W | 5 |
| Brake signal and dimensions | Two-pin incandescent lamp P21/5W with metal base | 21/5 |
| Turn signal | Baseless single-pin W5W yellow | 5 |
| High brake light | LEDs | — |
To replace the lamps yourself, you will need a simple repair kit: a small flat-head screwdriver and a medium-length Phillips screwdriver, a ten-point socket wrench and, in fact, replacement lamps. It is better to work with cloth (dry and clean) gloves so as not to leave marks on the surface of the glass of the lamps.
If there are no gloves, then after installation you should degrease the surface of the light bulbs with an alcohol solution and let it dry. Don't give up at this point. This is really very important. Why?
If you work with your bare hands, you will definitely leave fingerprints on the glass. Even if they are not visible to the naked eye, they are fatty deposits on which dust and other small particles will subsequently stick. The light bulb will shine more dimly than it could.
And most importantly, the stained area will become hotter, which will ultimately lead to the lamp burning out as quickly as possible.
Important! Before you begin, disconnect the negative terminal of the battery.
Which companies should you trust?
The following types of lamps are used in Nissan Qashqai:
- near module – H7, 55 W;
- long-range module – H7, 55 W;
- side light – W5W, 5 W;
- direction indicator – PY21W, 21 W.
The Qashqai low beam bulb is not considered rare and can be found in every auto parts store. When choosing, you should trust only well-known manufacturers:
- Philips;
- Osram;
- MTF;
- Koito.
Particular attention should be paid to lamps from Koito and Osram. Philips LongLife EcoVision are inexpensive and durable lamps that do an excellent job of lighting in fog and snow.
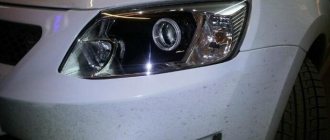
Front optics
Front head optics include low and high beams, dimensions, turn signals, and PTF.
dipped headlights
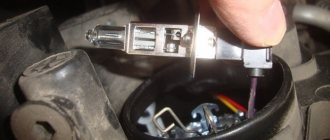
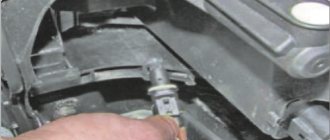
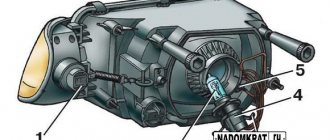
Before starting work, remove the protective rubber cover of the headlight unit. Then turn the cartridge counterclockwise and remove it. Remove the burnt out light bulb, replace it with a new one and carry out installation in the reverse order.
Important! Standard halogen lamps can be converted to similar xenon lamps. Its durability, as well as the brightness and quality of light are much higher. In the future, such light bulbs will have to be changed less often than incandescent lamps. The price, of course, is slightly higher. But the replacement pays for itself completely.
High beam headlights
You can change the high beam lamp in the same way as changing the low beam lamp. First remove the rubber casing, then unscrew the lamp counterclockwise and replace it with a new one.
parking lights
To replace the front signal, the cartridge is rotated clockwise (unlike most others, where the rotation is against the direction of the clock). Then the lamp is pulled out of it (it is here without a base) and replaced with a new one. Installation is carried out in reverse order.
Turn signals
After dismantling the air duct, turn the socket counterclockwise and unscrew the light bulb in the same way. Put the new one in place and carry out installation in the reverse order of steps.
Installation of the side turn signal is carried out in the following sequence:
- gently press the turn signal in the direction of the headlights;
- remove the turn signal from the mounting socket (in this case, its body will simply hang on the socket with the wiring);
- turn the chuck to unhook the turn signal cover fastening;
- Carefully pull the light bulb out.
Carry out installation in reverse order.
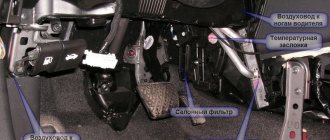
Important! When dismantling the turn signal, low and high beam lamps in the left Nissan Qashqai headlight, you must first remove the air duct. You can read how to do this below.
- A flat-head screwdriver will help you unhook the two hooked clips that secure the air duct.
- Unfasten the air collector pipe from the plastic housing where the air filter is located.
- Now you can easily disconnect the air collector.
After performing the necessary manipulations with the lamps, it is important not to forget to put it back, strictly observing the sequence. To service the right headlight, no additional manipulations are required; nothing obstructs access to it.
PTF
The front mudguard prevents the removal of the front fog lights. It is secured with four clips that can be easily removed with a flathead screwdriver. Then you need to do the following:
- Unfasten the power supply terminal for the fog lights by pressing the special plastic clamp;
- turn the cartridge counterclockwise approximately 45 degrees and pull it out;
- After this, remove the light bulb and insert a new, working light element.
Install the sidelight in the reverse order, not forgetting to replace the mudguard.
Types of lighting fixtures
There are two most popular types of lamps for Qashqai 2011: xenon and LEDs. Each of them has its own positive and negative qualities.
Xenon devices
Xenon has the following advantages:
- A fairly bright and powerful light that will guarantee good illumination and, therefore, maximum safety.
- The service life of a xenon lamp is quite long: about 2500 hours, while for a halogen lamp it is no more than 600.
- This lamp consumes about 7% of energy to create heat, so it can be installed in any headlight. Compared to halogen ones, about 40% of their energy goes to heating.
Flaws:
- In Russia, only those xenon devices on the Qashqai 2012 are allowed that were installed during the initial assembly of the car. The use of counterfeits, especially Chinese ones, can lead not only to refusal to have your car serviced, but also to a fine.
- Such a device requires the additional installation of ignition units and auto-corrector of headlight angle.
- This type of product provokes increased fuel consumption due to the greater load on the generator (0.3 l/100 km).
- High price.
- If one bulb is broken, you will have to change both because the color and brightness of the light flux changes over time.
LED options
LED lamps have the following positive qualities:
- Very low energy consumption. Energy consumption will be 6–8 Watts (halogens have 60 Watts), and fuel consumption will be 0.3 l/100 km.
- No additional equipment needed.
- Such a lamp heats up even less than xenon. It takes no more than 4% of energy to create heat.
- The lamp will last up to 10,000 hours.
- The nature of the light is not very different from xenon.
- LEDs are universal, and you can match the bulbs to almost any car.
Flaws:
- The cost of such products is higher than halogen ones.
- The brightness of the lighting is a little stronger than with xenon, but it is very noticeable.
Having understood the pros and cons of each of these devices, you can make a choice in favor of LED ones. They will serve you much longer, and you won’t need to bother with installing additional equipment.
Rear optics
Rear optics include side lights, brake lights, reverse signal, turning lights, rear PTF and license plate lights.
Rear dimensions
Replacing the rear marker lights is similar to replacing the front lights. The socket should be turned clockwise and the bulb should be pulled out and replaced with a new one. The light bulb is used without a base and can be easily dismantled.
Stop signals
To get to the brake light, you must first remove the headlight unit. The sequence of actions for replacing light elements is as follows:
- remove a pair of fixing bolts using a wrench and a 10mm socket;
- carefully pull the flashlight out of its socket in the car body, while the latches will resist;
- turn the headlight with its back side facing you to gain access to the dismantled elements;
- Unclip the terminal with wiring using a screwdriver, remove it and remove the rear optics;
- press the brake light holder lock and remove it;
- Press the lamp in its socket with light pressure, turn it counterclockwise, and remove it.
Install the new light signal and install all components in the reverse order.
Reverse
Here everything is a little more troublesome. In particular, to change the rear running lights, you will first have to remove the plastic trim of the rear door. This is not as difficult as it seems: it is attached with ordinary plastic clips. Then you need to do the following:
- unscrew the cartridge to the left;
- press the base tightly against the contacts of the cartridge, unscrew it against the movement of the clock and pull it out;
- insert a new light signal and carry out installation in the reverse order.
When replacing the reversing lights, you should also check the rubber seal ring. If it is in a dilapidated condition, it is worth replacing it.
Turn signals
Replacing rear turn signals is similar to replacing brake lights. It is also necessary to remove the headlight unit. But there are some differences. Sequencing:
- unscrew the two fixing bolts using a wrench and a size 10 head;
- carefully remove the lamp from its mounting socket in the machine body, while doing this, overcome the resistance of the latches;
- turn the headlight back towards you;
- unclip the power terminal clip using a screwdriver, pull it out and remove the rear optics;
- press the turn signal holder lock and pull it out;
- Turn the base counterclockwise and remove it.
Install all components in reverse order.
Rear fog lights
Rear fog lights should be changed as follows:
- remove the plastic casing of the flashlight by prying it off with a flat screwdriver;
- press the latch to detach the block with the flashlight power wires;
- rotate the cartridge counterclockwise approximately 45 degrees;
- remove the socket and replace the light bulb.
Carry out installation in reverse order.
License plate light
To replace the light bulb that illuminates the car's license plate, you must first remove the lamp. It is fixed with a latch on a spring, which must be pryed with a flat-head screwdriver to disengage it.
Then you need to separate the cartridge from the lampshade by turning it counterclockwise. The light bulb here is without a base. To change it, you just need to pull it out of the cartridge. And then install a new one in the same way.
In addition, LED brake lights are also located there. They can only be changed together with the rest of the device.
Preparation
We hope that your workshop has all the appropriate tools to carry out various repairs, but in this case you will only need:
| Flat head screwdriver | With its help, the plastic clips of the air filter pipe are disconnected. |
| Cotton gloves | To install a light bulb so as not to touch its glass bulb and thereby extend the service life of the product. |
The materials you will need are a low beam lamp for a Nissan Qashqai. The most commonly used is Osram H7 12V 55W.
Tip: Place the car on a level surface and secure the wheels with a gear, handbrake, or place a “shoe” so that it does not suddenly start moving. Don’t forget to turn off the ignition and remove the “-” terminal from the battery.
What is low beam used for?
Before moving on to the process of installing a new light bulb in the headlight, we will find out whether it is needed at all or whether it can be done without it. Typically, low beam is needed to sufficiently illuminate a small area of the road or shoulder.
When it is turned on, the light beam is directed downwards and towards approaching vehicles.
There are two main designs:
- a separate headlight, for example, as in the wiring diagram of the VAZ-2103 (this arrangement is now extremely rare);
- a lamp having two filaments installed in the headlamp.
The very important significance of low beam is that its factory adjustment prevents blinding oncoming vehicle drivers, so with its help you can safely pass in certain areas.
At the same time, the low beam light bulb on the Nissan Qashqai is not used at high speed, since the limited coverage area sharply narrows the possibilities for safe driving of the car.
Therefore, in this case, you should switch to high beam, and when the vehicle approaches at a distance of 100-200 m, switch to it, restoring high beam after passing.
Advice: starting from 2010, low beams must be used in the country both on highways and within city limits, according to traffic regulations.
Low beam doesn't come on
What can happen in this case when the low beam in the Nissan Qashqai is not on:
- the coil on the lamp burned out;
- the Nissan Qashqai low beam fuse has deteriorated, F5 - for the left, F6 - for the right;
- wire break in the on-board electrical circuit;
- The lamp is not installed correctly in the socket.
Process
So, it's time to start the main actions.
The instructions are simple and will not require much effort from you:
- Take a flathead screwdriver and disconnect the clips that secure the air filter pipe. Just don’t use excessive force; everything can be done without any problems.
- Disconnect and remove the air pipe so that you can carry out the rest of the work more comfortably.
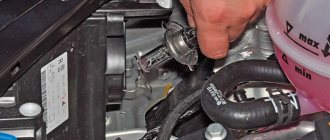
- Remove the protective cover from the back of the headlight, which prevents moisture and dust from entering the light fixture.
- Remove the socket along with the lamp with your own hands and disconnect it.
- Install a new lamp into the socket without touching the glass so as not to leave greasy marks. The price of careless actions is short service life and poor light.
- Install the socket and close it with the rubber gasket by turning it clockwise.
Adjustment
The process is carried out from the back of the optical device.
The Qashqai low beam lamp can be adjusted independently only as a last resort and to do this you need to take the following steps:
- unload the car;
- set the tire pressure that corresponds to the manufacturer’s value;
- fill the fuel tank completely or put ballast in the body of the appropriate weight;
- must be driven by a person or ballast weighing 75 kg;
- Park the machine on level ground.
Use the screws located on the right and left to carry out adjustment work. One serves to set the light beam in height, the other for lateral adjustment.
You need to do this:
- start the engine briefly and set the headlight range control to o;
- park the car 10 m from the garage door or a light wall;
Tip: if you need to adjust only one headlight, install its beam at the adjusted height.
- make appropriate markings on the wall and ensure that the beams of light are directed at the intersections of the lines. (See also the article Adjusting Kia Sid headlights: features.)
Salon
This applies to the exterior lighting of a car. There are also optics inside the car. This directly includes lamps for interior lighting, as well as for the glove compartment and trunk.
Interior lamps
In the front lighting fixture of the Nissan Qashqai interior there are three light bulbs covered with a plastic shade. To access them, you need to remove the lampshade. It is easy to pry off with your fingers. Then change the light bulbs. They are installed on spring contacts, so they can be easily removed. The rear light in the cabin is designed in a similar way.
Glove compartment lighting
The glove box light, being the least used, lasts a very long time. However, from time to time there is a need to replace it. This can be done through the side of the glove compartment. To do this, you need to remove the plastic side panel by carefully prying it from below with your fingers and pulling it towards you, and then down.
Put your hand into the vacated hole, feel for the socket with the light bulb and pull it out. Then change the light bulb and install all components in reverse order.
Important! If you replaced the factory incandescent lamps with similar LEDs, you must maintain the polarity when replacing them. If the lamp does not light up after reinstallation, it must be turned over.
Luggage compartment lighting
To remove the trunk light cover, you need to pry it off using a flat-head screwdriver. Then carefully unfasten the power cable. And also remove the diffuser lens secured with plastic fasteners. The light bulb here, just like in the cabin, is fixed with springs, so it can be easily pulled out. After replacing it with a new one, you should not forget to put everything else in its place.
Generally speaking, replacing optics, both external and internal, is one of the simplest milestones in self-service car maintenance. Even a beginner can handle such manipulations. And the simple diagrams proposed in this article will help you figure it out.
If any difficulties still arise, then YouTube will come to the rescue, where there is a wide variety of videos on this topic. And also be sure to watch the video on the topic below. Good luck with the optics replacement!
Tools and materials
To replace light bulbs in Qashqai yourself, you do not need any special knowledge or skills. To make work easier, you need to remove the air duct casing and protective caps from the back of the headlight. Removing the battery and additional disassembly of the engine compartment is not required.
To remove the clips holding the air duct, you will need a knife or screwdriver. Also, during the work process, a clean rag and a couple of napkins may be useful.
Nissan Qashqai 2012 l. With. — electronics
Krasnoyarsk
Nissan Qashqai, 2008
667 000 ₽
Orenburg
Nissan Qashqai, 2010
645 000 ₽
Moscow
Nissan Qashqai, 2008
550 000 ₽
Penza
Nissan Qashqai, 2011
699 000 ₽
See more cars on Drome
Participate in the discussion can only registered users.
Login Register
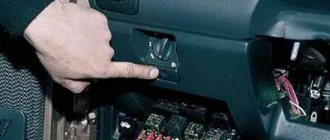
Adjustment
If you did not change the lamps in the field, then the headlights must be adjusted immediately. No matter how good the optics and lamps are, if the light flux is directed directly, they will blind oncoming people. Markings for adjustment can be made on the garage door. If there is a need to adjust only 1 headlight, then set it to the same level as the adjusted one. If you changed the light elements of both headlights, then you will have to tinker longer. The most important conditions for adjustment:
- Empty trunk;
- Correct pressure in all tires;
- The ballast or the person in the driver's seat must not weigh less than 75 kg;
- The car must be level;
- The distance between the machine and the adjustment markings must be at least 10 m.
How to replace a low beam lamp in a Nissan Qashqai
Did you like the article? Follow our channel for new ideas of useful car tips. Subscribe to us in Yandex.Zen. Subscribe.
The car is equipped with the necessary lighting equipment, and low beam is usually used when it is necessary to well illuminate the road in front of the vehicle, but not blind drivers of oncoming cars.
The maximum distance in this case is approximately 50 m, in addition, according to the new rules, it should also be used both in the city and on the highway, even during the day. Therefore, when a headlight bulb becomes unusable, it is necessary to replace it as quickly as possible.
Today we will deal with this problem step by step using a Nissan car. By acting carefully and following the work order, you will be able to restore the vehicle’s functionality in a short time and there will no longer be any complaints against it from the police.
Selecting light sources
Everyone wants to buy a lamp that is good value for money. Many experienced drivers identify several models in which this ratio is the best among others:
- MTF Palladium.
- Bosch plus90.
- Bosch Blue Vision Ultra.
- Koito.
- Philips Diamond Vision/
- Philips H7.
When you compare these products, you will find that their prices vary significantly, but they are still the best options. If you still don’t like anything from the list proposed by experienced people, then you can look at other models.
There are many different types of lighting fixtures on the market. They vary in cost, power, brightness, and so on. But not always the more expensive the lamp, the better and better quality it is. You can buy a cheap light bulb and it will last for several years, but an expensive one may break in six months.
Nissan Tiida wiper blade size
Published: 11/08/2018
Spread the love
Spread the love Car wipers for Nissan Tiida sizeContents1 Car wipers for Nissan Tiida size1.0.1 Rear windshield wiper for Nissan Tiida 11.1 Nissan Tiida size 2 wiper blades1.1.1 Which wipers to install on Nissan Tiida Size of installed wiper blades for Nissan Tiida of the first and second generation. Nissan Tiida 1 - years of production from 2004 to 2014 Nissan Tiida 2 ...
Nissan Tiida wiper blade size Read more »
Video
Qashqai J10
Nissan Qashqai J10 is equipped with various lighting equipment, which periodically fails. At the same time, replacing light bulbs on a first-generation Nissan Qashqai does not take much time and does not require the use of complex equipment. In the material we will consider the required procedure when changing light elements. We will also present the tools necessary for work and modification of suitable lamps.
The sequence of dismantling the door trim
- First of all, carefully remove the decorative trim that covers the mirror adjustment. We dismantle it using the same clip cutter or a flat screwdriver (but very carefully).
- Remove trim from door handle. Also, using a clip on the side of the lock, pry up the lining and remove it. Remove by hand to avoid cracks.
- Remove the screw from the door handle.
- Next, place the clip on the side under the handle and bring it to the middle of the width of the handle. The panel should pop out without much effort. The panel, as a rule, has a special spike in the center that can easily be broken. To remove it carefully, you need to slightly lift the panel and at the same time slightly pull the trim towards you with a clip puller.
- Now the wires are visible. They must be disconnected from the power window controls.
- At this stage there are 3 screws left at the bottom of the door. We unscrew them. Usually on all cars there are 3 screws at the bottom of the door.
- The casing is now held in place only by internal clips. We grab the casing from below and carefully pull it towards us. The clips should come loose and clicks will be heard.
- After the pistons have fired, we lift the casing up and release it. Clips can become fragile over the years, so it is advisable to install new ones.
Recommendation: after completing the necessary work (replacing or repairing the lock, installing speakers, installing a soundproofing layer, etc.), when assembling the door trim, put in place the part that is between the door and the glass that is easier and more convenient when the glass is in the lowered state .