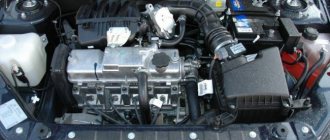
It is rightly said about the Fiat Albea that it is a typical people's car. Buyers saw the first cars in 2002, followed by modernization in 2005. Since 2006, it was produced at the automobile plant in Naberezhnye Chelny. 2012 was the last year for the production of this model; no replacement was invented.
Fiat Albea power units have a timing belt in the valve mechanism drive. Such a drive requires careful, high-quality maintenance, so it will be useful for owners to learn how to replace the gas distribution mechanism on a Fiat Albea.
Check after timing belt change
The car owner must ensure good belt tension.
The verification technique is carried out using a special device or without its use. Sometimes it is enough to just press with your hand and understand the tension force of the element. You shouldn’t tighten it too much, but it’s also not recommended to allow it to sag. After this, the pulley returns to its previous installation location. A test drive is a great way to test properly produced techniques. If the replacement rules are incorrectly interpreted, the machine will give a signal in the form of a lighted indicator. Suspicious noise is an alarming “bell” for the vehicle owner, indicating an illiterate installation. In the absence of “symptoms,” you can be calm and confident that the installation is correct. The reverse order of assembly follows a strict work sequence scheme. To clearly understand the correctness of judgment during repairs, it is worth driving several miles to make sure that the “steel horse” is in perfect order, allowing you to once again enjoy the kilometers of the road, as well as to overcome them safely.
Tools for setting valve timing
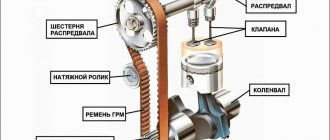
In order for the engine to operate without interruption, it is important to set the timing timing correctly and install the camshafts in the desired position relative to the crankshaft. On all engines, the shafts are set according to marks, and a lot depends on the accuracy of the installation
If the shafts are not aligned correctly, various problems arise:
- the engine is unstable at idle;
- The internal combustion engine does not develop power;
- There are shots in the muffler and popping noises in the intake manifold.
If the marks are wrong by a few teeth, it is possible that the valves may bend and the engine will not start.
On some models of power units, special devices have been developed for setting valve timing. In particular, for engines of the ZMZ-406/406/409 family there is a special template with which the camshaft position angles are measured. The template can be used to check the existing angles, and if they are incorrect, the shafts should be reinstalled. The device for 406 motors is a set consisting of three elements:
- two protractors (for the right and left shaft, they are different);
- protractor
When the crankshaft is set at TDC of the 1st cylinder, the camshaft cams should protrude above the upper plane of the cylinder head at an angle of 19-20º with an error of ± 2.4°, and the intake cam should be slightly higher than the exhaust camshaft cam.
There are also special devices for installing camshafts on BMW engines of the M56/ M54/ M52 models. The kit for installing the valve timing of the internal combustion engine of the BVM includes:
- torque wrench with extension;
- adjustment plate for double VANOS system;
- pins for fixing the flywheel;
- sleeve with spindle for tensioning the primary chain;
- a device for tensioning the secondary chain, as well as for blocking the tensioner plunger;
- camshaft retainer.
ADJUSTING THE CLEARANCES IN THE VALVE DRIVE
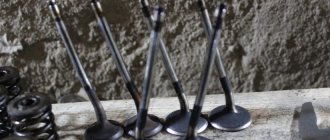
To compensate for the thermal expansion of the valve, a gap is structurally specified between the end of the valve stem and the camshaft cam. With an increased gap, the valve will not open completely, and with a decreased gap, it will not close completely.
The gap is measured with a feeler gauge on a cold engine (at a temperature of +20°C) between the camshaft cam (the cam should be directed upward from the pusher) and the valve pusher adjusting washer. The nominal clearance for the intake valve is (0.30±0.05) mm, for the exhaust valve - (0.40±0.05) mm. The gaps are adjusted by selecting the thickness of the shims. Spare parts are supplied with washers of various thicknesses (every 0.05 mm).
Counting from the camshaft drive pulley, valves 1, 3, 6 and 8 are exhaust, valves 2, 4, 5 and 7 are intake.
Valve adjusting washers for Fiat Albea fit our Samara (VAZ-2114, 2109), verified! But the quality of the metal is an order of magnitude lower than that of the FIAT ones, as well as the diameter of the Samara ones is 30 mm versus 31 mm of the FIAT ones.
From time to time, some owners, especially new ones, have this question? Do the valves on the 350A1000 engine bend or not when the timing belt breaks?
Attention: Today this question remains open! There is still no reliable answer! Of those known isolated cases of belt breakage that are known, nothing criminal happened to car owners. Several other known cases of belt breakage, on the contrary, prove with 100% certainty that the pistons meet the valves
Anyone who has 100% verified information on this matter, please share with us. And we will already share it with all car enthusiasts.
Video of the replacement process without tags
The next period of technical inspection and replacement of the timing belt on a Fiat Albea with your own hands. The systematic operation of the unit depends on the quality of the belt, which drives the crankshaft and camshaft pulley drive, which in general constitutes the phase of the gas distribution mechanism in any car.
In other words, two shafts, when rotating mutually, contribute to the ignition of the combustible mixture and the removal of exhaust gases from the combustion chamber.
As a matter of fact, both human organs and machine components sometimes become unusable, and the timing belt does not escape this. Car owners with little experience sometimes do not know where and what is located and how to replace it. To avoid such questions, in the article below we will carefully analyze the option of replacing this unit.
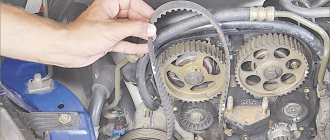
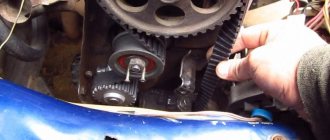
How to correctly set the crankshaft and camshaft marks?
Right under the injection pump we find a window through which we see the flywheel, and there we also see a mark on the box casing.
We twist the flywheel (conveniently with a flat screwdriver by the teeth of the crown) until we see zero, align it with the mark on the casing.
There are other marks on the flywheel, we don’t pay attention to them.
Next: set the camshaft.
The camshaft gears sit without keys, do not touch the front camshaft gear, unscrew and remove the rear camshaft gear, after removal we see a groove in the end of the camshaft journal.
We need to insert a flat metal plate, strictly 4.5 mm thick, into this groove (the main thing is that it fits tightly).
The plate inserted into the camshaft slot should lie tightly, exactly along the plane of the head!
Without removing the plates from the camshaft and once again checking the mark on the flywheel, we put on the timing belt.
We do the tension with a pump; if there is no device for tensioning the belt, then we tighten the belt so that on its longest section, you can turn it 90 degrees with your fingers.
Article number and approximate price for the original timing belt for Fiat Albea
The Fiat Albea uses several engine models, which use different belts to drive the gas distribution mechanisms. Thus, an engine with a volume of 1.2 liters and a power of 73 hp uses consumables with article numbers 71719652 and 46526291. The price for a branded product under the Fiat/Alfa/Lancia brand ranges from 540 to 720 rubles.
In the gas distribution mechanism drive system, many components and parts have a resource comparable to the service life of the belt. Therefore, when replacing it, it is recommended to simultaneously change the worn-out elements. For these purposes, there is a special original kit with article number 71771599. It allows for complete maintenance of the timing drive system. The cost of a branded set ranges from 6000-8000 rubles.
Fiat linea replacing the timing belt at the same time as disassembling and removing the belt
CAR WORKSHOP - do-it-yourself car repairs
Replacing timing belt and drive belts FIAT Albea
Simultaneously with disassembling and removing the belt, the connections and parts of the system are checked. If necessary, additional components are purchased and parallel replacements are made. The video shows the process of replacing the timing belt and drive belts on a FIAT Albea. Spare parts used: - timing belt...
Timing belt FIAT Linea 1.4 77 hp.
The general replacement process is roughly divided into two stages. In the first, the units for working with the timing belt are dismantled and the timing belt drive is removed. Timing belt FIAT Linea 1.4 77 hp.
how to change a timing belt without marks Fiat Albea 1.4 #2
These aspects are general and may indicate other problems in the engine. However, they are considered sufficient reason to, among other things, check the timing belt drive. If signs of wear are detected, replacement begins.
JTC 4929 conductor for timing belt replacement
Next we made marks on the camshaft belt and pulley and the crankshaft timing belt. We transfer the marks to the new belt and do everything in reverse order. In theory, there should also be loosening of the camshaft gear and tensioning of the belt with a roller, but we didn’t loosen the gear and made do with setting marks, i.e. Video review of a set of clamps for a FIAT 8V with a belt drive. Included: Crankshaft retainer. Latch...
Replacing the timing belt, alternator and pump on a Fiat Albea
If the belt is changed for preventive purposes and the engine has not yet been disassembled, then the car owner should be prepared for additional costs. Usually, when dismantling engine components, wear of related parts is detected. It is more convenient to change them right away, so often replacing a timing belt is delayed for several days due to additional purchases. Do-it-yourself replacement of belts on a Fiat Albea.
Replacing the timing belt on a Fiat Punto
Preparation for replacement begins with the acquisition of new components. If the engine was previously disassembled down to the gas distribution mechanism, along with a new belt, other parts are purchased to replace worn connections. replacement of timing belt #fiat #fiatpunto Replacement of timing belt, seals, pump on Fiat Punto, Albea 1.4.
Fiat timing belt 150,000 km. Do I need to change it at 60,000 km?
Maybe this entry will be useful for holders of cars with T-Jet engines, etc. It was back on May 1, 2015, I have had the car for 4 years and at the same time the year of manufacture is 2010, due to such facts it was decided to replace all the belts. Fiat timing belt. Factory replacement schedule is 120,000 km. A Fiat 500 with a 1.2 petrol engine has passed the timing belt...
Timing belt BRAVO No. 5
It was back on May 1, 2015, I’ve had the car for 4 years already and the year of manufacture is 2010. Due to such facts, a decision was made to replace all the belts. In general, this procedure required tools, which were ordered by another owner of another line (with whom we worked on the machines).
Replacing timing belt on Fiat Albea
In our catalog you can see the main characteristics and what the Fiat Linea timing belt kits look like in the photo, as well as how much the spare part costs. Our specialists know which timing belt kits are suitable for Fiat Linea, depending on the year of manufacture and modification of the car, so before replacing the timing belt kit, and in order for the installation of the spare part to occur without problems, contact us and we will help you choose the right spare part and we will arrange a sale with delivery to your address or on a pickup basis from our office.
Fiat / Ford 1.2l Replacing timing belt and water pump
The timing belt in Fiat Linea is changed in accordance with the manufacturer’s recommendations and wear prevention. To replace it with your own hands, you will need specialized tools, experience and skills in working with the engine, as well as care and following the instructions. This tutorial gives you a step by step instruction how to replace the timing belt and the water pump of your Fiat Panda, Fiat 500 or Ford Ka Mk2 with the 1.2 l …
Camshaft device
The camshaft performs an important function in the operation of a car engine - it synchronizes the intake and exhaust strokes of the engine.
Depending on the type of engine, the timing belt can be with a lower valve arrangement (in the cylinder block) or with an upper valve arrangement (in the cylinder head).
In modern engine building, preference is given to the upper location of the timing belt. This allows you to simplify the process of servicing, adjusting and repairing the camshaft, thanks to ease of access to timing parts.
Structurally, the camshaft is connected to the engine crankshaft. This connection is made by means of a belt or chain. The camshaft belt or chain is placed on the camshaft pulley and crankshaft sprocket. The camshaft is driven by the crankshaft.
The most effective is the camshaft pulley - a split gear, which is used for tuning the camshaft in order to increase the power characteristics of the engine.
The cylinder head contains bearings in which the camshaft journals rotate. In case of repair, camshaft repair liners are used to secure the bearing journals.
Camshaft axial play is prevented by camshaft clamps. A through hole is made along the camshaft axis. Through it, the rubbing surfaces of parts are lubricated. On the rear side, this hole is closed by a camshaft plug.
The camshaft lobes are the most important component. Their number corresponds to the number of intake and exhaust valves of the engine. It is the cams that perform the main purpose of the camshaft - adjusting the engine valve timing and the order of operation of the cylinders.
Each valve has its own individual cam, which opens it, “running” onto the pusher. When the cam leaves the tappet, the valve closes under the action of a powerful return spring.
The camshaft cams are located between the bearing journals. Two cams: intake and exhaust for each cylinder. In addition, a gear is attached to the shaft to drive the distributor-distributor and the oil pump. Plus an eccentric to drive the fuel pump.
The gas distribution phase of the camshaft is selected experimentally and depends on the design of the intake and exhaust valves and the engine speed. Manufacturers indicate camshaft timing for each engine model in the form of diagrams or tables.
The camshaft cover is installed on the camshaft supports. The front camshaft cover is common. It contains thrust flanges that fit into the grooves in the camshaft journals.
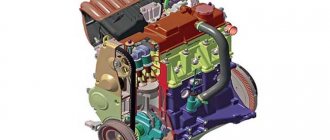
Engines
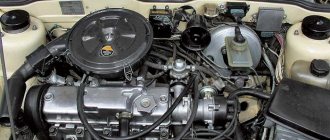
This car was supplied mainly to the automobile market of Russia and Turkey; it was equipped with a 350A1000 engine. It is an in-line engine with four vertical cylinders. The engine displacement is 1400 cm 3, the power supply system is injection, the recommended fuel is AI 95 gasoline. Features of the engines include the ability to electronically control changes in valve timing.
The motor can develop a power of 78 hp. The cylinder head is cast from aluminum, in which 8 valves and a camshaft are installed. The intake and exhaust valves are located on opposite sides of the cylinder head. The thermal clearance of the valve mechanism is adjusted using calibrated washers.
Fiat Albea 1.4 timing belt replacement
Replacing the timing drive on a Feat Albea 1.4 is not such a complicated procedure, but it still requires some preparation. Incorrect installation of the belt drive can lead to engine damage, so you need to take it seriously. This manual has been compiled by those who have extensive experience in car repairs. By following it exactly, you can install the belt drive without any problems.
Proper installation largely depends on the correct location of the shafts
It is very important that they continue to be in the same position as after removal. If even one shaft moves slightly, this will cause a violation of gas distribution
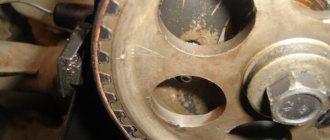
When dismantling the belt, check the condition of the tension roller. If it is unsatisfactory, then it is better to replace the roller too. If you leave the defective roller, then after some time it will still need to be replaced, but in this case you will again have to disassemble the entire mechanism.
Checking timing marks and Fiat chain extension in Yekaterinburg
Checking the Fiat timing marks and chain tension
An incorrectly aligned timing belt will not allow you to start your Fiat car or can cause many other breakdowns. A factory belt can last quite a long time, but this directly depends on the driver’s driving style, the quality of the road surface, and so on. On average, replacement must be done after every 70-90 thousand kilometers. However, after replacement, it will also be necessary to correctly set the timing marks and doing this without a special tool is quite problematic. Signs of a stretched timing chain can easily be confused with other malfunctions, so if you hear knocking or metallic rumbles while driving, be sure to check the timing chain, and it is best to turn to professionals for such services.
How to eliminate incorrect labels?
In order to avoid a situation where, after replacement, the marks do not match, before starting repairs, set the engine to the BMT–1 position; however, not all drivers remember this. In order to check the timing marks after installing the belt, you need to rotate the crankshaft using a socket with a ratchet and observe the reaction of all engine elements. If all the parts work well, then the marks have not gone astray and the timing belt has been installed efficiently.
How to correctly set the engine to BMT-1 position? There are a couple of simple ways :
You can check the timing marks in two ways at once.
What are the consequences of incorrectly installing timing marks?
A Fiat service center will help you install the timing marks correctly, since doing it yourself is not only difficult, but also dangerous. Since this part is responsible for ensuring the smooth operation of the entire gas distribution mechanism of the car, an incorrectly aligned timing belt can cause serious problems in the operation of the car. Breakdowns while driving can cause an accident, so car repairs must be done immediately. Our car service center in Yekaterinburg provides high-quality diagnostics and repair services for cars of any complexity. The cost of our work will depend on its features, but in any case it will remain acceptable.
When to change and how to maintain?
The condition of the belt drive must be constantly monitored. If you don't do this, it may tear, and this is very serious. In this case, the valves will hit the pistons, resulting in deformation of the latter. The belt ensures the order of operation of the propulsion system, and if it is not there, then a real mess will begin in the engine. That is why the belt should be diagnosed at least after 25,000 km. And the service life of the consumable will not exceed 80,000 km. Keep this in mind.
If your car stops starting the first time, then this is a good reason to look under the hood and inquire about the condition of the transmission. If the engine begins to constantly fail or its power has decreased, if the engine constantly overheats, this is also a reason to inquire about the condition of the belt. Of course, these symptoms may have other causes, but wear of the belt drive should not be ruled out.
The condition of the belt can also be determined by its appearance. Here are the cases in which a consumable must be replaced immediately:
- the belt looks frayed;
- the surface is cracked;
- chips and cracks became visible on the belt;
- the ends have become frayed and individual threads are being sharpened;
- There was a decomposition of the structure.
Another reason to replace a consumable is the discovery of oil stains on it. This means that the seals have begun to leak and oil is dripping onto the belt. This will have a detrimental effect on the condition of the consumable, as the oil strongly corrodes the rubber. In this case, it is better to replace the oil seal as well, otherwise oil will drip onto the newly installed drive, which will cause its early wear.
So, if you decide that you can cope with replacing consumables yourself, then prepare everything you need and get started. Here's what you'll need to make the repair:
- purchased belt;
- tension roller (if diagnostics showed that it has backlash or other defects);
- oil seals;
- set of horn keys;
- set of heads;
- screwdrivers with various tips;
- jack.
Sequencing
Here are the tools we need:
- screwdrivers with different tips;
- pliers;
- keys and heads;
- jack;
- new tension roller;
- purchased belt.
Now let’s start doing things step by step:
1. Take a jack, use it to lift the car and remove the right wheel. 2. Remove the engine protection. To do this you will have to unscrew several screws. 3. Remove the generator belt, having first loosened the generator. 4. Unscrew the power steering mounting bolt. 5. Remove the power steering strap. In the photo below you can see the timing kit, which includes all the rollers and pulleys. This is the kit you should buy.
6. Now we need a partner. He will need to press the brake pedal at 4 speed. And at this time you should remove the pulley, having first removed the top cover of the timing belt assembly. Then you will need to remove the bottom cover. 7. Now is a very important stage - setting marks. There is already a mark on the crankshaft, we need to install a second one opposite. It is placed on the block. 8. Now we put a mark on the camshaft block and after setting the mark on the tooth, we put another mark on the head. 9. Now it’s time to unscrew the tensioner. 10. Now you can start dismantling the old belt drive. We remove the belt. 11. When putting on a new belt, make sure that the marks remain in the same place as they were. In addition, pay attention to the direction of the arrows on the belt. They must look in the direction of travel. If you install a belt without following this rule, its teeth will wear out very quickly.
By the way, you can buy a belt without a kit. If you already have the remaining parts of the kit or they do not require replacement, then there is no need to buy them. See photo below:
12. Now turn the crankshaft 2 turns to the right. We tighten the roller. The car should not be at speed during this time. Now you need to check the placement of the marks again. 13. Be sure to check whether the belt is tight enough. Its tension is checked using a special device, but this can be done without it. Simply press down on the belt with your hand. By the way, the belt tension must be correct in all senses - the belt should not sag, and it should not be overtightened either, as this will definitely stretch it. 14. Return the pulley to its place. 15. Now you need to start the car. 16. If the belt is not put on correctly, the warning indicator will light up. Also in this case, extraneous noise may be heard. If this does not happen, then everything was done correctly. 17. If all is well, install the remaining components in their places. Installation must be done in reverse order.
After the belt is installed, be sure to drive the car for a while to break in the new belt. 2-3 kilometers will be enough.
Article number and approximate price for the original timing belt for Albea Fiat
The Fiat Albea car uses several engine models, which use different belts to drive the gas distribution mechanisms. Thus, in a 1.2 liter engine with a volume and power of 73 hp, consumables with article numbers 71719652 and 46526291 are used. The price for a branded product under the Fiat/Alfa/Lancia brand is 540 from up to 720 rubles.
In the gas distribution mechanism drive system, many components have parts comparable to the service life of the belt. Therefore. When replacing a resource, it is recommended to simultaneously change worn-out elements. For these purposes, there is a special original part number with kit 71771599. It allows for complete maintenance of the timing drive system. The cost of a branded set ranges from 6000-8000 Procedure.
How to set TDC on Fiat Alba
In this case, since the vehicle identification number is also stamped on a special marking plate - it is either Instructions for replacing the timing belt on a Fiat Albea Replacing the timing belt and drive belts FIAT Albea The French automaker recommends setting a gap of 0.1 to 0.15 mm for each intake valve Setting up timing belt replacement according to Fiat Doblo tags Fiat Doblo 1. Fiat Doblo alternator belt replacement Fiat service 09 Mar 0 Comments.
Fiat Doblo Replacing the crankshaft oil seal Fiat service 08 May 0 Comments. Checking and replacing the timing belt.
Timing for this
Owners are informed about replacement by the vehicle's operating instructions. According to the instructions of the car manufacturer, the drive must be replaced after a mileage of 60. Check. km. thousand of its condition are carried out during each technical maintenance of the machine. The condition of the belt is influenced by many factors, this is the operating condition, quality, car parts installed. Its performance is negatively affected by the ingress of technical fluids, especially motor oil, into the working area of the drive. And also the “age” of the product plays a significant role, if it is mileage, and large is small, the belt is subject to mandatory Video.
Consequences of incorrect labeling
If the timing marks are set incorrectly, serious consequences for the car can occur.
The most common cases:
- Due to misaligned timing, valves can become deformed during engine operation, and the damage will accumulate.
- The valves will become deformed - bent. Although this will not happen in an 8-valve engine.
- Due to deformation of the valves, the cylinder head may be damaged. As a result, the guide bushings will fail, and cracks may appear on the main power elements.
- The piston mechanism may burn out due to incorrect placement of the timing marks.
- There will be an oil residue on the spark plugs. Plus, the ignition moment of the fuel mixture worsens.
- And also other unpleasant consequences arise.
How to understand that it is time to urgently change the timing belt
On most modern engines, the scenario for a motor accident is as follows. When the timing belt breaks, the camshaft stops rotating and the valves stop in one position. Meanwhile, the crankshaft continues to rotate by inertia, and the pistons “meet” the valves. The camshaft elements, cylinder head, connecting rod group, pistons and more can also become deformed or destroyed. As you understand, repairing the power unit after such a scenario will cost a pretty penny.
The service life of the timing belt, depending on the model, varies from 50 to 100 thousand km (the exact data is indicated in the car’s service book), but you cannot rely on these figures in all cases. It happens, for example, that a car has low mileage, but the belt itself is more than five years old. By this time, this part will almost certainly be worn out due to the natural aging of rubber.
No less often, the service life of the belt is affected by its incorrect installation and external influences. Let's say, a fairly common reason for the premature death of a belt is dirt or debris from previously broken generator and air conditioning compressor belts getting under it, but even more often - oil spillage from leaking camshaft seals, as well as coolant from a leaking pump.
One of the possible reasons for a broken timing belt is poor quality of the product. Hence the conclusion - do not buy such parts on the market “on the cheap”. However, a more common cause of timing problems is leaks or foreign elements under the belt, as well as severe wear, overtightening or insufficient belt tension.
These phenomena will sooner or later lead, if not to a break, then to so-called slippage - the belt will jump several teeth on the crankshaft or camshaft pulley. In this case, the engine may begin to operate intermittently or even stall. Sudden loads on the belt can lead to a break, for example, if the car is often started “with a pusher”.
Taking into account the above, you should regularly inspect the engine compartment for leaks. If you notice a fresh stain in the area of the timing belt cover, sound the alarm.
After all, even a small amount of oil or antifreeze can create conditions for the timing belt to slip. If there are no visible traces of oil or antifreeze, and the engine operates intermittently (does not reach high speeds, does not start well, stalls), you should remove the timing belt cover and make sure that the installed timing marks of the crankshaft and camshaft match.
The ideal option would be to inspect the belt for scuffs, cracks and tears yourself. However, it is not always possible to do this promptly, since access to the part is usually difficult - the belt is covered with dust particles, and there are various parts nearby that many car owners will not be able to remove or will not dare to remove.
However, the presence of a problem can also be determined by external signs. When the belt wears heavily, characteristic ticking or shuffling sounds appear from under the system casings. The same symptoms, by the way, are caused by damaged tension roller bearings or pumps. In any case, if you hear something similar, go to the service center.
If service technicians recommend changing the timing belt due to its wear, then in some cases (for example, when the car is no longer young or you purchased it secondhand and do not know its past), it would be reasonable to change not only the belt, but also a set of rollers.
Moreover, in some cases, along with replacing the old timing belt and rollers, experts advise also changing the pump. The logic of the recommendation is simple - replacing the timing belt is time-consuming and expensive, and the service life of the pump in some cases is comparable to the service life of the timing belt. In other words, this is how you anticipate possible problems. After all, a breakdown of the same pump can lead to a break in the timing belt.
We change it ourselves
Of course, you can replace the timing belt at a service station. But for this simple procedure they will charge you more than one thousand rubles. Therefore, it makes sense to master this not very labor-intensive process yourself.
Required Tools
- hydraulic lift;
- a set of keys;
- round nose pliers;
- socket head;
- screwdrivers;
- tension roller;
- replacement kit;
New kit
- Unscrew the bolt and remove the phase sensor (1);
— Loosen the bolt (1) connecting the high-pressure hose on the power steering pump to gain access to the belt protection bolts;
— Loosen the mounting bolts (2a) and remove the belt protection (2b) from the power steering pump; — Loosen the front (1a) and rear (1b) bolts securing the power steering pump to the mounting bracket, and also loosen the screw (1C) of the belt tension device;
— Thus, we gained access to the timing belt (1c), tension roller (1b);
— Unscrew the nuts (1a) and remove the timing belt;
- Remove the plug (1) of the camshaft timing pulley (2b) and, holding the camshaft in the flats with a wrench, unscrew the bolt (2a); - Secure the camshaft with the tool (1);
— Fix the crankshaft by installing the device (1) previously screwed to the crankshaft toothed pulley;
— Using tool (1a), install and tension the new timing belt, aligning the marks (1c), of the semi-automatic timing belt tensioner roller (1d);
— Unscrew the bolts (1) and remove the side protection of the timing belt;
— Use a special lock (1a) to fix the camshaft gear;
— Tighten the gear to the camshaft, then remove the locking devices, all three. Rotate the crankshaft several times. Check the tension of the semi-automatic timing belt roller; the marks must match. We are installing blockers again
phase installation control. After all the checks, remove the clamps and reassemble the car in the reverse order.
- clean rags.
Stages
- After raising the car on a lift or with a jack, remove the right wheel.
- After unscrewing the screws, remove the plastic protection.
- Loosen the generator tension and remove the belt.
- Next, you need to loosen the power steering tension by unscrewing the tension bolt.
- Remove the power steering belt.
Complete set with all pulleys and rollers
The part can be purchased separately without a kit
After completing the test work, we drive 1-2 kilometers and at this point the work of installing a new timing belt on the Fiat Albea 1.4 can be considered completed.
Self-replacement
The process of preparing to replace the timing belt comes down to choosing a workplace and selecting tools. In the first question, if possible, use a repair pit or a lift; in their absence, a jack with supports is sufficient.
Among the tools necessary for work are:
- set of screwdrivers, pliers;
- sets of open-end and spanner wrenches;
- hammer, pry bar, installation device;
- pullers for belts and pulleys;
- new consumables.
When working with replacing the timing belt, special clothing and gloves are also used. During the preparation process, to increase safety, turn off the minus on the battery. They also put stops under the rear wheels of the car.
Removing the belt
The procedure for removing the belt is conventionally divided into two stages: dismantling the units to provide access to the timing belt and working with the belt drive itself. The first process includes the following steps:
- remove the engine protection, if any;
- dismantle the right wheel and mudguard;
- remove the intake air duct;
- carefully remove the drive belts of mounted units and their tensioner;
- remove the spark plugs, as well as the coil and wires;
- at the end, remove the rear covers (1) of the camshafts and the clutch housing hatch.
After gaining access to the gas distribution system, proceed to removing the timing belt:
- through the adapter (2), the dial indicator is installed in the spark plug hole of the first cylinder;
- its piston is brought to the top dead center (TDC), the displacement of marks (3) and (4) is checked, and the indicator value is reset to zero;
- the flywheel (5) is locked with a corresponding lock;
- remove the crankshaft pulley nut (6) and the pulley itself, as well as the timing belt drive cover;
- Loosen the tensioner nut (7) and remove the belt.
During the removal process, all related parts and mechanisms are checked. If necessary, replace worn components, update lubricant and washers.
Installing a new element
Installation of a new timing belt on a Fiat Bravo is carried out sequentially:
- Check the correct fixation of the flywheel (5);
- Using an adapter and a wrench (8), unscrew the bolts securing the camshaft toothed pulleys (9);
- Install a special device in place of the rear covers (10) and (11);
- A new belt is placed on the crankshaft timing pulley;
- Mount the pulley itself and tighten the nut (6);
- Check again for correct fixation of the flywheel, and then tighten the nut to a torque of 220 Nm;
- Remove the retainer, check the installation of the piston of the first cylinder using the indicator;
- The camshaft pulleys are turned clockwise;
- The belt is put on them counterclockwise;
- Unscrew the bolt securing the rear cover (12) and secure the tensioning device (13) with it;
- Turn the bolt (16) counterclockwise, set the maximum tension (14) and tighten the tensioner nut (7);
- The indicator adapter (2) is unscrewed from the first cylinder;
- Block the camshaft and tighten the bolts (9) to a torque of 115 Nm;
- Remove the installation device (10) from the end of the camshafts;
- The crankshaft is turned two turns clockwise to TDC, checking the correspondence of the mark (4) with the reference mark;
- Loosen the tensioner nut (7), align the pointer with the mark (15);
- The tensioner nut is tightened to a torque of 23 Nm;
- Remove the tensioner and return the cover bolt (12).
After replacing the timing belt on a Fiat Bravo, all dismantled engine components are reassembled in the reverse order. During the assembly process, the tightness of the fasteners is checked, and the systems are simultaneously inspected for worn connections and leaks.
Replacing the timing belt on other models
Replacing the timing belt on the Fiat Marea, as well as on the Fiat Tempra, is carried out according to the same algorithm as in the Fiat Bravo. The general process is standard, but has a number of nuances depending on the car assembly, model and engine type.
The main differences are:
article numbers of parts and components - when purchasing, you should pay attention to this point; mismatch of parts can quickly damage the system; necessary tools - the general requirements for them are the same, individual fasteners, however, may have different removal methods; location of components - assemblies may vary even within the same model range depending on the year of manufacture and other factors; working with parts - tensioning moments, fixation, the need for removal and concomitant replacement - all this may also have minor nuances and differences.
Taking into account such factors, when working with replacing the timing belt on a Fiat Marea, Tempra or other models, it is recommended to refer to the technical documentation of the corresponding assembly. The help of a specialist and his control over the correct assembly are also welcome. This aspect will be especially relevant if you are replacing the timing belt yourself for the first time.
Alfa Romeo, Fiat
Photo 33,34, We install the device for the crankshaft, the pin on the left, do not forget. We screw the bolt from the casing there! Photo 36,37,38, We screw the device for the camshaft into the hole under the camshaft gear, but it’s not necessary, you can use a marker to make marks on the gear and on the head or cover, or better yet, I do it both ways.
Sometimes, when removing, the tension roller rests against the front engine mount, which prevents it from being pulled out. Photo 42,43, An assistant takes the belt and puts it on the crankshaft gear and holds it until the belt is completely installed.
Photo You place the belt on the pump pulley and pull the belt up.
Photo And put it on the camshaft gear. Photo And then onto the video. Photo 48, Using pliers for locking rings, do it as in the photo, turning them clockwise, aligning the forks as shown in the photo, and tighten the timing pulley nut. Photo I tighten it without pliers, with a large screwdriver, it’s more convenient.
Photo But for this you need to remember the tension of the old belt. By the way, pay attention, this branch of the belt should be tensioned with the installed devices. During the work process when removing and putting on the attachment drive pulley, the guide pin photo 28 on the crankshaft gear very often breaks.
In this case, the pulley can be installed in the wrong position and the car will not start. We pay special attention to this pin, as it is small in diameter and very fragile!
FIAT Albea, 77 l. With. — scheduled maintenance
Remove the old belt and compare it with the new one, if it is not the original one, I installed the original one, but still was not too lazy to count each tooth. If everything is OK, transfer the marks to the new belt, counting the number of teeth between the marks on the old belt or overlay, and the direction of the arrows on the belts should match. Continue according to plan, aligning the marks and moving the belt to the inner edge of the pulleys.
If you use a screwdriver, then everything works out by itself, but be careful, the pin on which the roller is attached bends dangerously. Don't overdo it.
Main reasons leading to wear
It’s not for nothing that vehicle manufacturers make recommendations and set regulations - the car undergoes many tests before being released onto the global automotive market. Failure to comply with operating rules inevitably leads to breakdowns. Some of the most common ones include:
- aggressive driving style;
- poor condition of the road surface;
- bad climatic conditions.
For those who want to save time, you need to go to a car repair shop. However, there is nothing difficult about replacing the timing belt on a Fiat Albea with your own hands. In addition, this will help you avoid unexpected costs and gain technical experience.
Step-by-step sequence of work
The car is raised using a jack, and the right wheel is removed. This is the main point at the start. Next you will need to perform the following procedure:
- If you are replacing the timing belt on a Fiat Albea 1.4 with your own hands, you will have to remove the screws and remove the vehicle protection.
- The generator belt is removed, loosening the generator slightly.
- The bolts of the power steering consumable (power steering), which is responsible for transmitting rotations, are loosened.
- Next you will have to disassemble the power steering strap. Experts advise purchasing a kit with pulleys and rollers. Some people buy a complete belt if they have important parts.
- Here, call a neighbor or friend. His “mission” is to press the brakes at fourth speed. At this time, the owner of the vehicle himself has to remove the pulley. Do not forget to remove the cover on top of the mechanical assembly, then on the bottom, in advance.
- This step is extremely important! Remember, when replacing the Fiat Albea timing belt, marks are a responsible matter that requires care and accuracy. A mark installed on the crankshaft facilitates the process; the car enthusiast’s task is to correctly mark the second one. It should be installed on the block.
- A mark is placed on the camshaft block, marks are made on the tooth and head.
- The next step is to unscrew the tensioner and dismantle the outdated belt drive.
- When putting on a new belt, you must not allow the marks to move. The direction of the arrows on the belt is taken into account: they should look in the direction of movement. If you ignore this advice, the teeth will wear out very quickly.
The above steps will be followed by turning the crankshaft two turns to the right. The speed should not be turned on and the roller should be tightened. Checking your marks again won't hurt things at this stage.
Tips and tricks
As you can see, it is quite difficult to say unambiguously how long the timing belt runs. Everything will depend on the operating conditions, timing, condition of other elements that interact with the belt, the quality of the timing belt itself, etc. As a rule, a high-quality belt is guaranteed to last about 60 thousand km. or 3 years, but only if the rollers are in full working order, there are no problems with the water pump, no oil has gotten on the belt, etc.
It also happens that ignoring the rules for replacing rollers and pumps can lead to the new timing belt breaking as a result of jamming, for example, of a water pump. The result is the same valve bending and engine repair. For this reason, it is necessary to periodically check all elements, and also, as part of replacing the belt, optimally change all the rollers. As for the pump, it is also better to change it every 80 thousand km. mileage, even if it is in working order at the time of replacement.
Also, if oil or technical fluids accidentally get on the belt, there is no need to wait for mileage when you need to change the timing belt. In this case, replacement must be carried out immediately! The main reason is that even a new belt, when exposed to oil and other chemical components, begins to delaminate and crack, which significantly increases the risk of breakage.
We also note that when purchasing a timing kit or individual elements, it is important to purchase an original and not a fake. The fact is that today the products of well-known manufacturers are actively counterfeited
For example, you can find counterfeits on the market, for example, timing belts or rollers from well-known brands Gates, Contitech, INA, etc. At the same time, not only individual spare parts are counterfeited, but also entire sets.
As a result, the car owner significantly increases the risk that problems with the timing belt or with the engine itself will arise much earlier than planned. It happens that fake parts of average quality still last 50-60 thousand km, but it is not uncommon for a fake timing belt to break already at 5-10 thousand km, the roller jams, etc.
For this reason, it is necessary to purchase such products only from trusted sellers, perform an independent check, study material on how to distinguish an original timing belt from a fake, or how to check a timing kit for originality.
Much also depends on the correct installation of the new belt on the car. If you change the timing belt yourself, it is important to take into account all the subtleties and nuances as part of such a replacement. If this belt replacement will be performed by other people, it is necessary to entrust such work exclusively to experienced specialists
Remember, errors when installing the timing belt can lead to both engine malfunctions and premature failure of timing drive elements or belt wear/breakage.
Operating principle and diagnostic algorithm
Replacing the timing belt on a Fiat Albea is an important and responsible process that requires attention and free time. Experience is not necessary if you follow the practical recommendations described below.
- We tear off the mounting bolts with a wheel wrench and jack up each side in turn;
- Having provided access to the area of the fender liner, we remove it and remove it from under the bumper;
- We proceed to removing the casing, which is secured with three bolts. We use the cape on “8”;
- Using a “10” cape, unscrew the screws of the air filter housing, remove the filter element itself, as well as the base of the air duct;
- A bundle of electrical wiring chips approaches the timing belt adjusters; it must be disconnected by pressing simultaneously on the sides;
- Using the head at “13”
we release the timing belt tensioner a little, in this way we will ensure greater belt travel, which means freedom of replacement; - Unscrew the pulley that secures the belt to the crankshaft;
- We remove the belt itself and visually inspect obvious defects. The presence of at least one crack or scuff may indirectly indicate loss of performance and imminent failure;
- Installing a new one requires a little skill and diligence. In addition, you will need an assistant for a while, since you cannot install it yourself. Throw and hold the belt over the crankshaft gears, and your assistant will put the pump pulley and the rest of the tensioner roller on the belt;
- We set the piston
of the first cylinder at top dead center by turning the crankshaft shaft by hand. Top dead center marks can be seen directly on the pulleys when synchronizing them. If you do not set these marks, then you should expect instability in the operation of the engine itself and early or late ignition. In other words, the motor will stall and start unstably; - Having completed the procedure, we begin to assemble all other parts in the reverse order;
- At the same time, carry out a visual diagnosis of the chip with the wires; abrasions may be identified that can lead to a short circuit and failure of the sensor;
- In addition, pay attention to the alternator belt drive and the state of its tension. Experts recommend that it be no more than 1.0 cm; if more, then slippage is possible and instability in charging the battery;
- Having finished, we start the engine and run it at different speeds. If there is a poor-quality installation or part, the belt will begin to make similar sounds and noise. This means that it is necessary to re-dismantle and replace the belt, which is most likely defective or not intended for this motor;
Now, taking into account the above recommendations, you know exactly what it is to replace the timing belt on a Fiat Albea. We hope that our tips will help ease the replacement process for many drivers, thereby passing the time and saving their money.
Replacement procedure
Most owners trust the replacement of timing belts to repair shop specialists; this will require additional costs for the work performed. If you have experience in servicing and repairing vehicles, you can independently successfully replace the timing belt in the Fiat Albea timing drive. Desire alone will not be enough; you will also need to have a place to carry out the work, the necessary tools, and new spare parts. The work can be done in the garage above the inspection hole.
To work you will need to prepare:
- car jack;
- a set of wrenches and socket wrenches;
- car jack;
- stand for car body;
- wheel chocks;
- round nose pliers;
- Screwdriver Set;
- rags.
Timing belt Fiat Albea
During operation of the Fiat Albea, the timing belt gradually wears out. Its break leads to the inoperability of the power plant.
To prevent this, periodic timely replacement of the belt is required. It is not particularly difficult to do it yourself, but it is important to know a number of subtleties of successful timing drive maintenance.