We seal cracks in the head and engine block with electric welding
All cracks are subject to resuscitation, with the exception of those that pass through the valve seats, cylinder mirrors, as well as the contact plane of the block and head. In the latter case, the product is rejected, in the rest they try to rehabilitate them, and this is what we will do now, dear readers.
At the very beginning, it is worth informing that there are several ways to eliminate defects. Briefly about everyone.
The first method includes sealing cracks using a conventional drill or electric welding.
If the block is cast iron, then the ends of the crack can be drilled with a drill and ground at an angle of 90 along the entire length with a circle, chisel or some other device.
If you choose to eliminate cracks using electric welding, then before starting work the block must be heated to 600-650C. Then, using a cast iron-copper filler rod with a diameter of 5 mm and flux, you need to apply a continuous, even layer that should not stick out above the metal surface by more than a couple of millimeters. After the crack has been welded, the block should be slowly cooled in a heating cabinet.
The method proposed above is not the only one; you can weld a crack without heating the block, but for this you will need electric welding.
You can use a more affordable method if you don’t have magnets at hand. The surface where cracks are suspected is thoroughly washed with kerosene or any paint solvent. After this, liquid paint is applied to the surface and left for 10-15 minutes, then the surface is wiped with a rag and all defects become visible to the naked eye.
The liquid method is also often used. Before pouring water into the channel, all holes are hermetically sealed. Air is pumped into the channel after water under pressure; you can use a regular car compressor, after which the channel is closed and the block is left for several hours. Places where water will seep through will indicate the presence of cracks. You don’t have to wait several hours; to do this, the block is immersed in water, and air bubbles will indicate the location of the defect. When eliminating cracks, it should be taken into account that it is not recommended to attempt to repair defects on the valve seats, on the cylinder mirrors and at the point of contact between the block and the cylinder head.
Determination methods
To finally verify the formation of microcracks, there are several ways to determine defects.
- Magnets are installed on the device body or cylinder head. Metal shavings are poured on top. It begins to move towards the places where the magnets are installed, getting into the cracks.
- Apply special liquid paint to the cylinder head surface thoroughly washed with acetone or kerosene and wait 10 minutes. After this, use a clean rag to wipe off the remaining paint. Defects after this method are detected immediately.
- Liquid can be used to check integrity. To do this, you need to seal all the holes and pour water into the channel. Using a pump, we pump air into the channel at a pressure of 0.7 MPa. Leave the block in this state for several hours. The leaking water will indicate that there are defects in the block head. In the same way, integrity is checked by immersing the block in a container of water. In this case, the bubbles will show the location of the cracks.
Locations of defects that are not worth attempting to eliminate.
- on valve seats;
- on the cylinder mirrors;
- on the plane of contact between the block and the head.
We weld a patch to a crack in the engine head
You can also weld a patch, for this you will need copper electrodes wrapped in tin. Finally, the seams must be coated with epoxy paste.
The epoxy paste that we have already mentioned can be used to repair cracks in the head and engine block in another way. To do this, you need to clean their surface, drill small holes at the ends of the crack, then cut threads into them and screw in copper or aluminum plugs flush. Then you need to degrease the surface (acetone or gasoline are suitable for this). Then, using a spatula, you need to apply layer by layer, as a result you should get a layer 3-4 millimeters thick. After this, the epoxy should harden within 24 hours, and if you create a hundred-degree heat, it will harden in a couple of hours. Finally, sand the surface and you're done!
For the third method of eliminating cracks, we will again need epoxy paste and fiberglass, which we will use as a patch. The preparatory stage for work is similar to that presented above, only each layer of paste must be alternated with fiberglass. Do not regret it, make a patch with a margin of a few millimeters, otherwise the result will be unsatisfactory. The last layer should be epoxy.
And the final option for today, but not the last in the general list, is the option of resuscitating cracks in the block and engine head - using pins. To do this, at the very beginning we drill holes throughout the crack at a distance of 7-8 mm from each other. We cut the thread and screw in the copper rods to a depth corresponding to the wall thickness. Then we cut them with a hacksaw, leaving the ends protruding a few millimeters above the surface of the parts. Afterwards, with gentle blows, we hammer out the ends of the pins, which form a continuous seam. To consolidate the result, you can finally coat it all with epoxy.
We have described the most suitable options for eliminating cracks in the head and engine block on your own, however, the troubles with the car, unfortunately, do not end there; problems may still arise when the camshaft wears out, as well as when working on the shock absorbers. In any case, do not despair, all this can be easily fixed with your own hands, just by following our simple recommendations.
Water test
This method is similar to the previous one. The whole difference between them is that you don’t need to lower the head with water, but quite the opposite - you need to pour it into the head:
- Check all the holes for leaks.
- Then pour the channel into the water.
- Next, using a pump, pump air into the channel.
- Leave the part to be treated for several hours. If you notice that the water has gone, it means there is a problem with the head and it needs to be changed or, at best, repaired (which will be cheaper, but... will not guarantee the longevity of this component).
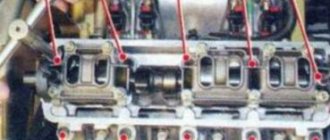
Crack in the cylinder block
Deformations of key engine elements, such as the cylinder block and cylinder head, are serious malfunctions that, if not corrected in a timely manner, can lead to the need for major engine repairs. The formation of cracks in the engine block and cylinder head is one of the most difficult breakdowns in a car. Cracks can occur due to impact (for example, during an accident), due to high wear or manufacturing defects. In this article, we will look at how to determine that the engine cylinder block or cylinder head is cracked, and what can be done about it.
Our email: [email protected]
The problem of repairing cracks in a cast-iron cylinder block in a car service center, and repairing defects in cast-iron parts in general, is very acute.
Cast iron is a treacherous metal, the high carbon content (from 3% to 7.5% in the form of cementite Fe 3 C) makes it low-ductility and difficult to weld, so repairing cast iron products is very delicate. We'll show you the basic principles of coating when repairing heads
cast iron
car cylinder blocks
(cylinder heads) using DYMET® installations.
The photographs below show repaired DYMET® cast iron cylinder blocks and show the stages of the work.
To begin with, we will carry out preliminary preparation of the cylinder head for repair - we will “fix” and then “cut” the defect in the cast iron block
.
This means that, using a milling cutter or other tool, we create
a small groove about 1.5-2.5 mm deep on a crack in a cast iron block
. In order to prevent the crack from spreading, we drill along the edges. Important! – A crack in a cast iron block
should not move when heated, so we fix it with pins or welding at one or more points.
Next, to increase adhesion, it is necessary to give the surface the roughness necessary for the spraying process. Good roughness and adhesion are the basis for reliable adhesion of the coating to cast iron. To treat the surface of the cylinder head, we use the abrasive composition K-00-04-16, that is, we hit the surface with abrasive powder until the roughness suits us - when the cast iron becomes “white” and adhesion increases. If repair work is on stream, it is advisable to use an SD-6 abrasive blasting machine for abrasive processing. You can increase adhesion by applying a thin layer of coating in 3 (third) or 2 (second) mode of operation of the device to the places for future coating on the cast iron block head
cylinders
Let's start filling the crack
composition A-20-11 in 4 (fourth) mode along the entire length of the previously prepared groove. Powder composition A-20-11 perfectly covers cracks and holes. The spraying process first involves the growth of tubercles at the edges of the crack, then the crack is closed.
So, instead of a crack-groove on the surface of a cast-iron block, we have a mound of sprayed metal. It is necessary to carefully cut off the excess coating to the base metal with any proper tool; if we remove a little more, it’s not a big deal, since after that we apply the final sealing coating. To do this, apply to the filled crack in the cast iron block.
in modes 2 and 3, copper composition S-01-01), or copper with zinc (composition S-01-11). But the already familiar A-20-11 composition is also suitable for us.
When repairing a crack in a cast iron cylinder head
the part is slightly heated by hot air, fifteen minutes is enough to cool down.
After 15 minutes, we perform quality control of the repair and sprayed coating. If the preparation of a crack in cast iron
for spraying was not proper (the vast majority of cases are due to poor tack), then we will see a hair-thin crack.
If the crack is quite long (the assessment comes with experience), it is necessary to “cut” and spray again. For short cracks,
we get by with drilling.
Note that the cost of consumables, energy and labor when repairing cylinder head and cracks in cast iron blocks with DIMET® is negligible compared to the cost of new parts.
For your attention, a review of the repair of the cylinder head of Motorservice LLC:
Find out the cost of DYMET devices for cylinder head repair by filling out the form below. Please indicate your region, field of activity, and your email address for a response. Thank you!
Symptoms of a crack in the cylinder block and cylinder head
There are several signs that, if detected, should sound the alarm and send the engine for diagnostics. They may indicate both the formation of cracks in the engine and other malfunctions. Most often, cracks in the cylinder block and cylinder head are indicated by:
- Regular engine overheating. If, due to a crack, the system is no longer sealed, this will lead to coolant leakage and constant overheating of the engine. This problem can also occur due to burnout or other defects in the cylinder block gasket;
- Problems with the operation of the temperature control device (thermocouple). This is fraught with severe overheating of the engine and its deformation;
- The expansion tank does not hold pressure and air pockets form;
- Incorrect temperature sensor readings. If the temperature sensor needle changes chaotically, either up or down, this may indicate sharp changes in the temperature of the engine itself during operation;
- Engine vibrations. One of the most obvious signs of cracks in the cylinder block. If the engine vibrates or shakes excessively, especially when driving uphill, this may indicate the presence of microcracks in the engine block.
Repair of the combustion chamber of the “TOYOTA” cylinder head
The meeting between the piston and the valve did not please the owner at all. The engine started knocking - the combustion chamber of the TOYOTA cylinder head was broken. Buying new?
No, of course, because for DIMET, repairing a cylinder head with this damage should take no more than an hour.
Everything is in the standard sequence: we remove all these ridges and saggings that appear as a result of the “meeting” manually with a milling cutter and expand the nicks, then with abrasive in mode “3”, there are no narrow cracks and cavities, then we apply A-80-13, if there is - better A -20-11, apply with a margin of 1-1.5 mm. Everything took 25-30 minutes. They took it for milling - another 15 minutes. The cylinder head was repaired, as expected, in an hour.
How to detect cracks in the cylinder block
Not always, when we talk about a crack in the cylinder block, it means a serious defect noticeable to the eye. Quite often these are microcracks, which can be determined by one of the following methods:
- Pneumatic crimping;
- Use of ultrasound scanning;
- Application of specialized magnetically sensitive equipment;
- Hydrocontrol.
Each of these methods allows you to determine whether there are microcracks in the cylinder block, and where exactly they are located. Most often, service centers, in the absence of specialized equipment for diagnosing a cylinder block, use the method of searching for cracks using water or air.
The essence of this method is simple - water is pumped into the cylinder block, and if it leaks out, it means there is a crack in that place. When using air, air is pumped inside, and the part itself is immersed under water, thereby, by the presence of bubbles on the surface of the water, it will be possible to understand whether there is a crack.
Please note: Magnets can be used to pinpoint the location of the crack. They are installed along the edges of the expected split in the cylinder block, after which the space between them is filled with conductive sawdust. If there is a crack, the magnetic field lines will break and sawdust will collect in the area where the microcrack is located.
How to repair a crack in a cylinder block
Depending on the extent of the damage, various methods can be used to repair the cylinder block. It is worth noting that in some cases it is more advisable to replace the unit rather than repair it.
Welding method
The most common method of repairing a crack in a cylinder block. At the same time, welding a cylinder block is quite a complex job, since it requires strict adherence to technological regulations. If you make mistakes when welding, the seam will come apart while the engine is running and the problem will return.
When welding, the ends of the crack on the cylinder block are initially drilled out. This must be done to avoid the possibility of crack propagation. Drilling and further grinding are carried out at an angle of 90 degrees.
Next, the welding process itself begins. To do this, the cylinder block must be heated to 650 degrees Celsius, after which a continuous seam is applied using a cast-iron-copper rod and flux. Next, the part is gradually cooled in a heating cabinet.
Important: Do not suddenly cool the part, otherwise it will lead to rupture of the seam.
It is worth noting that you can weld the cylinder block without heating it. To do this, you should use electric welding and copper electrodes in a tin wrapper. At the end of the work, the applied seam must be degreased using acetone or special compounds. Next, you need to apply a layer of epoxy paste on top of the seam with a spatula. Next, the part needs to be “dried” by leaving it at room temperature for 24 hours so that the epoxy is completely dry. The final stage is grinding the treated seam.
By applying epoxy and fiberglass method
A simple method that allows you to eliminate minor cracks on the surface of the cylinder block. The method involves creating an additional layer made of epoxy paste and fiberglass on the surface of the crack.
To seal a crack using this method, you first need to thoroughly degrease the surface so that the applied compounds “take root” better. Next, several layers of epoxy paste and several layers of fiberglass are applied alternately. The last layer should be epoxy.
SEAL-LOCK method
A rather labor-intensive modern method of eliminating cracks in a cylinder block. Its clear advantage is the ability to carry out work without welding and without dismantling the engine itself. The essence of the method is to fill existing cracks with soft metal.
The work is performed as follows:
The first step is to localize the damage. The crack is drilled from the edges;
- After this, holes are drilled across the crack at the pitch provided by the technology. Clip ties are placed in these holes to tie the edges of the crack. Staples should be selected based on the type of split. Service stations usually stock the most common staples in length and shape, and if necessary, they can be custom-made for a specific fault;
- A hole is drilled between the installed brackets and a tapered thread is cut using a special tap;
- To remove the oxide film, the resulting hole is processed;
- The cone plug is screwed into the formed threaded hole;
- Next you need to file down the “extra” part of the plug, which rises above the surface area of the cylinder block. Afterwards, be sure to “tighten” the plug more tightly using special tools, as a result of which the sawed area will break off;
- Next, you need to sand down the protruding remains of the plug;
- After this, they proceed to drilling the next hole, which should partially overlap the previous hole with the plug installed. In this way, the entire crack is filled with plugs;
- After finishing the work, the seam formed by these plugs must be additionally compressed so that it more reliably fixes the gap.
Let's look at repairs using Seal-Lock technology step by step.
- Visual inspection for cracks, use of ultrasonic or magnetic particle methods to detect hidden cracks.
- Determining the crack boundary and drilling along the edges to prevent further development.
- Drilling side holes to install staples perpendicular to the crack. The staples, made from high-strength steel and heat-treated, stop further expansion of the crack when screws are installed (this process is described below). The paper clips are pre-forged using a special Seal-Lock pneumatic hammer.
- The next step is to install special conical screws along the entire crack between the already installed staples. For each screw, a hole is drilled and the thread is cut with a special conical tap. Each hole is coated with Seal-Lock to prevent voids from forming in the sealing area. Thermal resistance of the sealant is 1700? C.
- Installing a screw into a threaded hole (Selans - for cast iron parts, Alumalans - for aluminum parts) with the force necessary for a tight tension in the threads. The part remaining on the surface is cut off and a hole is drilled nearby, along the crack, so that part of the material of the cut screw is drilled. And so on until the entire crack is filled.
- Forging metal of paper clips, screws and the part being repaired with a pneumatic hammer. In this way, a continuous row of plug material is created, connected to each other and to the part at the molecular level. It is a seamless connection.
- Sanding the repair area. If required, pressure testing is performed.
This technology eliminates holes in the engine block. The puncture site is machined into shape to make the patch easier to fabricate. When installed, the manufactured patch fits tightly to the seat. At the resulting junction of the two parts, conical bolts are installed with overlap.
With this repair method, if the defect is in an easily accessible place, eliminating the malfunction is possible without dismantling or disassembling the engine.
Summarizing the Seal-Lock technology described above, the use of a special material of staples and screws made repairs simpler and more reliable. These parts are made of a durable and at the same time ductile alloy, capable of bonding metals together at the molecular level under light loads and without heating.
This is interesting: Do-it-yourself motor installation
Cracks in the head and engine block: problem solving
The formation of cracks in the block and engine head is a direct consequence of the driver’s oversight. The factors that provoke their appearance are both mechanical damage and banal freezing of the liquid in the cooling system. Of course, no one is immune from such force majeure circumstances, however, it is still better to take into account the above reasons when operating a car.
If you couldn’t avoid trouble, you shouldn’t despair. You can repair damaged parts yourself, with some effort and a preliminary study of the extent of the cracks that have formed.
Thus, parts that have cracks located in the area of placement cannot be restored: the plane of the junction of the block and the cylinder head, the cylinder mirrors or the valve seats. It is quite possible to try to repair all other damage.
Audi 1988, 75 l. With. - just
Biysk
Audi 80, 1988
65 000 ₽
Omsk
Audi 80, 1990
120 000 ₽
Barnaul
Audi 80, 1989
45 000 ₽
Funny
Audi 80, 1989
75 000 ₽
See more cars on Drome
Participate in the discussion can only registered users.
Login Register
Solutions to the problem
One of the most common is the welding method (electric or gas). In the case of repairing an engine block made of cast iron, it is necessary to first drill out the crack at the ends 0.5 cm deep, then cut it along its entire length with a chisel, grinding wheel or similar tool so that the angle of application is 90 degrees.
The depth of impact should reach 80% of the total wall thickness. Before starting welding work, the block must be heated to a temperature of at least 600 degrees Celsius.
Next, you need to start welding using a neutral flame of a gas torch (gas welding method), using a five-millimeter (in diameter) copper filler rod or flux. The metal is applied to the damaged area evenly, completely, allowing the seam to protrude outward by no more than 1.5 millimeters.
Having completed the welding process, the block must be subjected to gradual cooling in a special pit or heating cabinet.
If electric welding equipment is used for work, you can do without heating the engine block to be restored. In this case, it is necessary to use reverse polarity direct current. If you want to install a steel patch in place of the crack, you will have to use copper-based electrodes in a tin wrapper.
For greater safety, the weld area can be coated with epoxy-based paste.
Another way to repair cracked structural elements of an engine block is to seal the cracks with a special epoxy-based repair paste. In this case, the area where the crack is located is thoroughly cleaned inside and out using a metal-based brush. Then holes with a diameter of no more than 4 millimeters are drilled at the ends of the crack and used for cutting threads.
A plug made of wire on an aluminum or copper base is screwed into the resulting hole. Next, the surface of the crack is processed using a tool (chisel, grinder, wheel, etc.) to a depth of up to 75°/o of the total value, making an impact at an angle from 60 to 90 degrees.
Along the entire length of the crack, retreating from its edge within three centimeters, it is necessary to apply notches using a tool. The surface of the block prepared for repair is degreased using gasoline or acetone, and then proceed to applying an epoxy-based paste.
The paste is applied in two layers, each of which should not have a thickness of more than 2 millimeters. Hardening of the material occurs within one to two days, depending on the final thickness of the layers. If the repair area is heated to one hundred degrees Celsius, the curing time will be reduced to three hours.
After the paste has hardened, the surface is leveled and ground using a file or abrasive materials.
You can also repair cracks in the block and engine head using a fiberglass patch and the already familiar epoxy-based repair paste. In essence, this method differs little from the previous one. The only difference is that each layer of applied paste is covered with a duplicate layer of fiberglass, followed by covering the surface of such a patch with paste and leveling it using roller devices. In this case there can be no more than eight layers in total.
You can also repair the surface of the block by installing pins on it. In this case, holes are drilled not only at the ends of the crack (up to 0.5 cm deep), but also along its entire perimeter, 7-8 millimeters apart.
Next, threads are cut and copper rods are installed (the depth should correspond to the thickness of the block wall). Then the excess parts of the rods are cut off (as a result, they should not protrude above the surface by more than 2 millimeters).
And in the spaces between the installed pins, additional holes are drilled, the diameter of which should be a quarter larger than the size of the plugs. Copper rods are also placed into these holes and trimmed.
The resulting row of pins is hammered until a continuous, seamless seam is formed. If desired, the resulting surface can be further strengthened by coating the outside with an epoxy-based paste. Upon completion of the repair, the unit must be pressure tested.
Repairing a cracked cylinder head is done in the same way , but only if the areas where the valve guide bushing is located, the combustion chamber or the valve seat in the seat area are not cracked.
Is it possible to weld cast iron with a semi-automatic machine?
Cast iron is cooked using a
at low direct current and with reverse polarity. A graphite lining (subform) is placed under the parts. The holder is held at an angle of 50-60 degrees to the surface of the parts to be welded. The main thing is to see the end of the wire and control the entire process.
Interesting materials:
How long will it take for a parcel from China to Belarus? How long will it take for a parcel from Moscow to Perm? How much will the mortgage be in 2022? What time is half past six? How much will a DNA paternity test cost? How much will the euro be worth in 2022? How much will the new Niva cost? How much will the toll road from Moscow to St. Petersburg cost? How much will it cost to completely repaint a car? How much will it cost to build a fence?
Signs of crack formation
There are several main symptoms, if they appear, you should immediately contact service. They may be the result of cracks in the engine or other problems with the car. The following signs are most common.
- The engine began to overheat frequently. If cracks form, coolant may leak through them, causing overheating. Sometimes the cause may also be burnout or defective cylinder block gaskets.
- Malfunction of the device that controls the temperature. Delaying the solution to this problem can lead to overheating and engine deformation.
- Air pockets appear in the expansion tank and pressure increases.
- The temperature sensor shows incorrect data. If you notice that the sensor needle constantly jumps from high to low readings in a chaotic manner, this may indicate constant changes in engine temperature during operation.
- Engine vibration. This is the main sign by which cracks can be detected. If the engine shakes or vibrates when driving uphill, it most likely has defects.
How to Diagnose the Problem
It is not always possible to see defects on a cylinder with the naked eye. Most often they are microcracks, so to detect them, use one of the following methods:
Each of these methods allows you to effectively find the problem, but even specialized salons do not always have the necessary equipment. Therefore, they usually use the water or air method.
To do this, pour water inside the cylinder block and inspect it from all sides. If in some place water begins to seep and drip, then there is a crack there. To use the air method, air is pumped into the block and immersed under water. If bubbles come out of it on one side, then the crack should be looked for there.
Another way to quickly detect a crack is with magnets. They should be placed on both sides of the intended split site, and the space between them should be filled with sawdust that conducts current. If there is a crack on the device, then sawdust will gather in a heap in the place where it is located.
Pressure diagnostics
This technique is performed in several ways: immersion in water or without it. Read below on how to perform these operations.
Immersion in water:
- Initially, close all channels of the spare part that may be adversely affected by water.
- After this, place the part in a container filled with water over 40 degrees Celsius.
- Then use compressed air (there is a crack in the places where bubbles appear).
The procedure without “immersion” is performed as follows:
- As in the previous case, make sure that all GBU channels are closed.
- Pour the soap solution onto the lid.
- Supply air masses into the circuit of the “sick” part. If there is a defect, soap masses form at this place.
How to repair a crack
The method that should be used to fix the problem depends on the size of the suspected crack. If it is too large, it would be wiser to replace the unit rather than repair it.
This is the most affordable and popular method for eliminating cracks. However, the process itself is quite complex: the technology must be strictly followed, otherwise the seams may come apart during engine operation.
First you need to drill out the ends of the crack on the cylinder block. This is done in order to avoid a possible increase in the size of the crack. Welding and further grinding should be carried out at a right angle (90 degrees).
Now you can proceed directly to welding. Heat the cylinder block to 650 degrees Celsius, and then use flux and a cast-iron-copper rod to create a continuous weld. Cooling of the part must be carried out in a special heating cabinet.
Attention! Do not cool the part suddenly, otherwise the seam may rupture.
Welding can be carried out without heating the part, but for this you will have to use electric welding - copper electrodes in a tin wrapper. After completing the work, be sure to degrease the resulting seam with acetone or a special compound. Then apply a layer of epoxy paste on it with a spatula and dry at room temperature for 24 hours. Finally, be sure to sand the finished seam.
Epoxy and fiberglass overlay
This is the easiest way to eliminate cracks. It consists of applying an additional layer of epoxy paste and fiberglass over the damaged area.
Before starting work, be sure to degrease the area so that the compounds stick better, otherwise the crack may open again after some time. Then place several layers of paste and the same amount of fiberglass one by one. Please note that the epoxy layer should be applied last.
SEAL-LOCK method
This modern method is considered the most labor-intensive, but at the same time the most convenient. To use it, you do not need to remove the engine itself; all manipulations are performed without dismantling. The essence of the technology is to fill the found cracks with soft metal.
- First, localize the damage and drill out the crack from the edges.
- Then drill holes crosswise to insert staples that will tighten the edges of the hole. Select the size of the staples in accordance with the parameters of the drilled holes.
- Now you need to drill a hole between the installed brackets, and then cut the tapered thread using a special tap.
- Treat the resulting hole to remove the oxide film.
- Screw the cone-shaped plug into the resulting threaded hole.
- Now you need to file off the excess part of the plug that sticks out above the cylinder block. Then tighten the plug harder so that the sawed part breaks.
- Sand the remaining protrusion.
- Start cutting the next hole so that it slightly overlaps the previous one with the plug. Continue making plugs until the entire crack is filled with them.
- Further compress the resulting seam from the plugs so that the gap is fixed as reliably as possible.
Finding and repairing cracks in a cylinder is not as difficult as it seems. The easiest way at home is the option of applying epoxy and fiberglass. It does not take much time and effort, and is also simple if you repair the car yourself.