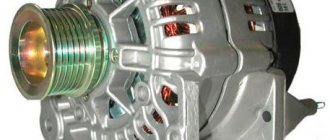
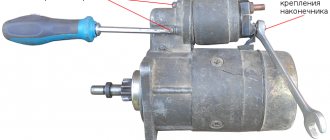
Rice. No. 1. Design of generators KI, NI from Bosch. a – rectifier block, b – appearance of the rectifier block diode. Where: 1 – positive heat sink; 2 and 8 – terminals “B+” of the generator; 3 – output “D+” of the generator; 4 – terminal “+” for connecting a capacitor; 5 – pressed diode; 6 – heat sink of negative polarity; 7 – output “W” of the generator; 9 – spring terminal “D+”.
Rectifier circuit diagram, explanations
To increase the power of the generator, an additional arm of diodes VD7, VD8 is used, that is, an eleven-diode bridge. The additional diodes are connected to the common point of the stator winding, wound in a WYE (star) configuration where the phase voltage is applied. With the help of these diodes, the generator power is added, it increases by 15 - 20% without design changes or harm to the generator components.
Rice. No. 2. Schematic diagram of the generator, where under the number 4 on the diagram there are diodes of the power rectifier, VD7, VD8 - diodes that increase the power of the generator. Under the number 7 are the diodes of the excitation winding rectifier.
Circuit of its own rectifier using diodes VD9, VD11. Thanks to these diodes, the battery holds a charge for a long time when the engine is turned off.
Generator burnout or what is a diode bridge
When they talk about the generator burning out, they mean the diode bridge. It is a mandatory component of the generator.
Diagnosing a car with a burnt-out gene can be done easily. But repairs will require some effort and specific knowledge. It will be necessary to carefully study the design of the generator in order to be able to disassemble it, thereby getting to the diodes.
How to check the diode bridge? First of all, check the readings with the values on the dashboard. There is an icon that resembles a battery. After starting the engine, this icon should go out. Thus, the motorist is informed that the power supply to the main electrical components of the car has been switched from the battery to the generator.
But if the icon does not go out, then this is a cause for concern. The system gives a signal that a breakdown has occurred in the circuit. The reason still needs to be clarified more specifically, because this may also indicate a weak or damaged battery.
The main marks confirming damage to the diode bridge are the following:
- leakage current;
- fast and frequent battery discharge;
- small spark on spark plugs;
- reduction in cooling fan power;
- unstable operation of the air conditioner;
- interruptions in the functioning of the sound system;
- poor lighting of the optics while the engine is running.
Read also: How to connect a receiver for digital television
By looking at the headlights, many experienced motorists will immediately determine the faulty gene, without confusing it with battery problems. If the headlights shine dimly when the engine is off, the battery is to blame; if when the engine is running, it’s the generator.
If the diodes burn out, don't panic. It is better to find out the reason why this happens. Below we will describe instructions that imply autonomous diagnostics of DM.
The generator will need to be disassembled to gain access to the diode bridge.
- the current at the gene outputs is checked (it should not be lower than 13.5 V);
- At the same time, you need to check the instrument readings to see if the indicator continues to light after starting the internal combustion engine (provided that the gene is connected to the car);
- check the diode bridge with a voltmeter (if the meter needle moves into the red zone, the diodes are definitely faulty).
However, these signs, even if they are identified in their entirety, cannot yet prove 100% failure of the diode bridge, since similar symptoms indicate a breakdown of the chocolate bar (regulator).
Experts advise using the exclusion method in this case. That is, check the voltage regulator. If it is working properly, there is definitely a problem with the bridge.
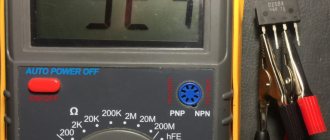
The diode bridge is professionally tested with a multimeter. The device must be set to sound indication mode. If the multimeter does not have this ability, then you will have to measure in 1-kOhm mode.
It is noteworthy that individual measurements are carried out for diodes. In particular, the ends of the diodes should be touched with the probe of the measuring device several times, changing the terminals of the device each time. In one of the cases, the test should show BRS (infinity resistance), in the other - Ohm fluctuations in the range of 500-700.
A diode can be considered damaged if the readings are the same when measured in different directions.
Diodes are also checked using an indicator. This is done like this:
- gene protection is dismantled;
- The DM plate is connected to the negative terminal of the battery;
- The indicator is connected at one end to the positive terminal of the battery, and at the other end it is checked.
If, after touching the second end of the indicator to the diodes, the light bulb lights up, then the element is damaged.
Causes of diode breakdown
The diode bridge burns out due to overload due to excess current consumption. This happens due to the connection of consumers with a load exceeding the calculated value.
Examples of diode bridge output are:
· incorrect actions to “light” someone else’s car with the engine running in your own car;
· reversed polarity of the battery when lighting a cigarette;
· a short circuit between the plates of heat sinks connected to the “ground” and “plus” of the generator by random metal objects or conductive bridges made of dust and dirt can cause a fire along the generator-battery circuit. Therefore, the heat sink plates are partially insulated.
· connection of powerful acoustics with a soft buffer with a large load, increasing the rated current for which the generator is designed;
· short circuit in the banks of a faulty battery;
· microcracks appearing from temperature changes under the hood of the car, as a result of condensation or ordinary moisture entering the cracks from careless driving;
· sometimes diodes fail on their own.
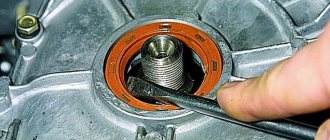
Removing the generator on the “eight”
To dismantle the unit for replacement or repair, you will need “17” keys and a mounting blade. Before starting work, be sure to generously treat all threaded connections to facilitate dismantling. The procedure looks like this:
- Disconnect the negative terminal from the battery.
- Unscrew the top nut securing the generator housing to the bracket.
- Unscrew the nut on the lower mounting bolt.
- Slide the generator housing towards the engine block and remove the belt.
- Unscrew the nut from the power contact and move the wires to the side.
- Remove the lower mounting bolt.
After all these manipulations, you can completely dismantle the unit. This can be done either from below, if protection is not installed on the car, or from above.
Diode check
The junction in semiconductor diodes is always open; there are no obstacles to the flow of current in the presence of voltage. Serviceable diodes do not pass current in the opposite direction, that is, one-way conduction is observed. A probe from the positive contact is applied to the anode, and a minus contact to the cathode. Current must flow. We applied minus to the anode and plus to the cathode, no current should pass.
A faulty diode is when conductivity is completely absent or current flows in both directions. The check is carried out using a tester.
The diode bridge can be checked without removing the generator from the car using a connected oscilloscope. For example, on Bosch generators the rectified voltage is characterized by a pulsating nature. Identical ripples indicate normal operation of the rectifier. Violation of the symmetry of the pulsation graph is the failure of one of the diodes. Checking the diode bridge without removing it from the car is carried out with the terminals removed from the battery.
High current requires separate (parallel) connection of diodes. The design of a high-power generator involves parallel connection of semiconductor diodes or rectifier units. The diode current is equal to a third of the current produced by the generator, so if the diode is rated at 75 A, then the generator will also be 75 A.
Replacing diodes requires certain skills, so for correct replacement and to prevent erroneous connections, use the services of a specialized workshop. So, you will save time and your own nerves. Do not forget that sometimes it is better to completely replace the diode bridge than to repair it.
Once it starts working, the generator begins to produce direct current, but to operate all the devices in the car, as well as to charge the battery, an alternating current is needed (pulsating with a clearly defined frequency).
Diode bridge 2110-3701315 “StartVOLT” for VAZ 2110-2172 generators produced by KZATE
It is the conversion of current that the diode bridge of the VAZ 2110 generator, which is also called a rectifier, is engaged in. And although there are many design options, the cars are equipped with three-phase ones, the advantages of which are obvious:
- At the output they create the smallest ripple voltage;
- Three-phase rectifiers are suitable for bridge and half-bridge diodes;
- They make it possible to install an additional capacitor - a current filter.
Diagnostics
To check, the generator does not need to be removed. The test is carried out using a tester. You can use a cheap Chinese tester. The two probes of the measuring device need to be connected to the battery terminals and the voltage checked.
Analysis of voltage values makes it possible to judge the health of the generator set. What voltage the generator device produces can be found in the manual.
Unit location
Signs of device malfunction:
- The charging indicator light is constantly on or flashes when the engine is running;
- the battery either does not discharge completely or receives an increased charge;
- The headlights do not shine well enough when the engine is running, poor performance of other electricity consumers;
- the headlights are too bright, the electrolyte in the battery boils;
- heats up at high voltage;
- increased noise during engine operation from the generator side.
There may be problems in the brush assembly, which may be due to a malfunction of the brushes, their size, or problems with the three-level regulator. It is impossible to check the size and serviceability of the brushes without removing the generator. But you can change the brushes.
Signs of worn brushes:
- no battery charging;
- Voltage jumps when charging;
- The on-board voltage in the network is below normal.
If the brushes are less than 0.5 cm long, that is, they do not correspond to the required size, they need to be replaced. The condition of the brushes is checked to see how the brushes move in the grooves. After replacing the brushes, the generator restores its operation after a few minutes when the slip rings and brushes grind in.
Three-level voltage regulator
The three-level regulator should be checked along with the brush holders. If the regulator is working properly, the voltage should be 14.7 V. If the voltage is less than 13 V, the regulator must be replaced with a new one, since it maintains the required voltage for devices in the on-board network. If the regulator is faulty, the installation heats up. The procedure for replacing the three-level regulator is similar to replacing the brushes, since the devices are removed together.
Problems are possible not only with the cheeks, but also with the diode bridge.
Signs of a diode bridge malfunction:
- There is no charging at all;
- charging significantly exceeds the permissible values.
Repairing a diode bridge by replacing its spare parts is problematic. Therefore, the problem can be solved by replacing the diode bridge with a new one. When replacing the diode bridge, install the contact bolt, install the leads of the stator windings, and install the brush assembly. After installing the protective casing, the diode bridge is mounted, the power supply is connected and the drive belt is put on the pulley. After installing the belt on the pulley, check the tension of the drive belt.
Design
In the original (factory) configuration, the diode bridge of the generator on the VAZ 2110 is a monolithic structure. It is quite reliable, inexpensive, compact, and has, one might say, only one drawback: if one of the diodes burns out, its local replacement is impossible; you need to buy a new factory bridge and install it.
In the event that a check shows that the diode bridge is no longer functioning and needs to be replaced, it is quite possible to assemble it from various diodes. If the factory layout provides four or six diodes, then during self-assembly you can install an additional one.
Many car enthusiasts do this. In addition, as a rule, in the case of self-assembly, diodes are installed not in the factory layout, but a little stronger, so that they do not burn out so quickly.
But since it is impossible to qualitatively test such a rectifier, during “home assembly” you can damage the generator, after which it will be necessary to replace not just a cheap part, but the entire assembly.
How to check the health of the generator
Generator type 94.3701 alternating current, three-phase, with built-in rectifier unit and electronic voltage regulator, right rotation (drive side).
The generator connection diagram is shown in Figure 1.
The voltage to excite the generator when the ignition is turned on is supplied to terminal “D+” of the regulator (terminal “D” of the generator) through indicator lamp 4 located in the instrument cluster.
After starting the engine, the excitation winding is powered by three additional diodes installed on the generator rectifier block. The “W” output of the generator is not used on vehicles of the VAZ-2115 family.
The operation of the generator is controlled by a warning lamp in the instrument cluster.
When the ignition is turned on, the lamp should be on, and after starting the engine, it should go out if the generator is working.
A brightly burning lamp or glowing at full intensity indicates a malfunction.
The “minus” of the battery should always be connected to ground, and the “plus” should always be connected to the “B+” terminal of the generator.
Failure to turn the battery back on will immediately cause increased current through the generator valves and damage them.
It is not allowed to operate the generator with the battery disconnected. This will cause short-term overvoltages to occur at the “B+” terminal of the generator, which can damage the generator voltage regulator and electronic devices in the vehicle’s on-board network.
It is prohibited to check the functionality of the generator “for spark” even by briefly connecting the “B+” terminal of the generator to ground. In this case, significant current flows through the valves and they are damaged.
The generator can only be checked using an ammeter and voltmeter.
The generator valves are not allowed to be checked with a voltage of more than 12 V or with a megger, since it has a voltage too high for the valves, and they will be broken during testing (a short circuit will occur).
It is prohibited to check the vehicle's electrical wiring with a megger or a lamp powered by a voltage of more than 12 V. If such a check is necessary, you must first disconnect the wires from the generator.
The insulation resistance of the generator stator winding with increased voltage should be checked only on a stand and always with the terminals of the phase windings disconnected from the valves.
When electrically welding components and parts of the car body, you should disconnect the wires from all terminals of the generator and battery.
Causes of breakdowns
As numerous checks show, the main cause of breakdowns is factory. Here, first of all, you need to pay attention to the shell in which the diodes are located. If it is aluminum, it is better not to take such a unit. Much more reliable is steel.
In addition, if the seller does not provide a guarantee, you should be wary. According to reviews on the Internet, the most unreliable diode bridges are made in Belarus.
- Another reason is moisture ingress, which results in oxidation of the space between the diode itself and the housing;
- Contact of oil or other working fluids of the VAZ 2110 on the surface;
- If you reverse the polarity of the battery while lighting or charging, the diode bridge can easily “fly out”;
- You can also suspect that the VAZ 2110’s rectifier is failing if the battery stops charging.
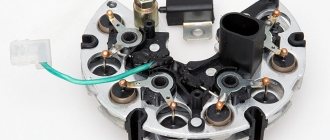
Checking with an indicator screwdriver
This is the simplest test option, which will give a general idea of the state of the diode bridge and the entire circuit as a whole.
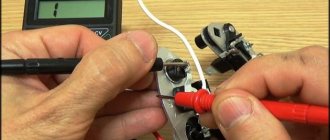
To operate, you only need an indicator, the entire procedure is performed under voltage, so extreme caution should be used:. Touch the tip of the screwdriver to each AC voltage terminal of the diode bridge in turn.
If the light does not light, this indicates a fault in the circuit up to the diode bridge - a broken winding, a broken charger, etc. If the light is on, then voltage is supplied to the bridge normally.
Touch the tip of the screwdriver to each AC voltage terminal of the diode bridge in turn. If the light does not light, this indicates a fault in the circuit up to the diode bridge - a broken winding, a broken charger, etc. If the light is on, then voltage is supplied to the bridge normally.
Rice. 2. Testing with an indicator screwdriver
- Also touch the positive terminal with a screwdriver - if the light comes on, then the diode bridge normally passes positive half-cycles, respectively, there is potential at this pin. If it does not light, there is damage to the diode bridge.
- Repeat the same procedure with the negative terminal. Be sure to divide the test into both terminals of the rectifier unit, since a fault may be present in any diode and in any branch.
As you can see, in this example an insulated blade screwdriver was used. This is due to the need to perform work under voltage, when you can cover different parts of the electrical installation with a metal part, which will entail extremely unpleasant consequences. A significant disadvantage of the method is its low information content and the limitation on the operating voltage - since the indicator is designed for a nominal value of 220 V, it cannot be used for low-voltage circuits.
Examination
Using a multimeter it is very easy to check the serviceability. Need to:
- Place the positive probe of the multimeter at the positive diode bus;
- Do the same with the negative probe and the “-” diode output;
- This test, if the diode bridge is working properly, should give readings close to infinity. If this is not the case, there is a malfunction and needs replacement;
- Now we swap the probes (put plus to minus and vice versa);
- Let's look at the readings. If the unit is working properly, the readings should be several hundred ohms;
- To check the additional diode, perform the same steps as described above.
No charging VAZ 2109
>When driving a car, you should always pay attention to whether the battery is charging. The VAZ 2109 battery is needed only to start the engine
While the engine is running, all electrical appliances of the VAZ 2109 operate from. Naturally, if the generator stops working, the battery doesn’t last long. How can you tell if the battery has stopped charging? There is a standard voltmeter on the instrument panel. According to its readings, it is very clear whether the generator is working or not. When the VAZ 2109 engine is running, the voltmeter should show a voltage of about 13.5 - 14 V. If you notice that the arrow is always tilted to the right, that is, the on-board voltage is less than 12V, then there is no charging from the generator. It is also very convenient to monitor the voltage of the on-board network of the VAZ 2109 using a digital tachometer. It measures the voltage from the generator with an accuracy of tenths of a volt.
Generator VAZ 2109
I recently had the following situation: I was driving and I saw that the voltage on the instrument panel voltmeter was about 11 Volts. Clearly, there's something wrong with the generator. Well, as usual, there is no time to repair it, it’s dark and cold outside, there is no garage. Well, as always, you need to drive a car every day, you can’t do without it. Therefore, at night every day I put the battery on charge, and in the morning I put the fully charged battery in the car and drove. If you drive only during daylight hours, that is, without headlights, then the battery may last for several days. If, as I did, you have to drive to work in the dark in the morning, then in the evening the battery will run out completely. Of course, it all depends on how often you turn off and start the engine. A lot of battery energy is wasted just for rotating the starter, you can also try to drive without it, then the battery is needed only for the operation of the ignition system and light signaling (stops, turns). Until recently, I believed that no matter how dead the battery was, the VAZ 2109 could always be started from the pushrod. It turned out that this was not true. There is a certain degree of discharge when the starter no longer has enough strength to turn the crankshaft, but it is enough. I pushed it, put it in gear, started up and everything was fine. However, if the battery is completely dead, it does not even have enough power to form a spark. , don’t push, the VAZ 2109 won’t start until you recharge the battery. But still, what to do if the VAZ 2109 battery has lost charging? Of course, not every one of us is an electrician and can check the generator with all its diodes, stabilizers and collectors. The very first thing to do if the VAZ 2109 generator stops working is to check the generator brushes. It’s easy to understand that the VAZ 2109’s brushes are faulty or worn out. Turn on the ignition and look at the instrument panel.
Checking the serviceability of the VAZ 2109 generator brushes
If the brushes are faulty, then the battery charging lamp will not light up when the engine is not running. Or it will glow very dimly. After you start the engine, the light will continue to glow dimly. The dim glow is visible only in the dark; it cannot be seen during daylight hours. If the brushes are in good working order, then when the engine is not running, the battery charging lamp lights up brightly; if it is started, it immediately goes out. It should be noted right away that the VAZ 2109 produced before 1993 has old-style brushes. On the new VAZ 2109, brushes of a new type are installed, immediately with a voltage stabilizer. However, there are both new and old samples of VAZ 2109 brushes on sale. The cost of VAZ 2109 generator brushes is about $3-5. Replacing the VAZ 2109 generator brushes is very simple, the sequence is as follows: 1. Remove the ground from the battery
Removing the mass of the VAZ 2109
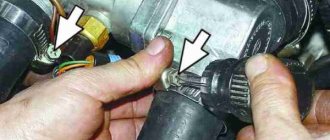
2. Disconnect the chip from the generator brush housing and remove the wires from the central stud of the generator.
Disconnect the wires from the VAZ 2109 generator
Wires pulled back
3. Now unscrew the two bolts securing the brushes to the VAZ 2109 generator housing. And slowly remove the brushes from the generator housing.
We unscrew the bolts securing the generator brushes of the VAZ 2109
4. If you want the new brushes to last a long time, you need to clean the generator commutator. To do this, loosen the nut on the generator mounting bracket, loosen the belt and remove it. We take fine sandpaper, press it against the commutator, and we ourselves rotate the generator using the drive wheel. In this way, graphite deposits from previous brushes are removed from the commutator. And the wear of the new brushes will be long. 5. Now we insert new brushes into the housing of the VAZ 2109 generator and clamp them.
Generator brushes VAZ 2109
6. We put back all the chips and wires of the VAZ 2109 generator.
VAZ 2109 generator brushes replaced
We check the functionality of the generator as indicated above.
Replacement
When dealing with any component related to electrical equipment, you need to start by de-energizing the VAZ 2110. So, we proceed according to the algorithm:
- Disconnecting the battery (remove the “-” terminal);
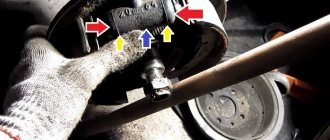
- Remove the pink wire that turns on the generator. To do this, you need to unscrew the nut from the positive bolt;
- Loosen the upper and lower nuts, and also unscrew the tension bolt, remove the belt;
- Turn the generator 90° and remove the lower mounting bolt;
- Clean all connections, as well as the rectifier housing itself;
- Clean the inside of the ring very thoroughly;
- Replace the generator diode bridge with a new one;
- Reassemble all parts;
- Check the functionality of the generator.
Before you figure out how to replace the diode bridge of a VAZ-2110 generator, you need to find out its location, because not all motorists know about it. It is also necessary to understand what kind of mechanism it is and what it is responsible for. So, let's start with the fact that the diode bridge gives a charge to the battery. When the car starts, this mechanism also starts working. Hence it is obvious that if it fails, then the battery is immediately discharged.
As for the location, it is necessary to clarify that the VAZ-2110 with 8 valves and the VAZ-2110 with 16 valves have different engines. Thus, the location may also differ slightly. But usually it is located on the generator, or rather, on the back cover, in the shape of a horseshoe. It is not difficult to recognize it, but if you find it difficult, then look at the photo of this mechanism, which will help you quickly understand where it is located.
The functions of the generator diode bridge are as follows:
- Blocking current from entering the stator winding of the generator, that is, acting as a valve.
- Increasing the reliability of generator operation.
These are the main functions of this device, which are very important for proper driving. Now let's look at the main breakdowns that occur with a diode bridge, as well as a diagram for replacing such a device.
How to dismantle a diode bridge
So:
- The negative terminal of the battery is removed, the wires that are connected to the plastic casing of the generator are disconnected (see Repairing the VAZ 2109 generator easily and simply).
- The wire block “D” is disconnected.
- The rubber protective cap is removed from the tips of the positive wires, after which the fastening nut is unscrewed. The wires are removed from the generator.
- Now you need to remove the plastic casing of the generator directly. First you need to unfasten the three spring clips, which are located around the perimeter of the block itself.
- The voltage regulator is unscrewed using a Phillips screwdriver.
- It is removed in assembled condition along with the brushes (see VAZ 2109: replacing the generator brushes yourself).
- Using a size 8 wrench, unscrew the three bolts securing the bridge.
- The leads leading to the stator winding are bent to the side for convenience. Use a Phillips screwdriver to unscrew the capacitor clamps.
- To remove the diode bridge using a 10-size wrench, you need to unscrew two nuts from the contact bolt. You also need to remove the bushings from this bolt, after which the bolt itself is removed from the bridge.
Now you can safely begin replacing the damaged part.
Causes of problems
As practice shows, the main cause of problems is mainly factory. If the shell is made of aluminum, then it is better to refuse such a unit. If it is steel, then this option should be taken. It is more reliable and durable. If the seller does not provide a guarantee, then this also makes it clear that you should not trust his product.
In addition, the causes of breakdowns may be:
- moisture ingress, which causes the space between the diode and the housing to oxidize;
- ingress of oil or other liquids;
- if the polarity of the battery is reversed when lighting a cigarette.
If the diode bridge cannot be repaired, which happens if it has worn out over the years or has completely failed, then it is necessary to resort to the last resort - replacing this unit.
More details about replacement
Of course, this procedure can easily be performed by a technician at the nearest service station. However, many car enthusiasts prefer to repair or change parts on their car themselves. If you have knowledge and experience in this matter, then follow this algorithm:
- At the very beginning, you should turn off the power to the VAZ-2110.
- Next you need to disconnect the battery.
- Then pull out the pink wire that turns on the generator. To do this, unscrew the nut from the positive bolt.
- Then you need to loosen the upper and lower nuts and remove the tension bolt. After all this, you need to remove the belt.
- Next, the generator is turned 90 degrees, removing the lower mounting bolt.
- Then all connections need to be cleaned, including the rectifier housing.
- The upper part must be cleaned especially carefully.
- After this, the mechanism is replaced, and all connections are assembled in the reverse order.
- Finally, you need to check how the generator works.
When purchasing a new mechanism, you need to know that it must come with a warranty card. That is why you should buy only in specialized stores. If you find it difficult to replace the diode bridge yourself, then it is better to entrust this work to specialists from the technical service. They will easily perform the replacement, without removing the generator and with a guarantee.
Published 01/27/2021 Author: Iris-Auto
In the Electrical section
Why is the battery not charging?
Before writing about the main reasons why the battery may not charge on VAZ 2109-2108 cars, I would like to warn all readers that the list I have given is not complete and is compiled only based on personal operating experience. So, during my short 10 years of driving experience, I had to operate a lot of cars and there were quite a lot of problems with charging the battery, and I will try to write about the main ones here.
It's no secret that the main device that is responsible for the normal operation of electrical appliances in a car is the generator. It is precisely because of the failure of some of its parts that charging may disappear completely or become weak. The main malfunctions of the generator, which entail a decrease in the charge current to the battery:
- Wear of generator brushes. This is a very common and most common reason. If they are worn down to the minimum permissible height, then the charge may disappear gradually, and then disappear altogether. To solve this problem, you just need to replace the brushes with new ones and that’s it.
- Failure of the diode bridge. The most reliable diode bridges are usually installed on VAZ 2109-2108 cars from the factory. And they are the ones who travel the most kilometers! This has already been tested not only by me, and any experienced auto electrician will confirm this. If one of the diodes or the entire rectifier unit burns out, then it also needs to be replaced. The procedure is not very fast and pleasant, but it will not cause much difficulty. Just below I’ll put a link to a page that describes the entire generator repair process.
- A more complex generator breakdown, such as a break in the rotor or stator winding. Of course, this is rare, but it still happens sometimes. The cost of these spare parts is quite low, so it is better to buy new ones and install the burned ones together than to buy a new generator.
- Poor charging may be due to slipping of the alternator belt. This becomes especially noticeable in damp or rainy weather, or when water gets on the belt. It begins to whistle, causing it to slip on the pulley, thereby preventing the generator from gaining sufficient speed to optimally charge the battery.
If you have problems with your car that are described above, then you can read all the maintenance procedures here: Repairing a generator on a VAZ 2109-2108 with your own hands. Everything is described there in quite detail and even for beginners the information will be very useful, and understanding it will not be difficult.