How to choose and adjust the optics on a Chevrolet Lacetti?
What should you know about car optics?
The car's optics consists of head lights, tail lights, daytime and side lights, turn signals, fog lights, interior lighting, trunk lights, and instrument panel lighting. Optics can be divided into two types: standard and tuning. The first type is installed at the factory. The second, called alternative, is installed at the driver’s request to give the car a stylish appearance (video author - Fara70, auto body parts).
Selection options
The following types of lamps can be installed in alternative and standard optics:
Halogen lamps are more often used in standard optics. They are losing their popularity because they poorly illuminate the side of the road due to the weak luminous flux.
Xenon is used mainly in alternative optics, but many drivers install xenon lamps instead of standard ones, or change the headlights completely. Drivers are attracted by the brightness of xenon and the ability to choose the color of the light beam.
LEDs are no less popular among car enthusiasts. They are less susceptible to mechanical damage and consume a small amount of electricity.
LED angel eyes
When choosing lamps to replace standard ones, you should consider the following points:
- You cannot install xenon in halogen headlights;
- you should choose products from well-known manufacturers; when purchasing Chinese and Korean goods, you need to require certificates allowing sale in European countries and Russia;
- If you have no experience in electrical installation work, it is better to entrust lighting modernization to specialists.
Instructions for adjusting headlights
Before making adjustments, the car should be fully fueled, equipped with a spare tire, an assistant should be placed in the front seat or a load of about 75 kg should be placed. In this way, the conditions in which the machine is usually operated will be created. Tire pressure must be normal. Before adjusting the headlights, the vehicle should be rocked under load to allow the suspension to settle.
Adjustments should be made in the dark. The machine must be installed on a flat horizontal plane at a distance of 5 meters from the wall. You need to put markings on the wall according to which the headlights will be adjusted.
Light adjustment circuit
On the stand, a vertical center line is drawn and two parallel lines at the same distance from it, corresponding to the left and right headlights. The horizontal line is drawn at the same height as the centers of the headlights from the floor. A second horizontal one is applied under it at a distance of 65 cm.
First, you should adjust the light from one low beam lamp by covering the second with cardboard or an opaque cloth. We set the headlight adjustment switch to the position corresponding to the minimum vehicle load, that is, “0” and turn on the low beam. The upper boundary of the light beam should coincide with the lower horizontal line. We align the bend in the border of the light beam with line A. The light beam of the second headlight is adjusted in the same way.
Tuning ideas
One of the common tuning options is replacing standard lamps with xenon or LEDs. A great way to improve the appearance is to modify the headlights - with angel eyes or eyelashes. For tuning, LEDs and headlight covers are used. You can darken the optics. For this it is better to use a special film.
Installing alternative equipment makes it possible to choose different color schemes. The headlights inside can be painted white, red or black. The light bulb can be blue, yellow, red or another light. Projector headlights and FF reflectors are in demand. Despite their small size, they provide greater efficiency.
Video “Universal optical correction”
This video clearly shows how to correct car optics with your own hands (the author of the video is an inquisitive person).
How to adjust correctly
In the lives of active car owners, situations often arise when the adjustment of certain components is disrupted.
And there’s no need to talk about PTFs - their low seating position during careless driving inevitably leads to the headlights starting to shine incorrectly:
- They “blind” oncoming drivers;
- They “blind” the owner himself in the fog (mirror effect).
To restore their parameters it is enough:
- Place the car on a level area near the wall of the house or garage;
- Measure the distance from the center of the PTF to the ground;
- Draw a horizontal line on the wall at the measured height;
- Turn on the fog lights;
- Adjust the light flux so that its border does not exceed the drawn line.
In most cases, this will be enough to restore the fog lights to work properly. (see also the article Features of connecting fog lights to Kalina)
Tip: making stickers for headlights will protect the glass from stones, thereby extending their service life.
Adjustment
It is not necessary to go to a service station to make adjustments. You can perform the procedure yourself. You will need an assistant and a 1 × 2 m plywood board with markings. In addition, you need a flat area, the size of which allows you to install the shield at a distance of 5 m from the Chevrolet headlights. Let's look at the setup process in order:
Preparation
Markings are applied to the plywood board:
- two vertical lines (in the figure - A and B), the distance between which is 1275 mm. This is the gap between the axes of the low beam lamps;
- two horizontal lines. The distance between them is 65 mm. The upper line (C in the figure) indicates the height of the low beam axis above the ground, the lower line (D) indicates the boundary of the main beam of light.
The distance between the Chevrolet Lacetti headlights and the shield is 5 m. The car must be refueled and free of additional load. The tire pressure is brought to normal, the headlight range control is set to the zero position. You will also need a small shield to alternately cut off the light of the left and right headlights.
Process
The setup is performed in the dark. An assistant sits behind the wheel. The Chevrolet Lacetti is vigorously rocked several times to automatically install the suspension. The low beams are turned on, one of the lamps (left or right) is covered with a shield. Using the adjustment screws located on the top of the housing, the light beam is alternately adjusted relative to the horizontal and vertical axes. When the setting is completed, the procedure is repeated for another lamp.
Fog lights are configured in a similar way, only the markings are slightly changed - the distance between the vertical axes is reduced to 1165 mm, and between the horizontal lines - 50 mm. In this case, adjustment is made from below, from under the bumper, using a cross-head screwdriver.
How to Adjust Headlight Height on Chevy S-10
by Alibaster Smith
The Chevy S-10 uses a screw to adjust the headlights and down. When replacing the housing, you will need to adjust the S-10 headlights. Because adjusting your headlights can affect your visibility at night, adjustments aren't just for oncoming vehicles. A TORX wrench is used to adjust the S-10 headlight housing. It can be purchased at most auto parts stores.
Step 1
Park the truck 15 feet from a flat wall with the headlights facing the wall.
Step 3
Open the hood of your Chevy S-10.
Step 4
Locate the vertical adjustment screw at the top of the headlight housing.
Turn the adjustment screw clockwise or counterclockwise using a screwdriver or TORX wrench until the headlight beam is angled toward the bottom of the wall.
More articles
Lacetti lamps
In this article we will look at Lacetti lamps that are installed on a car. These are the lamps installed on the Lacetti.
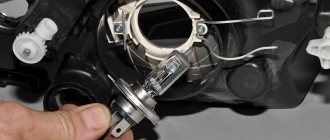
The Chevrolet Lacetti has two block headlights. For high and low beam, a two-filament halogen lamp H4U (hatchback) is used, which does not emit ultraviolet rays that can damage the plastic headlight cover. The sedan and station wagon have separate low and high beam lamps - H7 - low beam lamp, H1 - high beam lamp.
Lacetti lamps
Also in the headlights there are lamps for side lights and direction indicators. Turn signals are duplicated by side turn indicators (repeaters) mounted on the front fenders. To adjust the direction of the light beam, there are two screws on the back wall of each headlight unit, which allow you to change the direction of the light beam in the horizontal and vertical planes.
The headlight units are equipped with an electric luminous flux direction corrector, which allows you to change the direction of the light beam in the vertical plane from the passenger compartment in accordance with the vehicle load.
The vehicle is equipped with rear lights consisting of a turn signal, a reverse light and a side light/brake light (double-filament lamps are installed).
Some Chevrolet Lacetti cars are equipped with fog lights, which are installed in the niches of the front bumper.
On some cars, in the front part of the interior ceiling there is an individual lighting lamp, consisting of two sections (for the driver and front passenger). Each section is activated by a corresponding button.
Also installed on the ceiling of the Lacetti's interior is a ceiling lamp, which turns on automatically when any of the side doors is opened (with limit switches installed in the door openings) or forcibly with a switch. When the side light (exterior lighting) is turned on, the rear license plate is illuminated by two lamps. The Chevrolet Lacetti trunk light comes on when the tailgate is opened.
The glove compartment light comes on when the lid is opened.
Here are the installed Lacetti lamps
Lacetti lamps
- H7 - low beam lamp (sedan, station wagon) 55W
- H1 - high beam lamp (sedan, station wagon) 55W
- H4 - high/low beam lamp (hatchback) 60/55W
- H27W/1 - fog lamp 27W
- PY21W - turn signal lamp 21W
- P21W - fog lamp, reversing lamp 21W
- P21/5W - side light and brake signal lamp 21/5W
- C10W - interior lamp, trunk lamp 10W, C5W - glove compartment lamp 5W
- W5W - side light lamp (block headlight), additional brake signal lamp, license plate lamp lamp 5W, W7.5W - individual lamp lamp 7.5W
- WY5W - side turn signal lamp 5W
- W3W - indicator (control lamp) of fuel reserve 3W
- W1.4W - signaling devices (indicator lamps) of the instrument cluster 1.4 W
- W1.4W - instrument cluster illumination lamp 1.4W
- W1.4W - backlight lamps for the heating, ventilation and air conditioning control unit 1.4 W
- W1.4W - switch backlight lamps 1.4W
On this topic:
Instrument lighting Lacetti
License plate light Lacetti
Lacetti lighting. Description, replacement of lamps and tips
Lacetti fuses and relays
Members who liked this post:
- Lacetti fuses and relays
- Lacetti engine
If this is your first time on the site, then read this
You must be logged in to view your scores.
2 Visitors Viewing this page.Who is viewing: 2 Guests
New | Active | Popular
- duyha ($42509)
- Lacetti ($2524)
- Adekvat ($2351)
- sig ($2105)
- Alex130174 ($2104)
- Most Popular Topics
- Unanswered topics
Get a Community sticker for your car Loading...
Loading... New | Active | Popular | Alphabetically
Lacetti lighting. Description, replacement of lamps and tips
Lacetti lighting. In this article we will consider the design, testing, repair and replacement of backlight lamps for the Lacetti controls. Namely:
- illumination of the Chevrolet Lacetti climate control unit
- Chevrolet Lacetti headlight control illumination
- Chevrolet Lacetti brightness control backlight
- Chevrolet Lacetti hazard warning button illumination
- glove box lighting
What lamps are used in the Chevrolet Lacetti hatchback can be read in this article. What fuses protect these circuits is written here
The Lacetti's control lights have seven lamps, including the glove box light. Three in the climate control unit (popularly the air conditioning unit or the heater unit) and one each in the headlight range control, adjusting the brightness of the instrument lighting, the hazard warning button and the ashtray illumination.
I had such a situation that all the lighting of the Lacetti controls stopped working, except for the lighting of the hazard warning button and the glove compartment. I was already thinking that there were problems with the wiring, because five lamps would burn out at once (I don’t count the ashtray lighting, since it I never use it), somehow it looks fantastic. But, as it turned out, this also happens. I just drove in the summer with the lights on only during daylight hours and didn’t pay attention to the fact that four lamps burned out one after another, and the fifth one fell off altogether. In the fall, when daylight hours decreased, it became noticeable that the Lacetti’s lighting was missing.
Replacement process
Chevrolet Lacetti head lighting elements can only be replaced with similar types of lamps. For low beam, H7 single-filament halogen lamps with a power of 55 W are used. It is recommended to change them in pairs so as not to upset the balance of brightness of the left and right headlights.
To replace you will need the following tools:
- open-end and socket wrenches 10 (it is recommended to use a copy with a long tube);
- screwdriver;
- alcohol and clean dry rags;
- Cotton gloves;
- pliers.
Only the most necessary tools are listed; other equipment may be needed during the work process.
Let's look at how to change the low beam of a Chevrolet Lacetti sedan. Procedure:
- open the hood, disconnect the minus from the battery;
- Using wrenches, unscrew the upper fasteners of the headlamp;
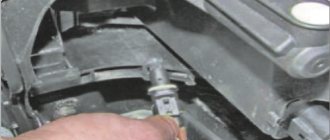
- Use a socket wrench to unscrew the nut on the lower stud;
- move the body forward and disconnect the block with wires;
- remove the headlight;
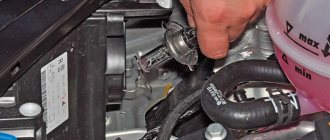
- open the low beam lamp compartment. It is located closer to the wing (or near the block itself, if it is more convenient for someone to navigate). The lid must be turned counterclockwise;
- disconnect the block with power wires from the lamp;
- release the spring clip and move it to the side;
- remove the burnt out lamp;
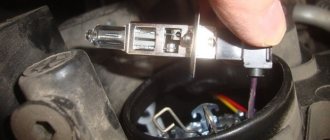
- Wipe the bulb of the new lamp with a clean cloth moistened with alcohol and install it in the socket. Wear gloves and do not touch the flask. The position of the lamp must be strictly defined - the cut edge with the tendril is directed upward. Otherwise, the focusing of the light beam will be disrupted;
- Reassemble the headlight in reverse order.
After assembling the headlight, it is recommended to immediately check the functionality of the new lamp by completing the procedure before final installation in the opening. If any additional actions are needed, you do not have to remove the housing from the socket again.
How to replace light bulbs and overlight the Chevrolet Lacetti instrument panel
Car enthusiasts are often dissatisfied with certain parts of the car, which creates a desire to modify them or outright rework them. Replacing the light bulbs in the Lacetti's dashboard is only a small part of what can be changed.
How many light bulbs are there in the Lacetti dash?
Depending on the configuration, up to 28 illuminators can be used. After 2006, the number of elements was reduced by half, which significantly simplified the design. Thanks to the use of diodes, the brightness did not decrease.
Chevrolet Lacetti dashboard: which light bulb does what
Typically, most car panels do not include all the lights and indicators.
- General illumination of the instrument panel.
- Right turn signal.
- Likewise for the left side of the car.
- Serviceability of the ABS lamp.
- Traction control system fault indicator.
- Likewise for system health.
- Tailgate open indicator.
- The EUR module is not working properly.
- Fixation of the engaged gear.
- Opening side doors.
- Battery low.
- The seat belt is not fastened.
- Parking brake.
- Display backlight.
- Reserve fuel remaining in the tank.
- Emergency oil pressure.
- Engine control system control.
- Airbag service indicator light.
- Indication of high beam headlights.
- Cruise control on.
- Turn on the rear fog lights.
- Automatic low beam headlights.
- Indication of the operation of the front fog lights.
- Hazard warning light.
LED lamps in the Lacetti tidy
When the panel is overexposed, car enthusiasts install diodes. The alternative to conventional light bulbs is a little more expensive, but the elements are much more reliable and more durable.
As a replacement, you should use illuminators that are suitable in terms of base size and power. They should be selected in accordance with the repair and maintenance manual for a particular vehicle. Typically, models of the following types are installed here: T10, T7 and T4.
Instructions for replacing light bulbs in the Lacceti tidy: hatchback and sedan
To change the light fixtures with your own hands, you will need to perform a simple procedure.
- Remove the power fuse or disconnect the positive terminal from the battery.
- Lower the steering wheel to the lowest position.
- Unscrew the fastening screws of the plastic cover and remove it.
- Next you will need to remove the panel and disassemble its back part.
- Now you need to use a special key to unscrew the light bulb from the socket along with the socket and replace it with a new one.
- Next you need to reassemble the device in reverse order.
Adjusting panel lighting
The dashboard backlight control was installed optionally on cars until 2006. After this, the device became standard and was supplied to all cars without exception.
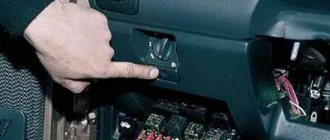
It is extremely easy to use. This is a roller slider mounted under the panel deflector to the left of the steering wheel. To increase brightness, scroll the slider up. To make the light bulbs dimmer, scroll down.
The dimensions and lighting of the Lacetti tidy do not light up
If the lights stop working at the same time, check the EF 23 fuse located under the hood of the car. When only the instrument panel does not work, it is recommended to check the integrity of the contact groups and module wiring.
Number plate light does not light up
Initially, the vehicle does not have an independent fuse installed for the sign lighting system. If the light bulbs fail, the components should be checked.
- Integrity of lamps. Often the filaments burn out or the contacts of the elements oxidize.
- Supply wiring. It is recommended to perform diagnostics of wires, contact groups and terminals.
What lamps are suitable for panel illumination?
To choose the right illuminators for repairing the shield, follow the article numbers. Installing items with different performance characteristics may damage the device.
The standard instrument panel uses three types of light bulbs. For ease of searching, each type has a unique catalog number:
- 93745150;
- 93745151;
- 93745152.
Replacing the illuminators in the Lacetti panel is technologically simple and can be done by the car enthusiast independently. To complete the procedure, you do not need to have deep knowledge of auto electrics or special tools.
Specialization : Graduated from the State Automobile University, worked for 20 years at GAZ-56, now I drive a Zhiguli.
Adjusting headlights on a Chevrolet lacetti (sedan and hatchback), choosing a low beam lamp and a rear lamp
This is a specialized subforum. Flooding is strictly prohibited!
Dear visitors of the FAQ section!
All topics from the FAQ have been moved to a special section of the site
https://lacetti.com.ua/faq/ All topics are divided into categories! Comments on the material are welcome.
If you want to add or place new material in the FAQ, please contact the Administration in a personal message
Group: Active users Messages: 5,328 Registration: 10.4.2008 From: Ukraine, Donetsk Real name: Andrey
My car:3.0 V6 6AT 4×4
Recently, in the fog, I noticed a very interesting nuance in the operation of my car's headlights - rub the left headlight strictly to the right, and the right one - exclusively to the left, as a result of which the light beams from the headlights converge, intersect about 5 meters and then diverge. Disorder. It is visually clear that the internal parts of the headlight are turned to their extreme positions.
The question is how to adjust the headlights horizontally.
Post edited by MAV
– 18.1.2009, 17:30
Dear Master
Group: Full members of the club Messages: 1,332 Registration: 12/18/2007 From: Energodar, Western region Real name: Sergey
My car: HB 1.6 SE Club card No. 366
valid until 01.11.2010
As I previously suggested, the Russian “primer” on the issue of adjusting hatchback headlights is a firebox!
Native optics
1. Location of knobs: Right headlight:
STYLE-AUTO
Their condition, as well as the correct choice and correct installation, must be approached more than two seriously, adjusting the headlights of a Chevrolet Lacetti hatchback video to the choice of tires. Replacing the rear struts of a Chevrolet Lacetti. Device for adjusting headlights. Most car owners do not know how to adjust the headlights on a Chevrolet Lacetti, and turn to a car service center, where it is not so cheap.
As annoying as it may sound, this process can be carried out without the help of others, with fewer suitable materials and tools. Try the Lacetti Sedan and everything will work out. But what to do when the low-beam headlight adjustment of the Chevrolet Lacetti hatchback video on the Chevrolet Lacetti on the road does not light up?
Adjusting Chevrolet Lacetti headlights
Proper adjustment of the car's headlights plays an important role in ensuring safety on the road.
It is important that the headlights shine at a certain angle and do not blind other road users. In this material we will talk about how the headlights of a Chevrolet Lacetti are adjusted
The information presented will be useful to motorists who are repairing their Chevrolet on their own.
Adjusting the headlights of a Chevrolet Lacetti
- To properly adjust the headlights, you need to select a flat area and park the car 10 meters from a smooth wall.
- Fill the fuel tank full and check the tire pressure (2.1 atm.). Also, when adjusting the headlights, a person of average weight should sit in the driver's seat.
- You must first draw adjustment markings on the wall.
- First you need to drive up to the stand wall at a distance of 13 meters and rock the car from side to side to optimize the correct position of the Chevrolet suspension
- Set the illumination width control to 0 and check for defects and cracks on the headlight glass
- We make the adjustment with the low beam on, one at a time to the right, and then to the left, covering the glass with previously prepared cardboard.
- We mark the center points of the headlight beam on the wall at the same height from the floor and at the same distance from each other as the center of the headlights on a car.
- Draw horizontal line No. 1 along the established marks
- Then draw another parallel line No. 2 12 cm lower
- Line No. 3 is also drawn parallel to and below line No. 1 by 22 cm
- If the position is correct, the upper limit of the light spots of the headlights on the wall should coincide with line 2. If the adjustment is violated, we adjust the light beam using special correctors on the headlight body.
- The marked gears at the edges of the headlight adjust the light beam to the right and left
- Gears in the center adjust the beam of light up and down
Adjusting the headlights of Chevrolet Lacetti — Chevrolet Lacetti, l., year on DRIVE2
The border of the light spots should coincide with the second line. If this is not the case, then adjust.
The fog lights also need adjustment. We turn them on and the upper border of the light should coincide with the third line, this is if there are no defects.
How to adjust headlights on a Chevrolet Lacetti sedan. Headlight adjustment bolts.
For a vehicle with a hatchback body: Placement of screws for adjusting the headlights for a hatchback car Adjuster for the vertical plane of the light beam Adjuster for the horizontal plane of the light beam If you set a goal to create manipulations, a Phillips screwdriver will come in handy.
So, by moving the regulators, the light beams of the headlights are adjusted. The distance of the car from the wall or screen should be five meters. This indicator is mandatory, since it is in this case that the adjustment will be considered correct.
Headlight from a hatchback. Conclusions Adjusting the headlight beams on a Chevrolet Lacetti is quite simple and every motorist is able to cope with this simple task on their own within half an hour.
How to replace a Chevrolet Cruze low beam bulb
Air ducts to rear passengers. In the base and LS configurations, make a normal screen for the radio, not a strip! The design of the rear is subjective 6. Improve the dashboard materials.
Possible noise 7.
Change the steering column covering materials - the steering wheel is peeling off. Move the knobs for controlling the intensity of the stove's operation and temperature and make a clearer fixation of the positions of these same controls. Provide adjustable lumbar support. Possibility of opening the trunk from a button in the cabin.
Low beam on a Chevrolet Cruze - features of lamp selection and replacement
The box under the seat is like in Lacha. So that in low beam you can leave all the buttons and the radio at maximum brightness. Possibility of installing bi-xenon at least in the top, optional. Daytime running lights at the front and LEDs in the rear lights on ALL trim levels, starting with the base.
There are fewer honeycombs in the radiator grille and a protective mesh in the bumper opening. Change the design of the adjustment knobs for the wipers and turn signals, that is, round the ends, otherwise the stubs stick out from the steering column, the tactile sensations are terrible when you press them and hit the degree edge of the cut.
For example, the design of the adjustment knobs on the CR-V. Reduce the volume spread from 63 to 40 though. I think this will not be an advertisement since many people choose these manufacturers - Catz and Koito. All things being equal, the final choice was made in favor of Catz after I found out that I got a good discount in a Japanese store.
I ordered all-weather lamps on the website with a light temperature similar to the standard ones. There were also options, but I settled on all-weather ones. Which is remarkable. Next to the garage to test. I compared osram from Germany eagleye from Taiwan and catz from Japan. The photo below shows the difference between the lamps. But each type has its own pros and cons. To make the light brighter, you should choose lamps with increased brightness.
Lamps with xenon effect are difficult to see in damp weather. Long life series lamps have a longer service life compared to other lamps.
Change one lamp or in pairs If you are replacing a similar lamp, then there is no point in buying two lamps. If you are installing a lamp from a new company, or a lamp with increased brightness, then of course it makes sense to buy a couple of lamps at once.
The H4 lamp burned out on a Chevrolet Cruze. The lamps can burn out either from exhaustion, that is, they have reached the end of their service life, or as a result of a voltage surge in the network.
Backlight Lacetti
Attention: Before starting work, you must disconnect the terminal from the negative terminal of the battery!
Replacing lamps in the headlight range control unit and the Lacetti instrument backlight control unit
To check and replace the lamps in this unit, it must be removed from the vehicle. To avoid damaging the front part, do not pick with anything. It is enough to remove the cover of the fuse box, which is located at the end of the dashboard...
Fuse box located in the interior of the Lacetti
...and press the corrector block out with your hand. They come out easily.
How to remove the Lacetti headlight adjustment unit
Disconnecting the wire blocks
How to remove the Lacetti headlight adjustment unit
For accurate diagnostics, you can check the presence and magnitude of voltage in the backlight circuit. To do this, connect one voltmeter probe to any metal part of the body, and the second to the connector to which the brown wire with a white stripe is connected.
Checking the voltage in the Lacetti backlight power circuit
We turn on the side lighting and look at the readings. Should be more than 12 volts
Note: To measure voltage, do not forget to temporarily connect the negative terminal of the battery!
Checking the voltage in the Lacetti backlight power circuit
If so, then this means that power is coming through the circuit, and the problem is in the unit itself or a burnt out light bulb.
We remove the corrector unit from the car and disassemble it.
Note: To replace the lamps, it is necessary to disassemble only the unit for adjusting the brightness of the instrument illumination. The lamp on the headlight level adjuster can be changed without disassembling! But if you have free time, then it is advisable to disassemble it to check the quality of soldering and the condition in general.
Unclip the latches on both sides and remove the front part
Lacetti headlight corrector unit
We see the “hero of the occasion”.
How to disassemble the Chevrolet Lacetti instrument brightness control unit
It needs to be analyzed further. To do this, by pressing the adjustment wheel slightly to the side, we remove it from the hole in the housing.
We remove the board from the case and see the backlight
Replacing the lamp in the Chevrolet Lacetti instrument brightness control unit
You can't do without a soldering iron, the lamp is soldered.
Replacing the lamp in the Chevrolet Lacetti instrument brightness control unit
As it turned out, the lamp is absolutely working! And the problem is the extremely terrible state of soldering! As, in principle, in the climate control unit. Honestly, it's unpleasant to see this. This is not some kind of TV, but still a car
Soldering in the Lacetti backlight control unit
The whole board is covered in such cracks! I had to resolder all the soldering points. I, as a radio mechanic by training, do not understand how it is possible to install such horror in conditions of constant vibrations and temperature changes...
After soldering, the regulator backlight worked fine.
In the headlight range control unit, to replace the lamp, just turn its holder a quarter turn with a screwdriver...
Replacing the lamp in the headlight range control unit of a Chevrolet Lacetti
...and remove it along with the lamp
Replacing the lamp in the headlight range control unit of a Chevrolet Lacetti
To check the serviceability of the lamp, you can check it with an ohmmeter by connecting the probes to the lamp contacts. The device showed infinite resistance, which means the lamp has definitely burned out.
Remove the lamp from the holder and install a new one. Let me add that I was looking for this lamp for quite a long time. Plus, the light filter put on it stuck to it.
Chevrolet Lacetti manual
Chevrolet Lacetti Adjusting the direction of headlight beams
We adjust the direction of the headlight beams on a fully fueled and equipped car, with normal air pressure in the tires. We install the car on a flat horizontal area at a distance of 5 m from the screen (you can use a garage wall, a sheet of plywood or hardboard measuring 1x2 m). We draw a horizontal line 1 on the screen at a height equal to the distance from the center of the headlights to the floor. Below it, 65 mm, we draw a parallel line 2. We draw on the screen a vertical center line 0 (the distance from it to the center of the left and right headlights should be equal) and lines corresponding to the centers of the headlights (AE and BE). Set the headlight range control switch to position “0” (single driver or driver with a passenger in the front seat) and turn on the low beam headlights. Cover one of the headlights with opaque material. When adjusting, the upper boundary of the light beam should coincide with the lower horizontal line (see figure), and the point where the beam breaks (the point of intersection of the horizontal and inclined sections of the light flux) should coincide with the vertical line corresponding to the center of this headlight. Similarly, we adjust the direction of the light beam of the other headlight.
Scheme for adjusting the direction of headlight beams
The location of the light beam direction regulators on the headlight housing of a car with a hatchback body: 1 - light beam regulator in the vertical plane; 2 - regulator of the light beam in the horizontal plane
Location of light beam direction regulators on the headlight housing of cars with sedan and station wagon bodies: 1 - light beam regulator in the horizontal plane 2 - light beam regulator in the vertical plane
We adjust the direction of the headlight beam by rotating the regulators with a Phillips screwdriver. Similarly, we adjust the direction of the light beam of the other headlight. We adjust the light beams of the fog lights under the same conditions as when adjusting the headlights (see above). We measure the distance between the centers of the fog lights and the distance from the surface of the site to the center of the fog lights. We draw lines on the screen and draw another horizontal line below the height line of the center of the fog lights by 50 mm. The adjustment is made from under the car's bumper. By rotating the headlight adjustment screw with a Phillips screwdriver, we bring the upper horizontal border of the headlight beam to the height line of the center of the fog lights.
Light on the road and safety
The location of the headlight adjustment knobs is marked with arrows.
Headlights are, first and foremost, a safety factor when driving.
Thus, it is necessary to create visibility on the road, to identify the car for pedestrians, but at the same time, the light rays should not blind an oncoming car. To do this, every car enthusiast must adjust the light beams.
Adjustment process
Device for adjusting headlights.
Many car enthusiasts do not know how to adjust the headlights on a Chevrolet Lacetti, and turn to a car service center, where it is not so cheap. But, this process can be carried out at home, with a minimum amount of necessary materials and tools.
Scheme for adjusting the headlight beam.
So, to complete the process you will need a garage or just a flat wall, chalk and a little time. In fact, the whole process can be completed in half an hour, if you don’t rush at all. For those who don’t want to go through the hassle of drawing lines, special canvas screens with already drawn lines are sold. Having settled in with everything you need, you can proceed directly to the process.
First you need to draw lines on the wall according to the diagram below:
Screen layout diagram for adjusting headlights.