Responsibility for faulty lighting devices
Traffic rules prohibit operating a vehicle with faulty lighting devices. This is due to safety considerations for all road users. It is also prohibited to use vehicles that use lamps that do not meet the design requirements for the operation of the vehicle.
It is important to remember that you are not the only participant driving on the highway, and it is highly not recommended to install more powerful and brighter lamps in the headlights of your car. By this action you endanger traffic participants moving in the opposite direction.
All changes in the design of the vehicle or non-working lighting devices entail administrative penalties.
The best manufacturers
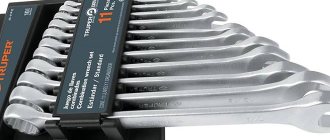
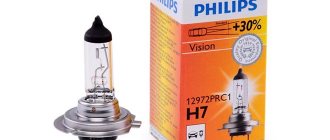
If you decide to use alternative optics, manufacturers Osram, Koito and Philips are considered the most reliable according to drivers' recommendations. The main advantage of the products of these brands is their long service life. The marking of the optics suitable in this case is H7.
We recommend: The dashboard of the domestic “Seven” and its features
Since these are the manufacturers that car owners try to choose, the market is filled with numerous fakes that cost several times less. There are no visually incriminating differences to be found, and sellers often surprise you with their incompetence or even brazenly guarantee you that the products are original.
A car enthusiast must be able to independently find the differences between the original and the fake, and for this a series of tests have been developed.
As part of the testing, it was determined that counterfeits costing 50 rubles. lamps can be signed by any brand, but their operation is not only ineffective, but also dangerous for the safety of the vehicle.
Let's look at the pros and cons of individual manufacturers using specific examples of optics:
- OSRAM H7 . Products of this brand are counterfeited with enviable frequency. The original will fully comply with the standards.
- Philips is the standard best option for those cases where the headlight is correctly adjusted.
- H7 MEGAPOWER+30%! - the least preferred option due to a number of disadvantages: the luminous flux is not standardized, the quality of the base leaves much to be desired, and the light spot also does not meet the state standard. In addition, there is no certification according to European standards - only Russian. The use of such products is not excluded, but it cannot be permanent and long-lasting.
Headlight bulbs
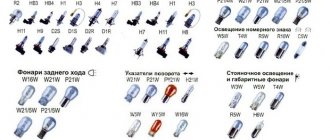
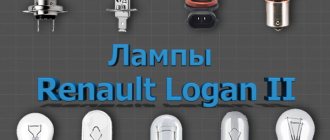
The headlight bulbs of the Lada Priora differ depending on the year of manufacture of the car, since at the end of 2013 daytime running lights began to be installed in the Priora.
Headlight bulbs for Priora models up to 2013.
| Installation location | Lamp type | Power, W) | Number in photo |
| Low beam | H7 | 55 | 1 |
| High beam | H1 | 55 | 9 |
| Turn signal | PY21W | 21 | 3 |
| parking lights | W5W | 5 | 8 |
Headlight lamp for Priora after 2013
| Installation location | Lamp type | Power, W) | Number in photo |
| Low beam | H7 | 55 | 1 |
| High beam/DRL | H15 | 55/15 | 2 |
| Turn signal | PY21W | 21 | 3 |
| parking lights | W5W | 5 | 8 |
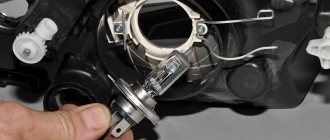
Replacing low and high beam bulbs in the headlight
- To replace the high and low beam lamps, you must remove the rubber or plastic headlight protection covers. Then pull the connector towards you and remove it from the lamp. By pressing on the lamp clamp, release it from the clamps and remove the lamp.
Replacing the turn signal lamps in the headlight
- Replacing the turn signal lamps must be done by turning the socket counterclockwise and removing it towards you from the headlight.
Replacing the headlight bulb
- To remove the side light bulb, you need to pull the bulb socket towards you.
Snapshot1
We demonstrate the work on the left headlight unit (for clarity, the work is shown on a removed headlight unit), and change the lamps in the right headlight unit in the same way.
It is more convenient to perform operations to replace lamps in the left headlight unit with the battery removed. To replace the turn signal lamp...
Automotive low and high beam lamps used on the Lada Priora in the restyled and pre-restyling versions are almost the same. The difference is in the layout of the headlight itself on the Priora. The lamp used in the dimensions of early cars has disappeared. The rear lights are distinguished by a diode insert in the brake lights; now there is a circuit with diodes, but before there was a light bulb.
Tail lamps
The taillights also differ depending on the year of manufacture. In cars after 2013. The taillight brake lights have become LED, but the bulbs used in the lights remain unchanged.
| Installation location | Lamp type | Power, W) | Number in photo |
| Reverse | P21W | 21 | 4 |
| Brake light/dimensions | P21/5W | 21/5 | 5 |
| Turn signal | PY21W | 21 | 3 |
| Rear PTF | P21W | 21 | 4 |
Replacing tail light bulbs
- To replace it, you must remove the rear light. To do this, unscrew the 3 screws that secure the light and move it away from the car body. Then unscrew the sockets counterclockwise and remove the desired lamp.
How to install angel eyes
Angel eyes Lada Priora with DRL controller. Angel eyes on the Priora are LEDs that are installed inside the front unit, along the perimeter of the lenses and in the rear light. To do this you need to purchase:
- Electric wire of moon-white color. Type SH; diameter 2.6 mm;
- Receiver (Operating voltage – 12 Volts).
After everything is ready, you can begin active actions:
- Raise the hood, remove the battery (this will make it easier to work).
- Dismantle the block, remove the substrates.
- First secure the wires in place with tape (lightly) or clothespins - this is done to fix their position. Then fix them with epoxy resin.
- Wait for the resin to dry, secure the substrates and seal all the gaps with sealant so that the glass does not fog up. We carry out the installation.
Lamp type
The lamps installed in the headlights of Priora 1 and 2 differ due to the DRLs in the newer Lada model. Below is a table with lamp types.
| Vehicle model year | Lamp type | |||
| Low beam | High beam | Turn signal | Dimensions | |
| Headlight Priora until 2013 | H7 | H1 | PY21W | W5W |
| Headlight Priora After 2013 (with DRL) | H7 | H15 | PY21W | W5W |
Replacing lamps
Below we describe in detail the entire process of replacing lamps on cars, depending on the year of manufacture.
To replace the lamps on the left headlight of a car, it is recommended to remove the battery for convenience.
The lamps installed in the Priora headlights are halogen; when replacing, be careful and do not touch the lamp base with your bare hands.
Replacement in the headlight until 2013.
Turn signal
We start the process with the car's turn signal. To do this, turn the socket counterclockwise and remove it along with the lamp.
To remove the lamp from the socket, you need to press on it and turn it counterclockwise until it stops, then remove it.
Install a new lamp in the reverse order.
Low beam
Remove the rubber cover, which is located near the fender of the car. Then remove the connector from the lamp.
Next, you need to dismantle the lamp itself. To do this, press on the metal spring and disengage it as shown in the picture. Then remove the H7 low beam lamp from its seat.
Install the new lamp in reverse order.
High beam
Remove the rubber protective cover of the headlight. Then disconnect the black connector from the lamp.
Then remove lamp H1 by bending the metal spring to the sides.
Install the new lamp in reverse order.
To replace the headlight bulb, you must remove the bulb socket from the headlight reflector. To do this, pull it towards you and remove the W5W lamps from the socket.
Installing a new lamp is done in the reverse order.
Replacement in the headlight after 2013.
Turn signal
To replace the bulb, turn the turn signal socket counterclockwise and remove it from the headlight.
Then remove the lamp from the socket by pressing on it and turning it counterclockwise until it stops.
Install the new PY21W lamp in the reverse order.
Low beam
Remove the plastic protective cover of the headlight and disconnect the two chips from the H7 lamp.
We release the lamp from the spring and remove it.
Install the new lamp in reverse order.
High beam and DRL
Remove the cover from the headlight unit. Turn the H15 lamp counterclockwise and remove it.
The new H15 lamp must be installed in reverse order.
Pull the side light socket towards you and remove it from the headlight reflector.
We remove the W5W type lamp from the socket and install a new one.
Insert the cartridge in reverse order.
Source
Dorestyling
The life of the owners of pre-restyling cars was darkened by the fact that, in addition to the reduced service life, even then it was darkened by the fact that when replacing some light bulbs it was necessary to remove the socket along with the bulb - this, for example, happened when the owner wanted to replace a side light bulb. Owning a Priora became increasingly expensive; rarely did anyone think about buying another headlight - developed by other companies. Installing light bulbs from foreign manufacturers solved the problem of poor lighting well and for a long time.
Replacing Priora station wagon lamps
During the operation of the car, drivers may encounter minor troubles. For example, at night they notice that the headlights do not light up. If the check does not reveal faulty fuses, then the cause may be a burnt out light bulb.
Before replacing lamps, make sure the optics are turned off. To replace the lamps in the left headlight of the Priora, there may not be enough free space; to do this, remove the battery. Do not touch the lamp bulb with bare hands; use cotton gloves. If there is dirt on the bulb, it is recommended to wipe the lamp with a swab moistened with a 70% ethyl alcohol solution.
Lada Priora headlights can be of two types:
- High beam and DRL (daytime running lights) are combined. Option A – with two protective plugs.
- high beam without DRL. Option B - with one large plug.
Preventive measures
Let's return to the issue of longer service life of light bulbs. Do not forget that in Priora the light is provided by halogens, whose bulbs have an extremely negative attitude towards dust and especially grease. Recommendations to take them only by the base are fair, but this makes installation very difficult. The best way to change light bulbs is to wear a clean cotton glove. Rubber ones are no good, they leave sticky fingerprints on the glass, which is no better than your bare hand.
If you touched the flask
, wipe it with a soft cloth soaked in alcohol. If you ignore the procedure, you will at least get darkening in the places where the lamp comes into contact with the skin. In the worst case, it will burn out in a week.
Step-by-step guide to replacing lamps on a Lada Priora
- Step-by-step guide to replacing lamps on a Lada Priora
- Features of replacing Priora halogen lamps
- Replacing the low beam lamp
- Replacing the high beam lamp
- How to replace a side light bulb
- Replacing the turn signal lamp
It is difficult to overestimate the importance of headlights for a car. Every driver knows their importance well. But no lamp lasts forever. Accordingly, they should be replaced from time to time. This article will be useful to owners of the Lada Priora car. In it we will explain in an accessible way: how to change the side light bulb, low and high beam lamps and turn signal lamps on a Priora.
- Features of replacing Priora halogen lamps
- Replacing the low beam lamp
- Replacing the high beam lamp
- How to replace a side light bulb
- Replacing the turn signal lamp
Features of replacing Priora halogen lamps
Halogen headlights are the most popular in the modern automotive world. These low beam headlights use ellipsoidal reflectors . And for distant ones - parabolic. When starting to replace the light on your Priora, you should remember some features. Since the electronic device will be repaired, in order to avoid injury and damage, it is necessary to disconnect the battery.
The peculiarity of such lamps is that over time they fade and darken. Therefore, do not wait until the lamps on your car burn out, change them regularly.
Replacing the low beam lamp
Low beam headlights are needed to ensure visibility of the road at a distance of 40-50 m from the car , but they should not blind drivers in the oncoming lane. Therefore, you should pay constant attention to the low beam and change the lamps in a timely manner.
If you want to independently replace the low beam lamp on a Lada Priora, then the following instructions will be useful to you.
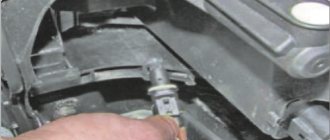
- Remove the protective cover of the headlight housing (rubber cover), which is located closer to the car fender.
- Disconnect the block with the wires that lead to the headlight from the lamp terminals to avoid damaging them.
- Press the lamp clamp and release its ends.
- Disconnect and remove the lamp.
- Remove the socket and replace and install the new Priora low beam lamp in the reverse order.
Replacing the high beam lamp
High beam provides visibility at a distance of about 150 m. It is most often used when driving at high speed at night and on poorly lit roads. In such a situation, the risk of an accident increases significantly. Therefore, it is better to change your high beam bulbs on time.
We figured out how to change the low beam on a Priora, now we’ll look at how to replace the high beam lamps. Essentially, the process is almost the same. It will be more convenient to remove the battery.
- Also remove the rubber cover.
- Disconnect all wires from the lamp terminals.
- Use the same method to remove the retainer from the lamp.
- Remove the bulb from the headlight housing.
- Install the light bulb in reverse order.
How to replace a side light bulb
The guide for replacing the side light bulb consists of just four simple points below.
- Remove the cover
- Remove the socket and lamp by the wires
- Now the lamp dimensions are out of the socket
- Replace in the opposite order
Replacing the turn signal lamp
We have already described how to replace the low, high and side beam bulbs on a Lada Priora car; all that remains is to consider how to replace the turn signal lamp. Everything is a little more complicated here.
- Remove the 4 screws securing the headlight housing (you will need a Phillips screwdriver).
- Remove the trim.
- Turn the socket, and with it the lamp, counterclockwise.
- Remove it from the headlight housing
- Press the lamp and turn it in the socket also counterclockwise.
- Take the lamp from the socket.
- When installing a new lamp, perform the steps in reverse order.
Whatever car lamps in the Priora model range need to be replaced (whether low-beam, high-beam, side-beam lamps or turn signal lamps), as we see, there is nothing complicated in the process of removal and installation.
Follow the instructions, and you will be able to do everything yourself. Subscribe to our feeds on social networks such as Facebook, Vkontakte, Instagram, Pinterest, Yandex Zen, Twitter and Telegram: all the most interesting automotive events collected in one place.
The lamps installed in the headlights of Priora 1 and 2 differ due to the DRLs in the newer Lada model. Below is a table with lamp types.
Below we describe in detail the entire process of replacing lamps on cars, depending on the year of manufacture.
To replace the lamps on the left headlight of a car, it is recommended to remove the battery for convenience.
The lamps installed in the Priora headlights are halogen; when replacing, be careful and do not touch the lamp base with your bare hands.
Replacement in the headlight until 2013.
Turn signal
We start the process with the car's turn signal. To do this, turn the socket counterclockwise and remove it along with the lamp.
To remove the lamp from the socket, you need to press on it and turn it counterclockwise until it stops, then remove it.
Install a new lamp in the reverse order.
Low beam
Remove the rubber cover, which is located near the fender of the car. Then remove the connector from the lamp.
Next, you need to dismantle the lamp itself. To do this, press on the metal spring and disengage it as shown in the picture. Then remove the H7 low beam lamp from its seat.
Install the new lamp in reverse order.
High beam
Remove the rubber protective cover of the headlight. Then disconnect the black connector from the lamp.
Then remove lamp H1 by bending the metal spring to the sides.
Install the new lamp in reverse order.
To replace the headlight bulb, you must remove the bulb socket from the headlight reflector. To do this, pull it towards you and remove the W5W lamps from the socket.
Installing a new lamp is done in the reverse order.
Replacement in the headlight after 2013.
Turn signal
To replace the bulb, turn the turn signal socket counterclockwise and remove it from the headlight.
Then remove the lamp from the socket by pressing on it and turning it counterclockwise until it stops.
Install the new PY21W lamp in the reverse order.
Low beam
Remove the plastic protective cover of the headlight and disconnect the two chips from the H7 lamp.
We release the lamp from the spring and remove it.
Install the new lamp in reverse order.
High beam and DRL
Remove the cover from the headlight unit. Turn the H15 lamp counterclockwise and remove it.
The new H15 lamp must be installed in reverse order.
Pull the side light socket towards you and remove it from the headlight reflector.
We remove the W5W type lamp from the socket and install a new one.
Insert the cartridge in reverse order.
In the Priora, little has changed after restyling - small details invisible to the eye, the center console, the dashboard. The headlights have also changed - they have become quite a bit larger. The principle of their design has remained virtually unchanged, except that there is now one plug at the back to isolate the contacts.
The design of the headlamp unit has become more complex: now in place of the usual high beam lamp there is a light consumable, combined with daytime running lights, which switches between operating modes. PTF fog light bulb, everything is also mounted depending on the configuration.
Turn
The turn signal signal is located the highest (in relation to the hood), and to remove it you don’t even have to wrap your hand under the hood.
- Remove three screws and a self-tapping screw from the plastic cover, pry it up with a flat-head screwdriver and remove it;
- Turn the cartridge strictly counterclockwise;
- Remove the cartridge;
- It is easy to press down on the lamp and rotate it counterclockwise until it begins to fall out of the socket.
When choosing a turn signal PY21W (Voltage 21 W), you should be careful - a lamp with a similar marking - P21W - will not have orange, but colorless glass, and will not be suitable as a turn signal.
How to replace all the lamps in the headlight on a VAZ 2170-VAZ 2172?
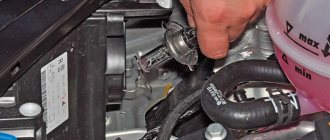
Replacing the high beam lamp:
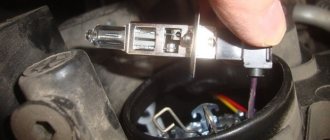
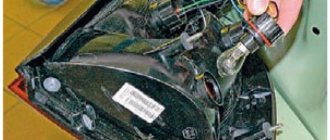
In order to change this lamp, you will need to first disconnect the battery and then get to the back of the headlight, and when you are there, at the beginning of the operation, remove the cover that covers the high beam lamp with your hand (Let us remind you that the lamp is located closer to the center of the car and thus, it can be considered an internal lamp), after the cover is removed (see photo 1) you will see a wire connector (Indicated by a blue arrow in photo 2) which is connected to the lamp terminal (Red arrow), so by pressing the latch which holds this connector, disconnect it from the lamp output, and then remove the spring clip from engagement with the hook (see photo 3) and ultimately remove the lamp itself from the hole in the headlight (see photo 4).
Note! The high beam bulb is installed in its place in the reverse order of removal, but just be careful not to touch the glass bulb of the lamp with your hand!
Replacing the low beam lamp:
To replace this lamp, you will need to do all the same operations that are carried out with the high beam lamp, that is, first look on the back side where the low beam lamp is located (It is located on the outside and further from the center of the car, unlike the high beam lamp ), so when you understand where the light bulb is, use your hand from the back of the headlight to first remove the rubber cover (It is round in shape and its removal is shown in photo 1) which covers the lamp, and when the cover is removed, disconnect the wire connector (Indicated by the red arrow on photo 2) from the lamp output (Indicated by a blue arrow), then remove the spring metal clamp that prevents the lamp from wobbling and falling from the two metal hooks with which it engages (see photo 3) and then move this clamp to the side, and when the latch no longer interferes, remove the low beam bulb from the headlight in which it is located (see photo 4).
Note! Install the new lamp in its place in the reverse order of removal, but when installing, hold the lamp terminal with your hands and not the glass part!
Replacing the side light bulb:
This lamp is located, as mentioned earlier, next to the high beam lamp, so to replace it you will first need to remove the rubber cover from the high beam lamp (How to do this, see above where replacing the high beam lamp is described, everything is described in detail there), and after removal, pull the socket and remove it together with the side lamp from the headlight (photo 1), then, holding the socket in your hand, grab the lamp itself and pull it, thereby it will come out and be removed from the socket (see photo 2).
Replacing the turn signal lamp:
This light bulb differs from all others in the way it is made, that is, it is not halogen but just an ordinary base lamp, it is also marked “PY21W”, it does not burn out very often since we do not always use the turn signal, but only in some cases (When turning, when parking for a long time, we turn on the emergency lights), but in order to replace it you will need to stock up on a screwdriver and use it to unscrew the four screws that secure the headlight trim (see photo 1) and then remove it (see photo 2), and when the trim will be removed and nothing will prevent replacement, find the place where the lamp itself is located and then grab it with your hand and turn its socket counterclockwise (see photo 3), and then pull the socket to remove the lamp completely from the hole in the headlight , and when the lamp is removed, grab the glass part of it with your hand and turn it counterclockwise and thereby remove it from the socket in which it is located (see photo 4).
Additional video clip: On the new second-generation Priors, the light bulbs are replaced a little differently, that is, instead of rubber covers there is one large plastic cover, when you flip it off you can immediately get access to the low and high beam lamp, see the video clip below for more details :