So, the car’s headlight went out and it became “one-eyed.” If the installation of the lighting elements was carried out in a car service center, and the lamp is still far from expiring, then under the warranty agreement it is obligatory to replace it free of charge. But not every car owner is willing to be left without a vehicle for several days because of such a trifle, as happens when there is a long line for service, so it’s easier to replace the light bulb yourself.
Fortunately, this process in most cases is not particularly difficult, although it is not without some nuances. They need to be analyzed in more detail.
Briefly about the service life of head optics
In principle, any automotive light source has a certain service life, measured in hours, for example:
- for halogen - 600–800 hours;
- for xenon – 2000–2500 hours;
- for LED - up to 20,000 hours.
It is worth considering that 2/3 of the time most drivers drive with low beams, using up the resource of this particular component.
Therefore, if, according to rough estimates, the lamp has already “run past” the period measured by the manufacturer, then, most likely, the time has come to replace the low beam lamp without particularly bothering with diagnosing the causes.
We recommend that you read: What is the fine for driving with a non-working low beam headlight?
Required Tools
Replacing low beam elements differs on different cars. A simple option is open access to the back of the lantern to remove the burnt part and install a new one. In this case, you only need a 10 or 12 key to disconnect the car battery.
On some models, replacement will require removing the bumper, headlight or front wheel to access a special mounting hole. In this case, you should prepare:
- set of wrenches;
- textile;
- several screwdrivers of different sizes.
What is needed for replacement
The main suspect for failure is the lamp. There are two approaches to test its functionality;
- Disconnect the terminal block, turn on the light on the instrument panel and check the presence of voltage at the contacts with a tester.
- Use a multimeter to check the contacts of the light bulb itself for an open circuit (not suitable for gas-discharge xenon lamps).
- Replace the broken element with an adjacent one on the opposite side to differentiate the damage.
If the lamp is working properly, then you will have to check the entire electrical circuit going to the headlight, starting with the safety block.
You can also assess the condition of the light bulb visually.
The halogen filament will be destroyed, which can be seen with the naked eye.
If made poorly, the halogen glass bulb may become deformed.
The risk of both options increases if you leave sweat marks on the glass during installation. In the contaminated area, heat dissipation is disrupted, as a result of which either the tungsten filament burns out or the glass melts. That is why it is not recommended to touch the flask with your hands.
When a xenon light bulb burns out, the inside becomes covered with soot.
This occurs when the ignition unit malfunctions, when an arc discharge occurs inside the bulb.
A burnt-out LED light source does not show itself outwardly, and it will not be possible to check it with a multimeter without disassembling it.
When there is no doubt about the source of the malfunction, it is time to replace the lamp with a new one. For this you will need:
- rubber or cotton gloves;
- screwdriver;
- a new light bulb, identical in parameters to the original one.
Gloves will have to be put on before opening the box with a new device to avoid accidental contact with the glass bulb. For LED light sources this rule is not necessary.
Tips for choosing headlight bulbs
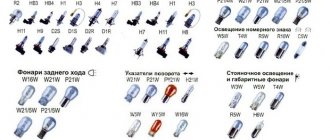
Currently, the most commonly used bulbs are H7 sockets. They are divided into:
- halogen;
- LED;
- halogen with xenon effect;
- xenon
Halogen lamps have the most average performance. These lamps are the most common among car owners. But these lamps are also the shortest lasting due to their high heat. Halogen lamps with xenon effect always have an increased service life compared to conventional halogen lamps.
LED lamps are more economical, but are more vulnerable to external influences: impacts, shocks. But at the same time, LED lamps are record holders in terms of service life. Also, having purchased these light bulbs, you may encounter some difficulties when adjusting the light beam, described below in the article.
Xenon lamps are immune to shock and vibration. Their temperature regime is closest to that of daylight. But not everyone can afford such lamps due to their high cost. Also, xenon bulbs require the installation of an additional light ignition unit.
As a rule, when choosing replacement light bulbs, drivers are guided by reliability and low cost. An important factor is also the efficiency of lamps in conditions of poor visibility. Philips and BOSCH bulbs fit these criteria perfectly among halogen bulbs. Philips light bulbs, like almost all other products from this company, are the longest-lasting halogen lamps, but also less bright.
This is interesting: How to prepare documents and dispose of a car? 4 stages of recycling, rules and features
An exception is Philips “X-Treme Vision”, which produces LED bulbs with increased luminous flux, but their service life is lower than that of their classmates. BOSCH lamps, on the contrary, wear out faster, but, as a rule, they shine brighter. The color range of the light beam from BOSCH light bulbs is also more diverse.
Among LED light bulbs, the highest quality ones are Philips “X-Treme Vision” and the Korean “MTF-Light Argentum” series with high glow temperature and brightness.
The most popular halogen bulbs with xenon effect are produced by Koreans. "MTF-Light Palladium" is a lamp with a fairly high glow temperature (5500 K) and the attractive effect of expensive xenon. This model is also the most budget-friendly of xenon lamps. Also worth highlighting is “Osram Cool Blue Intense”, which is visually close to the original xenon. The light emanating from such a lamp has an attractive white-blue tint.
The most popular xenon lamp in Russia is “MaxLux H7”. The ratio of its cost and characteristics is quite favorable. This lamp, with a cost of up to 950 rubles, has milky white and bluish shades and a glow temperature from 4300 to 6000 K. The disadvantage of the lamp is its production in Chinese Sho-Me factories, which sometimes gives reason to doubt the quality and integrity when delivering goods to the shops.
Always carefully check the lamps you purchase for unexpected cracks or deformations!
For more expensive models, there are top Japanese manufacturers such as KOITO MANUFACTURING. The cost of such lamps is the highest, but the quality is strikingly different from their colleagues for the better.
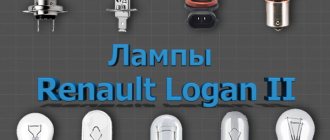
You can find the cheapest light bulbs from domestic ones and from Dialuch. But only one thing can be said about these light bulbs - their low price fully corresponds to their quality. Such bulbs are more suitable for owners of domestic cars and cars assembled in Russian factories (for example, Hundai “Accent” and Renault “Logan”).
How to choose the right lamp
It is important that the light source corresponds to the technical documentation of a particular vehicle, since installing a more powerful or weaker device can damage the electronic control unit of the vehicle systems. To select the required model, you can remove the broken light source and take it with you to the auto supply store. Consultants will help you understand the markings and select a replacement with the appropriate base and power, although it’s not difficult to figure it out yourself.
The most common types of sockets for automobile headlight lamps.
Checking the fuse
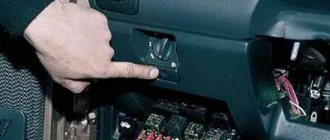
Since one of the common causes of problems with low beams is a malfunction in the safety unit, work begins from this place.
Checking the fuse
In most cases, the fuse block is located next to the battery. To replace, the latches of the block cover are pressed out, after which it is easily removed. Most vehicle manufacturers leave a detailed diagram on the inside of the block cover that shows which specific circuit each fuse is responsible for. If there is no such diagram, then you will have to look for it in the operating instructions. If the fuses are in order, then you need to proceed to the next step.
Correctly replacing a low beam lamp
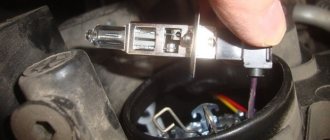
If there is an adapter on the lamp base, it must be disconnected and connected to the new device.
Lamp with adapter.
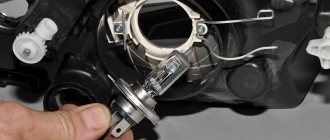
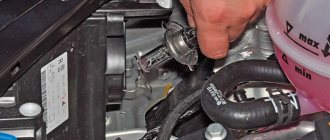
For bases H4, H7, H19, special projections are located in such a way that they can only be placed in one position. Structural grooves in the headlight will not allow the lamp to be placed on the wrong side. Subsequent assembly occurs in reverse order:
- Using clean gloved hands, without touching the glass bulb with your fingers, the light bulb is placed in the seat with the ears in the structural grooves. At the same time, it is sometimes more convenient to install a light bulb by visually monitoring the process from the front, through the glass of the headlight.
- The protective cover is put on.
- The terminal block is connected.
- With the appropriate design, the headlight unit is closed with a lid.
After carrying out the manipulations, you need to connect the power cable to the battery contacts and check the functionality of the new lighting elements.
If the flask is accidentally contaminated, then before installation it must be thoroughly wiped with alcohol and dried with a dry cloth.
Turn signals
Also, turn signals are installed in the VAZ 2107 headlight unit. They are part of the block, so we will look at them in this instruction. To remove the cartridge:
- Disconnect the wiring block
- Turn its body half a turn counterclockwise
- The fasteners come out of the latches of the headlight housing, the socket is pulled out
In order to change the light bulb in the direction indicators, turn its base a quarter turn so that the latches come out due to engagement in the socket and remove it.
As a conclusion
Changing the lamps on the headlights of a VAZ 2107 is not a difficult task. The main thing is to act carefully, because not so often a living person looks into them. Some parts may become “bitten” and will not want to be removed the first time. With a lot of force, there is a chance of breaking them. For example, when replacing dimensions, they often jam in the reflectors. There have been cases in my practice where they were “torn out” with a piece of that same reflector, and this was a replacement for the entire headlight.
So, you need to be careful, the “Seven”, although a strong machine, can tolerate and forgive you a lot, but some of its elements require a certain “tenderness”. A car is like a girl - the way you drive it is the way you will live with it - a popular automotive saying.
Good luck to everyone on the roads!