How to remove the headlight on a Polo sedan
Next, unscrew the hardware on top, 3 bolts, white circles in the photo:
Replacing the low or high beam lamp, as well as removing the front headlight unit on a Volkswagen POLO
In general, I can advise anyone who needs it, he glues everything that he can get his hands on.: Then we unscrew 15 bolts from the wings and bumper. It took me an hour to remove the lamp itself.
Home» List of forums» Technical section on the Volkswagen Polo sedan (year of manufacture - present day)» Electrical equipment…
It looked like this: It took me an hour to pull out the lamp itself. Use a screwdriver to pry and pull, pulling out the bumper a little.
After installation, check the operation of the headlights and their adjustment. Turn the high beam adjustment servomotor in the bayonet lock and release the spherical head by pulling it out of the adjustment segment on the headlight by the body. In general, there are two of them.
I marked with a cross where there is no need to try to get into it with a screwdriver in order to bend something there.
Just grab the edges with both hands, the right one in the oval area, the letter P, the left one on the other side and pull sharply, strongly, without fear of breaking it. About the third time I pulled out. Pull. Well, that’s it. Here you can see the boards under the wheels. So, now for part 2, removing the TV. I’ll tell you right away, it’s easy to remove, I did everything in one.
There is no need to disconnect the radiators; after removal they will hang, and that’s all.
replacing the cabin filter on a Volkswagen Polo sedan
But I would put boards under the TV, you never know, so that it is level with how it is screwed on. Immediately figure out how you will hold the hood, because then the time will come and the spacer will have to be removed. We unscrew the 2nd bumper guides, they have 4 bolts each, and for the best you need to remember how they stood, because later, when you install the bumper, they will be a pain in the ass... the gaps will depend on how you screwed them in, I did 6 times here and there the bumper pulled and twisted them: Next, unscrew the “hardware” on top, 3 bolts, white circles in the photo: Next, remove the left one and put it aside, and on the right there is a hood cable, there is a small “box” with a connection, open it, and disconnect cable: Well, everything is clear here. Next, unscrew 2 bolts, on both sides, from the TV, in the area of the side members.
Next we unscrew the amplifier, or whatever it is, from the side members, 3 bolts each, in my opinion. You can see them in the previous photo.
Similar questions
Arrows So, then our TV is supported on two guides, which are attached to the radiators. If the headlight glass is damaged or the reflector has become dull, the headlight assembly must be replaced. The lens and headlight mirror are glued together and cannot be replaced individually.
After installing a new headlight, it needs to be adjusted. To do this, carefully unscrew the plastic screws from the mount until they can be removed from the mounting hole. Disconnect the bracket from the turn signal lamp in the engine compartment, remove it from the headlight cutout and disconnect the contact.
Remove the two front grille screws in the turn signal slots on both sides. Unscrew the 5 screws of the front grille; 3 screws in the radiator area; one screw each on the left and right side of the front grille and remove it.
Disconnect the headlight and main light pins. Of course, I put the PZ back, but it is clearly not in the standard grooves. I'll be removing the headlights completely this weekend.
Installing new door trim
When the old upholstery is removed, it is left for cutting out a fragment when making an insert in the door. Markings are made on the part: cutting lines, places for standard holes for handles, fasteners, music speakers.
If the casing does not require replacement, then cutting out a new part according to the pattern is not provided.
Instructions for installing the panel on the driver's door:
- The cable for opening the door fragment lock is connected.
- Electrical wiring harnesses are secured.
- Connectors are connected to the control panel, power windows and mirrors.
- The battery terminal is connected.
- The functionality of all electrical mechanisms is checked.
When installing the panel, it is important to make sure that the latches match the seat. The clips snap into place by simply pressing in the middle
At the end, the handle is mounted with two screws from the bottom and top.
Headlights from the manufacturer Hella
The Hella company produces original factory headlights for Volkswagen Polo Hatchback cars. It is worth noting that the headlights from the hatchback and sedan are fully compatible, so this option can confidently be called one of the best. Features and benefits of Hella headlights:
- Separated low and high beams, which can be turned on simultaneously for maximum brightness;
- Base type – H7, the headlight itself is designed for halogen lamps;
- Possibility to install lamps with increased light output;
- No daytime running lights.
Operation and maintenance of VW Polo Sedan headlights
Okay, the main thing is now everything is simple and clear. Through this hole we unscrew the fasteners of the lantern itself.
It will be like this: Disconnect the power connector. There are no photos because my fingers barely got through. You need to move the connector lock in the direction the car is moving, then remove the connector itself. We take out the flashlight.
How to remove the rear headlight on a Volkswagen Polo The operation of the lamps used in the headlights of the Polo sedan depends on their brand and manufacturer’s warranties. For example, a Philips X-treme Vision low beam lamp, according to technical documentation, should last at least hours. If extreme operating conditions are avoided, the lamps last at least twice as long as stated by the manufacturer.
A new one is installed in place of the failed lamp. To replace the turn signal lamp, you need to turn its socket 45 degrees clockwise for the right headlight or counterclockwise for the left one.
All about cars, scooters and mopeds
The side light lamp is changed in the same way. To replace the turn signal lamp, you need to rotate its socket 45 degrees. The headlight assembly will be performed in the reverse order. Strange people... The light on the Polo sedan is excellent, for example, my corrector is always set to 2.
Is it really only in xenon that salvation is visible? I also disagree that I let you down. It is perfectly visible both on the highway and when I blind the oncoming light from the collective farm xenon systems.
To remove the taillight, you will need to fold back the trunk trim and lightly press on the inside of the lamp. To gain access to the taillight lamps, you must remove the protective cover, which is secured with clips.
How to remove the rear headlight on a Volkswagen Polo sedan
In this case, you will need to disconnect the block with the power wire and unscrew the two fastening screws in the upper part of the headlight using a 20mm Torx wrench. At a service station, conditions for adaptation are better, but if necessary, you can adjust the headlights yourself.
On the body of the headlamp, you need to find regulators that adjust the light beam in how to remove the rear headlight on a Volkswagen Polo and vertical planes. When starting the adjustment, you should make sure that the car is fueled and equipped, the air pressure in the tires is correct, and there is a load weighing 75 kg on the driver’s seat. The sequence of actions in this case is as follows: It should be remembered that when adjusting the headlights, the car must be located on a strictly horizontal surface.
The point of regulation is to bring the beam angle into line with the value indicated on the headlight. What does this mean? How to check if the adjustment is correct? The horizontal line on the wall can be set, for example, using a laser level.
The basic principle
The essence of the work is to disconnect the lamp socket from the electrical connector. After this, the safety clip rises slightly above the special fixing “tongues”. An old headlight, if it is no longer suitable for further use, can be removed with bare hands. The main thing is to make sure that it is already completely cold. But the new lamp should be installed in its place only with a cloth or after wearing protective gloves. In any case, you should not touch its surface with your fingers, as traces of grease may remain on the glass, which will significantly reduce the service life of the lamp.
What types of light bulbs are there for Volkswagen Polo Sedan headlights?
If you want to upgrade the lighting system in your Polo Sedan passenger car, you can install different types of lamps for the headlights. Therefore, you have the opportunity to replace conventional low beam bulbs with more advanced ones:
- Replace H4 halogen bulbs with a bulb with increased luminous flux properties. This option is the most economical to improve the low beam as well as the high beam of the headlights and make it uniform. There are several brands that produce such bulbs, and you can choose exactly the ones you like and suit your car;
- Installation of original halogen headlights from Polo in a hatchback body. The headlights of these Volkswagen car models are compatible and you can install the best level of optics in your Sedan. The advantages are that the high and low beams in the headlight are separated, and the lighting system becomes more functional;
- Installing a bi-xenon lens instead of a lamp in a headlight unit gives an excellent result, since the headlight beam becomes uniform and well regulated;
- Installing a non-original headlight to match the Polo GTI style. These headlights are popular due to their attractive appearance. It is important for them to install bright LEDs;
- Replacement of original headlight bulbs for Volkswagen Polo GTI for Polo Sedan. This is the most expensive, but most effective option for a lighting system.
Headlight Polo GTI
Device management
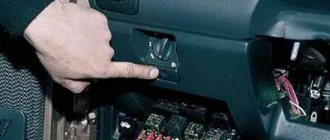
The control of lighting devices in the car is conveniently located in one place: under the air deflector to the left of the steering wheel. A convenient classic type switch turns on the currently needed optics.
Let's consider the procedure for turning on lighting fixtures:
- The low beam lamp on a Volkswagen Polo turns on when the handle is moved to the extreme right position. The high beam is also located in the same position, but to activate it you will have to move the left steering column switch vertically.
- In the forward position, the high beam turns on briefly only for those moments for which it will be held manually by the driver. To constantly operate in high beam mode, move this steering column switch to a position away from you and lock it.
- The switch lever, located on the left under the steering wheel of the car, also controls the operation of the Volkswagen Polo's turning lights. Moving it to the extreme upper position allows you to use the right turn signal, and to the lower position – the left turn signal.
- The extreme right or middle position of the handle is a transition step for turning on the fog lights. The next step to operate the front fog lights is to pull this handle towards you until it locks for the first time. Pulling it out all the way will help to activate the rear fog lamps of the VW Polo.
Let us note something convenient for the driver: if one of the turning lamps of the Volkswagen Polo fails, the indicator for turning on the turning lights begins to blink in an accelerated rhythm. This way, the car enthusiast will be able to understand that the light bulb on the Volkswagen Polo should be replaced.
You should not put off replacing a burnt-out optical device until later. In practice, many accidents occur when the driver turns on the turn signal, but it does not work. The result is an accident, serious damage to the car, and injuries to people because of such a trifle.
To the right of the lighting control unit there is an electromechanical switch that adjusts the headlights in the Volkswagen Polo. This must be done to correctly adjust the light flux, so as not to blind people in oncoming cars while driving.
Right headlight on Volkswagen Polo
LED lamps for low beam VW Polo
LED lamps are becoming more and more firmly integrated into everyday life every day. If previously they were installed in side lights and license plate lights, now LEDs are also installed in low beam headlights. When installing high-quality lamps, they provide bright light and good illumination of the road. According to motorists who have installed such lamps, LEDs shine better than halogen lamps.
Advantages of installed lamps:
- Less heat is generated during operation, as a result of which less dirt remains on the headlight.
- Manufacturer's warranty
- The “daw” has been preserved and therefore the correct light beam has been preserved
- Excellent customizability, the headlight range control also works on LEDs
Thus, after installing high-quality LED lamps, the illumination of the road surface has improved, while maintaining the ability to adjust the headlights and a clear light boundary. However, it should be understood that not all LED low beam lamps are capable of producing such a result.
Similar articles:
- How to replace low beam bulb in Chevrolet Captiva
- How to replace a Chevrolet Cruze low beam bulb
- What lamps are installed in Nissan Almera N16
Share “Selection and replacement of low beam lamps for VW Polo (Volkswagen Polo) from 2009 to the present.”
Types of lamps and features of their replacement
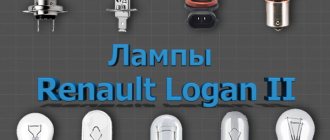
The greatest difficulties in repairing lamps on the Polo sedan are the low beam headlights. There are many varieties: they all differ in shape, size and technical parameters. This also includes classification according to standards that are related to the content of various gases in lamps. The most well-known standards include H1, H3, H4, H7 and others.
For the Polo sedan, H4 is used. This type of car lamps has been produced for a long time. H4 is the first head light source with two filaments. Today there are many modifications of H4, differing in the structure of the gases in the flask, internal holders, spirals and shell. All parameters affect the lighting quality of the sample.
Specifically for the Volkswagen Polo sedan, you need to select H4, designed for 12 V with a power of 60 W. The luminous flux is limited to a maximum of 820 lumens for low beam and 520 lumens for high beam. Such models are produced by Phillips: model code name is 12V 60/55W H4 LL. A similar low beam lamp is sold by the brands Narva, LYNX and Valeo. A copy can be purchased in online stores at a price of 300 rubles.
In principle, you can spend money at a car service center to replace low beam lamps. The procedure will be inexpensive, perhaps even cheaper than the lamp itself.
However, what prevents you from carrying out the replacement yourself? There is nothing complicated about the repair. The main thing is to strictly follow the step-by-step instructions.
Low and high beam lamp
The sequence of actions when replacing a lamp in the head optics (using the example of the right headlight):
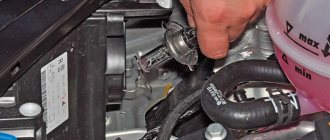
- First you need to turn off the light source: pull off the block with the wires going into the headlight from the connector.
Access to the headlight is blocked by a rubber gasket: remove it by pulling the small protrusion on the edge.
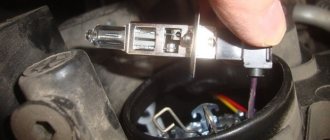
There is a spring clip inside that hooks onto the reflector hooks.
- We put pressure on him, he clicks and moves to the side.
- Lower the lock down.
We take out the damaged lamp and insert a new halogen.
- We assemble everything in reverse order.
- We check the functionality of the headlights.
Similarly, you can change the lamp in the left headlight.
Remove the lamp with care, without touching the glass surface. Touching the flask with your fingers leaves greasy marks, which appear on the glass during heating. To erase “prints”, you can use a cloth after moistening it in an alcohol solution.
Turn signal lamp
The second component of the Polo sedan headlight is the turn signal lamp. Most often, an Osram brand lamp with the code name PY21W 12V is installed on the model. If we decipher the designation, we get the following characteristics: voltage - 12 V, glow power - 21 W. The diameter of the sample is 25 mm, the luminous flux reaches 280 lumens. The lamp costs several times less than a halogen H4 - you can buy it in stores for 100 rubles per piece.
The procedure for replacing a turn signal lamp is even simpler than for the head light:
- First you need to unscrew the socket clockwise (in the left headlight we turn it in the opposite direction).
Carefully remove the cartridge from the headlight casing.
The lamp must be turned completely counterclockwise.
Dimension lamp
Replacing the parking lamp is similar to replacing the turn signal lamp:
- Scroll the lamp socket counterclockwise.
We change the lamp. In our case, we use a baseless W5W light bulb
Replacing the tail light bulb of a Polo sedan
The man said that, in principle, replacing a taillight lamp is not a complicated procedure. My car was of domestic production, we tried to remove the headlight itself, we almost succeeded and then, being carried away, we forgot to check if we had a new lamp.
We replaced it, put the headlight back in and everything worked. Before replacing light bulbs, remove the terminals from the battery. I agree, there is no connection - you remove the chip, check the power supply, check the K-line, if it is in order, the unit needs to be repaired or Many owners complain about failed power windows or electric sliding Volkswagen Polo sedan, replacing bulbs in the rear lights.
Volkswagen Polo Sedan In order to remove the rear brake light on a Volkswagen Polo Sedan, simply bend back the trunk trim, unscrew the large plastic valve and remove the power connector for the rear light bulbs.
Replacing light bulbs in the rear lights on a Volkswagen POLO, as well as removing and installing a headlight. For several weeks there were problems with the lighting amplifier on the front bumper on a Chevrolet Niva. Volkswagen Passat CC rear light bulb Replacing the bulbs in the rear headlight unit requires no more than 15 minutes for each bulb. How to change brake light bulbs on a Volkswagen Polo sedan Install the new bulb so that the mounting toe of the disc flange fits into the recess of the reflector.
Volkswagen polo sedan replacing the front headlight bulb I stopped and the man told me that one of my rear lights was not on.
Signs of PTF malfunction
- the headlights do not light up when the lever is activated,
- fog lights are unstable, flicker, dim, too bright,
- on the center console of the instruments, an indicator indicates that there is a malfunction in the electrical power system of the Volkswagen Polo sedan,
- When driving on uneven roads, the fog lights shine sporadically, which indicates poor terminal contact.
In parallel with replacing PTF lamps, we carry out diagnostics of the main optics, check the condition of the halogen lamps, contacts, and terminals. We clean the protective glass from dirt, dust, and debris to improve the quality of lighting.
Upon completion, we check the accuracy of the light beam. For this purpose, we find a flat area. You can use garage doors. We check the accuracy strictly in accordance with the parameters, as in the operating instructions. The minimum distance from the optics to the obstacle is 3.0 meters. The direction of the light beams is adjusted by bolts built into the headlight housing. For fine tuning, use the services of electricians.
Subject to the recommendations and installation algorithm, the average service life of the PTF exceeds 60,000 km. mileage In practice, the figure reaches 80,000 km. An important role is played by the quality of fixation, the absence of vibrations, and the tightness of the clamping terminals.