One of the best-selling cars in Europe, the Volkswagen Polo, produced by the German auto giant since 1975, is preparing for rebirth. In the new 2016, not just restyling is expected, but the next, sixth generation.
The pedantic Germans are preparing a grand surprise for all lovers of the German B-segment brand. Every time something new and unusual appears.
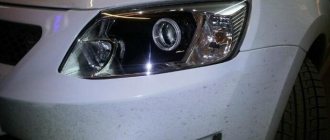
When it comes to lighting design, the Germans have no equal. Both low beam headlights and rear lights are constructed with the utmost care from the highest quality and most reliable materials. There is no point in talking about design at all. Each restyling is a completely new note of design art, made in accordance with the standards of fashion trends.
Separately, it is worth noting the painstaking work on the design of the rear dimensions of the Polo. Even the old sedan model uses high-quality LED technology, which is used for most modern foreign cars. The updated version of the Polo will feature even sleeker LED lights.
Quality is very good, but even reliable German technologies can fail. However, there is nothing unnatural in replacing lamps from “German” lighting equipment. Every car sooner or later undergoes lighting repairs. You can, of course, contact a service center and pay a substantial amount of money to replace incandescent lamps, or you can change everything yourself.
It’s a different matter if the car was involved in an accident and the glass body cracked. Then replacing the flashlight will cost slightly more than buying light bulbs. One way or another, the method of removing and installing the part is the same.
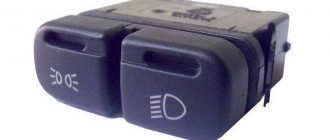
What lamps are installed in VW Polo
Note that the fifth generation of the model, produced from 2009 to 2015, has an H4 lamp in the low beam; since 2015, after restyling, they began to install an H7 lamp. Be careful when buying lamps
For Volkswagen Polo 5 from 2009 to 2015.
- Turn signal lamp PY21W 12v / 21W
- Side lamp W5W 12v5W
- H4 12v 60/55W low beam lamp
Selecting low beam lamps
- BOSCH H4-12-60 / 55 Pure Light 1987302041 price from 145 rub.
- NARVA N4-12-60 / 55 N-48881 price from 130 rub.
- PHILIPS H4-12-60 / 55 LONGLIFE ECO VISION price from 280 rubles (with long service life)
- OSRAM H4-12-60 / 55 O-64193 price from 150 rub.
- PHILIPS H4-12-60 / 55 + 30% Vision P-12342PR price from 140 rub.
If you want the light to be brighter, you should choose the following lamps:
- OSRAM H4-12-60 / 55 + 110% NIGHT BREAKER UNLIMITED O-64193NBU from 700 rubles per piece
- PHILIPS H4-12-60 / 55 + 130% X-TREME VISION 3700K P-12342XV price from 650 rubles per piece
- NARVA H4-12-60 / 55 + 90% RANGE RANGE price from 350 rub. / PC
These lamps have exactly the same power as regular lamps, but are much brighter. However, their service life is shorter than that of conventional lamps.
You can see how much the low beams of the polo sedan dorestayle cost above, below the price of the restyled version
Low beam lamp for VW Polo 5 restyling
As we wrote above, the updated version of the model has an H7 12v / 55W lamp installed in the low beam.
- NARVA N7-12-55 N-48328 price from 170 rubles pcs
- BOSCH H7-12-55 Pure Light 1987302071 price from 190 rubles per piece
- PHILIPS H7-12-55 LONGLIFE ECO VISION P-12972LLECOB1 from 300 rubles with long service life
- OSRAM H7-12-55 + 110% NIGHT BREAKER UNLIMITED O-64210NBU from 750 rubles per piece
- PHILIPS H7-12-55 + 30% P-12972PR Vision price from 250 RUR pcs
- OSRAM H7-12-55 O-64210 price from 220 RUR pcs
It is worth noting that it is easier to replace a low beam lamp on a pre-Restyle than on a remodel. Below we will describe both replacement options.
Do-it-yourself dismantling and replacement of low beam
As mentioned above, it is often necessary to replace low beam lamps. The reason is that drivers use them as DRLs, which means these headlights are constantly talking. And it doesn’t matter whether you have xenon or halogen, the part can quickly become unusable. Replacement can be done manually.
To replace the lamps you need to do the following.
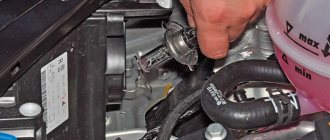
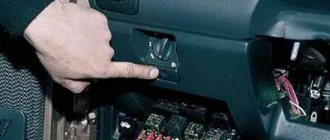
- Lift the hood and lock it in this position, leaning on the latch.
- Now you need to disconnect the wires from the lamp. To do this, you need to take the block and separate it.
- Then pry off the lamp plug (you can use a flathead screwdriver).
- Now step aside and lower the metal latch all the way.
- Unscrew the old light bulb. Be careful not to break the glass. Sometimes the old part is firmly in place due to corrosion and other phenomena, so a little more effort is needed.
- Install the new lamp and press it with the clamp.
- Perform all subsequent steps in reverse order. Don't forget to adjust the headlights.
Headlight Controls Remember that light bulbs can be quite hot, especially if they have just been turned on. Remove them with gloves. Also, don't leave fingerprints or dirt on your new parts. This will worsen the lighting in the future. In this case, use a clean cloth and alcohol to clean.
Examination
The check can be carried out in two ways: complex and simple. A simple method is to replace the sensor with a known good vehicle or purchase a new sensor and install it in place of the old one.
The second method is to check with a multimeter.
To do this, you will need a regular multimeter, a thermometer, a glass and boiling water.
- On the multimeter, set the switch to the resistance measurement parameter and connect it to the sensor.
- We immerse the sensor in a glass and fill it with boiling water.
- We lower the thermometer into the glass and look at the readings on the thermometers and multimeter.
- We compare the obtained data with the table below.
If the data differs, the sensor is faulty and requires replacement.
Replacing Volkswagen Polo lamps - until 2015
Low and high beam lamps
Operations for replacing low and high beams are considered using the example of a Volkswagen Polo headlight (right.
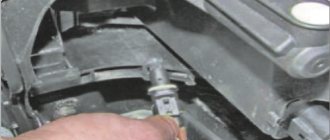
- First, the block with a number of wires is disconnected from the lighting device.
- Pull the end of the rubber boot out and remove it.
- By pressing the spring tongue of the latch, you must carefully unhook its edges from the mounting hooks on the body.
- At the last stage, the damaged illuminator is easily removed from the headlight housing.
- To do this, simply pull it towards you.
To remove dirt from the media, use a clean cloth moistened with alcohol.
A new H4 index lamp is installed in its place in the reverse order to that described above.
When removing light bulbs, it is permissible to hold them only by the socket. This is explained by the fact that the updated products are halogen-type illuminators, the cylinder of which is prohibited from touching the light bulb with your own hands. Otherwise, when heated, certain areas of the surface may darken.
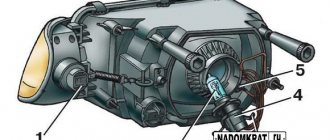
Turning lamps (as part of the headlight)
To remove the cornering headlights that are part of a unit that has already been removed from the vehicle, you will need:
- To begin, grab the base with your hand and press on it.
- Turn clockwise.
- At the next stage, the lamp is removed from the structure's support with a force directed towards itself.
At the final stage of the turn signal removal procedure, a new PY21W light is taken and installed in the reverse order.
How to remove a headlight on a POLO sedan g, Video, Watch online
Conventional incandescent light bulbs in headlights have a short lifespan. About hours of operation, after which they need to be changed. It is recommended to install xenon lamps, which last longer and provide better quality light. However, it is worth considering that if you install low-quality xenon lamps, you are guaranteed to blind oncoming drivers.
The lamp replacement procedure takes no more than 1 hour. There is no need to visit service centers; everything can be done with your own hands. When replacing lamps, you must always wear gloves. It is not allowed to leave stains from your fingers, so as not to provoke an early rupture of the light bulb. If you accidentally stain the lamp, wash it with a cloth soaked in alcohol.
The procedure for replacing lamps is identical for each headlight unit. It takes up to 15 minutes to replace each light bulb. Only a minimum of tools and experience is required. The front headlight units are most often dismantled either in case of replacement tuning or after an accident, or for a simplified method of replacing all lamps with new ones.
The headlight unit is also dismantled for subsequent removal of the front bumper. It takes up to half an hour to dismantle the headlight. Wear gloves when dismantling light bulbs. It is not recommended to leave stains on lamps. Replacing lamps in the rear headlight units requires no more than 15 minutes per lamp. The replacement process is even simpler than when dismantling the lamps in the front headlight units. Replacing Volkswagen Polo lamps. Comments Cancel reply Comment.
This is how you remove the headlight from a Volkswagen polo 6r from 2011. if you only want to change the bulb is not needed to remove the headlight, inside you have two caps after you remove the caps you can change the bulbs. Here is what removal tools i use: https://amzn.to/2LPmZxN
With this camera I recorded this video: https://amzn.to/2K8QgP1
Here is what socket set I use: https://amzn.to/2NXmBe6
DISCLAIMER: This video and description contains affiliate links, which means that if you click on one of the product links, I'll receive a small commission. This helps support the channel and allows us to continue to make videos like this. Thank you for the support! Here are some AliExpress links to cheap tools that I use daily in my workshop:
Plastic removal tool: -11 pieces removal tool set (I have bought this one for almost 3 years and I still use it) https://s.click.aliexpress.com/e/basZfJg8 -22 pieces removal tool set https:/ /s.click.aliexpress.com/e/cfz3y3ck -7 pieces ceap removal tool set https://s.click.aliexpress.com/e/c5FEA6Uo
Torx: -Torx Screwdriver Set from T5 to T30 https://s.click.aliexpress.com/e/cdIOzPBK -Long torx Screwdriver T15 T20 T25 T27 T30(use torx t20 to remove the car exterior door handles almost all cars have this screw) https://s.click.aliexpress.com/e/cDOzHHLw
Small Electric Drill Cordless Screwdriver: https://s.click.aliexpress.com/e/iAkSGXm
Flexible Magnetic Pick Up Tool: https://s.click.aliexpress.com/e/btR4NInm
Rubber Eraser disk: https://s.click.aliexpress.com/e/crov2JVA (i use this to remove old Stickers and Glue Adhesive left on car)
LED Flashlight: https://s.click.aliexpress.com/e/CbIfLBK
Infrared Thermometer: https://s.click.aliexpress.com/e/j5Ib2eM
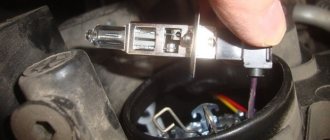
Replacing dorestyle low beam lamps
Disconnect the H4 unit from the lamp, then remove the rubber protection from the lamp
To remove the lamp, you need to gently press on it, remove the spring clip, remove it from the “ear” and lower it
We take out the old lamp, carefully take the new one without touching the bulb and install it. Next we install in reverse order.
To replace the w5w side light, rotate the bulb socket counterclockwise and remove the bulb sockets. Then we pull the lamp towards ourselves and install a new one.
LED lamp in low beam VW Polo
LED lamps are becoming increasingly powerful in everyday life.
If previously the license plate illumination was installed on the side lights, now the LEDs are located in the low beam.
When installed with high-quality lamps, they provide bright light and good street lighting. According to car enthusiasts who have installed similar lamps, LEDs shine better than halogen lamps.
When it's time to change
DRL headlights on the Volkswagen Polo sedan play a decisive role in the safety of both the driver and other road users. Therefore, they need regular monitoring and timely replacement. Many VW Polo users note the extremely low durability of standard equipment.
This is due to the frequent use of optics and the desire of the manufacturer to save on parts. Factory lamp models for the Polo sedan are formally designed for 2 years of operation, but in practice their service life is 30% shorter. The first signs that your Polo lights need to be replaced are:
Anti-fog headlight
There are several ways to replace a light bulb: from underneath the car or by removing the headlight. The first method is carried out on an overpass or inspection hole.
Replacement steps:
- Turn the light bulb counterclockwise and remove it from the housing;
- Press the latch of the power chip, disconnect it from the lamp;
- Unscrew the screws securing the front fender trim, bend the front wheel trim;
- Install the new light bulb in reverse order.
The fog lamp is removed when it is necessary to replace the lamp housing or when replacing the front bumper. This is done using a special hook from the car kit. Replacement process:
- Press the pad latches, disconnect the power from the lamp connector on the back of the headlight;
- We remove the headlight so as not to damage the wiring;
- Unscrew the screws securing the fog lights using a Torx T-25 wrench;
- Replace the light bulb with a new one and reassemble.
- Insert the wire stripper into the hole for adjusting the headlights, carefully pull out the decorative strip, remove it, overcoming the resistance of the clamps;
- Turn the light bulb counterclockwise and remove it from the housing along with the socket;
Side turn signal
- We take out the cartridge, remove it from the cartridge case;
- We pull the pointer out of the hole;
- Move the side turn signal to the front of the vehicle;
- We replace the old light bulb with a new one and put everything back in place.
Dimensions
Performed symmetrically for left and right checkboxes:
- We take out the socket and change the light bulb without a base.
- Guide the lamp socket counterclockwise;
The light source for the rear lights changes as follows:
- Remove the light from the body so as not to damage the car's paint;
- Unscrew the fastening nut;
- Using a flat-head screwdriver, lift the latch of the red connector, press the latch, disconnect the wires;
- Reassemble the lantern in reverse order.
- Remove the negative terminal from the battery;
- Pull the cutout on the side panel towards you;
- Hook the chuck between the clamps;
- Press the latches on the lamp socket, remove the pad from the lamp;
- Unlock the socket and replace the light bulb;
- Open the trunk;
For those car enthusiasts who want to make their Volkswagen Polo bright, you can purchase multi-colored LED chameleon lamps. They are equipped with two LEDs on the sides and are built into the dimensions of the flashlight. The light bulbs shine brightly and abundantly, with a power of 2.0 W.
Headlight protection
During operation, under the influence of external factors, headlights may lose their transparency and attractive appearance. You can extend the life of lighting devices using various types of protective devices, such as liquid compounds, vinyl and polyurethane films, varnishes, etc.
The varnishes that the manufacturer uses to coat the headlights protect the optics from ultraviolet radiation, but cannot protect them from mechanical damage. To protect glass from gravel and other small particles, you will need:
- liquid ceramics;
- vinyl film;
- open-pore polyurethane film;
- closed-cell polyurethane film;
- special protective plastic kits.
It is generally accepted that the least reliable way to protect headlights is to apply various liquid compounds, such as ceramics. Vinyl film provides a slightly higher degree of protection, but its disadvantage is its fragility: after a year, such film loses its qualities. Open cell polyurethane film can last 5 years or more, but tends to yellow over time, which can ruin the look of a white car. The highest quality film coating for headlights is closed-cell polyurethane film.
An extremely high level of headlight protection is achieved through the use of special plastic kits . Such kits are produced especially for the VW Polo Sedan by EGR. The products of this company are distinguished by their quality and reliability; for the manufacture of kits, thermoplastic is used, made using a unique vacuum technology. The resulting material is significantly superior to headlight glass in strength, but is not inferior to it in transparency. The kit is made taking into account the features of the VW Polo Sedan body and is installed without drilling additional holes. Transparent and carbon options for such protection are available.
Procedure for replacing brake light bulbs
As promised, we present instructions for removing and installing brake lights for Volkswagen Polo:
- Disconnect the negative terminal of the battery;
- Open the trunk lid;
- We find and fold the lamp compartment inside the luggage compartment;
- Unscrew the lamp clamp and remove the clamp from the housing hole;
- Disconnect the wire block by lifting it with a screwdriver and sliding it to the side;
- Slide the rear light off the seat and remove it. Here, force is required to overcome the resistance of the clamps;
- The taillights are mounted on a support, which must be removed by folding the latches;
Squeeze 5 holder clamps - Now you have to remove the brake light bulb by pressing it and turning it at the same time;
Find the brake light bulb and replace it - Install the new lamps in the reverse order shown above.
As you can see, performing these operations is not that difficult if you have detailed instructions in front of you. Perform all steps carefully and carefully to avoid scratching or damaging the body of your Polo. Good luck on the roads!
Tail light design
Before you begin the procedure, you should carefully study the design of the sedan's rear light. Outside is the building itself. Below it are four lights:
- The side light lamp is a baseless 5 W lamp - it is the smallest and is located approximately in the center of the body.
- The brake light lamp is single-contact, 21 W, “hanging” above the clearance.
- The rear turn signal lamp is yellow with a 21 W mixed socket - located under the marker.
- The reversing lamp is also 21 W - at the very bottom of the structure.
All components are attached to a special metal block, which is held in place by a locking screw located inside the luggage compartment.
If the light does not work, this does not mean that the light bulb has burned out. Perhaps the reason lies in the fuse box located in the front panel on the driver's side. Therefore, you should not immediately “pounce” on the rear light and disassemble the structure piece by piece.
If the problem is the light bulb, then when replacing it, experts recommend using either originals or analogues with the appropriate parameters and special markings on the base of the device.
Under no circumstances should replacement be done with bare hands. Fat stains from the fingers remain on the surface of the lamps, worsening the indicators of the side lights.
Also, do not forget about basic safety rules, which include installing a parking brake to secure the car, switching the lighting to position 0, and engaging the gear on a manual transmission or the “P” mode on an automatic transmission.
Use a slotted screwdriver to lift the wire block clamp.