In the Mitsubishi Lancer 9, as well as in the next generation of the model, T10 or W5W lamps are used for license plate illumination. At first glance, replacing license plate lamps may seem difficult, but in fact there is nothing difficult about it; with the help of our instructions, you can do it yourself in 15-20 minutes.
What lamps are used in license plate lighting?
Standard T10 or W5W incandescent lamps are installed from the factory. When choosing new lamps, you can choose regular incandescent lamps or lamps with an extended service life. The latter will last longer than usual, under exactly the same lighting as regular ones.
- OSRAM O-2825 price from 25 rubles pcs
- OSRAM O-2825ULT Ultra Life from 40 RUR pcs extended service life
- PHILIPS P-12961 price from 25 rubles pcs
- PHILIPS P-12961LLECOCP price from 40 rubles pcs extended service life
- Mayak 61205bts price from 7 rubles pcs inexpensive Chinese equivalent
- Koito 1583 price from 30 rubles pcs
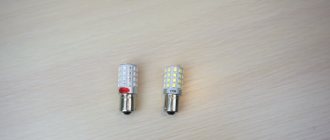
In addition to conventional incandescent lamps, you can install brighter LED lamps. Today there is quite a large selection of them, from famous manufacturers Osram and Philips, to inexpensive Chinese ones. When choosing Chinese diodes, you should not buy too cheap ones, since their service life is noticeably lower than expensive ones.
You shouldn’t buy too long LED lamps for license plate illumination on Lancer 9, as they may simply not fit into the lampshade.
Instructions for replacing lamps yourself
The license plate lamps are replaced from the trunk. So he opens it.
Now you need to remove all the clips securing the trunk lid trim, then carefully remove it and put it aside.
Next, take the backlight lamp socket and turn it counterclockwise 45 degrees, then remove it from the lampshade.
We take out the old lamp, install a new one and reassemble in the reverse order. If you use LED lamps, you must first turn on the backlight so as not to make a mistake with the polarity of the lamps, otherwise they will not light.
This completes the replacement of lamps in the license plate illumination of the Mitsubishi Lancer 9.
Examples of installing LED lamps in license plate lighting
One LED lamp, the other a regular one - the difference
Source: https://cleanerauto.ru/zamena-lamp-podsvetki-nomera-mitsubishi-lancer-9.html
Dimensional
Overhead bulbs are often replaced with LED bulbs, as halogen bulbs heat up the socket, which can cause it to begin to melt. The marker lamps are baseless, so they can be simply and easily pulled out of the holder. Rotate the bulbs 70 degrees.
As you can see, there is nothing particularly complicated here. If something doesn’t work out for you, remember that it’s better to read the instructions several times. Never neglect safety measures, because even something that seems trivial to you can cause irreparable harm to your health.
- https://carfrance.ru/lampochka-blizhnego-sveta-na-mitsubishi-lancer-10/
- https://svetilnik.info/avtomobilnyj-svet/lampa-blizhnego-sveta-lanser-10.html
- https://zapchasti.expert/mitsubishi/lancer-9/lampy.html
- https://zapchasti.expert/mitsubishi/lancer-10/lampy-na-lancer-10.html
How to replace a low beam lamp on a Mitsubishi Lancer 9
Mitsubishi Lancer 9 is equipped with H4 12v 60/55W lamps. That is, in one lamp there is both low and high beam. To replace lamps, you do not need the help of a specialist or car service center. You can make the replacement yourself using our instructions.
Which lamps to choose for replacement
The brightness of the lighting also depends on the choice of lamps. If the light of standard lamps is not enough for you, you can install brighter lamps from +30% light to +150%.
Such lamps will illuminate the road better, however, they also have a shorter lifespan than standard lamps.
You can install lamps with an extended service life - they will last a long time, but the light from them is not as bright as from lamps with increased brightness.
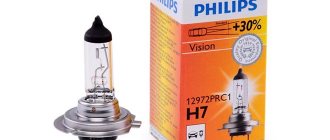
- PHILIPS H4-12-60/55 +30% Vision P-12342PR from 140 RUR Germany
- OSRAM H4-12-60/55 64193 from 140 RUR Germany
- NARVA H4-12-60/55 48881C1 from 100 RUR Germany
- BOSCH H4-12-60/55 Pure Light 1987302041 from 130 RUR Germany
- KOITO H4-12-60/55 W 0456E from 220 RUR Japan
- General Electric H4-12-60/55 50440U from 120 RUR Hungary
- AYWIparts H4-12-60/55 AW1910002 from 90 RUR Korea
- MTF H4-12-60/55 +30% Standard Long Life x4 HS1204 from 150 RUR Korea
Lamps with increased brightness
- OSRAM H4-12-60/55 +130% NIGHT BREAKER LASER set from 1300 RUR Germany
- PHILIPS H4-12-60/55 +130% X-TREME VISION 3700K set 12342XV+S2 from 1000 RUR Germany
- DiaLUCH H4-12- 60/55 +90% Megalight Ultra PRIME set 12604 PRMU from 600 RUR Korea
- AVS H4-12-60/55 +110% 3700K Sirius Night Way set A78949S from 500 RUR China
- BOSCH H4-12-60/55 +90% 1987301074 set from 900 RUR Germany
In addition to the above lamps, you can install others. For example, lamps with a blue bulb produce white light like xenon, but they illuminate the road much worse. There are also all-weather lamps, they shine with yellow light of 2500-3000 kelvin.
Removing headlights on Lancer 9
How to replace low/high beam lamps yourself
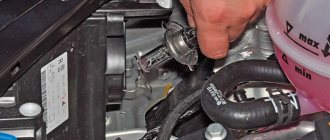
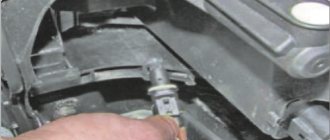
So, open the hood and start replacing the lamps. First you need to disconnect the plug from the lamp.
Next, carefully remove the rubber cover from the headlight.
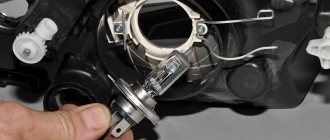
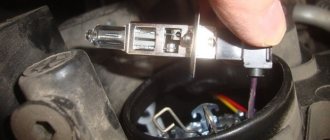
Now all we have to do is move the metal latch aside and pull out the old lamp.
We install a new lamp and reassemble in the reverse order.
When installing new lamps, do not touch the lamps by the bulb!
After installing the lamps, headlight adjustment is not required, since we only change the lamps without touching the adjustment screws.
Source: https://1remontauto.ru/lampy-blizhnego-mitsubishi-lancer-9.html
Removing headlights
Before starting work, disconnect the negative terminal from the battery. Prepare replacement components and a standard set of tools
Particular attention should be paid to the flat blade screwdriver, with which we will snap off the fasteners
Removing the headlight
Let's start with the right pair. On the Mitsubishi Lancer, the headlight is attached with only four bolts, but there is one problem: one of the fasteners is located under the front bumper, so the work cannot be done without removing the body kit. When you have removed the bumper, immediately unscrew the bolt on the side, which is seated in the eye. The remaining 3 bolts secure the headlight to the car body, so there will be no problems with them.
Now slowly pull the headlight towards you until it comes out of the clip, you will hear a corresponding click. Let's move on to the upper headlight clamp. Here you need to pry the plastic until the headlight housing comes out of the clamp.
If you are removing the right headlight, then for convenience it is recommended to remove the tank, just pull it up. Great, we got access to the wires. We disconnect the wiring, everything is simple here, since there are only two connectors going to the headlight. The right headlight is now completely detached from the body.
To remove the headlight on the Lancer on the left side, you will need to unscrew several bolts
Please note that the block is attached at the top using a self-tapping screw. We unscrew it with a Phillips screwdriver and move on.
So we dismantled the optics
To get to the lights (applies to both the left and right headlights), you need to snap off the clip and unscrew the bolts around the perimeter. Using a heat gun, you need to heat the joints to separate the headlight. Done, headlight removal is complete. Now you can replace individual lights or completely change the front optics.
Removing the rear light
- To gain access to the brake light, turn signal and tail light, you need to lift the trunk lid and unscrew the two fasteners that are located directly under the trunk shock absorbers.
- Disconnect the lamp by gently pulling it towards you. On the left side it is attached to the screws that we have already unscrewed. As for the right side, the lamp is simply inserted into the housing. With a little effort, you can disconnect the optics, after which it will be held only by the wires.
- Removal of the taillight is complete and you now have access to all lights. Remove the required element and replace it with a new one. Pull the wiring towards you until the light bulb comes out of the grooves. After this you can pull it out.
- Installation of a new lamp follows the same procedure.
- All that remains is to install the lamp in its original place and secure it with screws. The work is completed.
Mitsubishi Lancer FAQ
Judging by the numerous questions from Mitsubishi Lancer IX car owners regarding the lamps used, both in external lighting (head lights, fog lights/lanterns, brake lights, side lights, etc.)
etc.), and in the lighting of car interior instruments (dashboard lighting, cigarette lighter, ashtray, seat heating control unit, etc.), it was decided to put together a list of all lamps used.
After all, over time the car is used, sooner or later there will still come a time when it will be necessary to replace the faulty lamp with a new one, so I hope that this list will help many car owners clarify the situation.
Front lights
No. Place of application Catalog number Lamp type Power, W
| 1 | Front turn signals | Mitsubishi MS820026 | W21W | 21 |
| 2 | Front fog lights * | H3 | 55 | |
| 3 | Low/high beam headlights | Mitsubishi MS820968 | H4 | 60/55 |
| 4 | parking lights | Mitsubishi MS820090 | W5W | 5 |
| 5 | Side turn signal repeaters | Mitsubishi MS820077 | WY5W | 5 |
*Depending on vehicle equipment
Rear lights
No. Place of application Catalog number Lamp type Power, W
| 6 | Top brake light | Mitsubishi MS820026 | W21W | 21 |
| 7 | Rear fog light (driver's side only) | Mitsubishi MS820026 | W21W | 21 |
| 8 | Registration plate lights | Mitsubishi MS820090 | W5W | 5 |
| 9 | Reversing light | Mitsubishi MS820078 | W21W | 21 |
| 10 | Tail lights | Mitsubishi MS820090 | W5W | 5 |
| 11 | Rear turn signals (Sedan) | Mitsubishi MS820050 | WY21W | 21 |
| 11 | Rear turn signals (Estate) | PY21W | 21 | |
| 12 | Brake light and tail light | Mitsubishi MS820027 | W21/5W | 21/5 |
Lamps used in car interiors
No. Catalog number Place of application
| 13 | Mitsubishi MS820071 | Trunk lighting |
| 14 | Mitsubishi MR572769 | Illuminated hazard warning button |
| 15 | Mitsubishi MS820083 | Cigarette lighter illumination Ashtray illumination |
| 16 | Mitsubishi MB877458 | Front ceiling light |
| 17 | Mitsubishi MF820513 | Central ceiling lamp |
| 18 | Mitsubishi MR975280 | General illumination of the instrument panel |
| 19 | Mitsubishi MN134601 | Digital odometer backlight |
| 20 | Mitsubishi MR444536 | Illuminated all other instrument panel symbols (parking brake, high beam, direction indicators, etc.) |
| 21 | Mitsubishi MR568787 | Illumination of the interior heater control unit |
| 22 | Mitsubishi MR460120 | Climate control unit illumination |
Replacing the lubricant inside the variator
Before replacing the oil product in the variator, you should purchase a certain set of tools, a new filter and an o-ring for it, fresh lubricant, and prepare a container for draining the waste.
TIP: Before replacing the TM, you should warm up the machine so that the working fluids warm up and become thinner than they already are. To do this, you need to drive about ten kilometers in your Mitsubishi.
Place the car over a hole in the garage, or you need to drive onto a specialized overpass, this will provide an opportunity to get to the variator drain plug at the bottom. After this, find the variator drain hole on which the plug will be installed. Having previously placed the container, begin draining the waste liquid by unscrewing the plug. Wait until the waste is completely drained.
When all the lubricant has flowed into the container for it, clean it and replace the plug. Then pour the product inside the unit up to the HOT mark on the dipstick. After this, get behind the wheel and drive about 10-15 kilometers, this way the oil will flush the entire system and it will be ready to fill with new lubricant.
We drive onto the overpass or pit again and pour all the oil into the container. When the draining is complete, remove the cover on the unit by unscrewing the bolts on which it is secured. After this, replace the old filter with a new one, and also change its O-ring. Install all the parts of the unit in the old place and fill in new oil, according to the HOT mark on the dipstick.
TIP: After adding fresh lubricant, you should turn on the ignition and let the car idle, and then again, in accordance with the mark on the dipstick, add oil fluid, which will thicken once the car starts running.
After approximately the same time interval as for replacing the lubricant inside the variator, it is necessary to change the oil fluids inside the Mitsubishi Lancer 10 gearbox. The same service is carried out on the Mitsubishi Lancer 9, there is essentially no difference.
Experts recommend using transmission lubricant in the Lancer variator, the same type and brand as for the gearbox.
Drivers recommend using the following transmission oils for Mitsubishi:
- DiaQuenn CVT is a lubricant with a mineral composition, so its performance in winter is somewhat worse than in summer;
- Nissan NS-2 is an analogue of the above TM, but cheaper;
- Mitasu CVT is an inexpensive TM, a little-known, but at the same time quite high-quality product, the tenth Mitsubishi Lancer really loves this lubricant;
- Eneos CVT is an ideal oil product for the Mitsubishi Lancer CVT transmission, but its cost is very high.
You can use other lubricants that meet the requirements specified in the vehicle's operating instructions
But please note that the durability of the gearbox service depends on the quality of the TM used.
Low beam lamp Lancer 10. Electrical equipment and lighting. Replacement features
Side lights and lighting devices on the Mitsubishi Lancer 9 or 10 series allow you to identify the vehicle in the dark, and also make it possible to show other traffic participants the maneuvers being performed.
Headlights play a special role, so we recommend that you constantly monitor their normal operation.
Otherwise, this may lead to an accident with various outcomes or to an unplanned meeting with a patrol inspector, since the neighbor must be on fire in the car constantly.
Low beam work lamp Lancer 9
Electrical equipment and lighting
- Mitsubishi Lancer cars are equipped with block headlights, which combine low and high beams, turn lamps and dimensions.
The low beam lamp of the Mitsubishi Lancer 10 is located in the headlight unit closer to the car's fender
- To turn on the first one, the external lighting switch is used, the second one is used by a relay located in the mounting block when the low beam is turned on. (See also the article Relay for fog lights VAZ 2110: features.)
- The latter can also be switched on briefly with the headlight switch, even when the vehicle's exterior lighting is not switched on.
- The car also has an electric corrector, allowing the driver to adjust the height of the light beam from his seat when the car is loaded.
Advice: if the headlights, for example, in a KIA, begin to poorly illuminate the road and when you turn on the turn, the side light lamp starts blinking on the display, check the ground contact with the vehicle body. The low beam lamp of the Mitsubishi Lancer10 is located in the headlight unit closer to the car's fender
- We recommend periodically replacing the lamps in the headlight unit, since over time the glass bulbs begin to become cloudy from use, as a result of which the visibility of the vehicle ahead is greatly reduced.
- At the same time, you should not follow fashion and install pseudo-xenon, from which the headlights glow with a pleasant bluish light. If you are going to install it, only a standard one, the price of which is significantly different from Chinese counterfeits.
Replacement
Why does the low beam of a Mitsubishi Lancer 9 or 10 not turn on, when you need to replace old lamps with new ones, what faults in electrical wiring or lighting can contribute to this:
Individual lamps do not turn on
- The fuses have become unusable - check and replace the blown ones with new ones.
- The filaments in the bulb have burned out - install new lamps yourself.
- The tips of the wires are covered with oxides, they do not fit tightly, the wires are damaged - clean, tighten or replace.
Can't turn on headlights
- Burnt out lamps - replace with new ones.
- The steering column switch does not work - find the problem and fix it.
Replacing the low beam lamp on Lancer 9 is different from dismantling it on Lancer 10
The Mitsubishi Lancer uses the following lamps:
- low – HB4 at 51 W;
- long range – HB3 60 W.
Process
The instructions for replacing the low beam consist of the following steps:
- Lift the hood and secure it tightly using a special strip.
- Remove the negative terminal from the battery so that unexpected situations do not occur during operation.
Lancer X low beam lamps are marked HB4 51 W 12 V
- Remove the headlight unit from the car, for which you will need an open-end wrench set to “10” and a screwdriver. First you will have to disconnect the front bumper from the body using socket wrenches “10” and “12”, as well as screwdrivers with a flat or figured blade.
- Disconnect the block from the lamp base with the corresponding wires that go to it. To do this, there is a special latch on it that you should press.
- Remove the socket from the lamp by pulling it towards you.
- Grab the base and turn it to the left.
Lancer 9 double-filament low beam bulb with HB4 socket. Tip: loosen the lock with a screwdriver one turn if you can’t turn the socket.
- Pull out the burnt-out lamp by the base and install a new one in its place, without touching its bulb with your hands so that it does not become cloudy.
Second way
In this case, you will not have to disassemble the bumper and remove the headlight from the body.
Everything will remain in its place, although visually you will not see the light bulb, but you will be able to feel it and remove it.
- Purchase a set of two low beam lamps with an HB4 base of 12 Volts and 51 Watts.
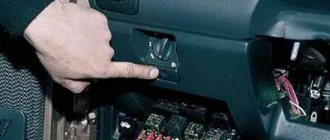
- You need to lift the hood by pulling the tab from inside the passenger compartment, located to the left of the driver next to the front right door. Then move the hook over the radiator grill to the side and, lifting it, secure it with a special holder.
- Let's start by replacing the right lamp, to do this, first remove the washer reservoir from its original location.
Tip: getting to the light bulb socket is a little difficult, so take off your outer clothing.
- Feel for the block with the wires by placing your hand under the upper body panel. Press its lock and pull it out.
How to replace the low beam bulb on Lancer 9 or 10 without dismantling the headlight
- Grasp the lamp base with your hand and turn it to the left until it disengages. Please note that this way it can only be pulled out if the latch does not press it too hard.
- Install a new one in place of the burnt one, being careful not to touch the glass bulb to the elements of the vehicle. Turn it to the right until it clicks.
- Replace the block with wires and the washer reservoir.
- On the left side everything happens similarly (there is no washer reservoir there).
- After repair, check the functionality of the headlights.
Installation and adjustment
So, the installation of xenon should be carried out by specialized services that have the appropriate permission.
You can do the installation yourself if you have space for a standard unit. There are three types of “xenon” known.
- The first type is easy to install, but it does not heat up well in winter.
- “Standard” blocks can be called less fastidious, but these are a little difficult to install due to their large size.
- Set with decoys - installed to deceive the on-board computer, which may not notice xenon, which absorbs little energy.
Installing a standard xenon is several times more expensive than an alternative (basic equipment will cost at least 45-50 thousand rubles, because the unit itself with a light bulb costs 20 thousand rubles). An alternative to the standard one is a non-standard xenon, but it cannot be installed without the appropriate permission. Another alternative is bi-xenon lenses.
Video: how to install xenon with ignition
Adjustment of Mitsubishi Lancer 10 headlights after installing xenon is carried out on a flat wall. The car should be positioned so that the distance between the wall and the lamps is about five meters.
Adjustment lines are drawn on the surface of the “screen”: one horizontal at the level of the center of the headlights, the second also horizontal, 75 mm lower than the first, the third and fourth vertical – at the level of the headlights.
Then the setup is carried out.
- The low beam turns on.
- The right headlight of the Mitsubishi Lancer 10 is covered with a piece of dark matter, the left one is adjusted so that the upper zone of the light beam coincides with line 2, and the break points with points E.
- The right headlight is adjusted in the same way.
It is recommended to have headlights adjusted in specialized centers. The owner of Lancer 10 must be sure that his xenon does not blind, otherwise problems with the law cannot be avoided.
Replacing the Low Beam Bulb Lancer 9 ~ VESKO-TRANS.RU
Close beam lamp Lancer 10
Side lights and lighting devices on the Mitsubishi Lancer 9 or 10 series allow you to identify the vehicle in the dark and also make it possible to demonstrate the maneuvers being performed to other road users.
A special role is given to headlights, so we advise you to constantly monitor their normal operation.
Otherwise, this can lead to a tragedy with a different ending or to an unplanned meeting with a patrol inspector, because the neighbor must be on fire in the car all the time.
What headlights and lamps are installed on the Mitsubishi Lancer, how they are turned on, what can cause their malfunction or wiring, as well as how to correctly replace the light bulb in the headlight unit - read about all this and much more further in the article. Professional advice and tips will also be given in the text.
Working lamp for close beam Lancer 9
Electrical equipment and lighting
- Mitsubishi Lancer cars are equipped with block headlights, which combine low and high beams, turn lamps and dimensions.
The Mitsubishi Lancer 10 low-beam lamp is located in the headlight unit closer to the car's fender
- To turn on the first, the external lighting switch is used, the second - a relay located in the mounting block when the low beam is turned on. (See also the article Relay for fog lights VAZ 2110: features.)
- The latter can also be turned on for a short time with the headlight switch, even when the vehicle’s external lighting is not turned on.
- The car also has an electric corrector, allowing the driver to adjust the height of the light beam from his own seat when the car is loaded.
Advice: if the headlights, for example, in a KIA, begin to poorly illuminate the road and when you turn on the turn, the side light lamp begins to blink on the display, check the ground contact with the vehicle body.
The Mitsubishi Lancer10 low-beam lamp is located in the headlight unit closer to the car's fender
- We advise you to replace the lamps in the headlight from time to time, because over time the glass tubes begin to become cloudy from use, as a result of which visibility in front of the vehicle is greatly reduced.
- With all this, you should not follow fashion and install pseudo-xenon, from which the headlights shine with a pleasant bluish light. If you are going to install it, only a standard one, the cost of which is significantly different from Chinese counterfeits.
Read also: Replacing the Front Wheel Bearing for Renault Logan
Replacement
beam not turn on , when it is necessary to replace old lamps with new ones, what wiring or lighting faults can contribute to this:
Replacing low/high beam lamps in Mitsubishi Lancer 9
Video about how easy it is to change low beam bulbs in headlights
/high
beam
in Mitsubishi
Lancer 9
.
Replacing low beam lamps Lancer 9
MOTOREALIA channel: video: ...
- The fuses have become unusable - check and replace the blown ones with new ones.
- The filaments in the bulb have burned out - install new lamps yourself.
- The tips of the wires are covered with oxides, they do not fit tightly, the wires are damaged - clean, tighten or replace.
- Burnt out lamps - replace with new ones.
- The steering column switch does not work - find the problem and fix it.
Replacing the low beam lamp on Lancer 9 is different from dismantling it on Lancer 10
The Mitsubishi Lancer uses the following lamps:
Process
The instructions for replacing the low beam consist of the following steps:
- Lift the hood and secure it tightly using a special strip.
- Remove the negative terminal from the battery so that unexpected situations do not occur during operation.
Lancer X low beam lamps are marked HB4 51 W 12 V
- Remove the headlight unit from the car, for which you will need an open-end wrench set to “10” and a screwdriver. First you will have to disconnect the front bumper from the body using socket wrenches “10” and “12”, as well as screwdrivers with a flat or figured blade.
- Disconnect the block from the lamp base with the corresponding wires that go to it. To do this, there is a special latch on it that you should press.
- Remove the socket from the lamp by pulling it towards you.
- Grab the base and turn it to the left.
Double-filament low beam bulb
Tip: use a screwdriver to loosen the lock by one turn if you cannot turn the base.
- Pull out the burnt-out lamp by the base and install a new one in its place, without touching its bulb with your hands so that it does not become cloudy.
Read also: How to Adjust Bosch Headlights on a VAZ 2110
Second way
In this case, you will not have to disassemble the bumper and remove the headlight from the body.
Everything will remain in its place, although visually you will not see the light bulb, but you will be able to feel it and remove it.
- Purchase a set of two low beam lamps with an HB4 base of 12 Volts and 51 Watts.
- You need to lift the hood by pulling the tab from inside the passenger compartment, located to the left of the driver next to the front right door. Then move the hook over the radiator grill to the side and, lifting it, secure it with a special holder.
- Let's start by replacing the right lamp, to do this, first remove the washer reservoir from its original location.
Tip: getting to the light bulb socket is a little difficult, so take off your outer clothing.
- Feel for the block with the wires by placing your hand under the upper body panel. Press its lock and pull it out.
How to replace the low beam bulb on Lancer 9 or 10 without dismantling the headlight
- Grasp the lamp base with your hand and turn it to the left until it disengages. Please note that this way it can only be pulled out if the latch does not press it too hard.
- Install a new one in place of the burnt one, being careful not to touch the glass bulb to the elements of the vehicle. Turn it to the right until it clicks.
- Replace the block with wires and the washer reservoir.
- On the left side everything happens similarly (there is no washer reservoir there).
- After repair, check the functionality of the headlights.
Didn't work after replacing
If after replacing a burnt-out lamp the new one does not work, then it is likely that the fuse has blown. This happens quite often: at the moment of failure, a xenon bulb can short-circuit its power supply. To eliminate this malfunction, it is enough to replace the corresponding fuse (it is separate for each low beam headlight). All that remains is to find and open this very block. Renault has two of them: in the cabin and in the engine compartment. We need a second one, which is not so easy to find in Reno. And it is located under the battery.
We dismantle the battery, unscrew the three bolts marked with three arrows on the left, and remove the cover (arrow on the right).
Next, take a 10mm wrench and unscrew the nut (green arrow in the photo below) that secures the clamp. Remove the clamp along with the wiring.
We unscrew the bolt marked with a green arrow - it secures the fuse box.
Now the shield can be easily removed. We turn it over, look for the required fuse and replace it with a new one of the same rating.
Conclusion
Replacing the light bulbs on the headlight of a Mitsubishi Lancer, as can be seen from the article, is not difficult. Now you can perform this operation on the road, without using the services of a car service. The video in this article will provide additional information on the above topic.
Low beam lamps experience maximum load. In city conditions, they are the main headlight devices, only partially yielding primacy when driving on intercity highways. The service life of lamps is limited; they have to be changed periodically.
For untrained people, this procedure can be difficult, since getting to the lamp is not easy, you need to know the procedure. Let's look at how to change low beam lamps on a Mitsubishi Lancer 10, one of the most popular and widespread car brands.
Main conclusions
Replacing low beam lamps on a Mitsubishi Lancer 10 is not difficult and does not require the use of special tools. Perhaps one of the readers can provide additional information on this issue, which would be very useful for novice car enthusiasts. We encourage experienced drivers to post their opinions and advice that can help some newbies.
The optics in the car are responsible for the safety of the driver, his companions and other road users. That is why it is important to keep the headlights in good condition; all lights should light normally - this applies to high and low beams, dimensions, turn signals, etc. If one lamp burns out, you must immediately carry out repairs or leave the car in the garage until the optics are restored. We will tell you how to remove the headlights on Mitsubishi Lancer 9 and 10 with your own hands and replace them. We will talk about the front and rear lights. Follow our instructions, and within an hour you will have new optics on your Lancer bumper.
Recommendations
Comments 17
Everyone's crap yeah
We remove the wing, the wheel, the engine, the front suspension and still struggle with pushing back and forth)))))
But why the wing)))))?
When selling a car, you will get tired of explaining why you unscrewed the fender mounting bolts.
He will do this, and no one will have to explain anything))
You can’t give me a link to the chickadees!
I myself ordered here jpm.kz But this is a Kazakh site, there is no delivery to Russia, unless it’s a large order (for a lot of money). And from there a friend arranged for me to send it. I’ll send you links in a personal message, China, same seller, different colors.
You can’t give me a link to the chickadees!
When selling a car, you will get tired of explaining why you unscrewed the fender mounting bolts.
there the paint on the bolts is normal and the head doesn’t come off
why unscrew the wing Oo?
so that the headlight can be reached and nothing gets in the way.
I removed them without unscrewing the wing) I unscrewed the bumper from the top and where the fender liners were, and that’s all)))))
Yes, everyone removes the headlights without removing the fenders. The author of the topic got excited)))
Tuning has also reached the optics of the Lancer 10. Technologies allow you to decorate the headlights with xenon and angel eyes. Install LED lamps for low and high beam.
Diode light quickly gained popularity and PTF tape began to be installed on the Mitsubishi Lancer X. The AliExpress store sold a Chinese fake, but the price was high. That's why the reviews are negative.
Why do tuning?
Not only Russian-made cars are subject to such tuning, but also well-known brands such as Lancer. Angel eyes headlights create a look of aggression, uniqueness and individual power. By polishing and tinting the car will create the impression of a wild animal. Sports tanks equipped with Rallyart shock absorbers can especially boast of such qualities. Before you decide to do it yourself, you need to think carefully. It may not work out the first time. This work requires patience and skill. Is it worth turning around your headlights to install angel eyes?
Before starting work, you need to consult with specialists or watch a video teaching the rules of tuning. Do-it-yourself work, buying Chinese headlights will lead to financial and property waste. By turning to specialized services, the car owner will save on work and the consequences in the future of vehicles.
- https://svetilnik.info/avtomobilnyj-svet/lampa-blizhnego-sveta-lanser-10.html
- https://carfrance.ru/lampochka-blizhnego-sveta-na-mitsubishi-lancer-10/
- https://zapchasti.expert/mitsubishi/lancer-10/lampy-na-lancer-10.html
- https://zapchasti.expert/mitsubishi/lancer-10/regulirovka-far-lancer-10.html
- https://zapchasti.expert/mitsubishi/lancer-10/perednie-fary-dlya-mitsubishi-lancer-10.html
Recommendations based on your search history
Mitsubishi Lancer 9 (Skillful hands.) – Duration: 16:28
- 5 years ago
- 360,664 views
Lancer 9 sores, what to look for before buying – Duration: 6:02
- 1 year ago
- 218,631 views
Mitsubishi Lancer cable repair – Duration: 4:07
- 4 years ago
- 96
Install the lenses yourself and not make a mistake – VIDEO TUTOR – Duration: 21:33
- 4 years ago
- 577
How to disassemble any lamp, a very simple way – Duration: 2:34
- 3 years ago
- 408
Installing lenses and angel eyes in headlights. (with your own hands) – Duration: 20:06
- 2 years ago
- 380
Oil burn in Lancer 9 and experience in its treatment – Duration: 17:36
- 3 years ago
- 288,572 views
Theft of a Mitsubishi Lancer – Duration: 3:43
- 3 years ago
- 469
Foggy headlights - Duration: 2:14
- 5 years ago
- 107
Headlight fogging. Disassembly and repair. – Duration: 11:56
- 3 years ago
- 175
Disassembling, painting and polishing Lancer Cedia headlights – Duration: 7:38
- 3 years ago
- 16
Queries similar to how to remove a headlight on a Mitsubishi Lancer 9
Mitsubishi Lancer 9. face kit. – Duration: 17:00
- 3 years ago
- 40,161 views
20 Mitsubishi Lancer 9 Part 1, removing headlight fogging – Duration: 1:24
- 2 years ago
- 5
Installing Mini LED lenses on Mitsubishi Lancer 9 – Duration: 9:51
- 8 months ago
- 8
How to remove a headlight on a Mitsubishi Lancer X – Duration: 5:08
- 3 years ago
- 13
Instructions for removing headlights.
autoscan-40.rf – selection and inspection of cars before purchase in Kaluga – https://xn—40-5cdal0dzag4aj.xn.
About the details in detail
Although the pre-restyling and post-restyling modifications of the body component are not very different in appearance, they are structurally different. They are not interchangeable, they have different GR (geometric dimensions) and fixation points.
The body kit is fixed in this way: a beam is attached to the car body with 2 bolts as a load-bearing metal element. The decorative look of the bumper is given by fiberglass painted in body color, plastic grilles, an air intake and other components, including a skirt.
Newbie motorists often wonder what a skirt is, anyway? Let us immediately note that this component is also called a body kit/overlay, although it is more correct to consider it a spoiler, which has a unique location.