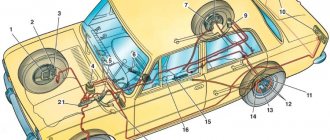
Classification of car brake systems
Modern cars are equipped with three or four types of brake systems:
- working;
- parking;
- auxiliary;
- spare.
The main and most effective braking system of a car is a working one. It is used throughout the movement to regulate speed and come to a complete stop. Its device is quite simple. It is activated by pressing the brake pedal with the driver's right foot. This procedure ensures simultaneous reduction of engine speed, by removing the foot from the accelerator pedal, and braking.
The parking brake system, as the name suggests, is designed to keep the vehicle stationary during long periods of parking. In practice, experienced drivers leave the car in first or reverse gear. However, on large slopes this may not be enough. The manual parking brake is also used when starting off on uneven sections of the road, when the right foot should be on the gas pedal and the left foot pressing the clutch. By smoothly releasing the brake lever with your hand, simultaneously engaging the clutch and adding gas, you can prevent the car from arbitrarily rolling downhill.
The spare brake system is designed to duplicate the main working one in case of its failure. This can be a completely autonomous device, or it can be part of one of the brake drive circuits. Alternatively, a parking system can perform the functions of a spare one.
The auxiliary braking system is installed on heavy-duty vehicles, for example, on domestic KamAZ, MAZ, KrAZ vehicles. It is designed to reduce the load on the main working system during prolonged braking - when driving in the mountains or on hilly terrain.
System design and principle of operation
The main thing in the braking system of any car is the brake mechanisms and their drives. The hydraulic brake drive used on passenger cars consists of:
- pedals in the cabin;
- working brake cylinders of front and rear wheels;
- vacuum booster;
- pipeline (brake pipes);
- master brake cylinder with reservoir.
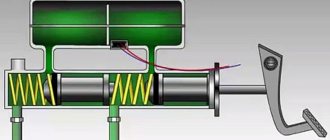
The principle of operation is as follows: the driver presses the brake pedal, driving the piston of the brake master cylinder. The piston squeezes fluid into the pipelines to the brake mechanisms, which in one way or another create resistance to the rotation of the wheels, and thus braking occurs.
When the brake pedal is released, the piston returns via a return spring, and the fluid flows back into the master cylinder - the wheels are released.
On domestic rear-wheel drive cars, the brake system design provides for a separate supply of fluid from the master cylinder to the front and rear wheels.
On foreign cars and front-wheel drive VAZs, the pipeline circuit diagram “left front – right rear” and “right front – left rear” is used.
Tips before bleeding the brakes:
- The entire procedure must be carried out with an assistant; his task will be to press the brake pedal.
You only need to add brake fluid of the brand that was poured into the system. If you don’t know what was filled, then see what the manufacturer of your car recommends. And when pumping, there should always be at least 1/2 level of liquid in the tank, or not lower than o.
Before you begin, first inspect the entire brake system - all the pipes and devices to find out where the fluid is leaking. If everything is good, then you can start pumping.
The sequence of bleeding the brake mechanisms is carried out in a strictly specified order:
- rear right;
- front left;
- rear left;
- front right.
The whole procedure was carried out on a VAZ 2110 car. It can be used on any other make of car. But first, you should familiarize yourself with the technical documentation of the car and find out some of the possible subtleties of bleeding the brakes, if any.
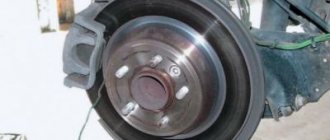
Types of brake mechanisms used in cars
The vast majority of cars are equipped with friction-type brake mechanisms that operate on the principle of friction forces. They are installed directly in the wheel and are structurally divided into:
- drums;
- disk.
There was a tradition of installing drum mechanisms on the rear wheels and disc mechanisms on the front. Today, depending on the model, the same types can be installed on all four wheels - either drums or discs.
Design and operation of the drum brake mechanism
The drum-type system device (drum mechanism) consists of two shoes, a brake cylinder and a tension spring located on a shield inside the brake drum. Friction linings are riveted or glued onto the pads.
The brake pads with their lower ends are hinged on the supports, and with their upper ends - under the influence of a tension spring - they rest against the pistons of the wheel cylinder. In the unbraked position, there is a gap between the shoes and the drum, allowing the wheel to rotate freely.
When fluid enters the cylinder through the brake pipe, the pistons diverge and push the pads apart. They come into close contact with the brake drum rotating on the hub, and the friction force causes the wheel to brake.
It should be noted that in the above design, the wear of the front and rear pads occurs unevenly. The fact is that the friction linings of the front pads in the direction of movement at the moment of braking when moving forward are always pressed against the drum with greater force than the rear ones. As a solution, it is recommended to change the pads after a certain period of time.
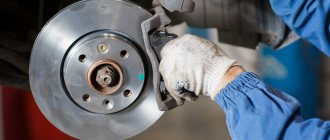
Disc type brake mechanism
The disc brake device consists of:
- a caliper mounted on a suspension, the body of which houses the outer and inner brake cylinders (there may be one) and two brake pads;
- disk, which is attached to the wheel hub.
When braking, the pistons of the working cylinders hydraulically press the brake pads against the rotating disc, stopping the latter.
Principle of operation
All GTZs today are two-section; single-circuit ones are no longer used. That is why it is worth considering the current option. A double-circuit cylinder includes pistons, each of them working with pressure in its own branch. It turns out that the brakes are duplicated. If a leak occurs, the second branch will still help the car stop. There will be no need to use the parking brake. The parking brake cables are responsible for keeping the brake discs or drums stationary (depending on whether there are pads and discs or drums) while parking to prevent the vehicle from moving.
One of the cylinder pistons is connected to the pedal rod. During movement, the compensation and bypass holes are blocked. The force is then transmitted to the primary circuit pads through the fluid volume. After pressing against the disks (drums), it stops through friction. The second piston interacts through a short rod and fluid from the first circuit. It is not for nothing that two-section GTZs are considered tandem, since the pistons are connected in series to each other.
All of the information listed is an approximate operating principle of the brake master cylinder.
Comparative characteristics
Drum brakes are simpler and cheaper to manufacture. They have a property called the mechanical self-reinforcement effect. That is, with prolonged pressure on the pedal with your foot, the braking effect increases many times over. This occurs due to the fact that the lower parts of the pads are connected to each other, and the friction of the front pad on the drum increases the pressure of the rear pad on it.
However, the disc brake mechanism is smaller and lighter. Temperature resistance is higher, they cool faster and better due to the provided window openings. And replacing worn disc pads is much easier than replacing drum pads, which is important if you carry out the repairs yourself.
The simplest hydraulic drive consists of the following main components and mechanisms:
- control pedal;
- main brake cylinder;
- vacuum booster (may be missing);
- pipelines;
- wheel cylinders;
- pressure regulator.
- master brake cylinder
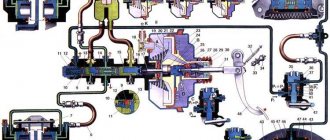
Diagram of hydraulic brake system
1 — brake cylinders of the front wheels; 2 — front brake pipeline; 3 — rear brake pipeline; 4 — brake cylinders of the rear wheels; 5 — reservoir of the main brake cylinder; 6 — main brake cylinder; 7 — piston of the main brake cylinder; 8 — rod; 9 — brake pedal
Various master cylinder designs share a common operating principle. In all of them, in the free position of the pedal, the brake line has a free outlet into the reservoir, where the brake fluid is poured. This makes it possible to make continuous compensation:
- fluid leaks through cylinder seals;
- expansion of brake fluid when heated;
- expansion of the volume of the working cylinders due to the development of linings on the brake pads.
The master cylinder separates the brake control circuits (parallel or diagonal) through two ports into two separate reservoirs for each circuit. This scheme allows you to maintain the overall functionality of the car’s braking system in the event of failure of any of the circuits, which increases the reliability and safety of driving.
Vacuum booster
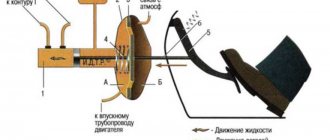
Vacuum amplifier circuit
A vacuum booster is used to increase the hydraulic pressure in the system. It is usually made in one module with the main brake cylinder. The amplifier has a circular chamber divided into two halves using an elastic diaphragm. One half of the chamber communicates through a valve with the engine intake manifold, where a vacuum is created. The second half of the chamber has free access to the atmosphere. When you press the pedal, its action is enhanced by the vacuum pressure on the piston of the main hydraulic cylinder. As a result, the hydraulic pressure in the actuator cylinders increases the clamping force of the pads to an additional 30-40 kg.
Pressure regulator
The regulator is designed to reduce pressure in the working cylinders of the rear wheels during heavy braking. Its necessity is due to the fact that when braking, the main mass of the car is transferred by inertia to the front wheels, and the rear wheels are unloaded. Locking the wheels can cause the car to skid, so the pressure in the rear cylinders is limited by the pressure distributor. It is included in the circuit of both circuits of the braking system and distributes fluid to the rear wheel cylinders.
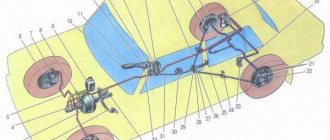
Pipeline diagram
Hydraulic drive layout diagram
1 — master brake cylinder with vacuum booster; 2 — fluid pressure regulator in the rear brake mechanisms; 3-4 - working circuits.
The distribution and transmission circuit of the brake fluid of the working system has a main and backup circuit. When there are no defects in the system, both circuits function separately as main circuits. If one circuit fails (liquid leakage), the second circuit operates as a backup. There are the following three circuit separation schemes:
- Parallel decoupling for 2 front and 2 rear cylinders in each circuit.
- Diagonal decoupling of cylinders along the contours (right rear – front left and vice versa).
- Duplicate activation (the first circuit includes all 4 working cylinders, the second circuit includes only 2 front cylinders).
Domestic cars with rear-wheel drive have circuit separation according to the first scheme. Foreign cars and VAZs with front drive wheels have a vehicle braking system designed according to the second scheme.
Brakes
Brake mechanisms are used to create a mechanical torque that counteracts the rotation of the wheels. Basically, all cars use friction mechanisms that operate on the friction of contacting materials. They are installed on the wheel and are divided according to their design into disk and drum types.
Disc brakes
1 - disc brake wheel stud 2 - guide pin 3 - inspection hole 4 - caliper 5 - valve 6 - working cylinder 7 - brake hose 8 - brake pad 9 - vent 10 - brake disc 11 - wheel hub 12 - mud cap
Disc mechanisms can have a moving or static support. The movable caliper promotes uniform wear of the rubbing linings and, in addition, provides a constant gap to the surface of the disk, regardless of the wear of the linings. It is mounted on the suspension using a bracket and has grooves for installing working cylinders. The disc connected to the wheel hub has a smooth surface and holes for rapid air cooling.
The pads with brake linings in the normal position are pressed against the caliper by return springs. Under the pressure of the piston rod of the actuator cylinders, the pads are pressed towards the surface of the disc, and it is braked. To indicate the wear of the linings in the pads, there is a wear sensor, which signals to the instrument panel that the friction surface layer of the pads is critically worn out.
Drum brake system
We determine possible malfunctions in the gas turbine engine and their causes
Modern cars are equipped with a two-section GTZ. Each section operates with its own hydraulic circuit. On front-wheel drive vehicles, each circuit combines the braking system of the front and rear opposite wheels (front right and rear left, front left and rear right). The braking system of rear-wheel drive cars is designed differently. One circuit works on the front wheels, the second on the rear wheels.
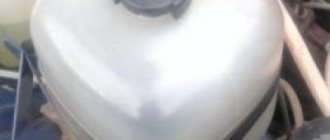
The brake master cylinder is installed on the vacuum booster cover. The fluid supply is poured into a two-section tank located above the main cylinder and connected to it through special holes. The tank is made of transparent material so that you can visually determine its level by the control marks on the walls of the tank. If the level falls below normal, a special sensor transmits a signal to the instrument panel, where the light comes on.
The master cylinder body contains two pistons arranged in tandem (one after the other). One of them is installed freely, and the vacuum booster rod rests against the other. The pistons are sealed with rubber cuffs. Two return springs return the pistons to their original position and hold them in this position.
At the moment of braking, the first piston is pushed by the vacuum booster rod. Moving along the cylinder, it closes the compensation hole. In the first circuit, the pressure increases, under the influence of which the second piston moves. In the second circuit the pressure also increases. As the pistons move, voids are formed, which the brake fluid fills through the bypass hole. Each of the pistons moves until the return spring is activated. In the circuits, the pressure rises to the maximum level, which brings the system mechanisms into working condition.
When braking ends, the springs return the pistons to their original position. The pressure in the circuit is equalized with atmospheric pressure through the compensation hole. When the piston moves back, the brake fluid returns to the reservoir through the bypass hole.
If a fluid leak suddenly occurs in one of the circuits, the operation of the other circuit will not be disrupted. If a leak occurs, the brake pedal travel will increase slightly, but braking will remain effective.
What malfunctions can occur and their signs
To avoid becoming involved in a traffic accident due to a faulty master cylinder, we must have an understanding of possible problems and their symptoms. Let's name some of them.
If the pads wear excessively or the brake fluid leaks, the level drops. In this case, the vehicle cannot be operated until the fault is corrected. We need to very carefully check the working and master cylinders, brake pipes and hoses, and calipers to identify any leaks.
We replace the part that is faulty. If the automatic drum brake adjustment system jams, a low brake pedal appears. The pedal travel can be restored manually, but this symptom will appear as the pads wear out.
To eliminate the malfunction completely, we must replace or clean the automatic adjustment system.
Low braking efficiency and a soft brake pedal occur if the brake system is depressurized or is not completely pumped and air has appeared in it. These signs also appear in the event of a breakdown of the turbocharger, and when the working cylinder jams or it overheats and the liquid boils in it. If the brake pedal, on the contrary, is too hard, it means that the brake booster, vacuum hose or vacuum booster control valve is faulty, which violates the tightness of the system.
The brake pedal has a long travel when the drum brakes are not adjusted, there is air in the system or the brake pads are worn out. This symptom is very dangerous, since in a difficult situation braking will be ineffective. If the pedal sinks to the floor, it means that one of the cylinders is worn out or the hydraulic system is depressurized. This is a very dangerous situation.
A grinding noise during braking indicates a pad worn down to metal, rubbing against the brake disc. To eliminate this defect, we need to replace the pads and bore the working surface of the disc or replace this part. If a whistle or squeal appears when braking, it means that poor quality pads are installed. To eliminate the malfunction, we simply replace them or clean the caliper and apply special lubricant. The reason for this phenomenon may also be vibration of the pads and caliper. In this case, we replace or bore the discs and then polish them.
Sometimes braking is uneven and not very effective. This happens when brake fluid or grease gets on the working surface of the pad. We fix this problem by eliminating the leak and replacing the pads. If the car moves to the side when braking, most likely the brakes are poorly adjusted, one of the cylinders has failed, or the brake pads are dirty or oily. A possible cause is uneven wear on the pads or discs.
It is clear that any malfunction must be eliminated. We can do some things ourselves, but to fix more complex breakdowns we will have to turn to specialists. But in any case, we need to make a diagnosis, and we must know how to check the brake master cylinder.
Diagnostics
First, we pay attention to the parameters of the control devices on the dashboard inside the car. If there is a problem with the braking system, the indicator will light up. Then we inspect the master cylinder body to see where the brake fluid is leaking. We pay special attention to the junctions of the pipeline and circuit outlets. During the inspection of the case, we identify mechanical damage (if any). Then we measure the pressure in the circuits. To do this, we attach a pressure gauge to the holes on these devices.
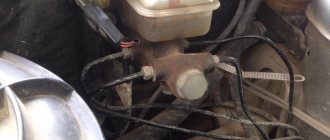
What is GTZ?
The main brake cylinder consists of a metal housing, which has holes for the supply of brake fluid (BF), a pedal rod and an expansion tank, which is located at the top. And also 2-3 pistons with seals and return springs, guide bushings and an end cap with a gasket.
The expansion tank is necessary to maintain the reserve, as well as excess fuel fluid. Inside, the GTZ has 2 cylinders with separate pistons located on the same axis. The edge of the metal case is tightly closed with a screw plug, and on the opposite side there is a flange for attaching to the vacuum booster. The brake pedal is attached to the first piston by means of a rod. The brake circuits of the front and rear wheels in the form of tubes are attached to the lower holes of the GTZ housing.
GTZ VAZ 2110 signs of malfunction, purpose of the device, performance check replacement
Despite the fact that these two units are inextricably linked with each other, in our material we will consider them separately. This will allow you to understand in detail all the nuances and features of the operation and repair of the two devices.
I — main cylinder body; 2 - low pressure sealing ring; 3 — drive piston of the “left front-right rear brake” circuit; 4 - spacer ring; 5 - high pressure sealing ring; 6 — pressure spring of the sealing ring;
7 — spring plate; 8 — piston return spring; 9 — washer; 10 - locking screw;
II — drive piston of the “right front-left rear brake” circuit; 12 — connecting sleeve; 13 - tank; 14 — emergency brake fluid level sensor; A - gap
How it works?
When you press the brake pedal, the two pistons in the master cylinder begin to move forward, pushing the brake fluid lines. The resulting pressure acts on the brake pistons of the calipers, which are located on each wheel.
When you release the pedal, the springs push the pistons back, thereby returning them to their original position. After this, the fuel fluid that was in the lines returns to the expansion tank and fills the cylinders again. When heated, the liquid can expand, and to avoid excess pressure, there are two holes that lead to the expansion tank. An integral part of the GTZ is the vacuum brake booster (VBR), which increases pressure and helps put pressure on the pistons, making life easier for the driver and making braking more productive.
How does a malfunction of the brake master cylinder manifest itself, as well as possible causes!
Despite the apparent simplicity and primitiveness of the GTZ, problems often arise in its work that can have very dire consequences. Problems in the operation of the system can be recognized by the following signs:
- You press the brake pedal, but the car stops very slowly and inefficiently. The culprits for this phenomenon may be cuffs that have become “stiff” or leaky. Also, a malfunction of the VUT can manifest itself in a similar way; it could be a crack in the membrane or depressurization of the joints of the hose that removes engine vacuum.
- The pedal travel is very short. Most likely, the compensation hole is clogged; the liquid inside the cylinder simply has nowhere to go and excessive resistance arises. The second option is deformation of the rubber seals, which have swollen and blocked the passage.
- The pedal has to be pressed with great effort. This can happen as a result of deformation or partial destruction of the rubber piston seals.
- The pads get hot and do not open completely; they do not release the discs or drums. There are several options here; it could be a jammed piston, a clogged bypass hole, or other reasons that impede the movement of the fuel fluid in the brake system.
- The brake pedal falls. This is perhaps the most common phenomenon that most of us have encountered. When you press the brake pedal, it seems to fall through, there is no feeling of pressure or resistance, and the braking itself occurs at the very end of its movement. This happens when there is critical wear on the cuff, as a result of which the liquid easily passes through the piston and returns to the expansion chamber. Simply put, the cylinder “bypasses” the fuel fluid. The failure of the brake pedal can also be observed if the system is airtight, that is, leaky, or depressurization has occurred on one of the brake cylinders.
Indicators of inoperability
The main symptoms of a malfunction are:
- when the brake pedal is pressed, jerking occurs;
- the brake pedal sinks or sticks;
- the brakes do not bleed;
- Traces of brake fluid on vacuum.
After identifying a malfunction of the gas turbine engine, as a rule, repair work is carried out, which is best carried out in the presence of an inspection hole or overpass. You can, of course, do without a hole and an overpass, but this can significantly complicate the work being carried out, since the wheels will need to be pumped, and without a hole they will need to be removed.
Read: Car brake caliper.
A big advantage of using a pit is inspecting all elements of the brake system, including adjusting the handbrake.
Symptoms of problems
The general technical condition of the car (including the brake system) can be checked using a personal diagnostic adapter - a car scanner. These types of devices are widespread and have a wide price range. We would like to draw your attention to the budget model of Korean production Scan Tool Pro Black Edition.
At a cost of about 2 thousand rubles. This scanner is capable of fully diagnosing your car (engine, gearbox, transmission, abs, srs and much more), which will pay for itself in 1-2 trips to the service station. The adapter is quite easy to use, has Russian-language software and is compatible with most cars produced in 1993. The device will also be useful when buying a used car, as it can show its real mileage and VIN.
The fluid brake system consists of many parts that can become unusable: pipes, wheel cylinders, calipers, drums and pads. Typical signs of a faulty master cylinder:
- After pressing the pedal, the car stops slowly. The reason is that the cuffs of one or two pistons have lost their tightness - they have cracked or “floated”.
- To slow down, you need to press the brake pedal hard. The phenomenon occurs due to swelling of the rubber of the piston seals.
- The brake pedal travel is too short. The fluid inside the cylinder has nowhere to go because the compensation hole is clogged. Another option is that the passage is blocked by a swollen rubber seal.
- A common symptom is pedal failure, the brakes coming on at the end of the stroke. This indicates complete wear of the cuffs; as a result, liquid penetrates behind the piston and rushes into the expansion tank - the cylinder “bypasses.”
- The pads do not release the brake discs and drums and get very hot when driving. Options: one of the pistons is jammed or the bypass hole is clogged.
The listed symptoms of a GTZ malfunction are similar to malfunctions of other elements. Pedal failure also occurs when a large amount of air enters the tubes or loss of fluid in one of the working cylinders. Sluggish deceleration and increased force on the pedal are often caused by a breakdown of the vacuum booster - a cracked membrane or a lack of tightness at the joints of the hose that takes off engine vacuum.
There are signs that clearly indicate the performance of the main hydraulic cylinder and the malfunction of other elements:
- during braking, the car pulls to the side - the problem lies in a certain circuit or wheel;
- jamming of the brake mechanisms of one wheel;
- creaking and squeaking when braking;
- heating the discs and pads on one wheel.
If you eliminate these symptoms, it will become easier to check the brake master cylinder in a garage. This also includes obvious brake fluid leaks and the knocking sound of worn calipers.
There are other symptoms indicating a malfunction of the gas turbine engine.
- When braking at speed, the car pulls to the side. This happens when one of the circuits or brake cylinders on the wheel is faulty.
- The appearance of a squeaking or knocking noise during braking. It could also be pads that are time to be replaced, but it happens that the problem is in the GTZ.
- The pads can jam, heat up and heat up the brake disc on a particular wheel.
Main problems with the node
The simplicity of the design ensures high reliability of the GTZ, but it also has “weak points”. The most common problem in this unit is wear of rubber elements. Sealing cuffs lose their elasticity over time due to constant exposure to liquid and crack. Because of this, the tightness of the sections is no longer maintained, so in the event of a breakdown in the line, the car loses its brakes completely. If the housing cuff is damaged, the liquid begins to come out.
Brake fluid leak from the GTZ
Brake fluid is very hygroscopic, which can also have negative effects. Due to contact with water accumulated in the liquid, the metal surfaces inside the housing can become corroded, which causes the pistons to jam during operation of the turbocharger.
But the GTZ is easily repairable and most problems with it can be eliminated by restoring the unit using repair kits.
Master brake cylinder
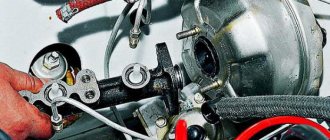
Now let's talk about the master brake cylinder on a VAZ 2110 car. If you do not want to allow the brakes to fail while driving, they should be checked periodically, and if problems arise, take appropriate action immediately.
Symptoms of a problem
Of course, brakes can completely lose their effectiveness for various reasons, but now we are talking specifically about the master cylinder. If the reason lies therein, then it can be determined by the following signs:
- The master cylinder shows signs of brake fluid leakage;
- The pedal has an idle motion, that is, when it is pressed, no force is created;
- The brake pedal simply won't press.
The most difficult process is disassembly. Therefore, let's talk about it in more detail.
- Carefully disconnect the master cylinder from the pipeline.
- Disconnect the block, which is equipped with wiring, from the emergency brake fluid indicator. The connection to the “ten” is made by terminals.
- Cover the pipe and assembly openings with something to prevent brake fluid from leaking. It will pollute the interior space, which is undesirable.
- Now remove the cylinder along with the reservoir. To do this, simply unscrew the fastening nuts that connect the element to the vacuum booster.
- After removing the brake fluid level sensor, drain the brake fluid present from the cylinder and the cylinder itself.
- If there is no serious need, you should not remove the tank. But for complete assembly, the tank is removed and then installed in place in strict order.
- Before reassembly, each element is washed with purified brake fluid. A good alternative is isopropyl alcohol.
- Do not forget to dry the parts with a compressor and wipe with a clean, dry cloth.
- Carefully avoid contact of the main cylinder with fuel or kerosene.
- Pay special attention to the O-rings. If you wash them with special alcohol, do not keep the rings in this liquid for more than 20 seconds. After processing, immediately dry and wipe the seals.
- Treat the surface of the piston and mirror to remove all rust.
- When replacing the master cylinder, new O-rings must be installed, regardless of their current condition.
- Check the elasticity of the piston springs under load. Refer to the VAZ 2110 repair manual, which indicates the appropriate loads and forces for testing.
- When free, the length of the spring should be 59.8 millimeters. If the indicator deviates from the norm, be sure to replace the springs.
If you think that after replacing the brake master cylinder you can safely go out on the roads, then you are mistaken. In fact, a complete repair of brake cylinders on a VAZ 2110 includes bleeding.
The procedure is not complicated, but requires following the instructions:
- Find someone who will help you in this matter. One will be near the car, and the second will be directly in the cabin.
- Inflate the brake pedal by pressing it several times.
- The assistant presses the pedal, and meanwhile you slightly unscrew the fitting on one of the brake system pipes.
- This should release air, as well as a small amount of brake fluid. Don't be alarmed by leaks, this is completely normal.
- Retighten the fitting using the same wrench as when unscrewing - 10.
- Command your assistant to lower the part.
- The procedure is repeated until air bubbles begin to come out when unscrewing the fitting.
- Each of the four circuits is pumped using similar actions.
- First make sure that the brake fluid in the expansion tank is filled to the required level.
How to check and bleed the brake master cylinder? Step-by-step methods »
How to check and bleed the brake master cylinder? Step by step methods
A timely diagnosis of the brake master cylinder and the entire brake system can save you from unexpected flaws on long and short journeys. What visual clues should you pay attention to before checking?
When braking
, the car should not be driven in any direction. This is especially dangerous on slippery roads in winter. Then the car may also spin in place due to this problem. Also, you need to check the integrity of the pipes and hoses supplying the brake fluid. The clamps should be well tightened, the hoses themselves should not be frayed, and should be well seated. These previews especially do not concern new cars, as they say, used ones in good condition. So, this good condition must be maintained further.
How to check and bleed the brake master cylinder yourself
. According to the above, the entire fascinating process consists of two parts: testing and pumping. Let's start in order.
What needs to be done before the check has already been discussed a little higher. It is advisable to carry out the entire process in the garage, and not in the open air. We will need the following tools: a set of wrenches, screwdrivers, a rubber bulb for pumping out brake fluid and blowing it off; it is better to wear protective gloves on your hands.
Open the hood of the car. We find a tank with brake fluid, it is clearly visible. Remove the level sensor from it. And we pump out the liquid with a pear (a large enema purchased at a pharmacy works well). It is a very toxic chemical product in its composition. This is where gloves come in handy. Be careful not to get the mixture into your eyes or skin. If this happens, immediately run home - rinse with plenty of running water, as doctors advise.
Further
– take a 10mm wrench and unscrew the fasteners of the brake pipes leading to the master cylinder. We pull them up and to the sides, gaining access to the body of the main part.
Disconnect the head cylinder itself from the vacuum booster. Usually, a 17mm wrench with a socket head is useful for these purposes. Having disconnected it, we take out the part and proceed to inspection.
For these purposes, we carefully disassemble the spare part
. We check the mirror for cracks, scratches, and other defects. Please pay attention to whether the spring is elastic and whether the piston is clean. We also inspect the rubber seals. To avoid deformation, use an elastic band (if available - 20 seconds) or a rubber bulb.
You can, of course, use a special stand for inspections, if one is nearby (or specifically for this purpose, visit a service station that has one). Technically, the check is carried out as follows. We open and close the main brake valves alternately.
At the same time, we forcibly rotate the flywheel, forcing the piston to move.
The repair itself, carried out in cases where breakdowns are detected, is carried out by installing a standard repair kit on the cylinder. Some, if there is free money, I prefer to change it entirely. But then don’t forget about the supply hoses. At the very least, they will have to be checked for integrity and shabbyness. And the best thing is to replace it along with the fasteners and clamps, especially in older cars, where all this has not changed since birth.
Checking the brake master cylinder
Testing your brake master cylinder is a good step towards diagnosing potential problems in your vehicle. The GTZ serves to create pressure in the brake system. When it does not work correctly, the required pressure is not achieved. This reduced brake function is very dangerous and must be identified and corrected as quickly as possible to avoid an accident.
- Open the hood of the car and look for the brake fluid reservoir. It will be behind the engine compartment and is a plastic cylinder containing hydraulic fluid. If you have a car with a manual transmission, then there will be two of them. Larger brake fluid reservoir.
- You need to have someone sit in the car and bleed the brakes while you inspect the brake fluid reservoir. If you notice swirls or bubbles forming in the reservoir when you apply the brakes, then your brake master cylinder is not working properly and most likely needs to be replaced.
- Carefully inspect the area around the master cylinder for fluid leaks. If you notice the slightest leak of brake fluid from the cylinder, this means that it is not working correctly and needs to be replaced. However, if fluid is leaking from nearby brake hoses or pipes, then the problem may not be with the master cylinder.
- Press down on the brake pedal until you stop, then hold the pedal in place while applying pressure. If, after the brake pedal returns to its original position, it begins to slowly sink again, then the master cylinder is not working properly and probably needs to be replaced.
- Determine if the problem is in the master cylinder. If there are no fluid leaks on the master cylinder, no craters or bubbles in the brake fluid reservoir, and the brake pedal does not release at constant pressure, then the master cylinder is working as it should.
Remember, car repairs should be done by professionals! Come to the Technika service station, we will help you identify and eliminate any malfunctions in your car’s brake system!
Malfunctions and ways to check them
It is possible that you may need to replace the vacuum booster on your VAZ 2110. The cause may be various malfunctions, the characteristic symptoms of which are as follows:
- When you press the brake pedal, a hissing noise occurs, and at the same time, the engine speed often increases;
- The car starts to shake;
- Spark plugs stop working efficiently;
- Fuel consumption increases noticeably.
Before replacing the vacuum booster on a VAZ 2110, it should be checked.
This procedure is performed as follows:
- As with normal bleeding of brakes, with the engine not running, press the gas pedal several times;
- After 5 or 6 presses, keep the pedal in the down position, resting it on the floor, and start the engine;
- After starting, the pedal itself will move forward a little.
There is also a high probability of damage to the diaphragm, on which a hole is formed over time. You can purchase the diaphragm with a repair kit, the cost of which is no more than 500 rubles.
To replace an element, you need to understand the main issue - how to remove the vacuum booster from a VAZ 2110. Directly replacing the old element with a new one will not be difficult, just like the reassembly process.
Therefore, we will tell you about the main thing - dismantling the amplifier. Let's start with the fact that the procedure is not complicated, but it requires accuracy and sequence of steps. If you follow the recommendations, the work will take little time and will not take much effort.
- Disconnect the block with wires, which includes brake fluid level sensors in its design.
- Hold the booster check valve with one hand and carefully disconnect the hose with the other. It is advisable to disconnect the hose with a strong hand, since this will require a lot of force.
- Remove the two bolts connecting the booster and master cylinder.
- Carefully remove the cylinder from the amplifier.
- There is no point in disconnecting the brake lines.
- Give access to the dashboard, which will allow you to unscrew the nuts holding the brake pedal bracket. There should be 4 of them.
- It is recommended to dismantle the bracket and amplifier through the engine compartment, since there is enough free space for such manipulations.
- Remove the pin lock plate. To do this, pry the finger with a screwdriver and squeeze it out.
- Now you can easily disable the brake pedal and booster.
- To disconnect the amplifier and bracket, you will have to unscrew the two nuts on the mount.
- A new one is installed in place of the dismantled old vacuum amplifier, and the reassembly procedure is performed in strict sequence of the dismantling process.
Diagnostics and repair
From the signs listed above, it is easy to understand that in most cases there is only one source of problems - rubber products that have become unusable. The cuffs crack and swell, as a result they leak liquid and close the discharge holes. Hence the recommendation: all “rubber bands” of the brake system should be changed at intervals of approximately 100 thousand km, without waiting for critical wear.
Reference. Many auto mechanics express the opinion that after replacing the cuffs, the main hydraulic cylinder will not last long. The statement is true if the car owner purchased cheap, low-quality spare parts or installed new o-rings in the cylinder, where internal wear has formed in the walls.
Before checking the GTZ for operability, make sure there are no other faults:
- Inspect the wheel assemblies from the inside for leakage of brake fluid from the working cylinders.
- Check the integrity of the expansion tank and the fluid level in it.
- Start the engine and at idle speed, press the vacuum take-off pipe to the amplifier. If the engine speed has increased noticeably, there is an air leak and the master cylinder is most likely working.
A clear symptom indicating a breakdown of the main hydraulic cylinder is drops of brake fluid on the body . If you discover a leak, feel free to dismantle the unit and disassemble it to look for the cause. Another common problem - fluid flowing through the seals - is diagnosed as follows:
- Open the cover of the expansion tank and place an assistant in the driver's seat.
- Listening to sounds in the tank, give the command to an assistant to press the pedal.
- If the pedal moves easily and gurgling is heard in the reservoir, liquid is entering there. The reason is that worn cuffs are unable to create pressure in the circuits; liquid seeps through the leaks and enters the container.
Also, problems with the GTZ are indicated by jamming or too little pedal travel. Sit behind the wheel, press it several times, and start the engine while holding the pedal with your foot. If it sinks to the floor or does not budge, disassemble the hydraulic cylinder.
To replace or repair the master brake cylinder, you need to remove the unit from the vehicle. Work is carried out in the following order:
- Suck out the liquid from the tank with a syringe. If the cuffs are leaking, press the pedal several times and suck out the excess fluid.
- Remove the expansion tank.
- It is not necessary to drain all brake circuits. Substituting a small container, unscrew the nut of the first tube and carefully move it to the side, plugging it with a wooden stick.
- Repeat the operation with the second tube, unscrew the fastening of the GTZ flange and remove the unit.
Further actions depend on the design of the master cylinder. If the element is completely disassembled, change the rubber seals. Otherwise, you will have to replace the pistons assemblies. Pre-wash the body and all openings with alcohol; do not use gasoline. After assembly, add fluid and bleed the brake system to remove air.
What to do?
The most unpleasant thing is when the breakdown takes you by surprise, somewhere in the middle of the highway, in which case it will not be easy, repairing it on the road is not an option, and continuing to move is unacceptable and dangerous. As you can see, the reason, as a rule, is always that the line is clogged and the coolant cannot circulate through the system. In most cases, the problem is associated with rubber seals that become unusable. By cracking and deforming, they interfere with the normal operation of the pistons and bypass fluid. To avoid such a phenomenon, it is necessary approximately once every 100 thousand km. mileage, carry out diagnostics and, if necessary, change all rubber seals.
Before checking the brake master cylinder, be sure to check that other components of the brake system are in good working order.
- Perform a visual inspection of the brake caliper cylinders, as well as lines, for leaks and leaks.
- Check the level and condition of the fuel fluid in the tank.
- Start the engine and try to clamp the vacuum take-off pipe to the amplifier; if the speed has increased and there is air leakage, then the turbocharger seems to be working properly.
- The presence of drops on the GTZ body, as a rule, always indicates that it is faulty. If there is depressurization, dismantle and determine the cause of the leakage of the fuel fluid. It is also recommended to do the following: ask an assistant to press the pedal, and open the tank lid yourself and listen to the sounds. Easy pedal travel and obvious gurgling in the reservoir - there is serious wear on the cuffs; due to a loose fit, they cannot create pressure in the circuits, and liquid seeps through the cracks back into the reservoir.
You can also understand the state of the GTZ by looking at the brake pedal. Press the pedal a couple of times, then start the engine, without releasing the pedal. If the pedal has sunk to the floor or has not moved a millimeter at all, there are problems with the GTZ.
Did you like the article? Write a comment and share the link to the article with your loved ones on social media. networks!
Why is pumping needed?
Before starting work, you should determine the purpose for which the procedure is being carried out. It helps remove air from the hydraulic system. The reasons for the formation of air in the system include:
- any intervention (for example, during repairs) in the brake system; caliper overhaul;
- depressurization of the system during repairs;
- damage to hoses;
- replacing the brake fluid and reducing it to the minimum level in the brake cylinder;
- reuse of liquid.
Excess air can be detected when braking. Vehicles will be characterized by a sharp stop with increased braking. Pressing the brake pedal will be “soft” with increased travel. If you notice such “behavior” in your vehicle, you should urgently pump it - it is not safe to drive a car in this condition.
Bleeding involves removing air from hoses, calipers and tanks. Actually, it is necessary for the brakes to work smoothly. If there is air in the master brake cylinder, or it has been replaced, then it must be bled first.
What will you need?
Those who have had to pump the GTZ know that it is difficult to do it alone. It is indeed inconvenient to carry out bleeding on your own, so I advise you to involve an assistant in this matter, whose main task will be to press the brake pedal. You will also need automotive tools (spanners, including a bleeder wrench), fresh brake fluid and a hose.
Before you begin, I always recommend checking for damage to the hoses and tubes. If there are any, you should first replace them and then continue. Repairing a car with your own hands requires certain skills and abilities, but it is much cheaper than service stations, the main thing is to know a few rules and follow the algorithm. In order for pumping to be carried out correctly and successfully, it should be done according to a certain algorithm.
Bleeding instructions
I would also like to give some tips that it is advisable to follow for a successful procedure:
- It is important to ensure that the liquid in the tank does not run out. If the indicator approaches the minimum value, it should be topped up. Before you start pumping the liquid, there should be at least half of it.
- After removing air from the main brake cylinder, you should begin bleeding the working cylinders.
- You should use the brake fluid that is already poured into the system, or the one recommended by the manufacturer if you do not know which one is filled. Another option is possible: drain the one that is in the tank and pour a new one. Otherwise, serious problems may arise in the further operation of the system.
- You should also check to see if there are leaks anywhere.
- There is no need to start the engine.
- ABS, if installed on a car, should be disabled.
Basic faults
Despite the simplicity of the design and the small number of moving elements, the GTZ often ceases to perform its functions normally due to malfunctions.
It is not difficult to detect a breakdown of the GTZ. The first signals of a malfunction will be given by the brake pedal. Any change in its behavior when pressed (lightness, increase in force, etc.) indicates a breakdown. But it will signal the emergence of problems throughout the system. Checking the system on the highway allows you to more accurately identify the malfunction (the car accelerates, and then emergency braking is performed). And then the traces determine how the system works. Afterwards, all that remains is to visually inspect all the components of the drive for leaks.
The main malfunctions of the master brake cylinder are:
- Depressurization.
- Air leak.
- One of the pistons is jammed.
The master cylinder loses its seal, usually due to severe wear or damage to the sealing collars. In this case, liquid can flow between the chambers and also come out of the housing. This allows air to enter the system. As a result, the pressure decreases significantly and the effectiveness of the braking system deteriorates.
Video:Replacing the master brake cylinder VAZ 2108 2109 2110
Air leaks in the system may occur due to blockage of the ventilation hole in the tank lid. Because of this, when the liquid moves, a vacuum is formed in the tank, which is compensated by air penetrating through the cuff. As a result, airing of the system causes a decrease in the efficiency of the system.
Piston jamming can occur for two reasons - debris entering the cylinder through the tank or the formation of rust on the internal surfaces of the housing. This causes one of the circuits to stop working.
Restoring the performance of the gas turbine engine is possible only in case of wear or damage to the seals or clogging. Special repair kits are sold for repairs.
Often, washing the cylinder and replacing rubber elements allows you to completely restore functionality. But there are also cases when such measures do not help and the problem can only be solved by replacing the assembly.