In addition to the fact that a car is a means of transportation, it is also a source of a wide variety of sounds. Sounds can tell a lot to an experienced owner. Many can easily make a diagnosis without even opening the hood or looking under the bottom. It is enough, as an experienced doctor, to listen to the nature of the noise, and the malfunction is clear in the palm of your hand. Some nodes cannot be diagnosed any other way. This is especially true for bearings. Today we will be interested in the generator bearing.
Bearing numbers and sizes
Car owners are often interested in what bearings are on the VAZ 2114 generator. It is worth noting that there are two such elements installed. There is a front one, which has a larger diameter, and a small rear one. The first has an internal diameter of 17 mm and an external diameter of 47 mm, while the second has these dimensions of 15 and 35 mm, respectively. The width of the clip at the front part is 14 mm, at the rear – only 11 mm.
Bearing numbers for the VAZ 2114 generator: front – 6302 , rear – 6202 . In addition, sometimes the following marking is found: according to GOST - front ball bearing - 6-180303 C17 , rear - 6-180203 C17, according to ISO - 6303.2RS and 6203.2RS. Designations in the catalog may differ slightly, since spare parts are produced by various domestic and foreign manufacturers.
These products are sold individually or as a set. The front element can be purchased together with the cover, making it easier to install.
It is worth noting that here are the dimensions and part numbers for the standard four-wheel generator. Often this unit on this machine is replaced with a more powerful one from a foreign brand. Car audio enthusiasts often do this. If such a replacement was made, for example, by the previous owner, you need to find out the make and model of the device. Using this data, you can find the necessary markings of spare parts on the Internet.
Imported or domestic
Belarusian 90-amp BATE and Japanese Denso generators have bearings of the same size.
Imported analogues of bearings have a slightly different designation, namely:
Most 80-amp generators have bearings of similar sizes, at least this applies to domestic ones. If the generator has already been replaced before you, then you may be faced with the fact that a generator from a different manufacturer is installed and the bearings are of different sizes. Depending on the generator manufacturer, bearings of other sizes are sometimes found, for example, in the fairly common Bosch 14V 53-98A 0124 415 038 generator, bearings 6003-2RS (rear) are installed, the dimensions of which are 17 × 35 × 10 and 6303-2RS (front) , respectively, 15×35×14. The same bearings can be found in other imported generators. However, there are options where the rear bearing is designated as 6000-2RS, and the front bearing – 6203-2RS.
In order to accurately determine the dimensions of the bearing, it will have to be removed. If the markings on the bearing are not visible, then it is best to turn to professionals (you should not trust a caliper).
If you have decided on the size of the bearing, then to the repeated question “What bearings are on the VAZ-2110?” The answer suggests itself - original!
The quality of bearings varies from manufacturer to manufacturer; some prefer to install bearings from domestic manufacturers on their generators, while others prefer imported ones. When repairing a generator, everyone decides this issue for themselves, but after listening to numerous tips, some car enthusiasts are inclined to choose imported ones. If you focus on price-quality ratio, many experts recommend DAS LAGER Germany. But there are other suppliers of quality bearings: the French company SNR; FAG is one of the leading companies in Germany; NSK is another major bearing manufacturer from Japan; NTN – Japan; Kouo - part of the Toyota concern of Japan; Kraft or BOSCH.
We also supply bearings from Chinese manufacturers, but the attitude of motorists towards generators and bearings from the Middle Kingdom is far from flattering. A bearing is considered original if it is approved by the vehicle manufacturer for sale on the market. It usually corresponds to what is (or was previously) supplied to the assembly line. The car manufacturer guarantees that these bearings will not let you down.
If you are considering various options, then all the bearings with the corresponding markings at first glance look the same, but after opening the package, you need to pay attention to the marking, which, in addition to the designation of the bearing itself, consisting of digital and letter designations, must contain an indication of the manufacturer and necessarily the country of origin. If this is not the case, then it is quite possible that it is a fake. In this case, the money lost will not be that big (most often up to 100 rubles per bearing). But you will lose significant time and nerves.
Replacement
The procedure cannot be called complicated, but it is very important to strictly follow the instructions. Based on our recommendations, as well as video tutorials, you can carry out the replacement yourself without any problems.
Recommend: Top 10 Brake Pads
You have already found out what bearings are on VAZ 2110 generators, purchased a set of new spare parts, so you can start repairing.
Front bearing
- Slightly unscrew the mounting nut on the generator, and also loosen the adjusting bolt.
- Reset the alternator belt and start the engine. This will allow you to verify that the problem is with the generator.
- If the noise disappears, then we move on. There is still a lot of work ahead of you.
- Let's move on to the battery, from which the negative terminal should be removed. This is important from a safety point of view and protection against accidental short circuits during repairs.
- Once the terminal is removed, unscrew all the wires going to your generator.
- If you have a crankcase guard, unscrew the mounting bolts and remove it. This will allow you to reach the lower mount of the generator and remove the device. Remove the generator by pushing it through the engine compartment.
- Using a regular screwdriver or other handy tool, you need to block the generator rotor and then unscrew the pulley.
- The next step is to look for special latches. By pulling them to the side, you will be able to dismantle the device body.
- Next, the generator brushes are unscrewed, as well as the mounting bolts holding the halves of the generator assembly. There should be 4 of these bolts in total.
- We recommend marking both halves of the generator housing to avoid problems during reassembly.
- Use a flathead screwdriver to pry up the cover and remove it.
- Practice shows that it is more convenient to remove the rotor from the front cover bearing in the following way. Take a nut and screw it onto the rotor threads. Then hit it with a hammer, first placing a wooden block under it.
- Find a part whose diameter will coincide with the diameter of the bearing being removed. For example, a 27 millimeter head may be perfect.
- Gently start tapping the element so that the bearing comes out of its seat.
- Take the new bearing and prepare to reinstall it.
- The first step is to treat the new bearing with lubricant so that it lasts as long and reliably as possible.
- To install a new component, you will need the old bearing. Place it on top of the new device and lightly tap with a hammer to install.
That's it, the front bearing has been removed and replaced. Let's move on to the back.
Rear bearing
- To remove the rear element, you will need a special puller;
- If you don't have a puller, you will have to knock out the component with a chisel. An alternative option is a metal rod and a powerful, strong screwdriver;
- The selected tool is used to strike the bearing with a hammer. Here you definitely need to move along the surface, moving in the opposite direction;
- Some people can easily cope with dismantling; they use a regular strong open-end wrench;
- Now take the socket that you used to remove the front bearing and the old generator element that was removed. With their help, a new bearing is driven into its seat;
- If you don't like this method, use a tubular wrench or a metal pipe whose diameter matches the diameter of the rear bearing.
Other modification
As for the direct brother of the car mentioned above, replacing the generator bearings on a VAZ 2112 differs little from the process described. After all, the filling of these cars is virtually the same. Moreover, the marking number of the bearing for the VAZ 2112 is identical to what we mentioned earlier, both for the front and rear.
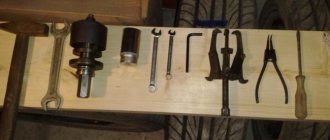
For repair actions you will need the same set of tools and accessories:
- spanners;
- round timber and block;
- puller;
- "Litol."
- We de-energize the car from the battery power.
- We dismantle the electric motor we need in the same way as for the “ten”, since it is mounted in the same way.
- In the sequence described above, we release the necessary parts from the assembly unit.
- Using thick lubricant, we install new parts.
We did not pay much attention to this instruction, since the VAZ 2110 engine and the VAZ 2112 engine are essentially the same, and the generator model used in these cars is the same.
Fourteenth model
Let's turn to another AvtoVAZ modification. Next, we will look at replacing the generator bearing in a VAZ 2114.
The reasons for the breakdown of parts here are similar to those given at the beginning of the article. Well, what will be useful to us for the next repair, we list here in a short list:
- set of wrenches;
- screwdriver;
- hammer and round timber;
- Litol lubricant.
Let's describe the repair technology point by point.
- Disconnect the terminals from the battery.
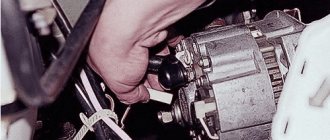
- We loosen the long adjusting bolt at the top of the unit being dismantled, then unscrew the lower mount of the electric motor, having previously treated the threaded connections with penetrating lubricant.
- Having disconnected all the wires, we remove the electric motor (you can try through the top), and also prepare new parts. Their numbers are 180302 and 180201.
- We unscrew the plastic cover of the electric motor, remove the brush holder and voltage regulator. At the same time we study the degree of wear of the brushes.
- Use a screwdriver to separate the stator from the cover. A hammer may come in handy here, but we do everything very carefully!
- Unscrew the nut from the pulley area and separate the impeller.
- We remove the bearings and install new ones, applying thick grease.
- Assembly is done in reverse
Symptoms of generator bearing failure
Problems with the generator cannot be ignored. After all, they significantly affect the ability to use the car. The following symptoms usually indicate that the bearings have failed:
- Crunching noise when the engine is running. It often indicates wear on the generator ball bearings, but can also be caused by other reasons. When such a sound appears, you need to make sure that it comes from this node;
- Whistle, noise when the engine is running. These sounds also often indicate failure of these parts, but they can also occur due to other malfunctions. It is important to check that the generator is whistling;
- Unstable battery charging. The battery can either work normally, or quickly discharge, literally overnight. Often there is a drop in voltage in the on-board network and the inability to start the car due to a dead battery. These signs often indicate a broken ball bearing, but can also be caused by a malfunction of other parts of the generating device. There may also be a problem with the battery, terminals or wiring;
- The generator housing is hot. This can be noticed by touching it when the power unit is running or has just been turned off.
You can check the serviceability of the bearings by removing the generator belt from the pulley. If, after starting the engine, the crunching, whistling or other noise disappears, the unit requires repair. It is possible to understand which of the two elements has failed only after disassembling the generator. These parts can travel on average up to 100,000 km. But usually they break down at about 60,000-80,000 km. This can happen sooner if the belt is too tight or slipping. Dampness and dirt in the engine compartment can cause their bearings to fail ahead of schedule.
Checking the overrunning clutch without removing the generator
When the engine is running, this part of the car should not make sounds such as creaks and noise. Experienced drivers can tell by sound whether the problem is mechanical or electrical. The generator should not become very hot during operation. If it emits heat, like a switched-on oven, it means it is not working correctly.
Turn off the engine, take a thin screwdriver and turn the generator armature. If everything is in order, it should only spin well in one direction.
If the overrunning clutch does not work properly, the alternator belt may become dislodged.
Selection and search of bearings for a car generator
Many motorists operating older cars with mileage of more than 100,000 km have probably encountered the need for repair or scheduled maintenance of the generator. And, as is known, bearings are subject to the greatest wear in the entire generator structure. Diagnosing generator bearing failure is often not at all difficult. If an extraneous hum appears during engine operation, increasing as the number of revolutions increases, then one of the sources of its origin may be the generator bearing. For a more accurate diagnosis, it is necessary to loosen the generator belt tensioner, then remove the belt and release the generator pulley. Next, we start the engine and, if the hum disappears, then the reason is clear. The generator bearing needs to be replaced. Replacing generator bearings is a labor-intensive, but moderately complex technical operation. Therefore, many motorists carry out repairs and maintenance of the generator themselves, without resorting to the services of auto repair shops. This solution has both pros and cons. The main advantage is that replacing the generator bearings yourself allows you to save a certain amount of money. Of all the costs, only the cost of purchasing bearings will fall on the shoulders of the car enthusiast. The disadvantages include the fact that when carrying out the work you will certainly need a special tool, for example a hydraulic press and various pullers, without which you will have to work hard and be smart. Another important point is the correct choice of bearing for the generator. And DAS LAGER specialists will help you understand this difficult issue.
The most convenient option would be to perform the work in the following sequence:
- Remove the generator from the car;
- Unscrew all fasteners, disconnecting the stator, rotor, diode bridge, etc.
- Remove the front and rear generator bearings;
- Identify bearings by the markings on them. If the markings have not been preserved, then perform identification by taking the installation dimensions;
- Purchase the necessary bearings from a trusted supplier;
- Install new bearings into the seats and assemble the generator in the recommended order.
And if the process of disassembling and assembling the generator does not raise any special questions, then choosing the right bearing is not so easy. Below we present the most common bearing options used in generators of various automobile brands. So, the design of a standard generator includes two bearings - front and rear. The front bearing of the generator is usually more powerful. This is due to the fact that the front bearing bears the entire main load. This load appears due to the action of a tense drive belt on the generator pulley. The pulley transfers the load to the shaft, and the shaft, in turn, acts on the bearing. Different manufacturers use different bearings when producing generators. We have identified the most popular ones from the total number. The following bearings are often installed in Russian generator models:
Ways to solve the problem
If such a malfunction occurs, you need to solve the problem as quickly as possible. Basically, there are three main ways to do this.
- Seek assistance from specialists at the nearest service station.
- Replace the complete prefabricated generator, rather than trying to solve the issue with a more budget-friendly method.
- Purchase a new bearing for the generator and replace it yourself.
What nuances does one or another method presented above have?
- The first option is reliable, but requires costs not only for the part itself, but also for the expensive services of craftsmen.
- The second option is more financially accessible, but you will have to do quite difficult work.
- Option number three is the most difficult from the point of view of independent execution, but is the most budget-friendly. Consequently, you will be able to save an impressive amount of money.
Generator bearings VAZ 2114 (2115, 2113) - instructions for self-replacement
A common breakdown in a VAZ generator is wear and failure of the front or rear ball bearing. The first signs of a malfunction that will require replacing the bearings of the VAZ 2114 generator:
| Malfunction | Cause |
| Crunch when turning | bearings of the VAZ 2114 generator have fallen apart, destruction or wear of the raceways, lack of lubrication |
| Whistle, noise | bearing jammed, rotation on seating surfaces, armature wear |
| Battery charging is unstable | |
| Overheating of the housing, rotor |
Watch the video to see how an electric generator with faulty bearings makes noise.
Noise from the front bearing of the VAZ generator
VAZ generator bearing wear
The article provides detailed instructions with photos and videos on how to make diagnostics, correctly disassemble the electric generator, replace the bearings with your own hands and put the unit back together. Additionally, information on the choice of bearings is provided (numbers for the injector, sizes, article numbers, prices, which ones to buy, markings), you will also find repair tips, diagrams describing the design of the unit.
Repair
So, you have decided to purchase new bearings and follow a difficult but fairly economical path. For cars like the VAZ 2114, self-repair is a common thing. Such work, even in the absence of impressive experience and knowledge, is not difficult to do. Simple follow the instructions.
- Disconnect the generator from the battery to deprive it of power.
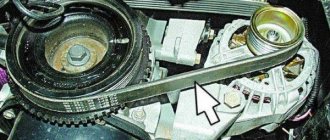
- Remove the timing belt.
- Using wrenches of the appropriate size, remove the fastening nuts.
- The film is removed, after which the sleeve is removed.
- The generator itself is carefully removed from its seat.
Subsequent work is more subtle and complex. After all, you have to disassemble the generator in order to get to the bearings. The task is not an easy one, but you can handle it yourself.
- There are nuts on the generator housing that need to be unscrewed;
- Remove the cover and remove the regulator from under it. This element is responsible for brushes and tension;
- Disconnect the stator from the cover. This operation should be done as carefully as possible so as not to damage the copper winding;
- Sometimes the housing can become rusty, making the stator difficult or even impossible to remove. In such a situation, arm yourself with a hammer and an impact screwdriver. With the help of these tools it is necessary to deliver the most accurate blows. This way you will be able to divide the element into blocks;
- Separating the generator from the stator, you will see both bearings - front and rear;
- Remove the damaged component and install a new alternator bearing in its place. Don't forget that there are two of them. For prevention, you can replace both at once, even if one of them is in completely good condition;
- Assembly is performed strictly in reverse order.
Working as a puller
Important Tips
There are several questions that you should know the answers to before you begin the job of replacing alternator bearings.
- Installation must be carried out using a special press. Theoretically, it is possible to install a new element in place of the damaged one with an ordinary hammer, applying directed blows to the bearing. But this way you can damage the new spare part, plus additional damage to neighboring elements.
- Make sure the new element is firmly in place. Only after this proceed with installing the pulley and impeller.
- When purchasing a part, ask the seller what kind of vehicle this particular bearing is designed for. These parts differ in size.
- During the replacement process, be sure to check the tension of the timing belt. If the tension is not strong enough, voltage sag may occur.
Disassembled generator
Consequences of a malfunction
A faulty bearing, like any other failure associated with generator components, leads to its malfunction. It is impossible to predict the consequences of such a breakdown.
Let’s just say that both an inadequate and an excessive charge pose a potential threat.
- If the alternator does not provide sufficient charge, the battery will quickly discharge, so you will not be able to start the car or go anywhere.
- If a charge is too powerful, the consequences are even sadder, since this puts the entire electrical circuit of your VAZ 2114 at risk.
What bearings are on the VAZ 2114 generator - how much, what numbers and sizes
When choosing spare parts, motorists have the following typical questions:
- What are the generator bearing numbers?
- Answer : Markings (numbers):
- according to GOST: 6-180303 C17, 6-180203 C17;
- according to ISO: 6303.2RS, 6203.2RS.
- What bearings are on the VAZ 2114 generator?
- Answer : In the VAZ 2114 generator (injector), the manufacturer provided closed single-row radial balls with lubricant.
- How much does a generator bearing cost?
- Answer : The cost of a set of two Russian-made ball bearings will be 300-350 rubles.
- Generator bearing dimensions?
- Answer : For detailed information on the dimensions of the parts, read the article “Replacing the bearings of a VAZ 2110 generator”
egoIST
I drive a Ford Focus ST in Moscow
The engineers did a great job - 15 devices in 1 case.
An entire car on-board computer with FULL HD footage. We are pleased with the clear rear view camera and GPS navigator with 32 satellites.
I've been using it for 6 months and already forgot about the fines
.
I am sharing a link to the official website of this miracle recorder: MORE
Table of recommended bearing manufacturers
| No. | Factory | Catalog number (article) | Price 2022, rub. | ||
| Front | Rear | Front | Rear | ||
| 1 | VBF Russia | 6303.2RS | 6203.2RS | 160 | 120 |
| 2 | SPZ Russia | 6-180303 C17 | 6-180203 C17 | 170 | 130 |
| 3 | SKF Sweden | 6303.2RS | 6203.2RS | 370 | 330 |
| 4 | FAG Germany | 6303-2RSR | 6203-2RSR | 320 | 310 |
see also
Battery charging lamp is on
- 6 0 22k
Strut support bearing
- 81 1 100k
Repair of VAZ 2115 generator
- 3 0 7k
Generator malfunctions - signs, diagnostics, causes, testing
- 797 13 648k
Replacing the front wheel bearing of a VAZ 2114
- 4 0 11k
Current to power conversion calculator
Convert how many amperes a kW has online. Calculator for converting current amperes to power watts
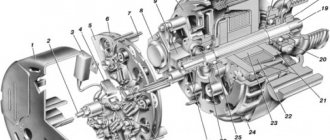
In a modern car, the generator provides current to the entire power supply system: powering the engine, lighting devices, and recharging the battery. On VAZ 2113/2114/2115 cars, generators of type 5102.3771 and 94.3701 are installed. Both generators are a three-phase AC electric motor with electromagnetic excitation, with a built-in rectifier unit and voltage regulator. The generator on cars of the Samara and Samara-2 family is traditionally located in the same way as on the “Classic”, on the right side of the engine compartment - near the headlight on the passenger side.