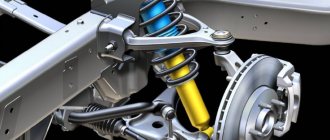
The main task of the stabilizer is to reduce the roll of the car when passing uneven roads and when performing maneuvers.
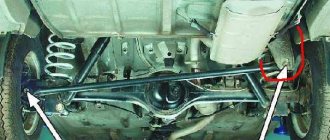
On the seven, the stabilizer has four attachment points: two internal ones, which are located on the body spar, and two external points on the lower suspension arms. The outer bushings are subject to greater wear due to the significant load on them. But a comprehensive replacement of stabilizer bushings is recommended for all attachment points.
Stabilizer bracket for VAZ 2101-VAZ 2107
The steel stabilizer bracket 2107 in the form of a bracket is used to attach the transverse link connecting the lower arms of the front wheels. In classic models of Zhiguli 2101-07 there are 6 such elements. As is the case with other components of these machines, maintenance of the anti-roll bar can be performed by the owner himself, if he so desires. The main thing is to have time and understand what this service involves.
Purpose and design of the unit
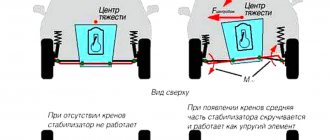
VAZ 2101-07 cars use a front stabilizer, whose task is to distribute the load on the chassis when turning, keeping the car in a horizontal position. Without it, under the influence of various forces, the car body will begin to tilt strongly to one side, which, even at average speed, can lead to a coup.
The main part of this unit is a long rod, shaped like the Latin letter U and made of steel with increased elasticity. Car springs are made from the same steel. The ends of the VAZ 2106 stabilizer are attached to the lower arms, and the middle part is attached to the front part of the body. The node consists of the following elements:
- barbell;
- mounting bracket - 6 pcs.;
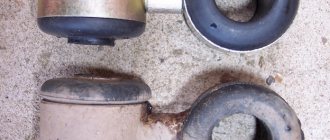
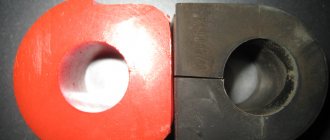
- rubber bushings - 4 pcs.
At the points of attachment, rubber bushings are put on the rod, covered by brackets in the form of brackets, attached to 2 bolts. Although there are only 4 mounting points for the anti-roll bar, there are 6 brackets, since two parts are used in 2 places. These parts have different heights, and in the opening there is a rubber bushing.
When driving in a straight line, the VAZ 2107's lateral stability link is practically inactive. When turning, one lever begins to pull the end of the bar up, the second - down.
Resisting torsion, the rod does not give much movement to the levers in different directions and thereby keeps the car in a horizontal plane.
Node maintenance
During the operation of classic Zhiguli models, several malfunctions associated with stabilizing traction occur:
- wear of stabilizer bushings on VAZ 2107;
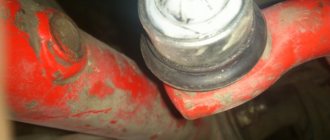
- breakage of the upper or lower pin on which the ends of the rod are screwed to the lever;
- separation of the U-shaped fastening strip welded to the lever at the factory.
Broken studs are quite rare and are the result of metal fatigue. The malfunction is characterized by sharp rolls when turning, accompanied by loud metallic knocks. This unpleasant sound is produced by the released end of the rod clinging to the side of the lower arm. It’s quite easy to fix the damage, even while on the road in the middle of a field: a regular bolt and nut are put in place of the torn stud.
The fastening U-shaped strip of thick metal comes off very rarely. Which entails a labor-intensive process of replacing the lower arm, since welding it to the old one is useless, the part will very quickly break again. If any of these two troubles occur, it is possible to drive a car, but only very slowly, especially on turns.
The VAZ “classic” stabilizer bushings are replaced when they wear out approximately once every 20 thousand km. mileage Wear is clearly visible visually; you just have to look under the front of the car and make sure that the rubber bands are cracked and do not cover the traction properly. In advanced cases, bad bushings make themselves felt while driving, when the car sways and tilts dangerously.
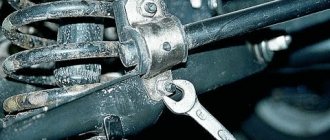
To install new bushings, you will have to completely remove the VAZ stabilizer. It is most convenient to carry out work from the inspection hole, although if necessary, you can do without it. To disassemble and replace, you will need a pry bar, 2 13 mm wrenches and a powerful screwdriver. Replacement is carried out as follows:
- It is easiest to remove the rod when the springs are completely unloaded. Therefore, it is recommended to hang both front wheels of the car.
- Using a 13 mm wrench or socket, unscrew the nuts on all brackets.
- Using a pry bar, remove the brackets from the studs one by one.
- Remove the rod and use a sharp tool to mark the position of the old bushings, as well as the right and left sides.
- Old rubber bands can be cut off with a knife.
When finished, the rod must be thoroughly soaped (do not lubricate it with oil!) and new bushings must be tightened, and then the assembly must be assembled. When assembling, it is undesirable to confuse the right and left ends of the stabilizer, which is why marks were placed on them. In the end, you need to check the car while driving and go to a car service center to correct the wheel alignment of the front wheels.
Strengthening stabilizing traction
Some owners of the “classic” VAZ, who love to improve their car in every possible way, have even gotten to the stabilizing unit. There is an opinion that the car behaves better on the road if you install a double stabilizer on the VAZ 2101-07. This modernization improves the car's handling, since rigidity does not allow it to sway and deviate from the trajectory.
To realize the strengthening of the stabilizer, you need to buy the following parts:
- stabilizer rod;
- set of rubber bushings;
- 4 brackets designed for attachment to the lever.
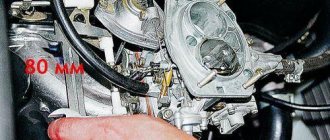
The new rod must be immediately trimmed by 80 mm on each side. Then remove the “original” rod along with the brackets. Further steps - according to the instructions:
- Remove the outer bushings from the “original” rod and clean the ends.
- Place 2 middle bushings on the new rod so that they coincide with the brackets on the old one. Pull the outer rubber bands onto the ends of the rod.
A similar design can be made by welding from bushings from a Niva and stabilizer struts from a VAZ 2110. This will cost a little more, and the appearance will not be very aesthetically pleasing.
Basic elements of a car suspension
Any pendant consists of several basic elements:
Tires. This is the first stage in the system for smoothing out uneven road surfaces. Having a certain degree of elasticity, the tire is able to dampen a small amount of vibrations that occur during movement. If there are malfunctions in the tire suspension, the wheels can act as an indicator of a malfunction, since the service life of the tire in such a situation is quickly reduced and uneven wear occurs.
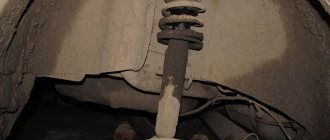
Basic elastic elements. The elastic elements of a car suspension include springs, leaf springs and torsion bars. The purpose of these elements is to provide an elastic connection between the body and the road surface. The entire load of the car falls on the springs, and due to their elasticity, the body is held at a certain height. During operation and heavy overloads, the metal of the elastic elements wears out, causing their rigidity to change. Such changes negatively affect the performance of the suspension as a whole. The angle of the wheels changes, the ground clearance decreases, and the load capacity decreases. Body sagging when unloaded is the main signal that the springs need to be replaced.
Additional elastic elements. Additional elastic elements include compression buffers; their use is necessary to dampen high-frequency vibrations, as well as vibrations generated during the contact of metal elements. Thanks to the presence of such elastic elements, the service life of other suspension components is significantly increased.
It is extremely important to monitor their good condition and promptly replace worn parts.
Guiding devices. The main task of the guide devices is to ensure the movement of the wheel in the established plane. Thanks to a system of levers, when moving on an uneven surface, the wheel moves in a vertical direction, while maintaining a perpendicular position relative to the road surface
Any violations in the guide elements will lead to rapid and uneven wear of the wheel tire, as well as other suspension elements.
Damping element. The element of the damping device is a shock absorber. The use of shock absorbers in the suspension system allows you to solve problems such as body vibration when driving on uneven roads, as well as smoothing out vibrations on other elements of the vehicle's suspension. Thanks to the damping function, constant contact of the wheel with the road is ensured, the car becomes more stable when driving.
Anti-roll bar. When turning at speed, the anti-roll bar prevents the vehicle from rolling. When performing a turning maneuver, the wheels on one side of the vehicle begin to lift off the road, which can cause the vehicle to roll over. At this moment, tension is created on the stabilizer, which tends to return the rising edge of the car to its place.
Fastening elements for individual parts. Fastening elements include ball joints, silent blocks and bolted joints that connect the remaining elements of the vehicle's suspension.
Double front stabilizer VAZ 2107, VAZ 2105, VAZ 2104
suspension, tuning and adjustment on your own
Making a double front stabilizer for a classic. So, in this article I will try to cover the manufacturing and installation of a double front stabilizer for a classic.
To do this we will need to buy the following spare parts: 1. Front stabilizer 2101. VAZ catalog number – 2101-29060102. Stabilizer strut 2110 in the amount of 4 pieces. VAZ catalog number is 2110-29060503. Stabilizer bar cushion 2121, 2 pieces. VAZ catalog number is 2121-29060404. Anticorrosive (anti-gravel)
First you need to prepare the outer mounts for the second stabilizer to the first. We take the stabilizer struts 2110 and pull out the rubber bushings from them (those without a metal tube).
We cut the racks and weld the rings (circled in the photo) in two pieces (that is, you need to cut 4 racks and get 4 rings) and insert back the pulled out rubber bushings of the VAZ 2107 (you can resort to the help of fairies to make your learning easier). This is what should happen.
Now we take the freshly purchased stabilizer and trim it from each edge by 7-8 cm. The fastenings to the spar are removed from it. As a result, what remains is just a bare stabilizer, trimmed from the edges.
We remove the standard stabilizer of the VAZ 2104. The photo shows all the spare parts before installation.
Here are the Niva stabilizer cushions
At the next stage, we take stabilizer pads 2121 and put them on the new (cut) stabilizer in the places where the stub is attached to the spar. After the pillows are in place, we take a new stabilizer and insert these same pillows into the mounts located on the stabilizer removed from the car.
Next, we take the previously made fasteners and put them on the edges of the stabilizers as shown in the photo (it is highly recommended to use fairies to simplify the procedure for putting on the bushings, otherwise you simply will not pull them into place).
Well, actually the double stub is ready.
This is what this equipment looks like installed on a VAZ 2105 car
Attaching the new stub to the old one using manufactured fasteners
Attaching both stubs to the spar
Now all that remains is to screw this entire structure into place to the car, paint it with anticorrosive and enjoy its positive effect.
Suspension tuning for VAZ 2107, VAZ 2105, VAZ 2104
- – Installation of double front stabilizer
- – Modification of the front suspension arm
Tuning Lada 2107, photos of tuning Lada 2105, modification of Lada 2104
Tuning is a change and modification of the factory settings of the car. Tuning a VAZ with your own hands is a labor-intensive task, so we decided to share some instructions for modifying a VAZ 2104. Tuning can be cheap and expensive, superficial and deep. The modification of the VAZ 2107 is considered in sections: interior tuning, suspension and steering tuning, braking system and body tuning, as well as engine tuning and gearbox tuning. First of all, when tuning a VAZ 2105, you should pay attention to the ignition system. The classic is a popular car that provides its owner with a wide range of tuning and modifications.
Types of self-propelled chassis:
- Automotive;
- Tractor;
- Special universal self-propelled chassis.
Typically, the chassis is produced in an automobile or tractor plant, and the equipment that sits on it is produced in another specialized plant for the production of attachments. For example, off-road equipment is installed on vehicles such as URAL.
An example of a self-propelled chassis is a truck crane. Universal self-propelled chassis are widely used in agriculture on seasonal equipment.
Universal self-propelled chassis
The self-propelled chassis most closely resembles a tractor; the only difference is the layout, in which the engine is located behind the cab, and in front of the cab, apparently, is a frame with a front axle. The frame can be installed with one or two beams. Various special equipment used in agriculture (dump truck body) is installed on the frame. The canopy of equipment is carried out quickly, for the convenience of replacing it if necessary.
Scope of application of self-propelled chassis
-In agriculture;
-In forestry;
-In municipal and road repair services;
-In warehouses (lifts, loaders).
Double stabilizer for classic VAZ
How to make a double front stabilizer for a classic VAZ (2106, 2107, 2101) with your own hands.
Detailed instructions for the manufacture and installation of a double vase stabilizer - several options. The front double (reinforced) stabilizer increases the vehicle's stability in corners (due to its rigidity) and improves handling. Such tuning of vases will not take much time and will not require much effort, and the effect will be noticeable immediately.
To make it, you will need the following spare parts (you can buy it in a store or at a car market).
— Front stabilizer VAZ 2101 or VAZ 2106 VAZ catalog number — 2101-2906010
— Stabilizer strut 2110 – 4 pieces. VAZ catalog number - 2110-2906050
— Stabilizer bar cushion 2121 V — 2 pieces. VAZ catalog number - 2121-2906040
— Anticorrosive (anti-gravel) and fairy for washing dishes. First you need to prepare the extreme mounts for the second stabilizer to the first.
We remove the rubber bushings from the stabilizer struts 2110
Then we cut the racks with a grinder and weld the rings (which are in the photo above) in two pieces (that is, we cut 4 racks and leave 4 rings). Then we insert the rubber bushings back (the fairy will help us in this difficult task). This is what happens
Now we take a new stabilizer and trim it from each edge by 7-8 centimeters. We remove the fastenings to the spar from it, that is, only the stick remains without any canopies.
Remove the stock anti-roll bar.
In the photo everything is laid out before installation on the car.
Stabilizer cushions from Niva VAZ 2121
Next, we put the stabilizer pads 2121 on the cut stabilizer in the places where the stabilizer is attached to the spar.
After the pillows are in place, take the cut stabilizer and insert the pillows into the mounts located on the stabilizer removed from the car. Then we put the previously made fasteners on the edges of the stabilizers as shown in the photo (the fairy will help tighten the bushings).
The double stabilizer for the classic VAZ is ready.
Stabilizer installed on the car
Attaching the new stabilizer to the old one using manufactured mounts
Attaching the double stabilizer to the spar We cover problem areas (or the entire structure) with anticorrosive.
Stabilizer link 2110
Stabilizer cushions from Niva VAZ 2121
Already cut and welded rings for double stabilizer (for connection)
Bulgarian new stabilizer (7-8 cm)
Ready-made double stabilizer for a VAZ classic
Double stabilizer installed on a VAZ car
Well, one more option.
The complexity of manufacturing a double stabilizer is small, and you will feel the effect immediately.
Materials and tools that will be needed for work
- Bulgarian.
- Keys and heads.
- Welding machine.
- Solvent.
- Electric drill.
- Sandpaper.
- An attachment for an electric drill to clean surfaces.
- Wheels for grinder.
- Blowtorch.
- Well secured vice.
All parts can be easily found at any auto parts store. A set of tools can be found in almost every car enthusiast’s garage. It is worth finding only a welding machine for the duration of the work.
Stabilizer VAZ 2107 what is it
Dear visitors of the “Cars” website! We will be very grateful for your comments on the video clip “What is the VAZ 2107 stabilizer”; registration is not required for this. We also ask you to let us know if you have any problems playing the video.
10.30.2017 – 16:38 John Fantasy
You would be better off showing how to install polyurethane. Rubber bands are not being made very well these days – they don’t last long. Its only advantage is that it is softer.
Solution
Many beginners may experience problems or difficulties when replacing bushings. This section of the article will help you solve them.
When to replace transverse stabilizer bushings
SPU bushings are replaced immediately after wear is detected. If this is not done and you continue to drive with worn bushings, then irreparable problems may soon appear and then you will have to replace the stabilizer completely.
Installation materials and tools
In order to successfully change rubber bands you will need:
A set of new bushings for the rear stabilizer;
- Set of open-end wrenches;
- Flathead screwdriver and hammer;
- Composition WD40;
- Mounting blade.
Sequence of operations for replacing rear stabilizer bushings on a VAZ 2107
Having prepared everything you need, you can begin the repair:
- After the car is placed in the pit, you need to inspect the fastenings. Usually, due to long-term use, a layer of dirt and rust could appear on them. To eliminate these unpleasant consequences, you need to treat the compounds with WD 40. After that, all you have to do is wait about fifteen minutes. During this time, dirt and rust should dissolve and work can continue.
- The nuts must be unscrewed with a 17mm open-end wrench.
- In order to loosen the stabilizer bar with the clamp, you will have to use a mounting blade. Having inserted it into a narrow hole, you need to use the lever principle and bend the clamp.
- After this you need to get rid of the old gum. This can be done with a knife.
- The place where the new bushing will be installed must be cleaned of dirt and rust. After this, you can install a new rubber band, having first lubricated its inside with grease (it should be sold with the kit). Now you need to put it on the rod and move it along it to the installation site.
- After the fifth step is completed, you need to tighten the nut on the clamp.
- Then all that remains is to replace all the other bushings according to the instructions above. Afterwards, you need to evaluate the quality of the work performed - if the stabilizer is not warped and no play is detected, then the replacement was carried out correctly. You can drive.
How to replace the anti-roll bar on a VAZ 2101-VAZ 2107?
1. First, remove the protection (If it is installed) from the car, if it does not interfere with the removal of the stabilizer, then you can leave it alone (Where the stabilizer is located, read above), now hang both front wheels (So that the stabilizer does not twist) and on both sides unscrew the nuts securing the metal brackets to the lower arms (see large photo below), unscrew the nuts carefully, without breaking off the studs (Studs age over time and breaking them is as easy as shelling pears), then remove the nuts and the engravings behind them and pry them off with a screwdriver, remove both the brackets that hold the bushings, just keep in mind that both brackets (Right and left) are different, when installing new bushings, do not confuse these brackets with each other (Look at the small photo in which number 1 shows the left bracket, and number 2 the right) otherwise they will crush the bushings and the bushings will have to be replaced with new ones.
Note! In order not to get confused in the staples, leave one on one side and the other on the other, or make a mark on them, like the letters “P” and “L”, the letter “P” means that the staple is right, the letter “L” is the left!
2. Let's move on, when the staples are removed, remove the bushings separately, removing the bushings will be as easy as shelling pears, this is done like this, the end of the rod is lubricated with soapy water, after which, bending the lever with something (a crowbar, for example, indicated by a blue arrow), hand You will need to grab the bushing (Indicated by the red arrow) and rotating it by hand, remove the bushing from the stabilizer, as shown in the small photo below:
3. We’ve sorted out the outer bushings, they can be removed as easily as possible, now let’s talk about the central bushings (After unscrewing the nuts that secure the central brackets, it will be possible to remove not only the bushings, but also the stabilizer itself from the car, and by the way, the central bushings are changed on the removed one stabilizer, keep this in mind), in order to remove them you will need to unscrew the nuts securing the brackets (These are the same brackets under which the bushings are located), we will not show where the central brackets are located because we already pointed with an arrow in the second photo from the beginning of the article (These are those the very brackets that attach the stabilizer to the spar), so by unscrewing the nuts, remove the brackets and thereby completely remove the stabilizer from the car.
4. When the stabilizer is removed, you can immediately change it (To avoid pain, it is better to buy the stabilizer complete with all the brackets and bushings and install it immediately), and also change the central bushings, they are changed in two ways:
First method: The rod is lubricated with soapy water and by rotating the bushing together with the bracket, try to remove them from the rod; if that doesn’t work, secure the bracket in a vice as shown in the photo below and by rotating the rod (rotate it with both hands), ensure that the bushing is assembled with a bracket I dreamed of a barbell.
Second method: Take a drill and a small drill, drill slightly larger holes at the brackets (see photo 1), thereby removing the flaring in the connections between the internal and external brackets (see photo 2) and separate both brackets from each other, then cut the elastic or Having also smeared the rod with soapy water, drag the rubber bushing to the very end and thereby completely remove it.
5. Now installation, regarding the installation of the central bushings and brackets, first of all, buy them, it is better to buy them assembled (So that the bushing is already in the bracket), after the purchase, after smearing the rod with soapy water, drag this entire so-called assembled part until your place, you will have to suffer, but it is quite possible to do it, so do not despair and do the work, this was the first way, the second way, you buy only one bushing and put it in the old bracket and install it in the same way, and finally the third way, it is done in the event that you drilled out a flaring and separated the staples from each other, then when implementing this method, the staples will have to be combined with each other somehow (by welding or something like that), it will be very easy to insert a sleeve into them (into the cut staples) and the most The main thing is that if you manage to install the bushing on the rod first, and then combine the brackets with each other, then it will be great, because there is no mark with pulling through and the like, but you will have to work very, very hard to weld both brackets together exactly.
6. When you have sorted out the center, install the stabilizer in its place, tighten everything you need, install all the bushings, after all the operations done, look at the bushings to make sure they are positioned correctly and by the way, all bushings have a protruding part in the center (Indicated by the red arrow ), so make sure that it fits into the groove in the brackets (The groove is indicated by a blue arrow), and the installation of the bushings and stabilizer will be completed successfully (If everything was done correctly).
Additional video: Watch the detailed video below, which explains in detail how the bushings are changed on the stabilizer.
Seat belts
At first, cars were equipped with belts with two-point fastening, which “held” riders by the stomach or chest. Less than half a century has passed since engineers realized that the multi-point design is much better, because in the event of an accident it allows the belt pressure to be distributed more evenly over the surface of the body and significantly reduces the risk of injury to the spine and internal organs. In motorsports, for example, four-, five- and even six-point seat belts are used - they keep a person “tight” in the seat. But in civilian life, three-point ones have taken root because of their simplicity and convenience.
For the belt to function properly, it must fit snugly to the body.
Previously, belts had to be adjusted to fit the figure. With the advent of inertial belts, the need for “manual adjustment” has disappeared - in normal conditions, the reel rotates freely, and the belt can wrap around a passenger of any size, it does not hinder actions, and every time the passenger wants to change the position of the body, the strap always fits snugly to the body. But at the moment when “force majeure” occurs, the inertial reel will immediately fix the belt. In addition, modern cars use squibs in their belts. Small explosive charges detonate, yank the belt, and it presses the passenger to the back of the seat, preventing him from being hit.
Seat belts are one of the most effective means of protection in an accident.
Therefore, passenger cars must be equipped with seat belts if fastening points are provided for this. The protective properties of belts largely depend on their technical condition. Belt malfunctions that prevent the vehicle from being used include tears and abrasions in the fabric strap of the straps that are visible to the naked eye, unreliable fixation of the strap tongue in the lock, or the absence of automatic release of the tongue when the lock is unlocked.
For inertia-type seat belts, the webbing should be freely retracted into the reel and blocked when the vehicle moves suddenly at a speed of 15 - 20 km/h. Belts that have experienced critical loads during an accident in which the car body was seriously damaged must be replaced.
Vehicle handling
Controllability is the ability of a car to move in the direction specified by the driver.
One of the characteristics of handling is steering - the ability of a car to change the direction of movement when the steering wheel is stationary. Depending on the change in the turning radius under the influence of lateral forces (centrifugal force during a turn, wind force, etc.), the steering can be:
- insufficient - the car increases the turning radius;
- neutral – the turning radius does not change;
- excessive - the turning radius decreases.
There are tire and roll steering.
Tire steering is associated with the ability of tires to move at an angle to a given direction during lateral slip (displacement of the contact patch with the road relative to the plane of rotation of the wheel). When installing tires of a different model, the steering may change and the car will behave differently when cornering when driving at high speed. In addition, the amount of lateral slip depends on the tire pressure, which must correspond to that specified in the vehicle’s operating instructions.
Roll steering is due to the fact that when the body is tilted (roll), the wheels change their position relative to the road and the car (depending on the type of suspension). For example, if the suspension is double wishbone, the wheels tilt to the side of the roll, increasing the slip.
Purpose of car suspension
A car suspension is a set of devices that work closely with each other, the main functional feature of which is to provide an elastic connection between the sprung mass and the unsprung mass. In addition, the suspension lightens the load on the sprung mass, distributing dynamics evenly throughout the structure. Among the most basic components in the suspension of a modern car are:
- elastic element - provides a smoother ride, as it reduces the impact of vertical dynamics on the mass;
- damping element - the vibrations generated during loads are converted into thermal energy, thereby normalizing driving dynamics (otherwise called “shock absorber”);
- guide element - processes lateral and longitudinal kinetics on the moving wheels of the car.
Regardless of the type of suspension and structural differences of the car, the general purpose of the suspension is to dampen incoming vibrations and noise, as well as smooth out vibrations that occur when driving on an uneven surface. Depending on the functional features of the car (you will agree that they are noticeably different for a small Smart model and an all-wheel drive SUV), the type and design of the car’s suspension will differ.
Photo of suspension on trailing arms.
Dependent suspension
Dependent suspension is characterized by the dependence of the movement of one axle wheel on the movement of the other wheel.
The transfer of forces and moments from the wheels to the body with such a suspension can be carried out directly by metal elastic elements - springs, springs, or using rods - rod suspension.
Metal elastic elements have a linear elastic characteristic and are made of special steels that have high strength under large deformations. Such elastic elements include leaf springs, torsion bars and springs.
Leaf springs are practically not used on modern passenger cars, with the exception of some models of multi-purpose vehicles. It is possible to note models of passenger cars that were previously produced with leaf springs in the suspension, which continue to be used at the present time. Longitudinal leaf springs were installed mainly in the dependent wheel suspension and served as an elastic and guiding device.
On passenger cars and trucks or minibuses, springs are used without springs, on trucks - with springs.
Springs as elastic elements are used in the suspension of many passenger cars. In the front and rear suspensions produced by various companies of most passenger cars, helical coil springs with a constant cross-section of the rod and coil pitch are used. Such a spring has a linear elastic characteristic, and the necessary characteristics are provided by additional elastic elements made of polyurethane elastomer and rubber rebound buffers.
On Russian-made passenger cars, cylindrical coil springs with a constant cross-section of the rod and pitch in combination with rubber bumper buffers are used in suspensions. On cars from manufacturers in other countries, for example, the BMW 3 Series, a barrel-shaped (shaped) spring with a progressive characteristic, achieved through the shape of the spring and the use of a variable-section rod, is installed in the rear suspension.
On a number of cars, a combination of cylindrical and shaped springs with variable rod thickness is used to provide progressive characteristics. Shaped springs have a progressive elastic characteristic and are called “miniblocks” due to their small height dimensions. Such shaped springs are used, for example, in the rear suspension of Volkswagen, Audi, Opel, etc. shaped springs have different diameters in the middle part of the spring and at the edges, and miniblock springs also have different coiling pitches.
Torsion bars, usually of round cross-section, are used on cars as an elastic element and stabilizer.
Elastic torque is transmitted by a torsion bar through splined or tetrahedral heads located at its ends. Torsion bars on a car can be installed in the longitudinal or transverse direction. The disadvantages of torsion bars include their large length, necessary to create the required rigidity and suspension travel, as well as the high alignment of the splines at the ends of the torsion bar. However, it should be noted that torsion bars have a low weight and good compactness, which allows them to be successfully used on middle and high-class passenger cars.
Structural features of the mechanism.
The strut provides a reliable and constant relationship between the wheels and the stabilizer beam; to put it simply, it is intended to create a movable connection between these suspension elements. Let's consider options for connecting struts with other suspension parts, their design and features:
- Ball joints are one of the simplest and most common connection methods, which ensures full movement of the joints. Balls are constantly under high load, as a result of which they wear out quickly. The stabilizer link, being a movable structural element, is constantly exposed to centrifugal force, due to which it can stretch, compress and twist. Often, ball joints are used in a stabilizer with a complex beam design. The element is beyond repair and requires replacement.
- The earrings have a primitive but durable design, which consists of a stud with rubber elements secured to it using lock washers. Between the rubber stops are the eyes of the stabilizer beam and the suspension arm. The earrings can withstand constant high loads and are easily repaired.
- Silent block is a rubber-metal hinge movable within one plane. It has a good service life and good maintainability, but it is not suitable for use in suspensions with a complex design.
Diagnostics
A breakdown can occur for a variety of reasons, so it is impossible to determine the exact time of full operation without breakdowns. Basically it all depends on the operating conditions. For example, if you often drive off-road, the stabilizer will break down often.
Basically, the SPU is checked during annual maintenance, but no one bothers you to do it yourself at any time.
First you need to remove the wheel. After this, use the steering wheel to make a maximum turn in any direction and shake the “bare” stand from side to side with your hand, grasping the middle third. If there are faults, looseness will be noticeable.
Signs of a broken rear stabilizer
The most common signs of failure are:
- Vehicle roll during sharp maneuvers, instability;
- The car begins to sway, as soon as you turn the steering wheel a little to the side;
- If you drive on an uneven road, you will hear a sound from the suspension;
- The car begins to “yaw” when braking;
- If you lower the steering wheel, the car will start to swerve.
How should the stabilizer be positioned?
A correctly installed SPU should twist when the wheels turn.
Therefore, on passenger cars it is strictly forbidden to weld to the frame, since there must always be an intermediate link between it and the wheel. For example, in the VAZ 2107 bushings act as such a link. It is not recommended to use a stabilizer without them.
Causes of creaking stabilizer bushings
Drivers most often complain about bushings creaking either in cold or dry weather. But these are not the main factors and each driver may have his own reasons for this problem. They are individual for everyone. Main reasons:
- The material from which the bushings were made is of poor quality;
- When it freezes, the rubber from which the bushings are made becomes harder and loses its elasticity, which is why squeaks are heard;
- The bushing has simply worn out and can no longer fulfill its direct duties;
- Due to the design features of the car.
Before replacing the anti-roll bar, you need to figure out what the problem is. Most often you just need to replace the rubber bands.
About the choice of jet thrusts
Traction "Track"
The product is very popular among owners of the “Seven”. These rods are distinguished by their high reliability and high price, which starts from 2100 rubles per set.
Trek thrusters are distinguished by high reliability and high price
The main difference between Trek is the heads for the bushings. Firstly, they are large, and secondly, they are attached to the rods by welding. The silent blocks on Tracks are also made of especially dense rubber, which significantly extends their service life.
Read more: Skoda Octavia 2022: configurations and prices for Russia, new body, photos, videos
Rods "Cedar"
Kedr rods have an affordable price and mediocre quality
The quality of Kedr is somewhat inferior to Trek. This is especially true for bushings and silent blocks. All this wears out quite quickly, and therefore they will have to be changed more often. But there is also a good side - a reasonable price. A set of “Cedar” rods can be purchased for 1,700 rubles.
Belmag rods
Despite the simplicity and reliability of Belmag rods, they have one significant drawback: they are not so easy to find on sale. Every year they are found less and less often on the shelves of auto parts stores. But if the car owner still manages to find them, then he can be congratulated, since he got a reliable product at a reasonable price. The cost of Belmag rods starts from 1800 rubles per set.
Today it is not so easy to find Belmag rods on sale
So what should a driver choose from all of the above?
The answer is simple: the only criterion for choosing jet rods is the thickness of the car owner’s wallet. If a person is not short on funds, the best option would be to purchase Trek rods. Yes, they are expensive, but installing them will allow you to forget about problems with the suspension for a long time. If you don’t have enough money, it makes sense to look for products on the shelves. Well, if this idea is not crowned with success, there remains a third option - “Cedar” rods, which are sold everywhere.
Here we should say a few words about fakes. Knowing that car owners most often choose products from the three above-mentioned companies, unscrupulous manufacturers are now literally flooding the shelves with counterfeits. Moreover, in some cases, the fakes are made so skillfully that only a specialist can identify them.
McPherson suspension
A similar design is named after the engineer Earl McPherson, who developed it in 1960. In the language of car enthusiasts, it is also called a “pumping spark plug.” The device is represented by one lower arm, a block of a spring element, and a stabilizer bar.
A special feature of this type of suspension is the use of a shock-absorbing strut, which is what is popularly called a candle. It consists of a shock absorber and a spring. At the bottom, this component part is attached to the wheel hub, and at the top it is fixed to the support (glass) of the car body.
This type of car front suspension performs several important tasks at once. The stand not only absorbs and dampens vibrations, but also serves as a fastener for the wheel to the vehicle body. The functionality of the wishbones is to provide a movable connection between the wheel and the car body, as well as to prevent its longitudinal movement. As for the stabilizer, it is, in fact, a torsion bar, which has an equally important role - to counteract the torsional force.
McPherson suspension is used not only for the front axle, but also for the rear axle, which determines its enormous popularity. Its advantages include compact size, simplicity of design, and reliability. As for the minuses, this is a change in the camber angle with a significant wheel travel relative to the car body.
Benefits of timely replacement
Replacing bushings is a simple process that any driver can handle. As they say - “if there is a desire.” If it is not there, it is better to contact a car service center, where you will be provided with professional assistance.
Thanks to the timely replacement of worn bushings, the anti-roll bar of the VAZ 2107 can last longer.
Thanks to the new bushings, driving on roads, regardless of whether they are of high quality or not, will become much more comfortable and safer.
Traction properties
The traction properties (traction dynamics) of a car determine its ability to intensively increase its speed. The driver’s confidence when overtaking or driving through intersections largely depends on these properties.
Traction dynamics are especially important for getting out of emergency situations when it is too late to brake, difficult conditions do not allow maneuvering, and you can avoid an accident only by getting ahead of the events
Just as in the case of braking forces, the traction force on the wheel should not be greater than the traction force with the road, otherwise it will begin to slip. The traction control system (TBS) prevents this. When accelerating the car, it slows down the wheel, the rotation speed of which is higher than that of the others, and, if necessary, reduces the power developed by the engine.