If the transverse stabilizer bushings in the suspension fail, this can hardly be called a critical failure requiring immediate repair. Because of this breakdown, the car will not lose control and its wheels will not fall off. But in order to drive a car with broken bushings, the driver will need very strong nerves. Because knocking and grinding noise caused by worn bushings will be heard in any cabin. In this article, we will tell the reader how to replace roll bar bushings in passenger cars, both domestic and foreign, with your own hands.
Replacing stabilizer bushings Lada Vesta
The first signal that a Lada Vesta requires replacement of the stabilizer bushings may be: extraneous sounds or creaks in the area of the front suspension when driving on uneven roads, poor handling at speeds over 60 km/h.
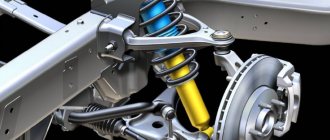
Even if these symptoms are not significantly expressed, it is worth visiting a service station as soon as possible, or purchasing everything you need and repairing the car yourself. Stabilizers consist of a rod, a clamp, a bushing, a stand and fasteners. It is important that the unit is always operational, otherwise the car may become unstable in turns, lose traction and tip over. One of the important elements of the unit is the bushing, which allows the rod to twist under load.
Creak of stabilizer bushings
Replacing the reverse sensor VAZ 2107
The driver and passengers often feel a squeaking sound when the car is moving. They especially begin to creak in severe frosts.
Let's look at the reasons why bushings squeak:
- The bushings were made of low grade material.
- In the cold, rubber becomes like oak and loses elasticity, which is why squeaks appear.
- The bushing is badly worn.
Ways to eliminate the creaking of car stabilizer bushings:
Logically, in order to eliminate the squeak, you need to lubricate the bushings, which is what some drivers do. But lubricant, be it lithol 24, various oils, silicone grease - all this attracts dust and sand. Adhering abrasives will only cause the bushings to wear out quickly.
Also, lubrication will lead to a partial loss of function of the bushings themselves, since they must tightly hold the stabilizers. The bushings are torsional and therefore protect against vehicle roll. For the bushings to function properly, they need to be seated tightly. And, if you lubricate them, they will already slide and can rotate.
Many drivers recommend changing bushings when squeaks occur. It happens that new bushings also creak. You should drive it for about a month, if the squeaks do not go away, then new ones need to be changed, but with polyurethane ones.
There are ways for folk craftsmen to improve the efficiency of stabilizer bushings. They wrap some of the bushings with electrical tape to make sure they fit tightly.
The video shows the process of replacing conventional bushings with polyurethane ones.
Comments: 25Publications: 324Registration: 04-03-2016
Purpose, design and principles of operation of the VAZ 2107 stabilizer
It has already been written above that the SPU is one of the important parts of the car. But why? The answer is simple - thanks to it, driving improves significantly, becoming more comfortable. This device makes it possible to keep the chassis tilt under control without increasing the pressure on the camber of the rear wheels.
The increased control over the vehicle on sharp turns is especially noticeable.
Thanks to the stabilizer, it will be possible to enter such turns at higher speeds without the risk of capsizing.
The roll bar SPU looks like a C-shaped hose that is installed next to the axle. The stabilizer is mounted on brackets with rubber bushings inside.
It is worth noting that the VAZ 2107 stabilizer bushing is the weakest point in the design and breaks most often.
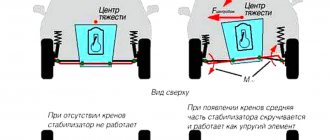
The stabilizer works on the principle of distributing the load between two suspensions.
It works relatively simply - when making a sharp turn, the car can roll. Stabilizer, since one wheel lowers and the other, accordingly, rises. The stabilizer prevents this from happening by twisting the rod and raising the lowered wheel and lowering the raised one. Thanks to this, the car is leveled.
The stabilizer struts on a domestically produced VAZ 2110 car are replaced as follows:
- Place the car on a viewing hole or raise it on a platform. The front part must be fixed to supports.
- To avoid putting yourself in danger, put the car on the handbrake.
- If you are in a pit, then place shoes under the wheels, even if the handbrake is on.
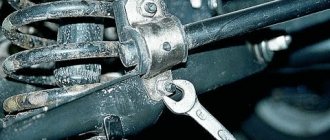
- On both sides, alternately unscrew the nuts that secure the body to the arms of the anti-roll bar struts.
- Remove the spring washers.
- Unscrew the bolts on both sides.
- Unscrew the two nuts that hold the stabilizer bars to the body.
- Remove the spring washers from the studs.
- Remove the stabilizer brackets and rods along with the struts.
- If you need to replace the strut or bushing, unscrew the nuts securing the strut and arm, then knock the former off the bar with a hammer. The hammer must be wooden or plastic. Under no circumstances should it be a metal instrument. You will damage the element with it.
- Visually inspect the condition of the struts and bushings. If deformation, tears, wear, deterioration of elasticity, cracks, or loose fit are detected, be sure to replace the failed elements with new, high-quality ones.
- To remove bad bushings, you will need a press. Because of this, it is easier to replace the struts at the same time as the bushings.
- Inspect the assembly rod. There should be no signs of deformation on it. Make sure the ends are in the same plane.
- If the geometry deformation on the stabilizer bar is minor, it can be corrected. Otherwise, the part is replaced with a new one.
- If the stabilizer pads are worn out, torn, have lost their original elasticity or do not fit well on the bar, they must be replaced. New cushions are mounted on the stabilizer bar 350 millimeters from its center. The cuts should be located towards the front of the car.
- The struts need to be lubricated with a soapy solution, which will make it easier to put them on the stabilizer bar.
- The bar is mounted in its rightful place, the nuts that hold the brackets from the pillows are tightened. They should be tightened until the play in the cushion cuts is eliminated.
- First you need to tighten it from the side of the cut, that is, the front nuts. Only then are the rear nuts tightened.
- The nuts holding the front struts are mounted in place until there is no gap between the struts and the arms.
- Weight the suspension to finally tighten the stabilizer nuts. Place the car on a hard surface. The tightening torque for the rack components should be in the range from 4.3 to 5.3 kgf-m, and for the brackets - from 1.3 to 1.6 kgf-m.
Video
As you can see, replacing the stabilizer link on one of the classic domestic VAZ 2110 cars is quite simple and quick.
The work will take you a little time, but you can save a lot on the services of craftsmen who charge exorbitant amounts of money for replacing racks. Although what do they do cheaply at service stations now?! Unless they pump up the tires.
Solution
Many beginners may experience problems or difficulties when replacing bushings. This section of the article will help you solve them.
When to replace transverse stabilizer bushings
SPU bushings are replaced immediately after wear is detected. If this is not done and you continue to drive with worn bushings, then irreparable problems may soon appear and then you will have to replace the stabilizer completely.
Installation materials and tools
In order to successfully change rubber bands you will need:
- A set of new bushings for the rear stabilizer;
- Set of open-end wrenches;
- Flathead screwdriver and hammer;
- Composition WD40;
- Mounting blade.
Sequence of operations for replacing rear stabilizer bushings on a VAZ 2107
Having prepared everything you need, you can begin the repair:
- After the car is placed in the pit, you need to inspect the fastenings. Usually, due to long-term use, a layer of dirt and rust could appear on them. To eliminate these unpleasant consequences, you need to treat the compounds with WD 40. After that, all you have to do is wait about fifteen minutes. During this time, dirt and rust should dissolve and work can continue.
- The nuts must be unscrewed with a 17mm open-end wrench.
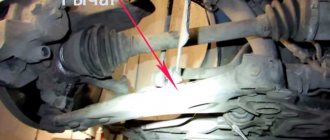
- In order to loosen the stabilizer bar with the clamp, you will have to use a mounting blade. Having inserted it into a narrow hole, you need to use the lever principle and bend the clamp.
- After this you need to get rid of the old gum. This can be done with a knife.
- The place where the new bushing will be installed must be cleaned of dirt and rust. After this, you can install a new rubber band, having first lubricated its inside with grease (it should be sold with the kit). Now you need to put it on the rod and move it along it to the installation site.
- After the fifth step is completed, you need to tighten the nut on the clamp.
- Then all that remains is to replace all the other bushings according to the instructions above. Afterwards, you need to evaluate the quality of the work performed - if the stabilizer is not warped and no play is detected, then the replacement was carried out correctly. You can drive.
Strengthening stabilizing traction
Some owners of the “classic” VAZ, who love to improve their car in every possible way, have even gotten to the stabilizing unit. There is an opinion that the car behaves better on the road if you install a double stabilizer on the VAZ 2101-07. This modernization improves the car's handling, since rigidity does not allow it to sway and deviate from the trajectory.
To realize the strengthening of the stabilizer, you need to buy the following parts:
- stabilizer rod;
- set of rubber bushings;
- 4 brackets designed for attachment to the lever.
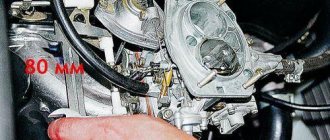
The new rod must be immediately trimmed by 80 mm on each side. Then remove the “original” rod along with the brackets. Further steps - according to the instructions:
- Remove the outer bushings from the “original” rod and clean the ends.
- Place 2 middle bushings on the new rod so that they coincide with the brackets on the old one. Pull the outer rubber bands onto the ends of the rod.
- Pull additional rubber bands on the old stabilizer that match the outer ones on the new one.
- Place the rods together and twist them with brackets placed on additional bushings on both sides.
- Install a reinforced stabilizer on the car.
A similar design can be made by welding from bushings from a Niva and stabilizer struts from a VAZ 2110. This will cost a little more, and the appearance will not be very aesthetically pleasing.
Preparatory work before installation
Part installed on a car
All the work can be done alone, but it is very labor-intensive. It's easier to find someone else to help you. Save time and effort. Of course, safety precautions must be observed
Remember that the grinder and drill must be handled with great care
Please note: the front anti-roll bar of the VAZ 2110 has a slight arc deflection - about 5 cm, for this reason it is necessary to bend the left part of the stabilizer a little more than 90°. To secure the car, you need to place a pair of supports under the front wheels. Then raise the rear part with a jack and make sure it is secure.
Before starting work, the rear wheels must be removed
Then raise the rear part with a jack and make sure it is secure. Before starting work, the rear wheels must be removed
To secure the car, you need to place a pair of supports under the front wheels. Then raise the rear part with a jack and make sure it is secure. Before starting work, the rear wheels must be removed.
First action
The most important stage in the manufacture of the VAZ 2107 stabilizer is the preparation of clamps that will serve as fasteners to the bridge. It is necessary to cut a pipe with a diameter of 57 mm into small pieces about 30-40 mm wide. When preparing clamps, we use welding. Finished parts are cleaned using a special drill attachment. Use solvent to degrease them and paint them with anti-gravel.
Second act
The rear anti-roll bar is shortened at the edges by about 5-6 cm. Then it is cleaned with a grinder to protect yourself and to keep the rubber bands for the stabilizer struts intact. After this, you need to heat it with a blowtorch until it turns bright red and bend it 90° using a water-gas pipe. Do not cool the bent rear stabilizer by immersing it in cold water. Wait until it cools down on its own. As in the first step, degrease and paint over the stabilizer.
Third act
It is necessary to create a mount with which the rear stabilizer will be connected to the suspension. The short jet thrust is being cut. Both pieces must be identical; they are welded to the VAZ 2107 stabilizer strut. As before, cleaning, degreasing and coating with anti-gravel are done. Everything you need is ready, then assembly follows.
Act Four
The previously prepared clamps are attached to the bridge
Be careful not to damage the brake hoses when bending them. The fastener rubber bands are put on the stabilizer, and clamps are placed on them (over time, the rubber bands can be replaced with new ones)
When installing the clamps on the rubber bands, you will need to slightly lift the muffler. Using keys, the finished stabilizer is attached to the tail axle of the vehicle. It is necessary to remove the stock (standard) jet rods
Wrenches will also help you here. At the end of the rear stabilizer of the VAZ 2107 it is necessary to put on the struts (eggs) and 2 welded parts of the jet thrust. The standard jet rod must be attached in its place, and the updated one is attached in the wheel area. All this is secured with 25 cm long studs (12 mm diameter) or bolts using screws, nuts and washers. Don't forget to look through the entire suspension and check whether the parts are securely fastened (if you notice noise or deterioration in the car's ride, then replacing the stabilizer bushings will help you). Screw the removed wheels into place and enjoy the quality of the VAZ 2107 stabilizer.
Purpose and design of the VAZ 2107 stabilizer
The design of the front suspension of cars of the VAZ 2101-07 family uses a front stabilizer, the task of which is to distribute the load as efficiently as possible. This is the load that the suspension of a domestic car experiences when turning and performing maneuvers on the road. Due to the presence of a stabilizer, the occurrence of a roll is eliminated, and the car is kept in a horizontal position. If you remove the front stabilizer, the driver will immediately feel how much the car will shift to one side during sharp turns or maneuvers. Moreover, the rolls are so large that the vehicle can tip over.
Structurally, the part of the suspension of the VAZ 2107 car under consideration consists of a long rod, which has the shape of the letter U. The rod is made of special steel, which has increased elasticity.
This is interesting! Springs for cars are made from similar steel, which have high strength, memory, and resistance to deformation.
The part in question is fixed using a bracket with a rubber bushing. The ends of the bar are secured to the lower control arms, and the middle area is secured to the front of the body. During operation, depending on the mileage and driving habits of the car, wear occurs on the rubber bushings or stabilizer pads. When they wear out, they need to be replaced. However, first let’s look at the design of the unit in question:
- The rod is made of steel with increased elasticity. The diameter of the part is 18 mm. It has a U-shape.
- Brackets for securing the rod in the structure of the machine chassis. Their quantity is 6 pieces.
- Rubber bushings of the same sizes and diameters in the amount of 4 pieces.
Double conversion stabilizer
This device, also called an inverter stabilizer, is completely different from all other models in its design and technical solutions. It lacks a transformer and switching elements. Its operation is based on the principle of double voltage conversion. From alternating voltage to direct voltage, and back to alternating voltage.
The 220V inverter voltage stabilizer circuit consists of the following components:
- Network interference filter;
- Power corrector – rectifier;
- Capacitor block;
- Inverter;
- Microprocessor node.
The mains voltage, having passed through the filter, is supplied to the corrector-rectifier, where the first conversion is carried out. The capacitor bank stores energy that will be needed at reduced voltage.
Typically, the inverter is implemented according to a circuit using a PWM controller. Additional power is needed to power the microprocessor, which controls the entire operation of the stabilizer.
This device has unique parameters, since the inverter stabilizer does not change the network voltage, but generates it again. This allows you to obtain high quality voltage with a stable frequency.
Based on the inverter principle, an adjustable voltage stabilizer circuit can be implemented. In this case, it is possible at the circuit level to calculate the value of the input voltage, which can be almost anything, and the stabilizer will output 220V.
How to replace the anti-roll bar on a VAZ 2101-VAZ 2107?
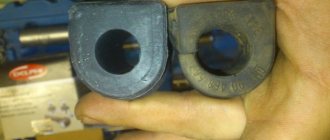
1. First, remove the protection (If it is installed) from the car, if it does not interfere with the removal of the stabilizer, then you can leave it alone (Where the stabilizer is located, read above), now hang both front wheels (So that the stabilizer does not twist) and on both sides unscrew the nuts securing the metal brackets to the lower arms (see large photo below), unscrew the nuts carefully, without breaking off the studs (Studs age over time and breaking them is as easy as shelling pears), then remove the nuts and the engravings behind them and pry them off with a screwdriver, remove both the brackets that hold the bushings, just keep in mind that both brackets (Right and left) are different, when installing new bushings, do not confuse these brackets with each other (Look at the small photo in which number 1 shows the left bracket, and number 2 the right) otherwise they will crush the bushings and the bushings will have to be replaced with new ones.
Removal
How to change antifreeze on a VAZ 2107
1. Place the car on an inspection hole or overpass and hang the front part of the car (see “Preparing the car for maintenance and repair”).
2. Mark the position of the stabilizer pad clips relative to the arms for correct installation during assembly.
Attention! The right and left clips for attaching the stabilizer pads are non-interchangeable. If we replace only the cushions, then mark their position relative to the stabilizer bar
If we replace only the cushions, then mark their position relative to the stabilizer bar.
3. Using a 13 mm socket wrench, unscrew the two nuts securing the stabilizer pad cage to the lower arm.
4. Using a mounting spatula, remove the cushion clip from the lever studs.
5. Remove the pillow from the stabilizer. Similarly, remove the pillow from the opposite side of the stabilizer.
To replace the stabilizer or the pads of its mounting brackets, remove the mudguard (see “Splash guard - removal and installation”).
Attention! When removing the stabilizer bar, it is necessary that the load on the right and left front suspension springs be equal. Otherwise, when removed, the twisted rod may straighten and cause injury.
6. Using a 13 mm socket wrench with an extension, unscrew the two nuts securing the stabilizer bracket to the body side member.
7. Similarly, unscrew the nuts securing the second bracket and remove the stabilizer. We clean the stabilizer bar from dirt.
8. To replace the stabilizer bracket cushion, clamp the bracket in a vice. If the stabilizer bar does not require replacement, then mark the position of the bracket pads relative to the stabilizer bar to facilitate subsequent assembly. Lubricate the stabilizer bar with soapy water to make it easier to remove the bracket with the cushion.
9. Turning the stabilizer bar in different directions, pull it out of the bracket cushion.
10. Use a slotted screwdriver to remove the rubber cushion from the bracket.
11. Similarly, remove the cushion of the second bracket.
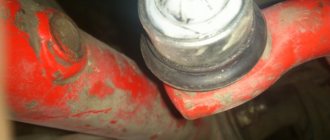
Diagnostics
Knocking of the stabilizers is a guaranteed sign of the need to immediately replace the bushings. In addition, squeaks may appear, especially when it gets colder, when the rubber loses its elasticity. It may be necessary to remove the crankcase guard to determine the need for replacement. To check the source of vibration, place your hands on the stabilizer link and directly on the mounting bracket. The partner must press firmly on the hood of the car several times. If vibrations are felt on the brackets, which are transmitted to the rack, it is necessary to install a new set, even if no play was noticed when inspecting the seats on the stabilizer. If the hole inside the bushing has taken the shape of an ellipse, cracks are visible on the surface, and the material has hardened, immediate replacement is necessary. Continued operation of the vehicle will significantly reduce the service life of the stabilizer struts.
What to do if the stabilizer link starts knocking: is it possible to drive?
The main sign of a malfunction is the sound of the struts, while a number of additional signals are observed:
- constant body roll when turning;
- spontaneous change in the trajectory of the vehicle while driving over uneven surfaces;
- when driving, you can hear the stabilizer joints rattling;
- During acceleration or braking, the suspension feels loose.
If the stabilizer bar is knocking: is it possible to drive? This is the question that worries most car owners. Let us emphasize once again: it is strictly not recommended to operate a vehicle on which the stabilizer struts are damaged, since such a malfunction causes a decrease in controllability, and this can provoke a serious accident. In addition, the constant knocking of the suspension while driving distracts the driver all the time.
The deterioration of the hinges located inside the stabilizer struts is a progressive defect, since at the initial stage the malfunction does not manifest itself in anything, and then, as wear progresses, extraneous noise and body roll occur while driving. As soon as the first symptoms are noticed, you must immediately go to the nearest car service center to diagnose the condition of the suspension elements (in particular the stabilizer struts), or perform independent troubleshooting.
Important! To diagnose the condition of the suspension, it is necessary to lift the car on a lift, or jack it up on all sides, since under the weight of the vehicle it is not always possible to detect play in the hinges. Can stabilizer struts make knocking noises when they are in good condition? Naturally - yes
The cause of extraneous noise is incorrect adjustment of the stabilizer elements, which must be eliminated without fail.
Can stabilizer struts make knocking noises when they are in good condition? Naturally, yes. The cause of extraneous noise is incorrect adjustment of the stabilizer elements, which must be eliminated without fail.
To carry out the diagnostic process, you may need the help of a friend and the following set of tools:
- jack - for lifting a vehicle and inspecting and repairing suspension parts. Please note that safety regulations prohibit performing any work when the car is jacked up without placing appropriate supports under its frame;
- shoes for fixing wheels;
- frame stands;
- It would be nice to have a car stethoscope, since when the suspension is unloaded, extraneous noise from its elements can only be heard with its help.
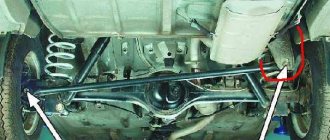
Signs of a broken rear stabilizer
It’s not difficult to guess that something is wrong with the rear stabilizer of the VAZ 2107. Here's what's observed:
- a characteristic grinding or creaking noise, which is especially clearly heard when entering a sharp turn at high speed;
- a significant increase in vehicle roll when cornering and a decrease in controllability when cornering;
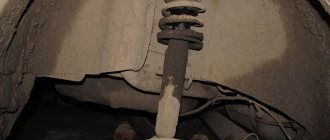
- the appearance of play on the stabilizer. Play can be easily detected by placing the car in an inspection hole and simply shaking the stabilizer bar up and down;
- destruction of bushings. The play mentioned above is almost always accompanied by the destruction of rubber bushings. They are squeezed out of their eyes, crack and completely cease to perform their functions.
All of the above things indicate only one thing: it’s time to repair the stabilizer. In the vast majority of cases, repairing the rear stabilizer comes down to replacing damaged bushings, since the fasteners and rod rarely need repairs. Such a need may arise only in the event of serious mechanical damage, when the driver caught a large stone or curb with the stabilizer, for example.
How should the stabilizer be positioned?
A properly installed stabilizer should be able to twist under the influence of forces on the wheels, and it should do this even when the forces applied to the right and left wheels are directed at completely different angles.
That is, stabilizers on passenger cars should never be directly welded to the frame; between the frame and the wheel mount there must always be some kind of intermediate link responsible for compensating for multidirectional forces. In the case of the VAZ 2107, such a link is dense rubber bushings, without which it is strictly not recommended to operate the stabilizer.
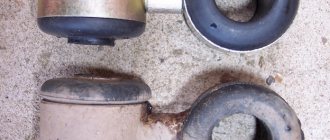
Why does the stabilizer bushing squeeze out?
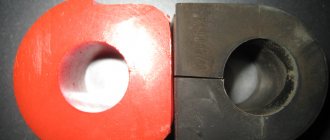
As mentioned above, the bushings on the stabilizer serve to compensate for the forces on the wheels. These efforts can reach enormous values, especially when the car enters a sharp turn. Rubber, even of very high quality, systematically subjected to enormous alternating loads, inevitably becomes unusable. Severe frosts and reagents that are used to sprinkle roads in our country during icy conditions also contribute to the destruction of bushings.
It usually starts with cracking of the bushing surface. If the driver does not notice the problem in time, the cracks become deeper and the bushing gradually loses its rigidity. At the next sharp turn, this cracked bushing is squeezed out of the eye and does not return back to it, since the elasticity of the part is completely lost. After this, play appears on the stabilizer bar, the driver hears a creaking and grinding sound when entering a turn, and the car’s controllability decreases sharply.
About double stabilizers
Double stabilizers are installed only on the front wheels of the VAZ 2107. As the name suggests, there are already two bars in this device. They have the same C-shape and are located approximately four centimeters from each other. The mounting lugs in the double stabilizers are also paired. Otherwise, this design does not have any fundamental differences from the rear stabilizer.
Why use two bars instead of one? The answer is obvious: to increase the overall stiffness of the suspension. The double front stabilizer copes with this task perfectly. But one cannot fail to note the problems that arise after its installation. The fact is that the front suspension on the classic “seven” is initially independent, that is, the position of one wheel does not in any way affect the position of the second. After installing a double stabilizer, this situation will change and the suspension will turn from independent to semi-independent: its working stroke will be significantly reduced, and in general the control of the car will become tougher.
Of course, the roll when entering turns with a double stabilizer will be reduced. But the driver should think: is he really ready to sacrifice personal comfort and cross-country ability of the car for the sake of its stability? And only after answering this question can you start working.
The reality associated with the front stabilizer tuned
By installing a front suspension stabilizer, you will not only not improve the car’s behavior, but, on the contrary, reduce its level of comfort.
The fact is that the front suspension of classic Zhiguli models is independent. A reinforced stabilizer, or double stabilizer, which gives greater rigidity compared to the factory one, makes the suspension not independent, but semi-independent, or even dependent. Let us explain: in an independent suspension, a change in the position angle of, for example, the left wheel does not affect the position of the right one. In a dependent suspension, a change in the position of any of the wheels is reflected in the position of the wheel located on the opposite side. Simply put, by installing a double front stabilizer on a classic, you significantly worsen the performance of the suspension and limit its operation. Not only will the car become much stiffer, but its cross-country ability will also decrease.
Of course, the stabilizer will reduce the roll of the car, but again, you will have to sacrifice the comfort and maneuverability of the car for this. Is the game worth the candle?
Dismantling with popular foreign cars
- wrenches, sockets;
- penetrating lubricant type "VD".
We begin work from the inspection hole.
- Jack up the car and remove the front wheels.
- We treat threaded connections with liquid lubricant “VD”.
- We unscrew the nuts of the lateral stability bar rods and remove the rods, simultaneously assessing their condition.
- Unfasten the steering rack and move it slightly to the side.
- Disconnect the interfering engine mount.
- Unscrew the fastenings of the U-shaped subframe.
- We unscrew the bolts on the brackets of our defective parts.
- We are replacing stabilizer bushings from Megan 2.
- We do the assembly, moving backwards point by point.
Also read about replacing the VAZ 2110 clutch cable and replacing the Ford Focus 2 clutch master cylinder.
When replacing stabilizer elements on a Renault Duster, you initially only need to remove the plastic shields from under the arches, after which you can immediately unscrew the brackets of our gaskets.
Access to the described units is just as easy for the popular German. When carrying out work on a Volkswagen Polo sedan, you don’t even need to remove the plastic shields - they are not here. The spacer mounts are easily accessible from the side when the wheels are removed.
Now let’s look at changing the stabilizer bushings for the Kia Sid. For this repair you will need:
- spanners;
- ratchet heads;
- penetrating lubricant.
We also begin work from the inspection hole.
- Here, too, everything is much simpler. The bracket bolts are easier to reach. We only remove the crankcase protection.
- We treat threaded connections with penetrating lubricant.
- Unscrew the lower and upper bolts of one bracket.
- Unscrew the lower and upper bolts of the second bracket.
- We separate the unscrewed staples, move them and take out the leaky rubber (or polyurethane) tabs. We install new spare parts.
- Let's put everything back together.
Here we add that changing the stabilizer bushings on the Mitsubishi Lancer 9 is done in a similar way. Moreover, on this car on the right you don’t even have to remove the wheel if you have a long wrench with a “12” head on hand. Next, let's see how the replacement is carried out on a Mazda 6. It is necessary to prepare the following tools before repairing:
- spanners;
- ratchet heads;
- penetrating lubricant.
We also start from the inspection hole.
- Remove the front wheels by lifting the car.
- Spray the threaded connections with penetrating aerosol.
- We unscrew the rear fastenings of the subframe, and then lower this part of the part.
- Unfasten the steering rack, then move it slightly.
- Now unscrew the bolts of the brackets of the faulty elements.
- We are replacing the bushings on the front stabilizer.
- We do the assembly in reverse order.
This concludes the procedure. It should be added that, for example, in the Tiguan, when replacing stabilizer elements, part of the subframe is also lowered.
What to do with other popular cars
- wrenches and socket wrenches;
- penetrating aerosol.
As you can see, the technology is simple. By the way, when replacing defective elements of the rear stabilizer of this car, you don’t even need to jack up the rear part. It is even easier to perform a similar operation there.
Now let’s figure out how to replace bushings on a Chevrolet Lacetti. We should prepare:
- wrenches and socket wrenches;
- penetrating aerosol.
- Jack up and remove the front wheels.
- We treat all threaded connections with a penetrating aerosol and wait a few minutes.
- We dismantle the rods by unscrewing two of their fastenings - if they do not give in, you can tap the key with a hammer.
- Next, we proceed to unscrew the rod mounts. One of the bracket bolts gives in from the inspection hole. But the second one can be unscrewed from above, through the engine compartment, using several extensions and a socket. Otherwise, if you abandon this method, you will have to dismantle the beam.
- We do the same with the second gasket bracket.
- Next, we replace these stabilizer bar bushings.
- When we attach the parts back, it is better to immediately install new rods so as not to have to deal with these units again after a short run.
This is where the procedure ends.
Sequence of work
- The car is securely fixed when jacked up.
- The wheels are unscrewed and removed. There is an engine protection shield in the right wheel arch. Its fastenings are unscrewed and the shield is removed.
- Most of the fasteners under the bottom are pretty acidic, so to speed up the process of replacing stabilizer bushings, they need to be thoroughly treated with a WD 40 solution, which removes corrosion.
- Using an open-end wrench, we fix the finger on the left post. It is slightly hidden from direct access, so you need to find the grooves almost by touch.
- We throw a spanner, preferably a ratchet, onto the nut that secures the shock absorber. Unscrew both fasteners.
- Having freed the stabilizer struts from their fastenings, we disconnect them from the shock absorber strut.
- We install a jack under the left rear part of the subframe. With its help, the subframe is fixed so that when the fasteners are removed, it does not suddenly jump off the studs. A metal plate of considerable size must be placed under the supporting head of the jack so as not to deform the subframe.
- Smoothly lower the jack a few centimeters from the body. Thanks to this, the subframe also lowers slightly, opening access to the bushings.
- A pipe is inserted into the resulting gap, and the subframe is further pressed down. A stopper is inserted into the resulting gap. A 27mm head is suitable; when installing it between the body and the subframe washer, it is better to use pliers. This will save your hand from injury if the pipe slips off the subframe washer.
- We generously water the bracket fastenings with WD-40. We unscrew the bolts gradually, without pressing too much.
- Remove the freed bracket from the bushing, and then remove the bushing itself.
- We install the bushing from the new kit. The cut on the part should be directed strictly back. We position the new part exactly in the place of the old one.
- Install a clamp over the bushing. Lightly tighten the fasteners with your fingers, and then tighten them with a wrench, tightening all the bolts one by one and evenly.
- The stopper, for which the key head was used, is removed. The subframe is lifted by hand and screwed to the body.
- All of these steps are performed in the same way with respect to the second clamp.
- Once the bushings are in place, both posts are screwed into place.
When performing the above work, you should be careful and pay attention to safety precautions. In general, such work can be done with your own hands.
Naturally, the design of different car brands differs significantly, so the replacement instructions are rather of a general recommendation nature. For more detailed information, a series of videos on carrying out this type of repair for various brands of cars is presented.
Video on replacing stabilizer bushings for Ford Explorer:
Video Chevrolet Aveo 3 - split bushings used in this model make the repair process quick and easy.
Nissan X-Trail Video:
Video explaining workflows for Renault Logan: