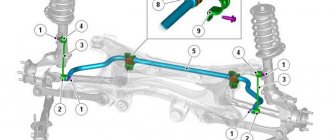
Stabilizers are responsible for the vehicle's stability on the road. To eliminate noise and vibration from the operation of stabilizer components, special bushings are used - elastic elements that make operation smooth.
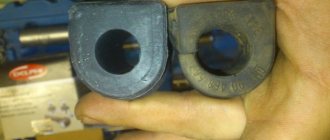
What is a sleeve? The flexible part is made of rubber or polyurethane. Its shape is almost the same for different car models, but sometimes it has some features depending on the design of the stabilizer. To improve performance, bushings are sometimes equipped with wedges and grooves. They strengthen the structure and allow parts to last longer, and also protect them from mechanical influences that can damage them.
What are bushings and why are they needed?
The main task of bushings is to reduce the noise of the suspension when driving and attach the stabilizer to the car body. As a rule, they are made from two materials: polyurethane and rubber. The parts have high elasticity and strength, which is why there are no squeaks or knocks when the height of any of the wheels changes. In addition, it is impossible to rigidly attach the stabilizer to the body, since the distance from the attachment point to the edge of the stabilizer changes when bending.
Often, a faulty bushing can be indicated by various sounds that occur when driving and making sharp turns - squeaks, knocks, and so on. This phenomenon is associated with the loss of elasticity of the bushing, as a result of which it becomes very rigid. Dust or sand may also accumulate under this part.
Stabilizer design features
In the field of mechanical engineering, the stabilizer appeared along with the first cars whose maximum speed exceeded 20 km/h. Due to the large rolls that occur when turning, there was a need to install this component. The main purpose of the stabilizer is to protect the vehicle from rollover, since during a turn the load on the outer wheels increases, and on the inside, on the contrary, decreases. This causes the car to rock. The stabilizer makes it more stable on the road, preventing it from turning over.
Stabilizer bushings. Signs of malfunction. Consequences.
For the best damping of vibration and force impacts on the car body, the vast majority of suspension elements are connected by means of elastic elements. The same applies to the stabilizer. To secure it, special bushings (rubber bands, cushions) made of durable rubber or polyurethane are used. Over time, as the vehicle is used, these bushings may begin to deteriorate and noticeably lose their elasticity. The result of this is unsatisfactory operation of the stabilizer =. More serious defects may begin to appear, which will only grow faster over time.
The first symptom indicating replacement of the bushings will be a slight knocking sound from the suspension. A similar knock can be observed with “tired” shock absorbers. Only in the case of bushings it will be heard not only on potholes and potholes, but also when entering relatively sharp turns. At the same time, the car often feels excessively rolly and sluggish. The knocking sound that appears will be a consequence of play that has arisen in the connecting nodes of the stabilizer arms due to worn bushings.
If measures are not taken in time, the knocking will only intensify in the future and will begin to accompany the operation of the suspension everywhere due to increasing deformation and destruction of the bushings. Body roll and excessive play in the steering wheel may occur. The car may “yaw” not only when turning, but also when braking or changing lanes. Most car manufacturers recommend changing stabilizer bushings every 30–40 thousand mileage. However, in our conditions it is better to focus on bushing wear. Therefore, a sudden knocking sound and slight rattling in corners will be clear signs of an impending component replacement.
As a popular method of checking the bushings for serviceability, it is proposed to drive the speed bump diagonally in 2nd gear. A dull knock appeared in the area of the pedals - most likely due to the hub bushings. You can also just crawl under the car and inspect everything yourself. A worn bushing will be pleased with the presence of cracks and abrasions characteristic of worn and cracked rubber. Auto mechanics sometimes also call these cracks “daisies.”
Also, the rubber of the bushings can simply harden and lose the necessary elasticity. If you can’t get a good look at the stabilizer bushings, just swing your hand strongly up and down and to the sides on the stabilizer itself. If you feel play, creaks and knocks in the lower part of the suspension, it means that the bushings have become unusable.
But for the best results, it is, of course, better to drive onto an overpass, an inspection hole, or use a lift. The only tools you will need are a crowbar or a mounting spade, which you simply need to rest against the bottom of the car and slightly “shake” the stabilizer where it connects to the body. If you feel noticeable play or loss of elasticity, then it’s time to think about replacing the bushings.
Stabilizer bushings - description and main faults
By means of bushings, the anti-roll bar is mounted - a unit responsible for the position of the car, eliminating or reducing body roll during braking and cornering and, thereby, avoiding extreme loads on the chassis. Elastic fastening is necessary so that the stabilizer has the ability to twist, and therefore perform its function correctly. However, during operation, the bushings sag and wear out, and play occurs, which eliminates the purpose of the part.
SIGNS OF FAULTY STABILIZER BUSHINGS
In regions where the quality of the road surface leaves much to be desired, stabilizer bushings (like other suspension elements) become consumables. On average, they fail after about 30,000 km, or 2-3 years of operation. You can determine that a part needs to be replaced by the following symptoms:
- knocking (even light) in the suspension on uneven surfaces and when cornering;
- vibrations and beating that radiate to the steering wheel;
- deterioration in controllability, pulling to the side;
- violation of stability, increased roll in turns.
However, the same symptoms are also typical for other malfunctions: in particular, deviation of the car from straight-line motion can occur due to a wheel alignment disorder, or even due to insufficient pressure in one of the wheels, and the cause of knocking in the suspension may be shock absorbers or other nodes.
To make sure that it is the stabilizer bushings that are to blame, you can do a small test. At low speed, about 20 km/h, drive diagonally over an artificial hump (the so-called “speed bump”). If you feel a dull knock in the area of the pedal assembly, the bushings are probably out of order.
A more reliable method is diagnostics on an inspection hole, overpass or lift. Control is carried out in two stages:
- Visual inspection, during which the bushings are diagnosed for physical damage: cracks, rubber abrasions, torn edges.
- Diagnostics using a crowbar (“mounter”). While resting it on the bottom of the car near the attachment point (a clamp with a bushing inside it), the stabilizer must be rocked. Plays, creaks, metallic sounds or loss of elasticity will definitely indicate the need to replace the stabilizer bushings.
Often, along with the bushings, other suspension elements also fail - stabilizer struts, ball joints, tie rod ends, silent blocks. Therefore, during inspection, you should not limit yourself to checking the stabilizer bushings alone; it is advisable to carry out a comprehensive diagnosis.
REPLACING STABILIZER BUSHINGS
For most cars, the cost of bushings is low; replacing them does not require special tools, which makes it possible to think that a person without special auto mechanic skills can handle the job. However, depending on the design or equipment of the vehicle, the following nuances are likely to complicate the replacement process.
- The need to dismantle other components. In order to get to the stabilizer bushing mounts, you often have to remove the engine protection, fender liners (“lockers”) and/or wheels. This is especially true for the front of the car.
- Keeping the vehicle raised. The work of replacing stabilizer bushings involves the use of quite a lot of force, so the car must be securely fastened. In the absence of an inspection hole or lift, in a garage or on an overpass (especially with the wheels removed), it is very difficult to ensure the safety of people under the car.
- Sticking of fasteners. The bolts securing the clamps of the stabilizer bushings are constantly in contact with an aggressive environment (water and reagents flying from the road), so they often rust and stop unscrewing. It is necessary to think in advance about the availability and possibility of using a cutting tool.
- Difficulty fitting new bushings. The fresh elastic material of the new parts differs in both properties and size from the old one. Problems may arise both with the installation of the bushing on the stabilizer, and with the subsequent installation and fastening of the clamp.
In addition, there is a real situation when, after replacing the bushings, some symptoms of a malfunction - primarily squeaking - may not disappear. This may indicate that the parts need grinding in (usually 200-300 km is enough), or that the material of the bushings is of poor quality or errors during installation: dirt or dust getting under the bushing or insufficient tightening of the clamps.
Therefore, in order to avoid problems and alterations, it is better to entrust this simple, therefore inexpensive procedure to professionals - for example, specialists from any service station in the Wilgood smart car service network.
HOW TO CHOOSE BUSHINGS
In principle, the selection of stabilizer bushings is made in the same way as other spare parts - according to the model and configuration of the car, based on its VIN code. However, some owners (mainly of budget cars), believing that the distribution network initially offers low-quality parts for their cars, resort to tricks. Taking advantage of the fact that the configuration and diameter of stabilizer bushings are often the same among completely different manufacturers, spare parts are used for expensive models that have higher wear resistance of the material and also have other advantages: for example, a fabric base for the mounting hole.
Another way to extend bushing replacement intervals is to use polyurethane products. Compared to traditional rubber, polyurethane has both significant advantages and disadvantages, which are not always discussed by its manufacturers and sellers.
The advantages include:
- Durability. When installed correctly, the service life of polyurethane bushings can be several times greater than the parameters of “stock” factory parts.
- Heat resistance. Polyurethane tolerates cold, heat, and temperature changes better.
- Chemical resistance. Polyurethane products are not affected by aggressive environments, from water and reagents to oil.
Polyurethane has one disadvantage - rigidity. And this affects not only the complexity of installing such parts. A stabilizer fixed with incorrectly selected polyurethane bushings does not provide the suspension with the necessary elasticity, as designed by the manufacturer. You can often feel this while driving - the car becomes stiffer.
But comfort is only the visible part of the problem. Due to insufficient twisting of the stabilizer, unwanted vibrations are transmitted to the body, as a result of which its structure, primarily welding seams, receives additional stress and wears out faster. Thus, minor savings on bushings and the cost of replacing them can lead to serious problems. This applies not only to polyurethane bushings, but also to all non-standard bushings. Their use is possible only if they are completely identical in rigidity to their factory counterparts.
Benefits of timely replacement
Every driver can cope with replacing bushings on his car, because this process is not a very complicated repair. You can do everything yourself, but if you don’t have the time or desire, then it is advisable to seek help from specialists. This will protect the stabilizer bar links from premature wear.
Driving on poor-quality road surfaces will fade into the background if you have previously installed new bushings. And in general, installed new bushings mean the absence of difficulties and problems when moving, as well as comfort and safety.
Replacing the Kia stabilizer bushing
Replacing the Kia stabilizer bushings involves the following algorithm: • Raise the front of the car and remove the wheels. Find the steering shaft and make a mark (for easy further installation in the original place), remove the mounting bolt. • Using a jack, lift the gearbox, unscrew the rear cushion and subframe. • To simplify access to the rear cushions, four bolts are removed to secure the subframe. • Raise the front part of the subframe using a jack. • Remove the fastening and treat it with an oil solution to prevent the development of corrosion processes on the metal. • Screw them into place only four to five turns.
This is done crosswise to provide additional security and uniform tightening of the plane. • Loosen the jack to a level where you can reach the bushing bolts. • The bushing on the right side can be easily unscrewed through the engine compartment, and on the left side - from below. • Insert staples. This procedure is carried out in a careful manner so as not to damage the clamp on the steering boot. • The process is repeated in reverse order. The peculiarity of the Kia Sid car is that the steering shaft has a telescopic appearance, and therefore its installation occurs at the last moment.
How to replace SPU bushings
Pillows on SPU are classified as “consumables”. And every car owner who knows how to hold a wrench in his hands will be able to change them himself.
When to change stabilizer bushings
Automakers recommend changing these parts every 30-35 thousand kilometers. But everything is ambiguous and individual. The replacement period depends on the following factors:
- technical condition of the vehicle chassis;
- the quality of the roads on which the car owner drives. A city dweller, who has a smooth, asphalt highway at his disposal, always travels longer than a villager who drives along dirt roads and “slumpy” broken roads in the fall;
- driving habits. Reckless drivers wear out faster not only the cushions on the stabilizers, but also other components of the chassis;
- the quality of the consumables themselves.
35 thousand kilometers is the ceiling, after which it is advisable to replace the airbags no matter what. But, if they began to collapse after 10-15 thousand kilometers, then, of course, you should not exhaust your car by driving the recommended 30 thousand. They are changed immediately.
How to understand that the bushings have exhausted their service life
The following signs indicate that the pillows are worn out:
- knocking when turning and driving over potholes and potholes;
- you can feel the car's rolliness.
To make sure that the airbags are being destroyed, you need to drive into a hole or lift the car on a lift, and look under the bottom of the body. Cracks and abrasions on them are noticeable upon visual inspection. If you shake the stabilizer at the same time, you will feel a clear play.
In winter, rubber parts harden and quickly lose their plasticity if the car is parked on the street or in an unheated garage. Rubber is sensitive to low temperatures, and parts that have lost their plasticity and become hardened are destroyed faster. In defense of polyurethane, we can say that this material is not afraid of frost, unlike rubber.
How to replace bushings yourself
Replacement of stabilizer bushings is carried out more often in the pit. But it is better to do this on a lift, because in a pit the car will have to be jacked up. Work algorithm:
- Remove the wheels by first unscrewing the nuts on them from the side where the SPU cushions are to be changed.
- Unscrew the nuts connecting the stabilizer to the rods and separate these parts.
- Unscrew the bolts securing the bushing clamps and remove them.
- Remove the bushings themselves from the rod.
- Clean the bar from adhering dirt and clay.
- It is advisable to treat the threads and bolts with WD-40 to prevent these surfaces from souring.
- Place the new parts on the rod, put clamps on top of them and secure them with bolts to the beam.
- Reinstall the rods and wheels. In general, perform the steps in reverse order.
The rear stabilizer bushings wear out less than the front ones. This is due to the fact that when the vehicle turns, the load on the front wheels is greater. Front airbags are also more difficult to change because the bolts that hold the clamps in place can be difficult to get to. And if the owner has coped with the front consumables, then replacing the rear ones will not be difficult. The work is done in the same way.
The following types of bushings exist:
1. Spherical (or “iron”) bushing. The design resembles a ball joint;
2. Rubber bushing.
Today, polyurethane type stabilizer bushings are becoming increasingly popular. They are quite easy to replace, which is an important advantage, and they also have good operating characteristics. Experienced drivers can safely say that these are the parts that are most convenient.
If a malfunction occurs in the area of the stabilizer bushing , it must be replaced without fail. Otherwise, this can have a very bad effect on the performance and handling of the vehicle. When the bushing is deformed or cracks appear on it, some noise may appear in the area of the car suspension (mainly when the car hits an obstacle or increases speed). In principle, problems in the suspension area are identified precisely by such noise.
In order to make sure that it is necessary to replace the bushings, periodically it is necessary to carry out diagnostics of the suspension, after which the malfunction will be identified or prevented.
In the event that it is determined that it is necessary to replace the stabilizer bushing, this can be done independently. Moreover, there is nothing complicated about it and the procedure is very simple. First, the bolts with which the clamp is attached are unscrewed. Then the stabilizer is moved to the side and the old parts are removed. Well, for the final action, the new part is installed very carefully.
It is according to this scheme that both the front stabilizer and the rear stabilizer are replaced . After replacing spare parts, driving a car will be much more pleasant and comfortable, and various kinds of road obstacles will be overcome without any difficulties. Among other things, the new elements will maximize the performance of the racks.
As you know, the anti-roll bar allows you to avoid extreme loads on individual parts of the chassis. To put it simply, the stability of the car on the road directly depends on its operation, and the stabilizer also prevents the body from tilting too much when cornering. In this case, the stabilizer is connected to other parts through stabilizer struts.
Also, to reduce noise and absorb vibrations that arise during the operation of the stabilizer, the design uses special elastic stabilizer bushings (made of rubber and in everyday life called stabilizer rubber). Next, we will look at what a stabilizer bushing is, how it is designed and works, as well as how to check stabilizer bushings and how to replace the bushing.
Read in this article
Replacing front bushings
This procedure can be performed in two ways: jack up one side of the car or two. The second method is considered more labor-intensive, but many motorists prefer it. In addition, with both sides of the machine raised, installation and removal of the bushings will be much easier. The main thing is safety precautions and following the step-by-step instructions given below.
Step 1: First, buy replacement parts. You can take the original or an analogue - it depends on your preferences and financial capabilities. Although even if you choose the original, you will have to pay no more than 400 rubles for the parts.
Try not to save money when choosing new bushings
Step 2. Having installed the wheel chocks, jack up the car. Then unscrew the bushing bracket mounting bolt. To do this, you will need a 12mm wrench. If the bolt does not turn, then treat it with WD-40 or, as this product is popularly called, “Vedeshka”. After 5-10 minutes, the fastening element can be easily unscrewed.
If the bolt is very rusty, then you will have to use a grinder
Step 3. After the fastening bolts are unscrewed, bend the retaining bracket slightly upward. It is very difficult to do this with bare hands, so use a screwdriver and slightly pry the outer part of the bracket with it.
Bend the fixing bracket
Step 4: Carefully remove the bushing. There is no need to use any tools for this; the bushing can be easily removed as is. After removal, inspect the part for damage, signs of wear, or cracks.
Removing the stabilizer bushing
Step 5: Place the new bushing in place and lower the retaining bracket onto it. Before doing this, it is advisable to treat the surface of the bushing with a small amount of graphite lubricant so that the bracket is installed on the rubber band without problems. After this, tighten the mounting bolt, being careful not to strip the thread. Otherwise, you will have a few more worries.
Place the bushing in its place
Front stabilizer bushings and building: what you need to know
First of all, the stabilizer bushing is a part molded from rubber or polyurethane. As a rule, the shape is often very similar for different cars. It should also be noted that to increase the service life and reliability, the stub bushings have grooves and bosses. These modifications made it possible to protect the bushings from mechanical damage.
The product is simple, but its functions are quite important. Not only comfort, but also the quality of operation of the stabilizer itself depends on the condition of the bushings. For this reason, it must be taken into account that any defects in the bushings are grounds for their replacement.
As a rule, replacement is required every 30-40 thousand km. mileage or 5-6 years. At the same time, experts recommend replacing all bushings in one go, that is, even if only one element has failed. During inspection, it is important to clean the bushings from dirt in order not to miss defects and to increase the service life of the part in the event that replacement is not currently required.
Replacement is also needed when the following symptoms appear:
- the steering wheel feels loose when cornering, and there is a wobble on the steering wheel;
- the body tilts strongly, when tilting you can hear clicks, tapping, and squeaks;
- the suspension vibrates, extraneous noise is heard
- the car began to pull when driving in a straight line;
- a clear loss of stability is noticeable, the car does not hold the road;
We also note that the creaking of stabilizer bushings, although not an acute and dangerous problem, greatly impairs the operating comfort of the vehicle. For this reason, it is also practiced to replace the bushings if the stabilizer bushings are held together.
When is the transverse stabilizer bushing replaced?
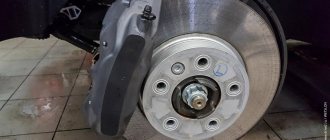
The degree of wear of the bushing can be determined during a routine inspection. Cracks, changes in the properties of rubber, the appearance of abrasions - all this indicates that the part needs to be changed . Typically, bushings are replaced every 30,000 km . Experienced owners advise changing all bushings at once, regardless of their external condition.
During a routine inspection, the bushings may become dirty. They should be cleaned of dirt so as not to provoke accelerated wear of the part.
Unscheduled replacement of bushings is necessary when the following symptoms occur:
- steering wheel play when the car turns;
- noticeable vibration of the steering wheel;
- body roll, accompanied by characteristic unusual sounds (clicks, squeaks);
- vibration in the car suspension, accompanied by extraneous noise;
- when driving in a straight line, the car pulls to the side;
- general instability.
Detection of such problems requires urgent diagnosis. Primary attention should be paid to the bushings. By replacing them, you can check the operation of the car, and if signs of malfunction remain, an additional inspection should be carried out.
Let's sum it up
As you can see, the rear stabilizer bushing or the front stabilizer bushing is a simple element both in terms of design and replacement. At the same time, the bushing of the stabilizer link and the bushing of the stabilizer itself are different, so it is important not to confuse these elements when selecting the necessary spare parts.
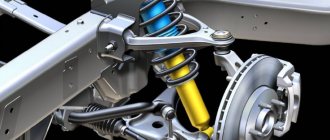
The vehicle suspension is one of the most important parts, subject to heavy loads and taking on all the impacts of a rough road. Thanks to its operation, the driver can feel comfortable and not be afraid that while driving the situation may get out of control. However, due to heavy loads, especially when driving on bad roads, which is not uncommon in the Russian Federation, its parts often fail. The most common problem is broken stabilizer bushings. Let's take a closer look at why this happens and how the stabilizer bushings are replaced.
What are stabilizer bushings used for?
The answer to the question: “Why are stabilizer bushings needed?” very simple. The main purpose of this car part is that it will influence the noise produced by the suspension while the vehicle is moving, reducing it. It is also used to attach the stabilizer to the body of your car.
A special feature of this part is its elasticity. Due to the fact that it is made of materials such as polyurethane or rubber, you will not hear any sounds when changing the height of the wheel. The choice of these materials allows you to attach the stabilizer to the body, despite the constant change in the distance between them that occurs during bending.
Note! The shape of the stabilizer is similar for most cars, but can be modified due to design features.
Why change stabilizer bushings?
If you do not take care of timely replacement of stabilizer bushings, the following will happen. When entering a turn or driving on a road with an uneven surface, the vibration of the suspension that occurs during these actions will not be dampened. The finishing of the stabilizer bar on the car will also worsen.
You can drive with such faults for quite a long time, but this will wear out the life of your suspension and the entire car much faster. In addition, the failure of stabilizers leads to the appearance of rather unpleasant noises.
How to identify signs of wear on stabilizer bushings?
The occurrence of the following malfunctions during vehicle operation will indicate a malfunction of the stabilizer bushings:
- The first warning sign when the bushing fails will be the appearance of noise and knocking in the suspension when the car is moving. The difference from faults with shock absorbers will be that the suspension will knock not only when passing uneven surfaces, but also when entering turns with a small radius. Moreover, the road surface in this case may be in good condition and not contain any unevenness;
- If you do not pay attention to the knocking sound in the suspension and continue to drive the car, the situation will begin to worsen. The noise in the suspension will increase and will be caused by any change in the position of the suspension. This will happen due to an increase in cracks and deformation of the stabilizer bushings;
- the next step will be the appearance of a large roll of the car when making turns with a small radius. The body will sway violently;
- In some cars, play in the steering wheel may occur. This is due to their design features;
- Further ignoring the situation will lead to the car's controllability deteriorating. The car may start to move from side to side when trying to make any maneuver.
Signs of wear
The task of every car owner will be to check the condition of the stabilizer bushing when potential signs of malfunction and wear appear.
There are several characteristic symptoms that may indicate that elastic elements have reached the end of their service life.
Experts identify the following signs of wear related to the stabilizer bar bushings:
- When the car is moving, an uncharacteristic knocking and noise appears. A car behaves in a similar way when there are problems with shock absorbers. But if these are bushings, then the noise will appear not only on uneven areas, but also when entering turns with a small radius. In this case, the coating can be completely smooth.
- If you ignore the previous symptom, the situation will gradually become more serious. Then obvious signs of malfunction will appear, and replacement of the stabilizer bushings will become mandatory in the near future. The noise from the suspension increases, and it appears with any impact on the stabilizer. This is due to the fact that the part is already severely deformed.
- At the next stage, there is a strong roll in small radius turns. The body actively sways even on a flat road.
- On some cars there is play in the steering wheel. This is explained by the design features of some steering units on cars.
- As a result, controllability will significantly decrease and the car will begin to skid in different directions during standard maneuvers.
The sooner you react to the situation, the better. This will minimize the consequences and reduce the costs of correcting the situation.
To make sure that the element is worn out and needs to be replaced, you can go to a car service center and carry out diagnostics.
If you don’t want to spend money on this, check it yourself:
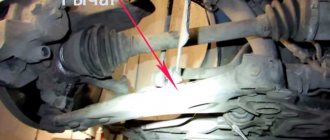
- Find a hole or overpass to inspect. Just don't use lifts or jacks. This is due to the fact that during testing you will need to rock the car and physically act on the stabilizer. While on a jack, the car may fall off. The consequences could be extremely serious. The pit and overpass will ensure maximum safety.
- Visually inspect the bushing carefully. Additionally, it is worth using a flashlight, looking at the part from all sides in good lighting. Over time, cracks appear on rubber and polyurethane, and tear points become noticeable. If this is present, replacement is needed.
- Additionally, swing the stabilizer, tug, pull in different directions. If such actions are accompanied by noise and squeaks, then the diagnosis is obvious. Need a replacement.
If you do not replace the elastic elements of the suspension in time, you can face serious and unpleasant consequences.
How to change stabilizer bushings?
Repair of rubber bushings is cheap and can be carried out at a service center with the help of experienced specialists. This procedure should not put a big dent in your budget. If you prefer to carry out repairs on your own or you do not have the opportunity to visit a service center in the near future, then you need to perform the following steps:
- drive the car to a pit or overpass. You can use a lift or jack, but these are less reliable and safe methods;
- loosen the wheel bolts next to which the faulty parts are located, and then remove them;
- the next step is to remove the nuts that secure the strut to the stabilizer. At the end of this procedure, disconnect the strut and stabilizer;
- Next, you should pay attention to the bracket mounting bolts. The rear ones need to be loosened and the front ones unscrewed;
- The next step is to remove dirt and clean the installation area for the new stabilizer bushings. Carry out this procedure carefully, because the service life of the new bushings will depend on the quality of its implementation;
- Lubricate the bushings on the inside. To do this, you can use silicone spray or regular soap solution;
- insert new bushings into their mounting location and return the vehicle to its original condition.
Note! Some car models, due to their design features, require removal of the crankcase protection.
The most difficult part is the process of replacing the front bushings of the vehicle. During its implementation, additional difficulties may arise due to the design features.
Stabilizer bushings and their replacement. When and how to change the bushings of the transverse and stabilizer links
If cars always drove in a straight line, and did not accelerate or brake, a stabilizer would not be needed at all. Its work begins every time the car tries to tilt.
Whether it's lateral roll when turning or longitudinal roll when braking, the stabilizer tries to keep the body parallel to the road surface.
And despite the elementary design, he does it well.
The stabilizer is just a rod connecting the subframe to the wheel mount (today we will talk about the MacPherson front suspension, so let’s put it more simply - with the suspension arm).
It should be noted that MacPherson really, really needs the use of a stabilizer, mainly due to some compromise in the design. The camber angle there is static, but during roll it changes due to the peculiarities of the suspension design.
Why is this bad? Because changing camber angles inevitably reduces the area of contact between the tire and the road. And the only way to avoid this phenomenon is to reduce the roll.
This is where the stabilizer, which works like a torsion bar, helps: with a lateral roll, the opposite ends, fixed in the levers, begin to move in different directions, twisting the middle part. The resulting moment prevents further relative movement of the wheels, reducing roll. As you can see, it works very simply.
But in order not to become a fan of the cult of the stabilizer, it is necessary to say a few words about its shortcomings. Firstly, the stabilizer willy-nilly reduces the suspension travel. Of course, this is not critical for a passenger car, but for an SUV it can be harmful.
This is a very dangerous misconception.
The first thing Kulibin will encounter with an arm-thick piece of iron in the front suspension is an unexpectedly easy drift due to an unhealthy imbalance of the grip of the front and rear wheels with the road (it will be insufficient for the rear wheels).
It must be understood that the engineers who developed the suspensions carefully calculated not only each of the suspensions, but also their joint work.
And if you incorrectly interfere with the operation of one of them, the overall controllability will decrease, although the roll, quite possibly, will become a little less.
So, what does the bushings have to do with it, and why change them? As I already said, the stabilizer must be able to twist from multidirectional forces on the right and left wheels.
If it is welded or rigidly attached to the subframe in any other way, it will be deprived of this opportunity, which is why it is attached to it using bushings.
Over time, they wear out, and the stabilizer begins to “walk” in them.
This play, like any other, increases the degrees of freedom of the part, which nullify all its ability to prevent roll. And then, when cornering, the car begins to lean on its side more than it should.
So, we have come to understand that bushings must be replaced periodically, and this is completely normal. Let's see how to do this.
What will you need?
What's great about this renovation is that it's inexpensive. And I would even say that there is no point in doing it with your own hands, no matter how skillful they may be. Therefore, let's go to the service center and just watch how a specialist does it.
You will need a minimum of tools: an 18 mm socket and a 10 mm wrench (or socket). But look at the wrench: why has life crippled it so much? In fact, what we have in front of us is not just a key, but the Modernized Special Tool of Alexey Teleshov, we will call it that.
Since we will be changing the bushings on Logan, we will have to take into account some of its features, so such a tricky key may come in handy. In addition, you will have to look for a lift, and quite possibly a hydraulic strut (we used it, in any case) along with an angle grinder. So, despite the apparent simplicity, everything is not so simple.
Now about the cost of spare parts. There is no point in chasing the original, there are very worthy manufacturers, especially since the bushing is a piece of elastic, and it is not so difficult to do something there. Therefore, we pay attention to two popular models: the French Sasic for 160 rubles and the Belgian Sidem for 180. We will choose Sasic.
We go into the box and get on the lift.
As usually happens with threaded connections at the bottom of the machine, they have all long since become covered with a layer of dirt and have become sour. Therefore, before starting work, it makes sense to pour WD40 on the bolts. We wait a little and pull out into the light that same key with a broken fate and try to unscrew the ten bolt from above (seen in the photo).
Naturally, this is as useless as asking a cat to quickly walk through an open door (if you have a cat, you will understand the futility of the plan).
But in this case, the design of the Logan suspension itself helps us: this bolt is usually simply cut off, because its purpose is unclear to anyone, even in the heavier and off-road Duster this unit is made simpler and a little more gentle (and the bolt has a smaller diameter).
Therefore, the specialist draws a mark with a white marker at which it will be necessary to cut off the ear of the clamp. Now it’s up to the “grinder”: cut off this ear and move to the other side.
Here the matter is complicated by the dangerous proximity of the clamp to the fuel pipes. They will have to be removed. This is easy to do: unscrew the nearest bolt protecting the oil pan, after which the tubes can be pulled out of the clamps and moved to the side.
To keep them out of the way, they can be secured with a hook made of any fairly stiff wire. But all this will have to be done only if the eye has to be cut off on this side as well - for some reason the bolt here came off easily.
Now remove the clamp. We unscrew the only fixing bolt with a head. Removing the clamp is not so easy, so we take the mounting bracket and hook it to the hole of this bolt. That's it, the clamp is in our hands.
Now, using the same installation, we remove the stabilizer from the subframe and take out the bushing. Just for fun, let's compare the new and old bushings. The part we just removed shows wear, but it is not critical yet.
A completely dead bushing has a well-defined ovality. But once we start making changes, we do the work until the end.
We take the assembly again and again move the stabilizer away from the subframe. We insert the sleeve, after which the mounting can be removed. To make it easier to install the clamp, we use grease (we used copper). We apply it to both the clamp and the bolt.
This is necessary so that, firstly, it is easier to put on the clamp, and secondly, it is easier to unscrew the bolt next time. It is not always possible to press the clamp into place by hand. I would even say that it always doesn’t work out.
If everything is assembled correctly (although what could be assembled incorrectly?), then the holes on the clamp and the subframe will coincide, and all we have to do is tighten the bolt and then tighten it to the end.
It happens that the clamp does not want to go into place. In this case, you should not try to pull it onto the bushing with excessive force: it can be damaged or deformed and simply tighten it crookedly.
It will turn out even worse than it was, because the stabilizer is equally contraindicated by excessive play and too tight a position, when it cannot work as a torsion bar.
Most likely, the problem is insufficient lubrication - without it, friction between the iron of the clamp and the rubber of the bushing will not allow the part to be installed correctly and without unnecessary effort. Add a little of it and everything will go much easier.
And now we repeat exactly the same operation on the other side, not forgetting to return the fuel pipes to their place and tighten the protection bolt if they still had to be removed. That's all.
What's the result?
In principle, there are no fundamental differences on other cars with MacPherson front suspension. And there is hardly anything difficult in this work, if not for the use of a lift and some other tools to deal with soured bolts.
Work in the service would cost 440 rubles per side. Inexpensive, but you can try to make it yourself. There is a beauty here: if something goes wrong, you can carefully drive to the service station without a stabilizer at all, and then everything will be put back together as expected. Well, maybe they will laugh, but this will happen in your absence.
It will be much worse to continue driving with broken or worn bushings. Even if there is no knocking at the bottom (and at first there will definitely be nothing knocking), the controllability will decrease, sometimes even to the point of disgrace. There is no point in bringing it to this point; every turn will be much more dangerous than it actually is.
For assistance in preparing the material, we thank the network of specialized stores and car services “Logan-Shop” (St. Petersburg, Shkolnaya St., 73/2, tel: 928-32-20)
Have you ever had a stabilizer bar?
What can cause stabilizer bushings to fail?
The main reason why these parts wear out is the strong impact on them during machine operation of the following factors:
- exposure to chemicals. It occurs due to its close location to the wheels of the car. During movement, various chemical compounds come into contact with the open parts of the bushings. The most dangerous of them are substances used in winter to remove ice on the road. They have a strong impact on the structure of the bushings, promoting their drying out and the appearance of cracks;
- strong mechanical impact. The quality of roads in each region differs from each other. However, even in the most favorable areas there are many trails whose quality leaves much to be desired. Accordingly, the more the car is used on roads with serious damage, the faster the strength of the parts is consumed. This happens due to the increase in friction that occurs when the suspension compensates for uneven road surfaces;
- the quality of the material from which the bushings are made. Typically, even the best rubber bushings have a relatively short service life. But most manufacturers install them on their cars. Therefore, when replacing old bushings with new ones, experts recommend using products made on the basis of polyurethane. These products have a significantly greater safety margin and will last you significantly longer.
What tools may be needed when replacing stabilizers yourself?
Performing this work will not require the driver to use high-tech devices. To do this you need to have the following tools:
- jack;
- extension for key;
- socket wrench for 10 and 13;
- ruler;
- socket heads for 13 and 14. Preferably elongated;
- ratchet wrench.
This is the minimum required set of tools, without which you definitely cannot carry out repairs. However, you may need an additional set. This need may arise when removing the fastening nuts. The fact is that during operation they can stick to the part. In this case, you may need a grinder or a hacksaw. You need to use these tools very carefully, because you can damage the stabilizer links. If this happens, then you will need to change them too.
What will you need for replacement?
You won't need many tools to do this job, but you will still need to prepare them ahead of time.
To replace stabilizer bushings you need:
- jack;
- ruler or caliper;
- special extension for the key;
- ratchet wrench;
- ring wrenches, one for 13, and the other for 10;
- extended socket heads or regular ones (14,13).
It is worth noting that this is only a basic set of tools; in fact, others may be needed. This is due to the need to unscrew the fastening nuts when removing the stabilizer. This is the whole problem, because with a regular wrench you will not be able to unscrew the fastening nuts (during operation they become stuck to the part). In this case, many resort to emergency measures - using a hacksaw or grinder. In the process of loosening the nuts, the stabilizer links may be damaged, so replacing the rubber bands alone will not do.