Purpose of valve guides
This element is the main one and the excellent performance of the “seat-valve plate” union directly depends on it.
The design of the part and the metal from which it is made are designed to ensure its operation at high speeds with regular temperature effects and limited access of lubricants to the space between the valve and the bushing.
Design and probable malfunctions of the valve mechanism
This element operates in the aggressive environment of internal combustion engines and is always subject to significant dynamic loads, significant speed conditions and heating. To reduce premature wear of the running elements of this part, materials alloyed with nickel and chromium are most often used in its manufacture. The composition includes two main elements:
- head;
- core part.
These automotive components can have heads of various shapes:
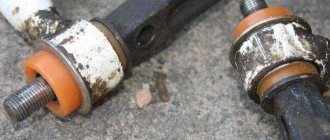
At the tip of the rod there are conical, shaped or cylindrical grooves that help fix the springs. The most likely sign of valve failure is a decrease in engine power and instability in operation. This is due to sticking and formation of gap areas. Another reason is the appearance of soot, which accumulates near the valve and does not allow it to close. Excessive emissions of exhaust fumes can also be considered a visible sign. If extraneous noise appears in the internal combustion engine, the rod parts and guides are worn out. Therefore, let’s look at how to replace valve seats with your own hands.
What causes valve bushings to wear out?
The above factors influence the fact that over time, the valve guides are subject to wear and their alignment with the valve tappet changes.
This leads to the guide being broken and the valve starting to dangle, which ultimately leads to damage to the seat chamfer. From this you can expect the valves to burn out and their seats to be replaced.
In addition, due to the “looseness” of the valve, when the guide is broken, the operation of the valve seals is disrupted. As a result, they do not retain oil due to valve misalignment.
The result is that lubricant gets into the cylinders, which leads to an increase in carbon deposits on the valves. The amount of harmful substances released into the exhaust system will also increase and the catalyst may fail prematurely. Accordingly, replacing the seals in such a situation will not correct it in any way.
What to use?
Such work involves the use of rough tools that are characterized by almost jeweler precision - countersinks and cutters. Such tools with narrow specifications are used exclusively for engine repairs.
A selection of cutters for valve seats is used for recessing the required diameter sizes. Such actions make it possible to give the plate maximum closing density.
Countersinks are used in the same way when repairing valve seats. But there is one difference - the countersink is used not only on mechanical, but also on power tools.
Instructions for diagnosing valve guides
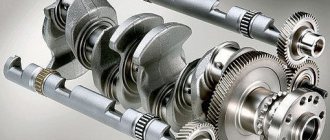
When an engine is repaired, in addition to updating the crankshaft, it is also necessary to repair the cylinder head.
- Because future compression in the cylinders also depends on it.
- Usually, during cylinder head repairs, car owners grind the valves and do not attach much importance to loose bushings.
- Since, when the gap between the valve pusher and the bushing exceeds the permissible parameters, then grinding in the valves will not give the desired result.
Completion of work
Before installing the valves, modify the internal holes in the bushings. To do this, let the block head cool completely. Try installing the valves - if they do not fit, use a reamer to enlarge the hole. Use the smallest size first. Be sure to test the valve after each pass.
You need to achieve maximum tightness of the valve fit in the bushing. When replacing VAZ-2112 valve guides, be sure to mark the position of the inlet and outlet holes. The inlet bushings are shorter than the outlet bushings, so it is impossible to confuse them during installation.
Source
Peculiarities
A considerable part of the parts have a special collar on the outside for their necessary vertical fixation in the head. In the case when the bushing is smooth, its installation is carried out with a special mandrel.
On intake valves, the parts in question must not protrude in order to avoid increasing the aerodynamics of the valve resistance. In the exhaust, the bushings must completely hide the valve post so that it is not exposed to high temperatures and heat is better removed from it.
How to profitably exchange a used car
To guarantee the legality of the used car exchange service and its objective cost, the purchase and sale process should be carried out at a trusted auto center. Here the client will be offered:
- Diagnostics of the old model, on the basis of which its cost will be determined;
- Selection of cars for exchange, completely new or with a clean mileage history: all cars undergo forensic examination, therefore the car dealership will never sell a car with a “dark past”;
- Legal support of the transaction: the client enters into a notarized agreement and, if necessary, can use the credit services of the car dealership’s partner bank;
- Efficiency of the service: the client does not need to look for buyers for his vehicle; he does not need to settle issues with the traffic police or the bank. The listed functions are the task of the auto center.
Thus, with minimal documents, it is possible to buy an improved car within one to three days. The used car exchange service makes it possible to regularly change the owner’s vehicle fleet by purchasing its best models.
Wear measurement
- Determination using a micrometer and bore gauge. They can be used to measure the inner diameter of the guides and the outer diameter of the valve lifter. By comparing these two values and calculating the difference, you can find out how much they correspond to the parameters necessary for normal operation. When measurements are taken, it is necessary to thoroughly clean the parts from dirt and carbon deposits.
- Detection of wear using a dial indicator. Using this tool, diameter readings are taken and if the obtained value is greater than the permissible value, a new valve is taken and a measurement is taken. If in this case the value is outside the limits, then these elements must be replaced.
Dismantling
In order to remove the bushings from their seats, it is necessary to heat the cylinder head to 100 degrees Celsius.
This is done because the head has a greater expansion coefficient and when heated, the tension between the bushings and the cylinder head will decrease, which will make it easy to knock them out of their seats using a hammer or sledgehammer.
During the dismantling process, it is recommended to use a special drift. It will give precision pressing without distortions. Those car enthusiasts who professionally carry out repairs purchase pneumatic hammers and special attachments for such procedures.
Saddle repair
Repair of valve seats is carried out when they are naturally worn out and the disc does not fit tightly to its seat.
In order to restore the geometry of the rings, valve seat cutters are used - a set of milling heads that allow making the necessary angles.
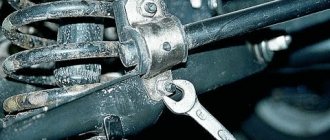
Roller cutters can be used in combination with special equipment. However, it is expensive. Therefore, at home, a ratchet wrench with an extension is used. Properly treated areas have angles of 30˚, 60˚ and 45˚. The processing of valve seats to create each of them is carried out with the appropriate cutter.
Grinding valve seats does not require heating or other processing. Grooving is done “dry”. In the future, at the time of lapping, it is necessary to use a special lapping paste. To achieve the best result, it is recommended that lapping on new seats be done by hand rather than using a drill. » alt=»»> Another type of repair is the grooving of seats for repair inserts. To do this, according to the algorithm described above, the saddles are removed, after which the places for them are ground with a special cutting tool. The size of the repair area should be 0.01-0.02 cm smaller than the insert. Installation is carried out after heating the cylinder head and cooling the mounted elements.
You can attempt to bore correctly yourself at your own peril and risk. However, taking into account the complexity of the procedure and the required high precision of work, it is better to carry out such manipulations in a qualified auto repair shop or auto repair plant.
Source
Installation
Initially, before installation, you need to know the parameters of the actual tension. To determine it, it is necessary to measure the diameter of the seat and the outer diameter of the sleeve.
- The difference in values between them should not be more than 0.03 - 0.05 millimeters.
- It follows from this that when the diameter of the sleeve is significantly smaller in contrast to the seat, it is necessary to select a product of a different size. Otherwise, you can increase the diameter of the socket on the drilling machine.
- Before installing the parts into the mounting socket, you need to warm up the cylinder head to the above-mentioned temperature. And before installation, it is advisable to cool them in liquid nitrogen to reduce their size, which will ensure their smooth pressing. This will also protect parts from unwanted damage during installation.
- If you don't have liquid nitrogen on hand, you can cool the parts in the freezer.
In addition, it is recommended to lubricate the parts with oil.
Installation of parts in place occurs in the same way as dismantling. The tool used is also the same. Afterwards, through a series of blows, the bushing is hammered into place.
Last stage of installation
Often valves are not included in new products. This is due to a decrease in their internal diameter after pressing. In order to correct the current situation, you need to apply sweeps.
- They are used in increments until the valve fits normally into the guide.
- Accordingly, you need to monitor the dimensions after using each scan.
- It is recommended to buy diamond-coated reamers, since ordinary steel ones very quickly lose their functionality.
Timely replacement saves a considerable amount of time and money.
Machining a new seat
The newly installed seat must be chamfered. It is best to do this on a specialized machine, so it can be processed most accurately. This is achieved thanks to rigid centering of the cutter, which cannot be achieved using hand cutters.
But if there is no such equipment in your area, roller cutters are all you can count on. If there is a metalworking shop nearby, you can try processing the valves on a milling machine, the result will be fine.
On the seat you need to cut three edges - the outer, the inner and on top of them the central, narrowest one, along which the seat will come into contact with the valve.
Didn't find the information you are looking for? on our forum.