Replacing the VAZ 2109 starter (2108, 2115, Kalina)
This article will discuss replacing the starter on a Kalina car. But due to the similar design of the engines, it is perfect for other cars of the VAZ family (2109, 2108, 2115, etc.).
Initially, on my car produced in 2007 (1118 1.6 8kl), a starter manufactured by BATE 2109-3708010-01 was installed. After 80,000 kilometers, it began to show itself and periodically refused to work - I turn the key, and in response there is silence, nothing clicks, nothing spins. But after applying physical force - tapping it a little with a key - it came to life and started working again.
An autopsy showed that the brushes were almost completely worn out, 90 percent. In this case, you could simply replace them with new ones, but I did not like the design of the starter itself. The permanent magnets are not glued to the body, installing them in place is sheer fun, there is no gearbox. And it was precisely because of the last reason that I decided to replace the starter with a new one - with a gearbox. In my opinion, a starter with a gearbox should turn the engine better in winter, because it was very difficult for the old one to do this.
I bought a starter from ATEK 2108-000.
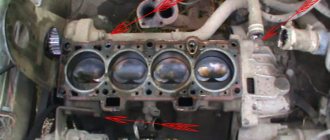
In order to remove the old starter you will have to remove the air filter.
Now you have excellent access to the starter itself. You need to disconnect two wires from the solenoid relay - one thin and one thick (constant + from the battery).
The starter is attached to the engine with three nuts, one of which is located at the bottom. It will be the most difficult to unscrew.
A bushing is pressed into the engine housing, which it is advisable to replace with a new one. I didn't do this because I thought it was still in pretty good condition. But getting it out is very problematic.
It is also advisable to clean everything from dirt. Lubricate the tip of the axle and the bendex gear a little. Now you can begin installing the new starter. And don't forget to connect all the wires in their places.
Before proceeding with the actual dismantling of the starter, it is imperative to disconnect the wire from the “-” terminal of the battery. At the same time, the procedure for removing the starter is not at all complicated, but rather inconvenient. It is best to carry out this work in a pit.
Work order:
1. The block with the wire is disconnected from the traction starter relay terminal.
2. Unscrew the fastening nut and remove the drive from the contact bolt of the traction relay.
3. The fastening bolts are unscrewed and the crankcase protection is removed.
4. At the bottom of the engine compartment there are two nuts that secure the starter - they need to be unscrewed.
5. At the top of the engine compartment, you need to unscrew another nut, with which the starter is attached.
6. The starter is removed from the VAZ car.
Perhaps that's all. The starter is installed based on this sequence of work only in reverse order.
Replacing the starter on a VAZ 2109 video bonus
The starter on a VAZ 2109 car is removed to replace or repair it. To carry out the work, prepare a standard set of tools, turn off the power to the car, and then drive it onto an inspection hole or overpass so that it is convenient to remove the lower engine protection. Perform the following sequence of actions:
First of all, it is necessary to disconnect all wires from the traction relay. Remove the block with wires from the relay connector, then unscrew the nuts and remove the high-voltage supply wire from the battery.
- Now you need to remove the engine crankcase protection; to do this, unscrew all the screws securing it around the perimeter and remove it.
- After that, immediately unscrew the two nuts securing the starter to the block from below.
Next, unscrew another nut from the top in the engine compartment and remove the starter.
At this point, the repair work to remove the starter on the VAZ 2109 car has been completed. Disassemble it and then repair it or completely replace it. Perform installation in reverse order. You must first lubricate the Bendix, namely its gear. Also carefully clean the traction relay terminals with sandpaper, since if they are heavily oxidized, a significant voltage drop in the circuit may occur and, as a result, the starter will not start well.
https://youtube.com/watch?v=DRhN3pF9UOE
Sources
- https://car-hobby.ru/zamena-startera-vaz-2109-2108-2115-kalina.html
- https://avtogury.ru/tyuning-dvigatelya/zamena-startera-na-vaz-21099-2109-2108-svoimi-rukami.html
- https://zubilovaz.ru/vaz-2109-kak-snyat-starter
The starter on a VAZ 2109 does not work, what should I do?
The design of starters on the VAZ 2109 has fairly good reliability indicators. But with use and over time, they still fail.
Appearance of the device
Design and operating principle
To understand the features of the repair, you must first study the design of the starter and understand how it works for the benefit of your car.
Let's start with the design. It includes four main nodes.
Knot
Peculiarities
It transmits direct current through four brushes
Freewheel with gear
A clutch or bendix drives the flywheel of your car's engine.
Serves to extend the bendix with gear when turning on the electrical appliance
Ensure easy rotation of the clutch, rotor, and gear. One bushing is located inside the starter, and the second is in the clutch housing.
Device diagram
Having familiarized yourself with the starter diagram, you can discuss the principle of its operation.
Typical faults
It is better to start diagnosing the starter even before you remove it.
After dismantling, some signs of failure, by which the source of the problems can be determined, can no longer be determined.
Signs of a faulty element include:
- An unusual noise occurs when the engine starts;
- Complete absence or slow rotation of the starter;
- Rotation occurs, but there is no gear engagement with the Bendix ring;
- The unit rotates with the bendix, but then the clutch breaks;
- Turning the key in the ignition, there is silence.
Checking the dismantled unit
Before blaming the starter for everything, take the time to look under the hood and check the condition of the terminal contacts and connectors. Also pay attention to whether everything is ok with the battery. Only after this can you start working on the starter.
Diagnostics
To carry out diagnostics, arm yourself with a conventional tester with voltmeter mode.
- Connect the battery terminals to the poles of your measuring device. You will need an assistant to drive.
- After connecting the terminals to the voltmeter, look at the readings of the device. If the battery is working properly, the data will be 11-13 V.
- Turn the ignition key and at this moment measure the voltage. If the losses are only 1-2 Volts, then the starter works normally and does not show resistance.
- If the voltmeter parameters decrease by 2 times or more, the reason is in the starter. Or rather its bushings or brushes.
- Remove the starter and check the relay. Connect the battery terminals to its terminals on the body and transfer it to 12 V. If the overrunning clutch moves in the front cover, then the relay works perfectly. If not, replace it.
Removal
Well, the check showed that the starter needs to be repaired. Therefore, the first thing we do is dismantle it.
- Secure the car stationary by turning on the handbrake and placing stoppers under the wheels.
- Move the negative terminal from the battery to the side. This will deprive your car of power.
- Disconnect the wire connector from the starter solenoid relay terminal.
- Unscrew the fastening nut from the relay contact bolt and remove the wire.
- If there is a crankcase guard, remove it. Here all the bolts are simply unscrewed.
- The 2 starter fixing nuts are unscrewed from the bottom of the engine compartment. But the third one is more conveniently removed from inside the engine compartment.
- Having removed the fasteners and disconnected the wiring, you can safely remove your starter from the clutch housing.
Before starting work, be sure to clean the device from accumulated dirt so that it does not get inside the structure and reduce all repair efforts to nothing.
Repair
Next, you have to check the condition one by one and take appropriate measures to eliminate problems with the following components of the starter:
- Brushes;
- Anchor;
- Overrunning clutch;
- Traction relay;
- Bushings.
Now let's talk about everything one by one.
Brushes
First, assess the current condition of the brushes. In most cases, they are the source of problems with the starter.
- Remove the pair of screws that hold the protective cover in place. The cover is now easy to remove.
- Use a screwdriver to remove the retaining ring from the shaft, and don’t forget about the adjusting washers.
- Unscrew 2 more tie rod nuts. Remove the manifold side cover.
- Use a screwdriver to press out the springs and remove the brushes from the holder.
- Measure the brushes with a caliper or ruler. If the height is less than 12 millimeters, the brushes must be replaced.
- It is also better to replace elements if there are chips, cracks and other defects on the surface.
Brushes
Anchor
If all is well with the brushes, the next suspect is the anchor.
- Remove the housing with the starter.
- At the anchor, look at the condition of the commutator, check whether the winding is intact.
- If there is carbon deposits on the collector or signs of breakdown, clean these areas with fine sandpaper.
- Check the armature and stator windings using a multimeter in ohmmeter mode.
Overrunning clutch
Parallel checking of the overrunning clutch with the armature will allow you to replace the latter at the same time.
To gain access to the clutch you will have to remove the armature from the front cover. At the same time, change it if necessary.
- Remove the retaining ring located near the overrunning clutch.
- Remove the restrictor ring.
- Remove the plastic lever stop, which will allow you to reach the anchor.
- Remove the intermediate support from the shaft.
- Check the condition of the gear teeth. If there are defects, the unit is replaced with a new one.
Bendix or overrunning clutch
Traction relay
Replacing the traction relay is necessary if, when voltage is applied to its terminals, the overrunning clutch does not extend. Sometimes the VAZ 2109 is equipped with collapsible relays. But it’s still better not to repair it, but to replace it with a new relay.
- To remove the relay, unscrew the two screws located on the front;
- Lift the relay, disconnect the armature from the lever;
- Remove the relay from the housing, grabbing the spring and armature. All elements are changed if necessary.
The design of the VAZ 2106 starter and the principle of its operation
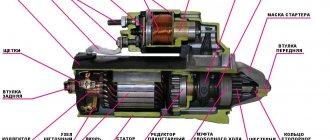
They were not equipped with a starter with index 35.3708, and the very first models ST-221 were gear type. Export models were equipped with German-made devices. The diagram of this, in fact, power electric motor is shown in the photo.
- Drive shaft.
- Cover sleeve.
- Restrictor ring.
- Gear with overrunning clutch ring.
- Overrunning clutch roller.
- Support with liner.
- Gear axis.
- Pad.
- Drive arm bracket.
- Lever arm.
- Front cover.
- Traction relay rotor.
- Stator.
- Retractor stator.
- Traction relay.
- Relay rod.
- Relay core.
- Contact plate.
- Lid.
- Bolts for contacts.
- Brush assembly output.
- Brace.
- Brush holder.
- Plus brush.
- Rotor shaft.
- Hairpin for tie.
- Back cover.
- Collector.
- Aluminium case.
- Magnet with constant field.
- Rotor core.
- Rotor shaft support.
- Planetary gear.
- Drive gear.
- Driven.
- Gear with teeth inside.
- Retraction ring.
- Hub.
The rated power is 1.3 kW, current is 500 Ampere and 550 A for ST-221 and 35.3708, respectively.
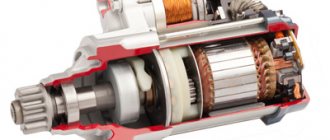
The starter is an aluminum housing that contains a copper stator winding, a rotor, two covers (front and rear) and an electromagnetic type relay on top. The body is connected to the covers using studs. The stator has three serial winding poles (connected in series with the rotor winding) and one shunt-type winding, which is connected in parallel.
The armature is a core on the shaft, a copper winding and a platform for graphite brushes, called a commutator. The clutch is designed to transmit torque from the Bendix to the flywheel, then the crankshaft begins to rotate and the engine starts. After starting, it also serves to break the connection between the flywheel and the bendix. A traction relay consists of two windings and a core.
Starter malfunctions
One of the components of a car's electrical equipment is the starter. Without it, no engine starts. But, like any other node, it tends to break. In order to avoid the extreme consequences of possible malfunctions, it is worth listening every time you start up in order to notice in time the first call signs of a possible breakdown. Almost every motorist can do this on his own, so you don’t have to buy a subscription to a service center for this purpose.
There are several starter malfunctions that will make it impossible to start the engine:
1.When the starter is turned on, the armature does not rotate and the traction relay does not operate. Externally, such a breakdown can be identified by a characteristic sticking sound. The causes of such a malfunction may be, for example, a complete discharge of the battery, oxidation of the pole terminals on the battery, weak tightening of the tips on the battery, a break in the wire or its disconnection from the starter to the traction relay, jamming of the armature and an interturn short circuit.
In this case, to establish a reliable cause, you will have to completely disassemble the starter, eliminating the easiest options from the possible causes.
2. When the starter is turned on, the armature does not work or rotates heavily, provided that the retractor relay works perfectly. Common reasons may be the usual burning of the commutator or a short circuit between its plates, wear of the brushes or their freezing, wear of the armature bushings, banal battery discharge or oxidation of the contacts, a break in the stator winding, displacement of the armature plates and a break in its winding, an interturn short circuit.
3. When the starter is turned on, rotation of the armature is observed, but there is no translational rotational movement at the crankshaft. The main reasons are a breakdown of the buffer ring or drive ring of the clutch, slipping of the clutch's free play, tight movement or jamming of the starter armature.
4.After the engine starts, the starter does not turn off. This occurs due to sticking of the drive lever or traction relay, sticking of the traction relay, breakage of the ignition switch return spring, or starter misalignment. In any case, if such a problem occurs, you must immediately turn off the ignition switch and disconnect the wire that leads directly to the starter relay.
5. The appearance of various unusual noises is explained by wear of the bearing bushings, loosening of the starter, breakage of the cover, damage to the teeth of the drive itself or the flywheel crown.
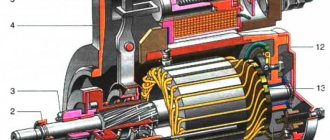
Starter 2108, device and purpose
Protective cap fixing screw (1), protective cap (2), retaining D-ring (3), rear cover fixing nut (4), rear cover (5), brush springs (6), brush guides (outer part) (7), brushes (8), stator (9), armature (10), drive lever (11), drive (12), restrictor ring (13), retaining ring (14), drive lever axis (15), traction relay mounting screws ( 16), front cover (17), cover O-ring (plastic) (18), tie rods (19), rubber plug (20), traction relay core (21), return spring (22), traction relay seal ring (23 ), traction relay (24), sealing washer (25), adjusting washers (26).
A starter is a device that is designed to convert electrical energy into mechanical energy in order to start the engine. Essentially, the starter is a DC electric motor.
Carrying out major repairs
The most vulnerable component in the entire device is the graphite brushes. The fact is that during operation of the mechanism they rub against the lamellas and heat up due to the current flowing through them. But there are many more nuances that should be taken into account during repairs. Here is a list of works:
- Replacing brushes is mandatory when carrying out repairs.
- Cleaning the lamellas on the rotor is mandatory. If they are destroyed, you will have to install a new rotor.
- Replacing the bronze bushing on the rear cover of the starter.
- Replacing the bendix is not necessary, but it is advisable to do so.
- Installing a new bushing in the internal combustion engine block (second rotor support point).
Please note that the bushings are also one of the conductors that transmits power to the rotor field winding.
To disassemble the VAZ 2109 starter you will need to perform several manipulations:
- Unscrew the cover bolts and remove it.
- Remove the solenoid relay.
- Using a “10” wrench, unscrew the nuts from both studs on the back cover.
- Using a screwdriver, unscrew the bolts securing the stator windings.
- Remove the locking bracket from the rotor and completely disassemble the mechanism.
That's all, a few simple manipulations and you have completed the task. Assembly is carried out in reverse order. Moreover, you need to focus your attention on the fact that one pin is insulated. After repairs, be sure to replace the bushing located in the engine block.
Do-it-yourself starter repair in a VAZ 2108
The starter of the VAZ 2108 car is the most frequently broken part
Therefore, it is important to be able to repair and replace it yourself, without resorting to the services of car services, it will be much cheaper. This simple action can be easily done by following the detailed instructions.
The main task of the starter is to convert mechanical energy into electrical energy in sufficient quantity to start the engine.
Starter VAZ 2108
Long-term operation of the starter is contraindicated, but car enthusiasts do this a lot, especially in low temperatures in winter. This use is one of the most common causes of VAZ 2108 starter failure.
The most common breakdowns are:
- The relay does not work and the armature does not turn;
- Low armature rotation speed;
- The crankshaft does not rotate;
- The starter continues to operate even though the engine has already started.
All these problems require repair. To carry out repair work, you will need to remove, check and disassemble the starter of the VAZ 2108.
How to remove the starter?
- Place the VAZ 2108 car on an inspection hole, overpass or on a jack;
- Place the gearbox in neutral;
- Remove the shield;
- Pull the hose out of the air collector;
- Remove the starter.
How to check the strater?
In order to check the windings you will need a multimeter.
- Place the part on its end, with the leads of the windings pointing upward;
- One probe of the device must be applied to the positive terminal, the other to the starter bolts;
- We check whether the starter turns or not;
- If it turns poorly, it means the starter is not working;
- If the starter is working well, you need to check the relay;
- To test the relay, pass a voltage of 12 V to the terminal, apply the minus to the body;
- If the ohmmeter does not show voltage surges on the scale, then the relay needs to be repaired or replaced. The VAZ 2108 relay needs to be disassembled only if it requires repairs.
Check the surface of the commutator and the armature, clean them of dirt with a cloth soaked in alcohol. There is no need to use acetone or other strong solvents for this purpose. The core and cage also need to be wiped dry and treated with a small amount of silicone grease.
How to disassemble the starter?
Prepare a free work surface and a set of tools. Inspect the VAZ 2108 starter carefully before you start disassembling it. Mark the wires so as not to mix them up during assembly.
Anchor VAZ 2108
- Using a 10mm wrench, unscrew the two stud nuts;
- Remove the starter and armature from the studs;
- Remove the center gear from the armature shaft;
- Unscrew the two screws of the back cover;
- Remove the back cover;
- Remove the brushes;
- Remove the anchor;
- Remove the adjusting washer from the armature axle;
- Remove the armature shaft support;
- Remove the drive planetary gears;
- Remove the drive;
- Separate the support from the lever;
- Place the end part of the ring gear on a block of wood;
- Place the 13 key on the restrictor ring according to the instructions;
- Use a hammer to compress the locking ring;
- Remove the locking ring;
- Remove the drive gear travel limiting ring;
- Remove the drive assembly;
- Unclench the retaining ring with pliers;
- Take it off;
- Remove the washer and drive shaft support;
- Remove the planetary gear ring gear from the drive shaft;
- Inspect the commutator and armature windings (there should be no traces of charring);
- Scratches on the commutator must be treated with fine-grained sandpaper;
- If the anchor is badly burned or worn out, it must be replaced with a new one;
- The shaft neck also needs to be treated with fine-grained sandpaper if scoring or enveloping of bearing materials is detected;
- Carry out a control measurement of the armature winding with an ohmmeter to detect short circuits;
- Check the brushes for wear, replace if necessary;
- Reassemble according to the instructions, but in reverse order;
- Before installing the brush holders, you need to remove all the springs and push the brushes into the guides.
This instruction will enable both beginners and experienced car enthusiasts to save money on starter repair and replacement services.
Features of the design and repair of the VAZ-2114 starter
In this short article we will try to understand in as much detail as possible how the starter is repaired on a VAZ-2114. This is a device that allows you to start the engine. A starter is an electric motor that spins the engine crankshaft. Due to its design, it engages with the crankshaft gear only after turning the ignition key. But what if suddenly nothing happens when you turn the key? This is exactly what we will look into.
Design
Where the starter is installed on the VAZ-2114, there are several more elements - an air filter, a thermostat, etc. Therefore, in order to gain free access to all components of the launch system, you will have to remove some parts. The starter design consists of the following components:
- Back cover.
- Bronze bushings.
- Copper-graphite brushes.
- Armature with winding (rotor).
- Stator with windings.
- Bendix - overrunning clutch, fork and gear.
- Gear starters have a planetary mechanism.
- Front cover.
- Solenoid relay.
Next, we proceed to describe the operation of the mechanism.
How does a starter work?
On VAZ-2114 cars, starters with a planetary gearbox are most often installed. They allow you to significantly increase the power applied to the flywheel crown. And the most important thing is that this design allows the use of a low power electric motor. The work occurs according to the following algorithm:
- When you turn the ignition key, voltage is supplied to the relay.
- The contacts are closed and voltage is applied to the solenoid relay.
- Under the influence of a magnetic field, the core is retracted and the power contacts are closed.
- In parallel with this, the gear on the bendix moves along the axis and is brought into engagement with the flywheel ring.
- Voltage is supplied to the windings of the electric motor, the rotor begins to rotate.
- And if there are no malfunctions, the car engine starts.
But it also happens that the VAZ-2114 does not start, but the starter turns. In this case, the breakdown must be looked for in the ignition system, timing drive, and fuel supply.
Typical breakdowns
If the starter on a VAZ-2114 does not turn, then the following faults may be present:
- The brushes are worn out.
- The battery is low.
- Broken armature or stator winding.
- Failure of the solenoid relay means destruction of the windings.
Please note that if the bendix and overrunning clutch break down, the starter will continue to turn, but there will be no engagement with the ring
Often the reason that the starter turns weakly is a bad mass or low battery charge. In this case, you will need to replace the bronze bushings and the wire that connects the gearbox and the negative terminal of the battery
Please note that the starter winding power circuit is not protected by a fuse.
Therefore, it is extremely important to timely replace brushes and clean the slats. This will avoid the occurrence of a short circuit, which will lead to inevitable breakdown of the starter.
This will avoid the occurrence of a short circuit, which will lead to inevitable breakdown of the starter.
How to remove the unit?
In order to repair the VAZ-2114 starter, you will need to dismantle it. To do this, just perform the following manipulations:
- Disconnect the wire from the negative terminal of the battery. If this is not done, a short circuit may occur.
- To free access to the starter, remove the air purification filter housing.
- Now, using a key set to “13”, you need to unscrew the nut that secures the power wire to the solenoid relay.
- The thin wire also needs to be removed.
- Using the same wrench, unscrew the three nuts that secure the housing to the clutch housing.
- Remove the unit.
Now you can begin repairing the VAZ-2114 starter. To perform it efficiently, you will have to completely disassemble the mechanism.
What exactly is making noise and why?
Let's try to understand this issue. The main causes of noise coming from the gearbox are:
- improper operation of the gearbox, in particular the use of counterfeit transmission fluid purchased on the black market and operation of a vehicle with a non-working clutch;
- poor quality of gearbox components;
- maximum service life of manual transmission;
- unskilled technical work on diagnostics and repair of gearboxes.
In addition, the main malfunctions that can result in noise in the gearbox are:
- sudden difficulty switching on speed: in order to engage one or another gear, the driver will sometimes need to move the gearbox lever several times to the neutral position with the clutch depressed;
- The box automatically switches off the car’s gear while driving;
- Transmission fluid may leak from the gearbox.
It should also be noted that the VAZ 2109 gearbox can make noise in various conditions: at neutral speed, while shifting gears, or simply while driving at a certain speed. And each of these noises can indicate a different malfunction of the box.
In addition, during diagnostics, one must not forget that only one external sign may indicate several malfunctions in the gearbox. Therefore, it is virtually impossible to visually (i.e., by the type of hum) calculate which component of the box has failed. The damage can only be determined by removing and disassembling the box.
It is also necessary to add that repairing a transmission and eliminating defects requires a lot of knowledge, so it is better not to do this at home. The gearbox is an important unit in the structure of any vehicle, so it is better to entrust its repair and diagnostics to a qualified specialist.
Often the hum of the unit manifests itself:
- when you press the clutch;
- when turning on the third and fourth speeds;
- at neutral speed;
- when driving a car at high speeds.
Most domestic VAZ 2109 car owners face such problems. But if when you press the clutch, extraneous sounds disappear, then this may indicate several breakdowns. In particular, the fifth speed or reverse gear may fail. In addition, the input shaft bearing or release bearing may be faulty.
As practice shows, in the case of bearings the problem is not critical. If noise appeared in your car and then disappeared after several hundred or thousand kilometers, then most likely the remaining bearings were simply ground up by the unit system.
If your VAZ 2109 starts making noise, this does not mean that the bearings or reverse gear have failed. These problems are the most common, but only high-quality diagnostics can specifically determine what has gone wrong.
Checking the starter using the battery
Before contacting a car service center, buying a new unit or spare parts for it, you should try to check its performance yourself. With the right approach, it is possible to independently identify problems.
First of all, if you suspect a malfunction of the starting device, you need to check the contacts on the battery and starter terminals, their tightness and the presence of oxidation, the battery charge, since in many cases the problem in starting the internal combustion engine is the above factors.
A simple way to check that the electrical network is working is to close the terminal bolts of the electric motor with a screwdriver; before this procedure, you need to put the car in neutral speed (or move the selector lever to park or neutral mode).
If the starter starts the engine, you should look for a fault in the electrical circuit. Otherwise, remove the unit by disconnecting all fasteners from the engine and removing terminals and other wires.
How to check Bendix
After removing the electric motor, it is necessary to inspect the bendix (the gear at the very end); if there is increased wear of the teeth or cracks in it, it should be replaced.
The Bendix should only turn in one direction, otherwise it will have to be replaced. By connecting the unit to the battery, it is unlikely to be able to diagnose the serviceability of the Bendix, since it can spin, but with insufficient force to start the internal combustion engine.
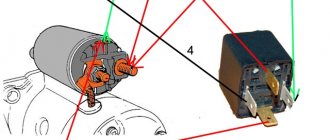
How to check Solenoid relay
When you turn the ignition key, you should hear a click, indicating that the armature is retracted and the bendix is engaged.
Before checking the serviceability of the starter, it is necessary to firmly secure it (either in a vice, having previously wrapped it with a thick layer of fabric, or with the help of a strong assistant who will hold the unit), since a very strong jerk may occur when starting it.
It is necessary to connect the positive from the battery to the positive on the starter, and the negative from the battery to the body of the unit. If the unit is working properly, then there should be a quick and sharp click and the bendix will extend and begin to spin.
If there is no click or movement of the overrunning clutch, it is necessary to replace the solenoid relay. When the power from the battery is disconnected, the bendix should retract.
How to check the Anchor and Brushes
To check the brushes and armature, you will need a multimeter or a 12-volt light bulb. Checking with a light bulb involves connecting its contacts to ground and the brush holder with the starter connected to the battery. When the light comes on, it indicates high brush wear.
When checking with a multimeter, the contacts are connected identically, only the results of measuring the resistance should tend to infinity, otherwise there is a short to ground.
The armature can only be checked by disassembling the electric motor. In addition to carrying out a visual inspection for the presence of oxidation, traces of short circuits, and increased wear, to check the armature you will need a special device PPYA (armature testing device) to check the interturn closure.
The difficulty of diagnosing armature malfunctions, as well as its repair, will require contacting specialized specialists, but in order to avoid unnecessary costs, it is necessary to check all other parts of the unit.
How to check the starter winding
To check the motor winding you will need a multimeter or a light bulb. The wires of the control lamp are connected to the winding terminal and the starter housing. If the light comes on, then there is a breakdown in the winding.
Using the same connection, the winding resistance is checked, for which the multimeter must be switched to the appropriate mode. The average reading of a serviceable winding will be 10 kOhm.
The starter is the most important element of the car, and its malfunction will immediately make itself felt either by the inability to start the car or by difficulties with it.
This unit is very reliable, but problems do occur with it. Some of them are easy to determine on your own, but to identify others you will need special equipment, which is available only to highly specialized specialists.
As you know, a starter is a device that starts a car engine. In fact, the starter is an electric motor that is powered by the battery. It is quite obvious that the failure of the starter significantly complicates or makes it impossible to start the internal combustion engine.
However, the starter rarely fails unexpectedly. In other words, certain signs indicate the occurrence of malfunctions. Next, we will look at what symptoms can be used to determine that the starter is faulty, as well as how to check the starter from a battery or with a multimeter.
Read in this article
Replacing starter bushings
If the bushings are worn out, the starter begins to turn slowly, and in some cases does not start at all. There are also differences between starters of the VAZ 2109 and VAZ 2110 types and in the location of the rotor bushings - the front bushing on the “nine” or “fourteenth” model is located in the front gearbox housing. To replace this bushing, you only need to remove the starter; disassembling the starting device itself is not required. The bushing in gearbox 2109 fits tightly, you can try to pull it out using a 14 mm tap.
The front starter bushing is pressed into place tightly, for this you should use a mandrel, and in order for the rotor shaft on the starter to fit into the bushing, before installation you should go along its inner diameter with a reamer of 12 mm. Replacing the starter bushing in the gearbox should be carried out carefully; chips and any parts should not get under the flywheel.
The rear bushing is located in the starter cover and to replace it the cover must be removed. In some cases, it is more convenient to replace the entire cover than to go through the hassle of re-pressing the bushing.
Main signs of starter malfunction
ATTENTION! A completely simple way to reduce fuel consumption has been found! Don't believe me? An auto mechanic with 15 years of experience also didn’t believe it until he tried it. And now he saves 35,000 rubles a year on gasoline! Read more". Experts write that the main prerequisites for the breakdown of the starting device are in the AC, the solenoid relay and the winding
The latter simply melts, which leads to a short circuit
Experts write that the main prerequisites for the breakdown of the starting device are in the AC, the solenoid relay and the winding. The latter simply melts, which leads to a short circuit.
| How the problem manifests itself | Cause of malfunction | Elimination method |
| When the starter is turned on, the armature does not rotate, the traction relay does not operate | The battery is faulty or completely discharged | Charge the battery or replace it |
| The battery terminals and wire tips are heavily oxidized; tips are loosely tightened | Clean the pole terminals and wire lugs, tighten and lubricate with Vaseline | |
| Interturn short circuit in the pull-in winding of the traction relay, its short circuit to ground or open circuit | Replace the traction relay | |
| Open circuit in the power supply circuit of the starter traction relay | Check the wires and their connections in the circuit between plugs “50” of the starter and the ignition switch | |
| Contacts “30” and “50” of the ignition switch do not close | Replace the contact part of the ignition switch | |
| Traction relay armature jammed | Remove the relay, check the ease of movement of the armature | |
| When the starter is turned on, the armature does not rotate or rotates too slowly, the traction relay is activated | ||
| Battery is faulty or discharged | Charge the battery or replace it | |
| The battery terminals and wire tips are oxidized; tips are loosely tightened | Clean the pole terminals and wire lugs, tighten and lubricate with Vaseline | |
| The lugs of the wire connecting the power unit to the body or to the negative terminal of the battery are loose | Tighten the wire lugs | |
| The contact bolts of the traction relay are oxidized or the nuts securing the wire lugs to the contact bolts are loose | Clean the contact bolts, tighten the wire fastening nuts | |
| Burnt commutator, stuck brushes or worn out brushes | Clean the commutator, replace the brushes | |
| Open circuit or short circuit in the stator or armature windings | Replace stator or armature | |
| Shorting the brush holder of the “positive” brush to ground | Repair the short or replace the manifold side cover | |
| When the starter is turned on, the traction relay is activated and switched off repeatedly | ||
| Cause of malfunction | Elimination method | |
| Low battery | Charge the battery | |
| Large voltage drop in the power circuit of the traction relay due to severe oxidation of the wire tips | Check the wires and their connections in the circuit from the battery to plug “50” of the starter | |
| Open or short circuit in the holding winding of the traction relay | Replace the traction relay |
Malfunctions
During the operation of the vehicle, the following malfunctions of the starter are possible, which may lead to its replacement:
- overrunning clutch is faulty;
- short circuit of the stator or armature windings;
- significant wear of the brushes.
These malfunctions are characterized by the following symptoms:
- the starter armature rotates slowly;
- Uncharacteristic noises are heard when starting the engine.
If you ignore the slow rotation of the armature, of course, you won’t run into expensive repairs in the future, but you can run into trouble like this. But in case of noise, there is no need to postpone repairs.
It is quite possible, for example, that a malfunction may occur such as breaking out the teeth of the gear of the overrunning clutch mechanism, and here you can already run into an expensive replacement of the flywheel. However, before buying a new starter, you need to make sure that it is not possible to repair it!
In order to save a little money, you can replace the starter yourself, especially since this will require the following tools:
- keys for 8 and 13;
- WD-40 liquid.
It is better to carry out work under a canopy or in a garage.
Due to the fact that getting to the starter is not very convenient, we will simplify our task by removing the air filter housing. To do this, disconnect the contacts of the mass air flow sensor, release the pipes from the body, and then use a 8mm wrench to unscrew the two bolts securing the front support brackets.
Having carried out the preparatory work, we proceed to the main thing - replacing the starter. We carry out the work in the following sequence:
- We de-energize the electrical circuit of the car by removing the “negative” terminal from the battery.
- We treat the threaded connections attaching the starter to the gearbox with WD-40.
- Disconnect the negative terminal of the solenoid relay (red wire).
- Using a 13mm wrench, unscrew the nut securing the “positive” terminal.
- Using a 13mm wrench, unscrew the three starter mounting nuts.
- Remove the starter from the studs.
We carry out the work on installing a new spare part in the reverse order, lubricating the studs located on the gearbox with graphite lubricant, which will help in the future to reduce the time for unscrewing if you need to remove the starter for any reason.
https://youtube.com/watch?v=7naohHI2PHQ
As can be seen from the description of the work, removing the old starter and installing a new starter is not difficult and does not require special tools or skills. Good luck on the roads and, of course, no breakdowns!
Starter of a VAZ 2108 car - how is it disassembled and replaced? Video
Unfortunately, VAZ 2108 car starters break down quite often. Going to a car service every time it breaks down is undoubtedly stupid, which means you need to learn how to repair this part yourself.
When might a starter need to be repaired or replaced?
The mechanism under consideration is a short-term motor.
In cases where the starter of the VAZ 2108 car is in fully working order, and the car battery produces high-quality current, starting the device lasts a few seconds at most.
It should not function for a long time, so those who like to “drive” the starter should give up their habit and use it only as recommended by the manufacturers.
As the practice of operating the starter shows, its replacement and repair are most often required precisely in those cases when the owner of a VAZ 2108 excessively overloads the described mechanism, and also starts it with a weak battery. In addition, the breakdown of the starting device may be associated with certain problems caused by malfunctions of the car engine.
Most often, the starter fails in winter. At negative temperatures, very high loads are placed on it.
If the mechanism is old, it simply “refuses” to function, which is not surprising, because it takes a huge current load of 450 amperes.
This current value causes some common starter breakdowns, in particular, the phenomenon of burning contacts on the device relay. In this case, we are talking about melting the wires connected to the stator motor and to the “plus” of the battery.
Burning of contacts during vehicle operation cannot be avoided, since a large current regularly passes through the power circuits. Therefore, there is only one way out - to repair the relay according to the diagram below, clean the contacts, thereby restoring the functionality of the starter.
Scheme for checking the mechanism and replacing its relay
Repairing the starting device and replacing it is never carried out by experienced motorists without first testing it. The scheme for carrying out this operation is very simple, we place the starter with the windings up (that is, at the end), and then perform the following actions: connect one end of the wire to the bolts of the mechanism being tested, the other to the positive terminal; we start the device.
If after starting the mechanism does not turn well or does not turn at all, you can safely begin to repair it. In those cases when the device works normally, there is no need to disassemble it; most likely, the reason for the poor start lies in another element of the car. It would also be useful to check the mechanism relay directly. The verification scheme in this situation is elementary:
- “minus” is applied to the relay body;
- 12-volt voltage is supplied to the output;
- An ohmmeter is connected to the contact bolts.
The appearance of sparks on the contact bolts and the movement of the coupling into the hole tell us about the serviceability of the relay.
But the absence of these phenomena, as well as voltage surges on the device, indicates that the relay requires replacement, since the starter does not turn because of it.
To install a new relay element, you need to disassemble the starting mechanism - remove the shield from it, remove the hose from the air collector, and then very carefully remove the starter itself.
We carry out all these procedures in neutral, and lift the vehicle itself on a jack or place it in a pit.
Then you should unscrew the bolts that connect the starter to the relay, and install a new mechanism. In this case, it is important to ensure that the drive lever engages with the tip of the device being installed. We install the starter in its place and connect the previously removed wires.
Tuning VAZ cars
In VAZ models that do not have oil nozzles and the engine is hot, it is advisable to install such elements from the VAZ 2112 engine. In this case, the most heavily loaded parts of the engine will receive additional cooling. The VAZ 2112 oil nozzle is installed using a drill in the cylinder block. Initially, a hole of small diameter is drilled, then with a large diameter to a depth of 5 millimeters. There is not much space to install the injectors, so the top of the injector is cut off, as shown in the figure below.
It is better to install the injectors as shown in the figure with red dots.
In this case, the devices will “sit” more in the block, and if the oil spray hole is directed correctly, the crankshaft will not touch the crankshaft. Using a hammer and file, if necessary, you can adjust the installation of the nozzle. You need to act carefully so as not to damage the body of the part; it cracks and breaks very easily.
Glory to the buckets! Cars 2Atmotaz - Born to run, you won’t get 3.14 years! Turbotaz - Born 3.14 to die, one horseradish will catch up, and from 3.14 will die =) by sharky
STK Yaroslavka - sports training and repair of domestic and foreign cars
https://sc.yaroslavka.ru/
blog.yaroslavka.ru/
www.yaroslavka.ru
https://youtube.com/watch?v=2lX9fJXOk_s
Sources
- https://vaz-russia.ru/remont-vaz-2108/proverka-forsunok-na-rabotosposobnost-na-vaz-2108-vaz-2109-vaz-21099.html
- https://masteravaza.ru/dvigatel/obsluzhivanie-dvigatelya/vaz-2112-maslyanye-forsunki-ohlazhdeniya-424
- https://www.lada.cc/board/index.php?showtopic=63384
Choosing a new starter for VAZ 2108, 2109, 21099 cars
If, having removed the old faulty starter device, you have come to the conclusion that repairing it is impractical, then the question arises, which new device to choose? In the case of VAZ cars, the choice is possible between conventional starters and gearbox ones. To be convinced of the significant advantages of the latter, let’s consider the principle of their operation.
In a standard starter, the force is directly transmitted to the flywheel from the armature. At the same time, the retractor relay is activated, pushing the bendix forward, which helps it engage with the flywheel teeth. A gear starter is characterized by a similar operating principle, but there is a significant difference in force transmission. It uses a gearbox, which allows you to reduce the power of the electric motor. In addition, an important feature of this type of starter is the presence of permanent magnets in the windings, which make the operation of the electric motor more reliable.
The energy consumption of a gear starter is significantly less, which is due to the presence of an additional mechanism that increases the torque of the electric motor. By the way, this is also due to the compact dimensions of such a starter device. In addition, the gear starter operates quietly even with a slightly low battery, which a conventional starter is not capable of.
At low temperatures in winter, the operation of a gear starter is also more reliable. It can even crank through slightly thickened oil, which a conventional starter cannot do. This becomes possible thanks to the gearbox.
If, taking into account all the advantages, you have made your choice in favor of a gear starter, then we offer you high-quality devices from the Belarusian. They have a two-year warranty, and spare parts are always available. You can familiarize yourself with the range of ATEK gear starters on this website, and you can purchase them in the online store of our partners.
Removal and installation
- Loosen the bottom mounting bolt and remove it.
- We unscrew the hose from the air intake, unscrew the nut that secures the shield on top and the nut that is located under the air intake.
- We remove the shield.
- We unscrew the two upper mounting bolts that connect the starter to the crankcase.
- We also unscrew the lower mounting bolt.
- We move the device forward and disconnect the relay output from the block.
- We unscrew the nut that secures the wire between the battery and the relay.
- The starter is removed upwards.
Installing a new device is carried out in the reverse order.
Repairing a VAZ 2106 starter is a long and thankless task. Moreover, you can buy a brand new device in the store for a small fee. Therefore, we advise you not to waste your precious time and, in case of a breakdown, simply install a new one. But if you still want to tinker, we suggest watching the video tutorial.
Starter replacement and installation procedure
It is worth familiarizing yourself with the process of removing the device in advance. This will avoid difficulties during repairs. It is also advisable to find out in advance where the starter is located.
Otherwise, various difficult situations may arise. The removal process includes the main steps:
- the terminals from the car battery are disconnected and the contact wires from the starter itself are disconnected;
- Next you need to unscrew the special nut that holds the block with the wires;
- it is necessary to dismantle the crankcase protection - if there is one at all (without this it is simply impossible to remove the starter);
- the lower part of the starter is equipped with two nuts that need to be unscrewed;
- then the starter is simply moved towards the wheel and removed from its seat.
After dismantling, it will be possible to carefully inspect the Bendix splines and carry out troubleshooting. Installation is carried out in reverse order
It is only important to lubricate all threaded connections with graphite lubricant. She will not let the carving turn sour over time
Replacing the bendix on the starter
A characteristic sign of a Bendix malfunction is that it spins idling - when the engine starts, it does not engage with the flywheel. In order to replace the Bendix on front-wheel drive VAZ cars, the starter must be removed in any case. It should be noted that the starter housings of the VAZ 2108-09-14-15 and VAZ 2110-11-12 models differ from each other; on the housings of the “nine” the bendix is of an open type, and the rear end of the rotor is installed in the gearbox bushing (in the figure below - under number 5).
For VAZ 2110-11-12 starters, the bendix is covered with a housing that is cast from aluminum.
We replace the bendix on the VAZ 2109 (2114-2115) starter as follows:
- on the unit removed from the car, unscrew the rear cover (key 10 bolts are installed);
- We knock down the stopper on the rotor shaft and remove the spring ring;
- dismantle the aluminum front cover assembly with bendix and fork;
- unscrew the two BP fasteners and remove the relay;
- we remove the old bendix with the fork and install the new one, in this case it is necessary to install the fork correctly;
- putting everything back together.
You can slightly change the course of disassembly (remove the retractor first), but this does not change anything much.
Checking the starter
It often happens that when the engine is warm, the car can be started, but when the engine is cold, the starter turns weakly, the battery is charged. The car may jerk when driving. Most drivers only check the terminals on the battery, after which the situation may improve slightly, but after a short period of time it repeats, and the starter turns as if the battery is dead.
To solve this problem you need to:
- Clean all terminal connections.
- Clean the places where the terminals are attached.
- Clean the contacts on the starter with sandpaper.
- Check the ground wire and clean the terminals.
- Replace high-voltage wires (if the car jerks while driving) if necessary.
Also, the starter may not turn well in cases where the lubricating oil is not suitable for the season. Then the engine crankshaft will have difficulty turning. However, this phenomenon occurs only at low temperatures. It is necessary to change the oil to a more suitable one and, if necessary, insulate the parking lot of the car.
Battery Application
Many drivers are wondering how to check the starter without removing it from the car. A quick check of the device can be carried out on site. This process only requires a working battery and power cables. In this case, you need to check the solenoid relay and the motor of the unit, and to check the armature, brushes or winding after disassembly you will need a multimeter.
Manipulating the battery will help you understand the correct functioning of the starter, since when you start the ignition it is difficult to understand the operation of the device due to clicks. When the output terminals and the starter housing are shorted, a malfunction of the solenoid relay or the starter itself is determined by visually observing the operation of the relay itself and the rotation of the starter motor.
You can check the ability of the gear to output and rotate without dismantling by figuring out how to connect the starter directly to the battery. To do this, the part must be fixed, after which the battery terminal “—” is connected to the case, and the positive terminal is connected to the upper contact of the battery start relay. Performance must be confirmed by moving the bendix out and rotating the gear from the armature.
After checking the starter with a battery, the fault may remain unknown. Therefore, the unit must be removed from the machine and a detailed inspection of all components must be carried out.
Relay test
To check, you need to connect the positive terminal of the battery and the negative terminal to the case. If it is working properly, there should be a click, after which the Bendix gear engages.
Due to some problems, the gear may not move out:
- The relay contacts are burnt.
- The anchor jammed.
- The starter winding or the relay itself has burned out.
Checking the starter brushes
Brushes are tested in different ways. The simplest method is with a 12 V lamp. In this case, you need to connect one output of the brush holder to the light bulb and the free contact of the lamp to the holder body. If the brush malfunctions, the lamp will not turn on, therefore, the brushes need to be replaced.
To check the second method, you will need a multimeter and a disassembled starter. The process is to check for short circuit to ground. It is necessary to measure the resistance between the main plate and the brush holder. In this case, the resistance must be infinite. When disassembling this unit, it is necessary to conduct a visual inspection of parts, such as:
There may be wear on the bushings, which, in turn, affects the current drawdown when trying to start and the stability of the motor, and if the commutator is damaged or burnt, the brushes will wear out very quickly. In addition, wear of the bushings contributes to warping of the armature and uneven wear of the brush, which can lead to an interturn short circuit in the winding.
Brushes are a very important element of the starter, and if they are worn out, the starter will poorly rotate the crankshaft both on a warm engine and on a cold one. If they are slightly worn, they should be checked for current leakage.
Bendix inspection
Bendix is a device that is responsible for reducing noise during operation of the starting device.
It is not difficult to check the Bendix robot. To do this, clamp the overrunning clutch housing in a vice, preferably using a soft gasket, and attempt to rotate it in both directions. If it turns, it means the overrunning clutch is faulty.
General tips for connecting high-voltage wires.
Checking high-voltage wires. To check the wires, you will need a multimeter tester. Check the resistance of the wires - it should be no more than 20 KOhms (in practice, the longest wire of cylinder 1 has a resistance of up to 10 KOhms). If the wire resistance is more than 20 Kom, it must be replaced. Carefully inspect the wires for chafing on parts of the motor or other wires. In case of significant abrasion, replace the wire. In case of minor abrasion, it is possible to lay the wire so that it does not rub and fix it in this position.
Laying wires. Do not try to connect the wires in a bundle. Disassemble the wiring harnesses, release the wires from the plastic holders. Connect the high-voltage leads to the corresponding cylinder spark plugs. Lay the wires so that they do not rub against each other, engine parts, or hoses. Avoid sharp bends and tension on the wires. After connecting all the wires, secure them into the bundle with special comb holders included in the delivery kit.
The procedure for connecting I/O wires to a VAZ carburetor (2108, 2109, 21099)
The central wire from the distributor cover always goes to the ignition coil (bobbin).
The outlet of the distributor cover, which faces towards the front of the car, is connected to the first cylinder.
The outlet of the distributor cap, looking down, is connected to the third cylinder.
The outlet of the distributor cap, looking rearward, is connected to the fourth cylinder.
The outlet of the distributor cap, looking up, is connected to the second cylinder.
The procedure for connecting high-voltage wires to a VAZ Classic, Niva with a carburetor and distributor.
Central wire from the ignition coil (bobbin)
1 cylinder - above the vacuum corrector. Next, clockwise, the order is 1-3-4-2.
Injection VAZ produced before 2004 with an old-style ignition module (4-pin low-voltage connector)
Actually, on the module body it is already indicated which cylinder the pins correspond to - but we duplicated them in red in case the module gets completely dirty, and you might not be able to see it in the photo.
Injection VAZ produced after 2004 with a new ignition coil (3-pin low-voltage connector)
As with the old-style ignition modules, the new coils are also marked with pins corresponding to the cylinders. But the connection order is different from the order on the old-style ignition module. Be careful!!!
A common problem with starting and stable operation of a car engine occurs due to improper gap between the spark plug electrodes. This problem is aggravated by the fact that today many manufacturers of such components claim that there is no need to adjust the VAZ 2109 spark plug gap (and indeed the gap in any spark plugs). As facts and numerous examples show, this is a categorically false statement. In modern conditions, any car owner needs to know how to check the serviceability of spark plugs and adjust the gap with their own hands.
Malfunctions and repair of starter traction relay
The traction relay is located on the front cover of the starter and is designed for short-term engagement of the starter shaft with the flywheel ring. It is this, and not the starter itself, that most often fails. In addition to the wiring and contact problems discussed above, the most common traction relay malfunctions are:
- burning of contact bolts (nickels);
- short circuit or break in the winding;
- mechanical damage.
The main sign of relay failure is the absence of a click when turning the key in the ignition switch. It means that:
- the electromagnet did not work;
- the relay contacts did not close;
- no voltage is supplied to the starter.
In such a situation, after checking the wiring and contacts, the relay should be removed from the starter and diagnosed. This is done as follows:
- Using a 13mm wrench, unscrew the nuts securing the power wires to the relay contact bolts.
- Disconnect the control wire connector.
- Using a slotted screwdriver, unscrew the three screws securing the traction relay to the front cover.
- Disconnect the relay from the cover.
- We inspect the relay and if we detect mechanical damage or burning of the contact bolts, we replace it with a new one.
- If there is no visible damage, we continue checking and connect the relay directly to the battery. To do this, we find two pieces of wire with a cross-section of at least 5 mm2 and with their help we connect the terminal of the control wire to the negative of the battery, and the relay body to the positive. At the moment of connection, the relay core should retract. If this does not happen, the relay needs to be changed.
Rare situations
They happen noticeably less frequently than those we described above. But under no circumstances should we exclude them.
After reviewing the situations below, compare them with the behavior of your starter and a car that has stopped turning or clicks but does not turn.
- With an injection engine at a frosty temperature of about -20 degrees Celsius, all devices function. This indicates that the battery is fully charged. At the same time, for some reason the starter refuses to turn. Your actions:
- If there are no clicks when you try to start the engine, check the condition of the fuse, wiring and solenoid relay;
- If there is a clicking noise, the most likely source of the problem is the solenoid relay. It must be replaced.
- The engine started normally throughout the day, but in the evening it suddenly stopped working normally. When you turn the key in the ignition switch, there is only a click, but the starter does not turn. When you try to start the engine several times in a row, several clicks are heard. Your actions: Charge the battery;
- Crimp, strip and tighten the contacts on the starter and battery;
- If the first two points do not produce results, check the battery itself. To do this, the wire closes its contacts. If the battery is working properly, a spark will appear that melts the wire;
- Connect the plus from the battery directly to the solenoid relay. If the starter is silent, replace the starter.
car battery
- During the day the car started without problems. But after being idle for several minutes, attempts to start the car fail. When you turn the key, the relay is activated, but the starter stubbornly refuses to turn. By closing the two bolts of the solenoid relay, everything started. We reached our destination, stopped, and turned off the engine. When I try to start again, the same situation occurs. Just locking the bolts no longer works. Your actions:
- Disassemble the starter housing;
- Check the condition of the brushes. There is a high probability that they have been completely erased. Hence this effect;
- Replace the brushes with new ones. This is cheaper than completely replacing the unit.
https://youtube.com/watch?v=dc-7XAXjy5o
- The starter doesn't turn over. When you try to close it, only noise arises, like when a drill is working. The engine shows no signs of life. But it was possible to start it from the pushrod without any problems. Your actions:
- Make sure your starter is working properly;
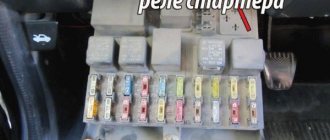
- If everything is fine with it, go to the mounting block and check the fuses;
- Also examine the condition of the ignition switch. It is possible that the problem is with him;
- Do not forget to check the wiring for breaks and short circuits;
- Check the status of the contacts. It’s not uncommon that minus does not reach the starter relay only for the banal reason of oxidation or burnt wire.
Having understood the reasons for the failure of the starter, you can bring the device back to life on your own. Don't rush to throw away your old starter and buy a new one. The practice of VAZ 2109 owners shows that partial repairs, and sometimes even simple cleaning of the device, make it possible to restore the functionality of one of the main elements of the ignition system for a long time.
Loading …