How to remove a VAZ-2109 engine yourself (carburetor, injector)
The engine is often called the most important element of a car. There are situations when it needs to be replaced or repaired. For example, when replacing piston rings. This is a rather complex multi-step process. If desired, dismantling can be done independently. We recommend that you ask a friend for help. Working together is safer, easier and more fun. If you have ever replaced a windshield wiper motor, it will be easier for you to change the motor. Let's look at how to remove the VAZ-2109 engine yourself without turning to auto mechanics.
Preparation
At the preparatory stage, short but very important, it is worth completely de-energizing the car by disconnecting the battery. You also need to remove all hoses, speed and clutch sensors. Be sure to drain the oil from the engine crankcase and the liquid that cools the radiator. Removing the engine without removing the gearbox:
- first of all, you need to put a reliable support under the car, preferably wooden stumps;
- unscrew the left crab, move the stretcher to the side;
- remove the generator from the engine;
- remove the tensioner pin, pump, distributor and receiving pipe;
- do not forget to remove the head if you are planning a major overhaul;
- the motor must be removed from the box and lowered to the floor;
- in order to get the engine, you need to raise the front part higher (this is done using a jack);
- you can also just pull everything through the top.
Using these instructions, you can quickly remove the engine without removing the box.
How to remove the engine from the gearbox:
- The first thing you need to do is turn off the power to the car. To do this, disconnect the battery. It’s easy to check the lack of current, try turning on the wipers;
- Drain the oil from the engine crankcase. A warm engine will speed up the process;
- drain the coolant from the cooling system, here you need a cold engine;
- get rid of the engine crankcase and exhaust pipe protection;
- carefully disconnect all hoses;
- Next, you need to unscrew the ground wire fastening nut. Next, you can safely turn off the thermostat;
- disconnect the central high voltage from the ignition distributor. To do this, you need to release the pad lock and remove it;
- remove the drive cable from the clutch lever;
- next, you should disconnect the starter supply wires;
- turn off the generator;
- disconnect the wires from the coolant temperature and oil pressure sensors;
- further work will take place under the car. To make it as comfortable and safe as possible, it is worth acquiring an overpass;
- At this stage, unscrew the drive rod mounting nuts. Disconnect the speedometer drive rod, disconnect the power wires;
- disconnect the two braces, tie rods and ball joint from the lever;
- Move the upper tail of the drive a little and push it out with a pry bar. Insert the technological plug into the vacant space;
- Next comes the stage of dismantling the engine. We fix it with a strong rope using the eyelets (rings). It doesn't hurt if you take the time to check their strength first;
- It is best to remove it through the top, but you can also get it through the bottom. Then lower the engine to the floor and lift the front of the car using a jack;
- After you have secured the engine with ropes, you can reach it through the top.
Remember that you need to act extremely carefully so as not to lose the motor, scratch the body, or damage parts. As you can see, the process is very complex. Successful dismantling is possible only if all points of the instructions are followed, you have deep knowledge, extreme caution and no haste.
Removing the injector head VAZ 21083. Video
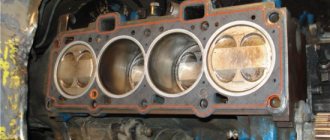
Photo. Head removed from engine
Next, unscrew the pipe, the upper bolts of the generator and the gearbox bolts (three bolts and one nut), they are indicated by arrows in the photo.
Photo. Engine, bottom view
Unscrew the wires from the generator and the generator mount itself is indicated by an arrow in the photo, and remove the generator.
Unscrew the crab, it is shown in the photo, I almost unscrewed it, there is only one bolt left, and loosen the rear link bolt.
Photo. Unscrewed crab
Place the unscrewed crab to the side as shown in the photo.
Photo. Fixed motor
Next, fix the engine as shown in the photo, you can use the timing belt and, in order to avoid scratching the car, place a rag under the brick, as shown in the photo. Loosen the engine mount and unscrew the mount from the engine itself, grab the belt and pull out the pipe that fixed the engine, lower the engine.
Photo. Lowered engine
After lowering the engine, it 50/50 comes off the box on its own, but if it doesn’t come off, pry it with a pry bar and it will come off.
Photo. Removed engine
In the photo you can see the completely removed engine, all that remains is to put it on its side and pull it out. Also, to make it easier to pull the engine out, you can put a sweaty rag or tarp under it in advance and pull the engine out on it. You can install the engine this way, but in reverse order, that’s what I do. But when installing the engine, I pass a large belt or rope under the engine and pull it from the bottom onto the box with an assistant.
Causes
There are several most common reasons why a car owner has to remove the engine from his car.
Cause
Peculiarities
In the event of a serious accident or as a result of wear of key engine elements, it will not be possible to restore its functionality without a removal procedure. Therefore, they resort to dismantling the engine
It’s not uncommon for VAZ 2109 owners to think about replacing the standard factory engine with a more efficient, powerful power unit. This is a serious step, where dismantling is one of the initial stages
If there is no opportunity or desire to change the engine, some simply modify the existing one. Tuning can be quite complex, involving the need to completely remove the engine from the engine compartment
Regardless of the reasons, you need to remove the engine carefully, following a clear sequence of your actions. Decide in advance whether you will dismantle the engine together with the gearbox or without removing it.
Without removing the gearbox
In short, it is quite possible to remove the engine from your “nine” without removing the gearbox. To do this you will have to follow these steps:
- Place bricks or other reliable supports under the gearbox;
- Unscrew the left crab, move the stretcher aside;
- Remove the generator, crankshaft pulley, and camshaft gear from the engine;
- The pump, tensioner pin, distributor, and exhaust pipe are also dismantled;
- If a major overhaul is planned, then you can also remove the head;
- Then the engine mount is removed;
- The motor is moved from the box and lowered to the floor. To remove the engine, the front part is raised higher using a jack and the volume is removed;
- Or you can pull it out through the top using a winch.
In practice, all experts recommend dismantling the engine along with the gearbox. Especially if you plan to replace the engine or increase the power of the standard engine. In this situation, the box itself is often changed so that it can clearly interact with the new motor.
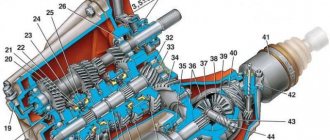
Gearbox from nine
How to remove the engine on a VAZ 2109 without removing the gearbox (Video)
Removing the engine from a VAZ 2109, like any other car, is a labor-intensive, multi-stage process that should be approached with the full degree of responsibility.
Nine engine
Causes
There are several most common reasons why a car owner has to remove the engine from his car.
Cause
Peculiarities
In the event of a serious accident or as a result of wear of key engine elements, it will not be possible to restore its functionality without a removal procedure. Therefore, they resort to dismantling the engine
It’s not uncommon for VAZ 2109 owners to think about replacing the standard factory engine with a more efficient, powerful power unit. This is a serious step, where dismantling is one of the initial stages
If there is no opportunity or desire to change the engine, some simply modify the existing one. Tuning can be quite complex, involving the need to completely remove the engine from the engine compartment
Regardless of the reasons, you need to remove the engine carefully, following a clear sequence of your actions. Decide in advance whether you will dismantle the engine together with the gearbox or without removing it.
Without removing the gearbox
In short, it is quite possible to remove the engine from your “nine” without removing the gearbox. To do this you will have to follow these steps:
- Place bricks or other reliable supports under the gearbox;
- Unscrew the left crab, move the stretcher aside;
- Remove the generator, crankshaft pulley, and camshaft gear from the engine;
- The pump, tensioner pin, distributor, and exhaust pipe are also dismantled;
- If a major overhaul is planned, then you can also remove the head;
- Then the engine mount is removed;
- The motor is moved from the box and lowered to the floor. To remove the engine, the front part is raised higher using a jack and the volume is removed;
- Or you can pull it out through the top using a winch.
In practice, all experts recommend dismantling the engine along with the gearbox. Especially if you plan to replace the engine or increase the power of the standard engine. In this situation, the box itself is often changed so that it can clearly interact with the new motor.
Gearbox from nine
Removal from gearbox
Follow the instructions clearly, be sure to watch the video tutorials. Plus, don't forget to check the condition of all engine mounts, since you'll probably be reassembling it again. All damaged elements will have to be replaced without fail.
- First, disconnect the battery to completely cut off the power to the car.
- Drain the oil from the engine crankcase. Here it is better for the engine to be warm. This will allow the oil to drain out faster.
- Drain the coolant from the cooling system. A cold motor is already required here. Be careful.
- To disconnect the exhaust systems, you will have to completely remove the engine crankcase protection and dismantle the exhaust pipe.
- Remove the air filter housing, and then disconnect all hoses from the engine, power wiring, sensors, damper rods, and brake system vacuum hoses.
- Unscrew the fastening nut of the ground wire, put on the stud and located on the clutch housing.
- Disconnect the cooling system pipes and turn off the thermostat.
- Disconnect the central high voltage from the ignition distributor. After this, you can release the clamp of the block with the supply wiring and remove the entire block.
- Disconnect the fuel supply hoses from the fuel pump. To do this, just loosen the fastening clamp.
- Unscrew the adjusting nuts to remove the drive cable from the clutch lever.
- Disconnect the power supply wires from the starter - one wire from the battery going to the solenoid relay and the wiring block.
- Switch off the generator in the same way.
- Deprive power by disconnecting the corresponding wires from the coolant temperature sensor and oil pressure sensor.
- Disconnect a pair of pipes from the radiator for the car interior. Loosen the clamps, which will allow you to remove the elements.
- We go directly under the car. Here it is better to have a pit or overpass available, otherwise it is inconvenient and unsafe to remove the engine while lying down.
- Unscrew the fastening nuts of the drive rod from the tip of the gearbox shift joint. The speedometer drive rod and the reverse sensor are also disconnected here. You need to disconnect the power wires.
- Disconnect both guy wires, right and left. Before this, you need to loosen the clamp of the tensioner fastening nut to the suspension arm on both sides. Next, unscrew the three bolts of the bracket to the car body. It is not necessary to remove them completely, but just move them to the side. This way they will not interfere with further processes.
- The next step is to disconnect the tie rods. To achieve the desired result, remove the cotter pin and unscrew the nut. Next, armed with a special puller, press the pin out of the swing arm.
- We perform the same actions with the ball joint, which will need to be similarly disconnected from the lever.
- Using a pry bar, pull out the upper tail of the front wheel drive and move it slightly to the side. Don't forget to insert a technological plug in place of this tail. A plug from an old grenade will suit you just fine, if you have one available.
- Now comes the stage of directly dismantling the power unit itself.
- Securely secure the motor by tying it by the eyelets using a strong rope or metal wire. Rym translated from Dutch “ring” means ring. That is, instead of a head, the eye bolt and eye nut end in a ring. And the eye bolt and eye nut are intended for gripping and moving machines, parts, as well as during installation, disassembly, loading, etc.
Top extraction process
- The fastening rope is properly attached to the support or winch. It is best to remove the motor from the top, but a lifting mechanism will come in handy here.
- You can also remove the engine through the bottom. To do this, the engine is lowered to the floor, after which the front of the car is raised with jacks. Here, act at your own discretion and do not forget that the motor weighs quite a lot. We strongly do not recommend trying to get it out manually.
- Once you have secured the engine with ropes and a winch, unscrew the motor mounting nuts holding it to the supports.
- That's it, nothing now prevents you from removing the engine from its seat.
- Act as carefully as possible so that the engine elements are not damaged during removal, it does not touch or damage the body, and also does not fall off the mounts at the most inopportune moment.
Homemade support for dismantling
Accuracy is the main requirement when independently dismantling the power unit from a VAZ 2109 and any other car. Be sure to enlist the support of a partner, since it is quite difficult to complete all stages with two hands.
Take your time, don't try to get the job done in a few hours. It may take several days to remove the motor. The main thing here is not speed, but the quality and care of each manipulation.
Removal from gearbox
Follow the instructions clearly, be sure to watch the video tutorials. Plus, don't forget to check the condition of all engine mounts, since you'll probably be reassembling it again. All damaged elements will have to be replaced without fail.
- First, disconnect the battery to completely cut off the power to the car.
- Drain the oil from the engine crankcase. Here it is better for the engine to be warm. This will allow the oil to drain out faster.
- Drain the coolant from the cooling system. A cold motor is already required here. Be careful.
- To disconnect the exhaust systems, you will have to completely remove the engine crankcase protection and dismantle the exhaust pipe.
- Remove the air filter housing, and then disconnect all hoses from the engine, power wiring, sensors, damper rods, and brake system vacuum hoses.
- Unscrew the fastening nut of the ground wire, put on the stud and located on the clutch housing.
- Disconnect the cooling system pipes and turn off the thermostat.
- Disconnect the central high voltage from the ignition distributor. After this, you can release the clamp of the block with the supply wiring and remove the entire block.
- Disconnect the fuel supply hoses from the fuel pump. To do this, just loosen the fastening clamp.
- Unscrew the adjusting nuts to remove the drive cable from the clutch lever.
- Disconnect the power supply wires from the starter - one wire from the battery going to the solenoid relay and the wiring block.
- Switch off the generator in the same way.
- Deprive power by disconnecting the corresponding wires from the coolant temperature sensor and oil pressure sensor.
- Disconnect a pair of pipes from the radiator for the car interior. Loosen the clamps, which will allow you to remove the elements.
- We go directly under the car. Here it is better to have a pit or overpass available, otherwise it is inconvenient and unsafe to remove the engine while lying down.
- Unscrew the fastening nuts of the drive rod from the tip of the gearbox shift joint. The speedometer drive rod and the reverse sensor are also disconnected here. You need to disconnect the power wires.
- Disconnect both guy wires, right and left. Before this, you need to loosen the clamp of the tensioner fastening nut to the suspension arm on both sides. Next, unscrew the three bolts of the bracket to the car body. It is not necessary to remove them completely, but just move them to the side. This way they will not interfere with further processes.
- The next step is to disconnect the tie rods. To achieve the desired result, remove the cotter pin and unscrew the nut. Next, armed with a special puller, press the pin out of the swing arm.
- We perform the same actions with the ball joint, which will need to be similarly disconnected from the lever.
- Using a pry bar, pull out the upper tail of the front wheel drive and move it slightly to the side. Don't forget to insert a technological plug in place of this tail. A plug from an old grenade will suit you just fine, if you have one available.
- Now comes the stage of directly dismantling the power unit itself.
- Securely secure the motor by tying it by the eyelets using a strong rope or metal wire. Rym translated from Dutch “ring” means ring. That is, instead of a head, the eye bolt and eye nut end in a ring. And the eye bolt and eye nut are intended for gripping and moving machines, parts, as well as during installation, disassembly, loading, etc.
Removing the cylinder head on a VAZ 2109
- Disconnect the negative terminal from the battery.
- Drain the coolant into a plastic container.
- The exhaust pipe should be disconnected from the exhaust manifold.
- Remove the receiver with the throttle assembly (VAZ-2111). You also need to dismantle the carburetor (VAZ 21083), intake and exhaust manifolds (but you can do without this).
- If the work is performed on a VAZ 2111, you need to disconnect the “mass” wires attached to the left end of the head. Remove the fuel rail with fuel pipes and injectors.
- Disconnect the high voltage spark plug wires. Then we disconnect the coolant sensor connectors and remove the oil pressure level.
- On the VAZ-21083 the housing of the auxiliary units must be removed.
- Next, the housing of the auxiliary units, the distributor sensor, and the fuel pump are dismantled.
- First remove the timing belt. Then remove: the tension roller and the spacer washer. Next, you need to remove the camshaft timing pulley.
- Unscrew the rear mounting nut securing the timing cover to the cylinder head.
- Remove the cylinder head .
- Use a Phillips screwdriver to loosen the clamps, then you need to disconnect the hoses from the cylinder head exhaust pipe one by one.
- Unscrew the 10 bolts that secure the cylinder head using a 10mm hexagon.
- Remove the screws and washers.
- Remove the cylinder head with gasket.
Removing the engine from a VAZ 2108, VAZ 2109, VAZ 21099 car
Removing the engine from a VAZ 2108, VAZ 2109, VAZ 21099 car 1. Remove the battery. 2. Drain the oil from the engine crankcase and coolant from the cooling system.
NOTE Remove the engine from the VAZ 2108, VAZ 2109, VAZ 21099 vehicle assembled with the gearbox. When removing the engine, lower the engine down from the engine compartment. It is more convenient to remove the engine by placing the VAZ 2108, VAZ 2109, VAZ 21099 on a lift.
3. Unscrew the mounting bolts and remove the engine crankcase protection.
4. Remove the exhaust pipe from the muffler (see “Exhaust system”).
5. Remove the air filter.
6. Loosen the clamp and disconnect the brake booster vacuum hose from the engine inlet pipe.
7. Unscrew the bolt and disconnect the ground wire from the clutch housing.
8. Loosen the clamps and disconnect the hoses from the thermostat.
9. Disconnect the high-voltage wire from the central contact of the distributor cover.
10. Use a screwdriver to press out the spring clip and disconnect the block with low-voltage wires from the contact socket of the distributor.
11. Loosen the clamp and disconnect the fuel supply hose from the fuel pump.
12. Loosen the nuts on the end of the clutch release cable.
13. Remove the cable end from the clutch release lever.
14. Disconnect the block with the wire from the terminal of the starter traction relay.
15. Unscrew the fastening nut and disconnect the wire from the contact bolt of the starter traction relay.
16. Disconnect the block with the wire from the generator output.
17. Unscrew the nut and disconnect the wires from the generator terminal.
18. Disconnect the block with the wire from the carburetor shut-off solenoid valve terminal.
19. Loosen the clamp and disconnect the fuel return hose from the carburetor. Remove the hose from the plastic clamp.
20. Loosen the bolt securing the choke rod to the choke control lever.
21. Loosen the bolt securing the air damper drive rod shell to the bracket and disconnect the cable.
22. Remove the spring clamp of the accelerator drive cable from the throttle valve drive sector.
23. Remove the throttle valve return spring.
24. Remove the accelerator drive cable from the throttle valve drive sector.
25. Unscrew the fastening nut and remove the accelerator cable bracket from the valve cover.
26. Disconnect the block with the wire from the limit switch of the forced idle economizer (EFH).
27. Disconnect the wire from the coolant temperature sensor (DTOZH).
28. Disconnect the wire from the oil pressure sensor.
29. Loosen the clamp and disconnect the heater supply hose.
30. Loosen the clamp and disconnect the heater outlet hose.
31. Loosen the clamp and disconnect the gear shift rod from the joint tip.
32. Unscrew the fastening nut and disconnect the cable from the speedometer drive.
33. Disconnect the block with the wire from the reverse light switch on the gearbox.
34. Loosen the nuts securing the left and right braces to the suspension arms.
35. Unscrew the three bolts securing the brace bracket to the body and move the left and right braces to a position so that they do not interfere with removing the engine from the VAZ 2108, VAZ 2109, VAZ 21099.
36. Remove the cotter pin from the tie rod ball joint nut to the swing arm.
37. Unscrew the nut securing the steering rod ball joint.
38. Press the steering rod ball joint pin out of the strut swing arm using a special puller.
39. Remove the two bolts and disconnect the ball joint of the suspension arm from the steering knuckle.
40. Using a pry bar, press the shank of one of the inner CV joints of the drive shafts out of the gearbox and move it to the side.
41. Insert a technological mandrel (for example, an old internal CV joint) instead of the hinge so that the side gear does not turn. After this, disconnect the second CV joint in the same way as the first.
42. Hook the engine onto the eyelets and tighten the hoist cables.
43. Unscrew the two nuts securing the rear support of the power unit to the body.
44. Unscrew the nut, slightly lift the engine and remove the bolt of the right front power unit support.
45. Unscrew the nut and remove the bolt of the left front engine mount. 46. Lower the engine onto the stands, lift the VAZ 2108, VAZ 2109, VAZ 21099 car and remove the engine from under it.
NOTE Before lowering the engine, check that all wires and hoses are disconnected from the engine.
USEFUL ADVICE This section describes the removal of the engine (as part of the power unit together with the gearbox) in accordance with the manufacturer's recommendations. To do this, lifting mechanisms are needed to raise the front part of the VAZ 2108, VAZ 2109, VAZ 21099 car higher. In garage conditions, it is easier to remove the engine from the VAZ 2108, VAZ 2109, VAZ 21099 car up, having first removed the gearbox.
Car engine VAZ 2108, VAZ 2109, VAZ 21099 (top view)
1 — pads with carburetor wires; 2 — fuel return hose; 3 — heater hoses; 4 — vacuum booster hose; 5 — fuel supply hose; 6 — tip of the clutch cable; 7 — ignition coil wire; 8 — radiator hoses; 9 — throttle linkage; 10 — air damper rod; 11 - sensor wire for emergency oil pressure warning lamp
Engine of a VAZ 2108, VAZ 2109, VAZ 21099 (bottom view)
1 - generator; 2 — right front support; 3 - engine; 4 — gearbox; 5 - starter; 6 — reverse light switch; 7 - stretching; 8 — left front support; 9 — left front wheel drive; 10 — plug for draining oil from the gearbox; 11 — rear support; 12 — gear shift drive rod; 13 — oil sump; 14 — right-hand drive of the front wheels; 15 — plug for draining oil from the engine
3.2.8 Removing and installing an engine without a gearbox
The engine without gearbox is removed upwards from the engine compartment using a lifting mechanism. It is also possible to remove the engine together with the gearbox, however, this is much more difficult, since this requires installing the car on a lift and using an additional lift to lower the engine together with the gearbox, having first disconnected and removed the units that prevent the lowering of the power unit.
1.
Remove the negative cable from the battery.
Warning
On vehicles with air conditioning, elements of the air conditioning system can make it difficult to work on the engine, and it is not always possible to unscrew the bolts and move the system elements to the side due to the insufficient length of their hoses. In this case, the air conditioning system must be discharged by a Ford dealer or air conditioning specialist.
2.
Remove the crankcase protection and mudguard.
3.
Remove the radiator grille.
4.
Disconnect the hood opening cable from the hood closing mechanism and remove it from the clamps.
5.
Remove the hood, first marking the position of the hinges to facilitate re-installation and disconnect the windshield washer tube.
6.
Drain the coolant from the cooling system by placing a suitable container under the radiator drain plug and opening the drain plug located at the bottom of the radiator. To speed up the draining of the coolant, open the expansion tank cap. To drain the coolant from the cylinder block, unscrew the drain bolt located in the cylinder block.
7.
To provide additional work space, remove the radiator.
8.
Disconnect the coolant hoses from the water pump housing on the left side of the engine and the cylinder head.
9.
Loosen the clamps and remove the pipes and hoses of the cooling system: – upper and lower radiator pipes; – expansion tank hoses; – hoses of the interior heating system from the cylinder head and the cooling system pump; – housing of the automatic carburetor starter.
10.
Drain the engine oil and remove the filter.
11.
Unscrew the four bolts securing the upper front cross member, the two bolts on both sides at the top and the two lower bolts securing the cross member support and remove it together with the radiator.
12.
Remove the air filter.
13.
Remove the breather hose from the cylinder head cover and unscrew the bolt securing the hose support hanger to the left front side of the cylinder head.
14.
Remove the fuel supply hose from the fuel pump and plug it with a plug.
15.
Disconnect the brake booster vacuum pipe from the intake manifold.
16.
Disconnect the electrical wires and remove the connectors from the following units and sensors: – generator; – starter; – radiator fan; – speed and crankshaft position sensor; – temperature sensor; – engine control system temperature sensor; – oil pressure sensor; – ignition distributor; – ignition coils; – components of the fuel injection system and fuel injectors; – throttle position sensor; – fuel temperature sensor; – automatic air damper heater; – radiator temperature sensor.
How to remove and install a VAZ-2109 engine: with or without a box
How to remove and install a VAZ-2109 engine: with or without a gearbox. Replacing the Lada 2109 engine (VAZ 2109) – AvtoZam
- Preparatory stage
- Without removing the gearbox
- Removal and installation of the VAZ-2108, VAZ-2109 and VAZ-21099 engine
- Boosting methods
- Oil change features
- Actions requiring increased caution
- How to remove the engine on a VAZ 2109 without removing the gearbox (Video)
- Road accidents in Russia
- Preparation
- Causes
- How to remove a VAZ-2109 engine yourself (carburetor, injector)
- Types of motor oil
- What do they do when overhauling the engine of a VAZ 2108 car?
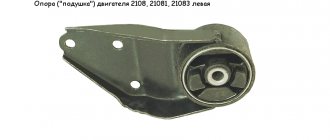
- How to replace the side engine mounts of a VAZ 2109
VESKO-TRANS.RU
AutoNews / Reviews / Tests
How to Remove a VAZ 2109 Engine Without a Box
How to remove a VAZ-2108 engine
You might be wondering how to take off a VAZ-2108, 2109, 21099 engine and repair it correctly. For those who do almost everything in handicrafts, I will explain, using an example from a photo, how to remove the engine as much as possible without removing the box from the VAZ-21099 injector. In any annotation about the repair and removal of the engine from the VAZ-2108, 2109
, B 21099, etc. describes how to remove the engine and gearbox, but it is long and very difficult, especially if there is no lift, and everything else must be removed manually.
I will explain how one person can take off
the VAZ-2108,
2109 , 21099, etc. engine, and not really.
We start removing the engine without removing the box, first we sort the front wheels and put them under the bricks, otherwise we just hit the bricks and fix the car with a handbrake or something that we put under the rear wheels so that the car doesn't roll . Because now in the summer it’s hot for us to remove the engine in the garden under the shade of a tree. When the car is installed on bricks with the front wheels, we start to remove the engine, first drain the engine oil and remove the air filter, but be careful with the filter; It is necessary to carefully disconnect the wires; in the photo the engine is already without an air filter.
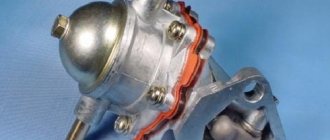
The reason for removing the engine from the VAZ-21099 is a split connecting rod.
Photo. Engine VAZ-21099
I will not describe in what order to remove the wire or hose, since I decided to remove the motor, this means that you are completely friendly and can figure out the details yourself, but I will explain the basic work of removing the motor.
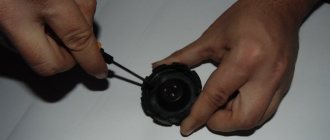
Photo. Ignition module
Unscrew the ignition module in the photo, the arrow indicates this and remove it from the side so as not to interfere, unscrew the plug on the block and drain the liquid.
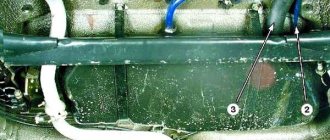
Photo. Hoses are disconnected from the head
Disconnect what is left for our customer to connect the wires from the head and unscrew the hoses, unscrew the gas cable, try to figure out where or write down. However, the great thing is that our client remains different and cannot be confused.
Photo. Disconnect the gas pipe hoses
When unscrewing gas pipeline hoses, be sure to use 2 17 mm wrenches. so as not to break the tubes, as shown in the photo. Be sure to remember that the hose is where it is and should not be confused.
Take off the VAZ 21083 engine without a gearbox. Do it yourself!
Unlimited card engine
with viburnum. Helps neighbors from the garage. Generally desirable.
Take off VAZ 21083 engine without gearbox
I'm talking about the main points in the process of removing the engine (engine) from above the VAZ
2108,
2109
, 2114. Thank you for your subscription.
Preparatory stage
Before starting work, it is strongly recommended that you familiarize yourself with the structure of the “heart” of the iron horse. This will help avoid many problems associated with incorrect connection of individual system elements, such as:
- right front support;
- generator;
- engine;
- gearbox - it is necessary to remove the gearbox only if the engine is overhauled or replaced;
- starter;
- system for turning on the lights for reversing marks VAZ 2109;
- stretching;
- left front support;
- a plug that secures the hole for draining oil from the engine;
- front wheel drives on the right side;
- rear support-fix;
- hole for draining oil from the gearbox;
- left-hand front wheel drive;
- gearbox shift drive rod.
Beginners are advised to take photographs of the listed parts in assembled form. In order to successfully dismantle the VAZ engine, it is necessary to use the tools recommended by the manufacturer. A list of these can be found in the vehicle operating instructions. Regardless of the reason that prompted the need to carry out removal and diagnostics, you must adhere to the following scheme:
A carefully removed car ignition module will help you remove the engine correctly. Due to the fragile nature of the device, do not use excessive physical force. After this, the plug located on the block is dismantled. Only after all the liquid has been drained is the next element removed.
All plugs from the drive are disconnected in random order. The same thing happens with the throttle and hose cables. Before starting this stage, it is better to use a camera to record the initial position. The photo will be useful when the installation of the VAZ engine begins.
Literally, pinpoint precision is required when it comes to removing the hose leading to the gas line. To do this, you need a key set to “17”, which will not break the rather fragile system. Here, as in the case described above, it is necessary to carry out recording using a photo.
When returning the VAZ engine to its rightful place, the photograph will help to correctly connect all the elements. There is no room for error here. Only after you have completed removing all the tubes on the “head” can you move on to those parts that are directly attached to it.
Engine Installation
After the cylinder block and crankshaft were repaired.
We repair the cylinder head. After this, we assemble the engine and begin installation.
Fill in: coolant; oil in the engine crankcase; gearbox oil
Finally tighten the threaded fasteners of the power unit mounts and front suspension parts after placing the car on the floor (before tightening, rock the front part of the car two or three times).
Connection tightening torques:
— nut of the left engine mount mounting bolt 42.0–51.0 Nm (4.2–5.1 kgf∙m);
— nut of the bolt securing the left suspension bracket to the engine 32.0–51.0 Nm (3.2–5.1 kgf∙m);
— nut of the rear engine mount mounting bolt 28.0–34.0 Nm (2.8–3.4 kgf∙m).
When connecting the front wheel drives to the gearbox, replace the retaining rings on the splined shanks of the inner joints.
Do not install used circlips on the splined joints as this may cause the front wheel drives to disengage from the transmission while driving.
After installing the engine on the car, adjust the air and throttle valves of the carburetor, the clutch drive, and the alignment angles of the front wheels.
Start the engine and check for fuel, oil and coolant leaks.
Check oil pressure. Listen to the engine, it should run smoothly, without any extraneous noise or knocking. Check the operation of the indicator lamps in the instrument cluster.
Source
Without removing the gearbox
In short, it is quite possible to remove the engine from your “nine” without removing the gearbox. To do this you will have to follow these steps:
- Place bricks or other reliable supports under the gearbox;
- Unscrew the left crab, move the stretcher aside;
- Remove the generator, crankshaft pulley, and camshaft gear from the engine;
- The pump, tensioner pin, distributor, and exhaust pipe are also dismantled;
- If a major overhaul is planned, then you can also remove the head;
- Then the engine mount is removed;
- The motor is moved from the box and lowered to the floor. To remove the engine, the front part is raised higher using a jack and the volume is removed;
- Or you can pull it out through the top using a winch.
In practice, all experts recommend dismantling the engine along with the gearbox. Especially if you plan to replace the engine or increase the power of the standard engine. In this situation, the box itself is often changed so that it can clearly interact with the new motor.
Removal and installation of the VAZ-2108, VAZ-2109 and VAZ-21099 engine
Correct removal of the VAZ 2109 engine is necessary for scheduled and routine repairs. In most cases, temporary dismantling occurs along with the gearbox. The procedure is carried out in a specialized garage with a lift. Moreover, if a person knows how to remove a VAZ engine, everything can be done with his own hands in a few hours.
It is advisable that this procedure be carried out by a car owner with some experience. Even minor errors will lead to possible damage to individual elements of the VAZ 2109 vehicle system.
What do they do when overhauling the engine of a VAZ 2108 car?
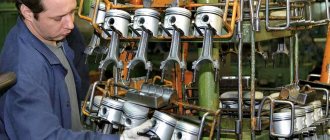
During a major overhaul, you can repair the engine efficiently, increase its power, immediately, if desired, tuning the device, installing a tuning camshaft, it is advisable during this period to increase the engine capacity when it is disassembled. The main stages of engine overhaul on a VAZ 2108 are:
- Removing the unit from the car.
- Washing.
- Disassembly.
- Drawing up a defect sheet.
- A major overhaul of the VAZ 21083 engine is carried out with the obligatory repair of the cylinder block. To do this, check the fit of the planes and dimensions. If necessary, the block is bored to the required size and then honed.
An alternative to overhaul is to install a different engine. The advantages of such a replacement will be:
- It is easier to install it yourself.
- Install a more modern injection engine instead of a carburetor device.
- Use a knot with a large volume.
- Install an engine with lower mileage from disassembly.
The disadvantages include:
- The risk that the expected results will not be obtained.
- Possibility of inconsistency between the engine number and the registration certificate.
Boosting methods
In most cases, achieving the required indicators is achieved by increasing the volume of the car engine. To accomplish a task of this kind, there are several options:
The first involves increasing the diameter of the cylinder block to accommodate a larger piston diameter by boring. It is called “folk” because of its low cost, because in this case all that requires expenses is the purchase of a set of pistons and wheels, as well as payment for turning services.
The second is to replace the factory crankshaft with one that has a larger crank radius and therefore a larger piston stroke and larger volume. Its cost is much higher than the first method, since you will have to spend money on a crankshaft, a set of pistons suitable for the new crankshaft (since the height of the cylinder block has certain restrictions), and special rings for the pistons. In addition, it will be necessary to pay for work related to block boring.
For many, it may be surprising that the increased displacement of the “nine” engine is not always the most advantageous method of boosting. In some situations (it all depends on what the engine should ultimately be like), it is much easier and more efficient to modify the cylinder head (cylinder head) and then install a suitable camshaft. This type of boost will also make it possible to increase the power performance of the power unit.
Of course, to maximize all the capabilities and reserves of the camshaft, a fairly serious modification of the cylinder head will be required, which may even include repressing the seats and installing valves with a large diameter. For example, engines characterized by the presence of eight valves will fit similar parts from BMW, and sixteen-valve engines will fit components from Opel and Volkswagen. At the same time, one should not lose sight of the intake/exhaust channels intended for circulating the fuel-air mixture - they also require improvement. Their improvement involves increasing the cross-sectional diameter to maximum dimensions through internal polishing.
The technical characteristics of the VAZ 2109 cylinder block, like other components, leave their mark on the overall performance of the engine. You can, of course, study in more detail the influence of the types and shapes of pistons, the weight of crankshafts and much more that is somehow reflected in the operation of the engine, but this article is not about that.
The following characteristics have a particular impact on the performance of the internal combustion engine: the ratio of the length of the connecting rod to the piston stroke and the dimensions of the crankshaft crank (diameter).
The importance of the above parameters is due to the fact that the engine is essentially a pump that pumps a certain amount of mixture through itself over a specific period of time. It is these characteristics that will be discussed further.
Oil change features
Filter and plug position
Changing the oil in a VAZ 2109 engine is not the most common process, but you can handle this task as needed. If you buy a used car from another person, you need to change the lubricant in the engine as quickly as possible. Repairing the steering rack on a VAZ 2109 with your own hands (video) The steering rack in front-wheel drive cars is fully responsible for the functionality of the entire steering mechanism. With all this, it is recommended to flush the engine with a special liquid, because it is not clear to you exactly what was filled in earlier.
"Nine for Nine" - Part 2 | Engine replacement | How to remove a VAZ-2109 engine Part 1 | I bought a VAZ-2109 for 9,000 rubles. Hi all! This is the 2nd part of the video “Nine. Part 1. Repair of VAZ 2114 Engine repair after 180,000 km.
It is also recommended to change the oil if you have not used the VAZ 2109 for a long time. Similar posts. Replacing the rear light of a VAZ 2115 with your own hands - step-by-step instructions. When the engine is not started for a long time, condensation accumulates in it and mixes with the lubricant, causing a deterioration in its performance and ultimately increasing wear on all internal parts of the unit.
Actions requiring increased caution
Remove the muffler and camshaft pulley last. Further actions are taken taking into account the actual situation. If the star bolts are covered with a layer of dirt and oil, then there is no need to unscrew them. Remove everything together with the camshaft. It is better to unscrew them if the motor has been used recently.
The front crankshaft pulley will help you remove the engine correctly. To do this, it is recommended to use a folding key. It is installed through the top, not through the bottom. Before using it, it is recommended to switch to speed 4-5. After this, the VAZ engine is more easily subject to normalized physical impact. If the above recommendations do not help ease the movement of the key, you must use the services of an assistant.
One of the assistants gets into the car and presses the brake pedal. In this case, it is easier to remove the front crankshaft pulley. After this, the pipe and the generator bolts located on top are dismantled.
If the transmission bolts show signs of physical wear or significant contamination, it is better to replace them.
In this case, removing the engine will reduce the likelihood of failure in the future. After all, no one knows when the next time a car owner will look under the hood.
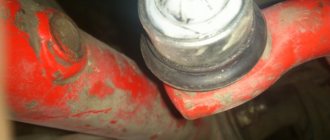
When removing the wires from the generator, it is necessary to gradually loosen the fastening of the device itself. The more accurately your hand moves, the less likely it is to get damaged. After this, the “crab” is removed with no less care. It is secured with two bolts, which we remove using a wrench. Before unscrewing the last bolt, the device is slowly moved to the side.
How is the VAZ 2109 engine removed?
Correct removal of the VAZ 2109 engine is necessary for scheduled and routine repairs. In most cases, temporary dismantling occurs along with the gearbox. The procedure is carried out in a specialized garage with a lift. Moreover, if a person knows how to remove a VAZ engine, everything can be done with his own hands in a few hours.
It is advisable that this procedure be carried out by a car owner with some experience. Even minor errors will lead to possible damage to individual elements of the VAZ 2109 vehicle system.
Preparatory stage
Before starting work, it is strongly recommended that you familiarize yourself with the structure of the “heart” of the iron horse. This will help avoid many problems associated with incorrect connection of individual system elements, such as:
Beginners are advised to take photographs of the listed parts in assembled form. In order to successfully dismantle the VAZ engine, it is necessary to use the tools recommended by the manufacturer. A list of these can be found in the vehicle operating instructions. Regardless of the reason that prompted the need to carry out removal and diagnostics, you must adhere to the following scheme:
A carefully removed car ignition module will help you remove the engine correctly. Due to the fragile nature of the device, do not use excessive physical force. After this, the plug located on the block is dismantled. Only after all the liquid has been drained is the next element removed.
All plugs from the drive are disconnected in random order. The same thing happens with the throttle and hose cables. Before starting this stage, it is better to use a camera to record the initial position. The photo will be useful when the installation of the VAZ engine begins.
Literally, pinpoint precision is required when it comes to removing the hose leading to the gas line. To do this, you need a key set to “17”, which will not break the rather fragile system. Here, as in the case described above, it is necessary to carry out recording using a photo.
When returning the VAZ engine to its rightful place, the photograph will help to correctly connect all the elements. There is no room for error here. Only after you have completed removing all the tubes on the “head” can you move on to those parts that are directly attached to it.
Actions requiring increased caution
Remove the muffler and camshaft pulley last. Further actions are taken taking into account the actual situation. If the star bolts are covered with a layer of dirt and oil, then there is no need to unscrew them. Remove everything together with the camshaft. It is better to unscrew them if the motor has been used recently.
The front crankshaft pulley will help you remove the engine correctly. To do this, it is recommended to use a folding key. It is installed through the top, not through the bottom. Before using it, it is recommended to switch to speed 4-5. After this, the VAZ engine is more easily subject to normalized physical impact. If the above recommendations do not help ease the movement of the key, you must use the services of an assistant.
One of the assistants gets into the car and presses the brake pedal. In this case, it is easier to remove the front crankshaft pulley. After this, the pipe and the generator bolts located on top are dismantled.
If the transmission bolts show signs of physical wear or significant contamination, it is better to replace them.
In this case, removing the engine will reduce the likelihood of failure in the future. After all, no one knows when the next time a car owner will look under the hood.
When removing the wires from the generator, it is necessary to gradually loosen the fastening of the device itself. The more accurately your hand moves, the less likely it is to get damaged. After this, the “crab” is removed with no less care. It is secured with two bolts, which we remove using a wrench. Before unscrewing the last bolt, the device is slowly moved to the side.
How to remove the head from a VAZ 2109. Video
Photo. Crankshaft front pulley
Unscrew the front crankshaft pulley, it is convenient to unscrew it with a spanner, or in other words, with a head, and so that it does not spin, turn on the fifth or fourth speed and ask the assistant to press the brakes, the crankshaft will lock and simply unscrew the pulley bolt.
Preparing for the reverse process
The process is completed by fixing the VAZ engine using a timing belt. It would be a good idea to use 1-2 bricks to help prevent the engine from falling. After making sure that the massive unit is fixed in space, the cushion is loosened and the engine is directly removed. Having secured the belt with your hand, you need to slowly remove the pipe.
If by this time the engine has not come off on its own, it is recommended to use a pry bar. After this, the unit is transferred to a temporary storage location for subsequent work with it. You need to remember - install everything in exactly the reverse order. If some elements have reached the end of their service life, it is better to replace them in advance.
The process of removing the “heart” of a car is complex and multi-stage. Accuracy and precision of actions is the key to successful repairs on your own. After removal, it is recommended to carry out a mandatory inspection of all engine components.
How to determine a malfunction in the engine
The main criteria for determining motor malfunctions are:
- The engine will not start.
- It works unstably and stalls at idle.
- There is no full power during operation.
- Connecting rod bearings knock at idle when the throttle valves are opened sharply.
- A muffled piston knock that occurs when the piston “beats” in the cylinder.
- Knocking noise from intake and exhaust bearings.
- Low oil pressure when the engine is idling.
- Increased oil consumption.
- High fuel consumption.
- Engine overheating.
- Rapid drop in coolant level in the expansion tank.
Any malfunction requires periodic or major repairs of the VAZ 21099 engine.
Periodic engine repair
The VAZ 21099 car engine requires constant maintenance and maintenance of parts and components in good condition. This will increase the service life of the machine and the periods between major repairs. Main types of work:
- Tightening the bolts securing the camshaft bearing housing.
- Tightening the fastenings of engine components.
- Periodic change of filters.
- Change oil if necessary.
- Adjusting the gaps between the camshaft cams and levers.
- Idle speed adjustment, including exhaust gas toxicity control.
- The condition of the piston system can be determined by checking the pressure in the cylinders.
- Coolant level monitoring.
- Replacing spark plugs.