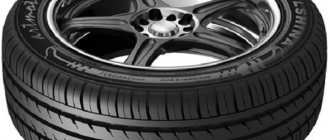
Car rear wheel bearings are a type of bearing support that ensures the rotation of the rear wheel of a car and its rigid fixation on the axle. The bearing itself is located in the hub, to which the wheel is in turn attached. Bearings differ in design, size, and technical characteristics.
In this article we will consider the following questions:
- Methods for replacing rear wheel bearings;
- Causes and symptoms of malfunction;
- Types of wheel bearing units, numbers and sizes;
- Tips for use and replacement.
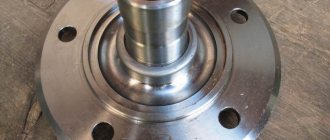
To begin with, we present 2 typical layouts of parts. In the diagram on the left is a non-separable hub assembly with HUB-3 (3rd generation bearing) - on the right is HUB-1 (1st generation).
What are the types of wheel bearing malfunctions?
- Depressurization of the seals on the side of the wheel and the ABS sensor is the main malfunction.
- Fatigue failure of metal, peeling due to prolonged use.
- Rust, which can appear as a result of water getting on the surface of the inner or outer race, as well as the hub or axle.
- The choice of low-quality parts with deviations in geometric dimensions leads to destruction or rotation of the housing in the knuckle hole or slipping of the hub axis, the wheel wobbles, and play increases.
- Inadequate amount of lubricant leads to jamming.
Hub functions
The main part of the car chassis assembly that experiences the heaviest loads is the hub, both front and rear. Because it is an intermediate part connecting the wheels and suspension of the car. If this important part breaks down, there is a threat to all road users. Each wheel has its own hub. The wheel is rigidly attached to the hub and performs a rotational movement around its axis, and the hub is attached rigidly to the car’s suspension. Depending on what kind of drive the car has, the functions of the hub differ. If the car has rear driving wheels, then the rear wheel hubs perform an additional function - this is the redistribution of torque from the crankshaft to the wheel. It turns out that the rear hub of such cars is an element of the transmission, and not just the chassis. The following parts are attached to the wheel hub - brake discs or drums. Inexpensive machines have drums installed. Therefore, another function of the rear wheel hub is to provide braking. In addition, the hub serves as a location for installing various sensors (speed, ABS, control and other technical indicators) that modern cars are equipped with. These are the functions of the rear hub:
- Ensuring rigid, reliable fixation of the wheel to the suspension.
- Ensuring the wheel rotates around its axis.
- Maintains anti-lock braking and braking systems.
- Serves as a mounting location for various sensors.
Symptoms and diagnostics
The main symptom is excessive noise, which increases while driving. The second important sign is the presence of play in the wheel.
To more accurately determine the malfunction and understand on which side a new part will need to be installed, you must:
- At a speed of 10-15 km/h, sharply turn the steering wheel to the left, after which this extraneous noise will disappear, which means that the noise comes from the left wheel, or more precisely, from its hub bearing.
- If the noise disappears when turning to the right, then you will have to change the bearing on the right wheel.
To carry out 100% diagnostics, follow the instructions:
- Raise the car with a lift or jack.
- If the car has front-wheel drive, then start the engine and pick up speed at 70-80 km/h.
- Next, you should determine by ear which wheel is making the most noise.
- If the wheel is not driving, then you can spin it by hand.
- After stopping the wheel, you need to grab the upper part with one hand and the lower part with the other.
- Try to swing the wheel in a vertical plane.
- Even if there is slight play, the bearing will have to be replaced.
- Similarly, shake the wheel in a horizontal plane.
Note:
It happens that play appears due to malfunctions of the suspension elements, or due to improper tightening of the hub nut. To make sure that the problem is not in the suspension, you need to press the brake pedal and check the vertical play. If the play does not disappear, then you need to look for the cause in the suspension. You should also check the tightening torque of the lock nut; instructions are in the article “How to tighten the hub nut and with what torque.”
Symptoms of malfunction
If, while driving a car, a hum and a kind of howl is heard from the rear of the car, increasing as it turns, this will indicate that the bearing is faulty.
Methods for checking a bearing
- Having hung each wheel on a jack one by one, we spin it as much as possible. And if noise and hum are heard during such manipulations, this is a faulty bearing.
- The wheels should be hung one at a time, since a dispute may arise when determining the side of the noise, and it also happens that two bearings require replacement at once.
- Another way to determine bearing wear is to hang the wheel and check its lateral play. We take it by the edges and swing it from us to ourselves. If the bearing is faulty, you will feel the wheel moving on the axle.
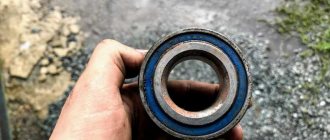
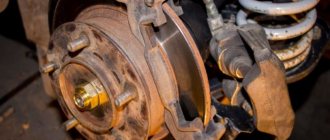
The grease has come out. Instead there is a rusty likeness. No wonder the bearing howled
Despite the fact that some models of bearings today can be purchased immediately assembled with a hub, this is not worth doing. Since buying a bearing separately and replacing it yourself will not be difficult. Below we describe this process in detail.
Causes of wheel bearing failure
Friction is the main enemy of balls or rollers. Over time, the lubricant loses its quality and abrasion begins on the spherical surface of the elements enclosed inside the cages. A sign is excessive heating, an increasing hum while driving, a metallic grinding sound.
Failure of one of the assembly elements: the axle or hub will certainly affect the operation of the bearing: the force of impacts on the cages will increase, and excessive axial and radial loads will appear.
Other reasons:
- extreme riding;
- poor road and climatic conditions: dirt, dust, potholes;
- improper installation, adjustment, use of impact methods when assembling the unit.
Replacing the rear wheel bearing
There are also several repair methods:
- With the removal of the rack;
- Without removing the stand;
- Using a puller/press;
- No puller/press.
The first steps in the instructions are similar for almost all passenger cars:
- We choose a flat area.
- Loosen the wheel nuts.
- We jack up the rear wheel.
- We place a support under the rear of the car, and place a wheel chock under the front wheel.
- We lower the car onto a support using a jack.
REPLACEMENT INSTRUCTIONS BY VEHICLE BRAND:
On our website you can see detailed instructions with photos and videos for all types of designs and techniques for the following car models:
- Chevrolet:
- Lanos
- Aveo
- Lacetti
- Fusion
- Nexia
- Logan
- 206
- Gazelle
- Accent
- Sportage
Note:
If your car is not on the list, choose by brand, in 90% of cases the instructions will be suitable for you!
Step-by-step instructions: replacing the rear axle bearing
At the beginning of the article, diagrams of the main components of the rear axle shaft of the KIA Sportage are shown. This car in 2WD and 4WD versions has a different design of the rear hub assembly, so we took this car as an example of repair.
Differences in the hub assembly: On the left, the HUB-3 is a non-separable unit. On the right, HUB-1 is a dismountable unit: HUB-1 is sequentially pressed into the hole of the fist 1, then the hub axle 2.
- Removing the wheel.
- Unscrew the 2 diametrically located screws securing the brake disc.
- Unscrew the 2 caliper mounting bolts.
- We dismantle the caliper and check whether the pads need to be changed.
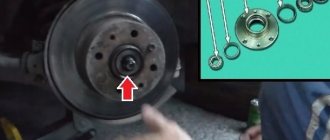
- Removing the brake drum (disc).
- Unscrew the central nut and remove the pressure washer.
- Trying to knock out the axle shaft with a hammer is sometimes unsuccessful.
- We squeeze out the axle shaft with a puller, unscrew the fastenings of the levers and supports, and free the fist.
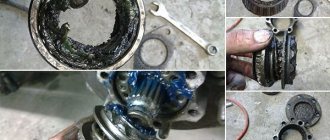
Photo report:
Replacing the rear wheel bearing using a special puller without removing the assembly
- We install a device called an impact hammer on the hub studs.
- It will take a few hard hits and the hub will come off, but often there will be clips left on it and inside the knuckle.
- We remove the axle shaft from the hole in the fist.
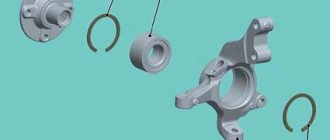
- We take out the retaining ring from the fist socket.
- We charge a screw puller - a set of a long rod (bolt) and a set of washers and round plates (pancakes) for the diameters of the outer and inner races, wide rings.
- We rest the round plate against the hole in the fist, and pass the rod (long bolt) into the hole in the plate. On the other end of the rod we put a plate along the diameter of the outer race and press it with a nut. We begin to tighten the bolt and place the key on the back side.
- Use a powerful wrench or a hand tool with an extension as a wrench. The bearing housing will move forward so that it comes out further, add a wide ring.
It is important to know:
Pay attention to the selection of the puller plates: they must match the diameters of the cages.
Photo report:
Instructions for replacing the wheel bearing with removing the unit
Points up to 7 are the same as in the step-by-step instructions.
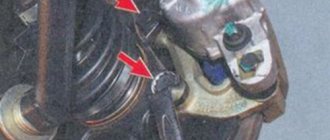
- We unscrew the bolt securing the ABS sensor, pull it out of the socket, and put it aside.
- We unscrew the bolts of the rods and levers attached to the knuckle axles.
- We disassemble the handbrake mechanisms: pay attention to the guide pins of the springs; if you are doing this for the first time, take a photograph of the position of the parts.
- We release the handbrake cable, take out the fixing bracket on the reverse side, and pull out the cable.
- Unscrew the 2 bolts securing the shock absorber strut from the knuckle axle.
- Remove the assembly completely.
Photo report
Replacing the rear wheel bearing on a pressing machine
- We take out the retaining ring.
- After dismantling the hub, install a clamp or puller.
- First we press out the hub, then the bearing.
Assembly of the unit
- After purchasing a new part, press it into the hub
- See if the retaining ring should be replaced with a new one.
- Press the hub into the assembly.
- Next, we carry out the installation in reverse order.
Photo report
Replacing the rear wheel hub flange assembly
A non-separable unit, when the bearing is combined with the hub, is easier to replace: disconnect the rear axle flange, just unscrew a few bolts, but this depends on the design of the flange.
- We remove the caliper and brake disc - operations as in the previous instructions.
- If the disk is clamped, turn the adjusting wheel with a screwdriver through the special hole. Depending on which side you remove the disc from, rotate the wheel teeth down or up.
- The HUB-3 flange mounting bolts can be accessed after removing the shock absorber. First place a stand under the rack arm.
- Unscrew the 4 flange mounting bolts, disconnect the ABS connector, and remove the wheel bearing.
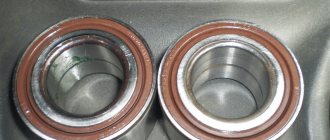
- Check the numbers of the old and new rear wheel bearings.
- Clean the flange seat. Installation in reverse order.
Photo report
Video instructions
Replacing the rear wheel bearing on a Kia Sportage
Kia Sportage - rear wheel bearing replacement
Types of designs of rear wheel hub units
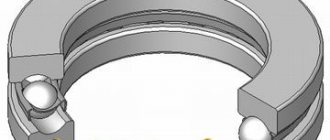
- HUB-1 has two rows of angular contact ball or roller assemblies enclosed in cage cells.
The factory seal reliably seals the internal parts from water and abrasive particles. The lubricant prevents friction forces. Operation under normal conditions reaches a mileage of 100,000 km.
- HUB-3 is a prefabricated structure with a flange.
The flanges are attached: one to the fist - the second is connected to the brake and wheel disc. If it fails, after approximately 150,000 km of run under normal operating conditions, the whole thing is replaced. HUB-3 with splines is designed for drive wheels.
Also, built-in ABS/speed sensors are added to the design of these bearings.
- Two single row bearings are pressed inside the hub.
They are pressed into the hub on both sides, the assembly is pressed onto the knuckle axle and secured with a hub nut. The design is typical for non-driving rear and front wheels of some car models. They are equipped with oil seals and, in some cases, an adjusting spacer ring.?
Tips for maintenance and operation of bearings
- How to lubricate a wheel bearing.
- Keep dust away from grease and bearings. Lubrication of external surfaces prevents corrosion. For external lubrication, perform the following operations:
- First, you need to cleanly rinse the seat of the clip with kerosene, wipe it dry, then lubricate the seating surface with a thin layer of lubricant. Put on a clean rubber glove, apply lubricant to your palm and rub it into the bearing, then insert the part inside and additionally wipe the surface with a rag moistened with lubricant.
- You can use any anti-corrosion lubricant; specialized lubricants for bearing units are sold on the market. When applying, observe the amount of lubricant - there should be no leaks from the unit.
- Lubrication of the bearing inside is possible if it is open or has rubber seals. Add lubricant inside, but here you also need to follow an important rule - there should be no excess lubricant (turn the races repeatedly, excess lubricant will come out, it should be removed).
Recommended lubricant is presented in the table:
| Lubricant brands | Manufacturers | Thickener | Base oil |
| RareMax AF-1 | Kyodo Yushi Co., Ltd. | Urea | Mineral oil |
| 6459 Grease N | Showa Shell Sekiyu, KK | Urea | Mineral oil |
| Pyronoc Universal N-6C | Nisseki Mitsubishi Oil Corporation | Urea | Mineral oil |
| HB-1 | Kyodo Yushi Co., Ltd. | Urea | Mineral oil |
| Ronex MP | Exxon/Mobil | Lithium | Mineral oil |
- How to extend service life.
Tighten the axle nut to the recommended torque. Excessive tension will cause excess friction, the lubricant will heat up, dry out, and the rubbing parts will become deformed. Insufficient fastening torque will cause more play than is permissible, which will lead to premature wear. Use original spare parts (nut, cotter pin, retaining ring, etc.) to repair bearings.
Calculate service life "Wheel Bearing Life Calculator"
Read the article “Tightening torque of wheel bearings”
- Which wheel bearing to choose based on manufacturer, and what to look for when purchasing.
The original number is indicated on the case; the manufacturer recommends installing it. If it is not possible to get the original, there are replacement brands. The main thing is that the dimensions and technical characteristics match. On the packaging, look at the inscriptions, barcode, stamped number on the case, and the package contents.
Read the article “Rating of the best wheel bearing manufacturers”
- Wheel bearing kit - what it includes.
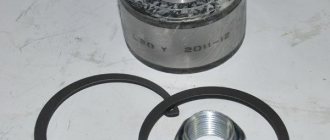
The repair kit includes consumable parts: wheel nuts 1 or 2 pcs., wheel bolts - set, lock ring 2 pcs. cotter pin Possible oil seals, outer races and even lubricant.
- What to use a press or puller.
For high-quality work, use a press, remove the assembly, take it to a service station, and for a small fee they will replace the assembly parts in 1-1.5 hours. The puller is used when replacing independently, purchased or rented. An assistant's hand will be useful for holding the key.
Important point:
Do not put pressure on the inner race of the bearing, as this may damage the elements of the bearing assembly.
- ABS bearings.
The presence of an impulse ring can be easily checked by placing a metal object on one side of the seals. The magnetized side is placed inside the hole of the fist to the connector of the reading sensor.
The third way to remove the bearing
If it is not possible to use the first method when deciding how to remove the bearing with a puller, then use the third method. It will require skill and the use of force and auxiliary tools. What is the procedure for action?
- Study the features of the procedure, how to remove a bearing, evaluate your capabilities and level of skills.
- Select the necessary tools: a sledgehammer with a soft tip, wooden stands, a vice.
- Fix the removable shaft in a vice and use a hammer and wooden blocks to knock the shaft out in the opposite direction. Be careful not to damage the entire structure of the part with an awkward blow, because it can be used in the future.
Thus, the third method is used if the bearing is completely worn out and does not come out of its seat, so force must be applied. There are times when it is difficult to solve the problem of how to remove the rear bearings from the shaft, so you simply have to cut them out. This radical method is resorted to by experienced craftsmen who have received a completely worn-out chassis system for repair, and there is no other way to get a bearing to replace it. Beginners are not recommended to use the third method, because they simply will not cope and can damage other elements of the chassis system. In this case, a simple bearing replacement will cost a pretty penny.