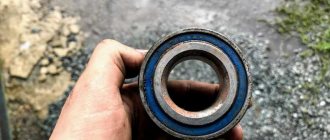
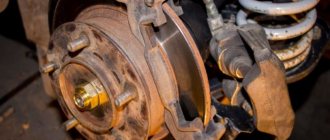
Bearing condition diagnostics
Often, a faulty front wheel bearing manifests itself in the form of noise when the car is moving. You can verify the serviceability (or verify the malfunction) of the wheel bearings as follows:
- Place the car on a level surface, raise the handbrake lever;
- install wheel chocks;
- raise the car by hanging the front wheel;
- install a stop under the lower ball;
- install a safety support under the body;
- lower the jack;
- shake the wheel with your hands, holding the top and bottom;
- spin the wheel.
If play is felt while the wheel is rocking, adjusting the bearing tightening can help. But usually, if a hum, grinding noise, knocking, or play in the bearing occurs, it is necessary to replace the VAZ 2107 wheel bearing.
Standard wheels
A car wheel consists of a disk and a tire, which have individual characteristics.
The AvtoVAZ concern indicates the standard tire size for the Lada Vesta car in the basic configuration - 185/65/R15 88 N (the manufacturer allows the use of T). It means:
- width - 185 mm;
- profile - 65% of 185 mm (120.25 mm);
- The tire must be mounted on a rim with a diameter of 15 inches;
- 88 — load capacity index 560 kg;
- H - speed index, up to 210 km/h (for T - up to 190 km/h).
Such tires under the name ArtMotion for AvtoVAZ are manufactured at Belshina OJSC; the products are characterized by moderate softness and good rubber wear resistance, low noise and excellent road holding. Belshina OJSC also produces tires with identical characteristics in a winter version - the ArtMotion Snow model.
In the basic configurations of the Lada Vesta, these tires are mounted on stamped steel rims of size 6J 15 ET 50 4×100 60.1 (as an option - light-alloy wheels of the same dimensions, ANNA-15 model from the manufacturer K&K), which means:
- 6J — disk rim width (6 inches);
- 15 — mounting diameter in inches;
- ET 50 - offset 50 mm;
- 4×100 (PCD, bolt pattern) - the disk is secured with 4 bolts located around a circle with a diameter of 100 mm;
- 60.1(DIA) - the size of the central (hub) hole.
For top-end configurations of Lada Vesta, the factory installs wheels with dimensions 195/55 R16 91 N (T allowed):
- width - 195 mm;
- profile height - 107.25 mm (55% of 195);
- R16 (mounting diameter of the disk) - 16 inches;
- 91 (load capacity index) - 615 kg;
- H (speed index) - up to 210 km/h (T is allowed - up to 190 km/h).
These EcoContact tires are supplied to AvtoVAZ by the German company Continental. They are mounted on light alloy wheels of the K&K company model Ptalomey-16 with dimensions 6Jx16 ET50 4x100 60.1, the geometric characteristics of which differ only in the mounting diameter - 16 inches.
For basic versions of Lada Vesta, installation of wheels of these dimensions on K&K alloy wheels is also possible as an additional option.
In the Luxe configuration of the Lada Vesta, for an additional fee, it is possible to install wheels even with 17-inch rims of the same model - Ptalomey-17.
For clarity, let’s summarize the correspondence between the sizes of tires and wheels of the Lada Vesta in a table.
Adjusting the wheel bearing on a VAZ 2107
If the bearing is slightly worn, you can tighten the adjusting nut and eliminate the play. To do this you will need a jack, a wrench, pliers, a hammer and a screwdriver.
You can correctly tighten the front wheel bearing of a VAZ 2107 as follows:
- lift the car with a jack, hanging the wheel;
- Use a screwdriver and hammer to remove the protective plug from the hub bearing;
- tighten the adjusting nut so that the wheel stops rotating by hand;
- gradually loosen the nut until the wheel rotates freely, but does not play;
- bend the side of the nut with a chisel or screwdriver so that it cannot unscrew spontaneously;
- put the protective plug in place;
- lower and remove the jack.
If play and noise cannot be eliminated in this way, the bearing must be replaced.
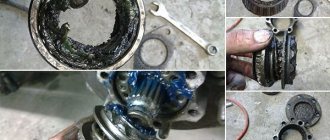
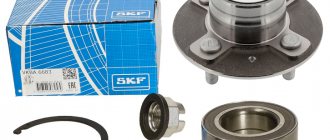
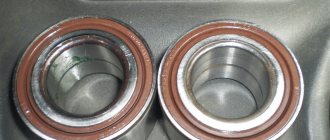
How to replace bearings
As in the case of diagnostics, we begin the repair by jacking up the car and removing the wheel. Further:
- unscrew the caliper and hang it so that it does not interfere;
- remove the nut cover on the hub;
- unscrew the nut with a 27 wrench;
- remove the washer;
- remove the hub with the attached brake disc;
- remove the small bearing separator;
- remove the oil seal;
- remove the large bearing separator;
- remove the clips with a puller or knock them out with a hammer and chisel;
- remove old grease from the hub and cap.
We perform assembly in reverse order.
- press in the bearing races;
- lubricate and install the inner bearing separator;
- install the oil seal;
- put the hub in place;
- lubricate the outer bearing separator and install it in place;
- install the pressure washer;
- tighten the nut;
- screw the caliper into place.
At this point, the replacement of the front wheel bearing of the VAZ 2107 is completed and all that remains is to adjust the tightening of the nut, this is done as I already described above.
Replacing a VAZ 2107 wheel bearing
- lift the car on a lift or “hang” the wheel using a jack;
- Unscrew the wheel mounting bolts;
- remove the wheel;
- unscrew the caliper mounting bolts;
- remove the brake caliper;
- pry up the protective cap of the hub with a screwdriver and remove it (sometimes you need to use a hammer for this);
- straighten the dented side of the hub nut, which prevents it from unscrewing spontaneously;
- unscrew and remove the washer nut;
- remove the hub from the car;
- pull out the bearing cage;
- remove the ring separating the outer and inner hub bearings;
- knock out the bearing races from the seat using an extension and a hammer;
- thoroughly clean the bearing installation area from old grease and dirt using rags and kerosene;
- press in the outer and inner bearing races
- thoroughly lubricate the internal separator;
- insert the internal separator;
- fill the inter-bearing space with lubricant by approximately 40%;
- insert the spacer ring;
- press in a new oil seal;
- install the hub on the axle;
- lubricate the external separator;
- insert external separator;
- install the external separator in place;
- put the washer in place and tighten the hub nut until it stops;
- achieve free rotation of the hub in the absence of play by smoothly unscrewing the nut;
- bend the side of the nut with a chisel or screwdriver, thereby preventing it from unscrewing;
- Reinstall the brake caliper and tighten the mounting nuts;
- install the protective cap;
- put the wheel in place and tighten the wheel bolts;
- lower the car.
Replacing the front wheel bearing of the VAZ 2107 is completed and the car is ready for use.
Tips for replacing a wheel bearing
After a short run (approximately 200-300 km), you should check the play of the hub bearing and, if necessary, eliminate it by tightening the nut.
Timely elimination of play is a guarantee of long bearing service.
After replacing the wheel bearing, you should check the wheel alignment parameters of the front wheels.
Causes of failure
How to replace the rear wheel bearing on a VAZ 2108-2109 with your own hands
Every part on a car tends to become unusable. Rear wheel bearings are no exception, but any part has characteristic operational features. If the operating conditions are met, the part can serve for years, which is confirmed by the driving experience of current older drivers.
The main reasons for bearing failure are:
- careless driving;
- incorrect installation of the product;
- water and dust getting inside the hub;
- leakage of lubricant;
- long service life.
If a VAZ-2107 car is often operated in aggressive conditions close to off-road, then the need to replace the rear wheel bearing will not take long to arrive.
It is especially important to take into account the fact that the famous “seven” is a rear-wheel drive car. But how can you determine that a wheel bearing has failed and needs to be replaced? Let's find out in more detail
Methods for determining whether a wheel bearing is faulty
Timely identification of a malfunction allows you to prevent unpleasant consequences that can provoke an emergency situation on the road. The part in question on the VAZ-2107 car plays an important role, since thanks to this product the wheel rotates easily. The car has 2 rear wheel bearings, one for each rear wheel.
The main way to determine the malfunction of an important part of the hub on a VAZ-2107 is to carry out the following manipulations:
- raise the rear of the car on a jack;
- swing the outer part of the wheel in different directions;
- if a knocking noise occurs and the wheel dangles, then the rear wheel bearing of the VAZ-2107 needs to be replaced.
If the car drives while turning corners and a squeaking noise appears, this also indicates the need for repair work. To replace the wheel bearing, you will need the following tools:
- domktat,
- wrenches and screwdrivers,
- chisel and hammer,
- puller,
- Litol brand lubricant.
After making sure that you have a complete list of tools and materials for the work, you can begin replacement.
Replacing a faulty product
You must begin replacing the product by loosening the wheel bolts. This must be done before the rear of the car is jacked up. At the same time, do not forget to install stops under the front wheels.
- A jack is installed, then the rear side of the car where the bearing needs to be replaced is jacked up. Once the car is raised, you can install a safety stump in case the jack comes off.
- The wheel is removed, and then the drum. It should be remembered that you cannot put the car on the handbrake, otherwise you will not be able to remove the drum. To remove the drum, you need to unscrew two pins and insert them into the technological holes. When the pins are tightened, the drum is pulled out, after which it can be dismantled.
- Using a screwdriver, pry off the steel cap or protective cover. The 4 nuts securing the axle shaft are unscrewed.
- We use a special puller, with the help of which the hub is removed from the drive axle axle. If there is no puller, then you can use a regular chain or cable, attaching it to the axle shaft.
- It is necessary to remove the worn bearing from the axle shaft using a puller or grinder. To remove the bearing using a grinder, you need to cut the outer race on both sides.
- Before pressing in a new product, it is necessary to thoroughly lubricate the seat on the axle shaft and in the hub. The bearing must be pressed in using a locking sleeve.
- The bushing must be heated with a blowtorch, then put on the axle shaft and cooled with water.
Further actions are performed in the reverse order of removal
It is important not to forget that when replacing a bearing, the sealing seals must also be replaced.
The bearing must not be misaligned, which can lead to its failure on the first day of operation. If you operate the car correctly and carefully, then you can forget about replacing the bearing for 2-5 years. You can also read about replacing the front wheel hub bearing.
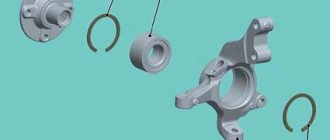
Steering knuckle repair
Repair of the steering knuckle is possible with minor wear or minor damage. As a rule, if a unit is seriously damaged after an accident, car enthusiasts simply replace it with a new one.
Repair work is only possible after the steering knuckle has been completely removed from the vehicle. The repair schedule looks like this:
- Clean the surfaces of the fist from dirt and dust, wipe it with a clean cloth, and blow with compressed air.
- Clean the grooves for the retaining rings.
- Inspect the steering knuckle after dismantling for signs of deformation and wear.
- Install a new retaining ring and press the new bearing in until it stops.
- If it is necessary to replace the trunnion, replace it. If the axle and kingpin are severely worn, it is recommended to replace the steering knuckle assembly.
Repairing the steering knuckle involves replacing the retaining rings and bearing. In case of extensive damage, only replacement is recommended.
Checking and adjusting the tightening torque
Wheel bearings are tightened strictly according to the factory requirements of a specific car brand. The moment depends on:
- bearing size;
- nominal axial play of the wheel;
- diameter, thread pitch of axle, axle shaft.
To complete the procedure you will need the following tools:
The method for adjusting the hub is practically the same on different cars. Execution order:
- Loosen the bolts.
- Raise the body and remove the wheel.
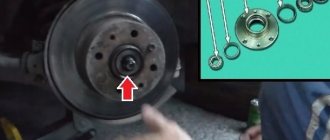
- Use a flat-head screwdriver to unscrew the protective cap of the hub.
- Unscrew the edge with a chisel. If there is a locking pin, remove it with pliers.
- Check the torque with a set torque wrench. Achieve the required value.
- Reassemble the unit in reverse order and install the wheel.
On some car models, the nut is secured by pressing the edge into the groove. The nut is disposable and must be changed with each adjustment. It is recommended to replace damaged, leaking nut protective caps with new ones.
Example - adjustment on a Chevrolet Niva
It is recommended to perform the procedure on two wheels of one Niva Chevrolet axle.
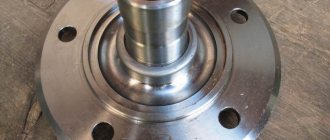
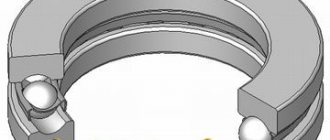
Structurally, the wheel assembly consists of several parts:
- a steering knuckle held in place by a pair of ball joints;
- brake disk;
- hub assembly;
- support for mounting cylinders, brake pads.
Required set of tools:
Hammer, chisel, flat screwdriver, 27mm socket, dial indicator with tripod.
Step-by-step instructions using the Niva Chevy as an example:
- The car is secured with a parking brake.
- The wheel mounts become loose.
- The body is raised with a jack or lift.
- The protective cap is removed.
- The indicator stand is installed on the hub bolts. Place the leg of the micrometer against the drive axis.
- Measurements are taken.
The presence of a torque that differs from the tolerance indicates the need for adjustment. For this:
- Unscrew the fasteners, unscrew the axle shafts from the thread;
- make a new one;
- tighten to a torque of 19.6-19.7 N*m;
- simultaneously turn the wheel in both directions to self-install the balls;
- Check the condition of the displacement with an indicator and the tightening torque with a torque wrench.
Watch the video for 2 ways to adjust without an indicator:
What can cause a bearing to play?
As mentioned above, there are two factors that lead to backlash:
- Worn or damaged wheel bearings
- Incorrect adjustment.
With the first case everything is clear. But the second one is worth clarifying. Many people notice that after adjusting the hub bearing according to the manual, after some time it begins to play again. This is normal; normal wear and tear on working surfaces and rubbing parts occurs.
After a certain time it is necessary to check and, if necessary, adjust again. It is recommended to do this at a mileage of 5-10-20 thousand km. For example, on Niva, wheel bearings are considered consumables and do not last up to 50 thousand km.
It is worth remembering that after replacing the front wheel bearing, it will also have a certain amount of play. If you don’t pay attention to this, then there will be only a few kilometers left before repairs are completed. Therefore, we make sure to make adjustments. We'll talk about this in detail below.