Removal and installation of wheel bearings Niva 2121, VAZ 2131, Lada 4x4
We carry out the work on an inspection ditch or a lift.
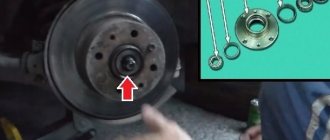
We hang the front part of the VAZ 2121 car and remove the wheel. We disconnect the caliper from the pad guide (see Disassembling the front brake mechanism Niva 2131)… …and tie them with wire to the upper arm.
We unscrew the adjusting nut of the hub bearings (see Checking and adjusting the clearance in the hub bearings).
We take out the conical bushing. Using a chisel, we unbend the edge of the locking plate of the nut for the front attachment of the lever to the steering knuckle.
Similarly, loosen the rear fastening nut.
Using a 19mm spanner, unscrew the nut that secures the rear lever to the steering knuckle.
Similarly, unscrew the front fastening nut.
We remove the locking plate. Having removed the lever from the bolts, we move it away from the steering knuckle.
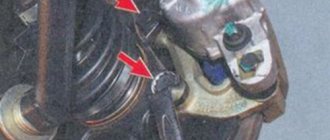
Disconnect the brake hoses from the steering knuckle (see Removing the front brake hose). We disconnect the fastening of the upper and lower ball joints from the arms of the Niva 2121 (see Removing the upper ball joint, and Removing the lower ball joint of the VAZ 2121).
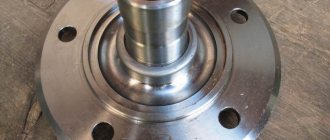
From the splines of the front wheel drive outer joint housing, remove the steering knuckle assembly with ball joints, hub assembly and brake disc. Disconnect the steering knuckle and hub with the brake disc.
If it is difficult to separate the parts, clamp the steering knuckle in a vice...
...and use a soft metal drift to knock out the hub. Now you can remove the bolts securing the Niva 2131 lever to the steering knuckle.
To separate the VAZ 2121 hub and the brake disc, screw the nut onto the stud...
...and knock out the pin. Unscrew the nut and remove the pin.
We dismantle the other studs in the same way.
We disconnect the hub and the brake disc. Use a chisel to knock down the mud ring. Using a “10” wrench, unscrew the bolt securing the protective casing...... and remove the casing.
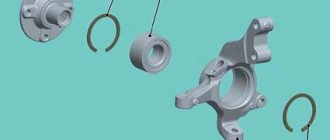
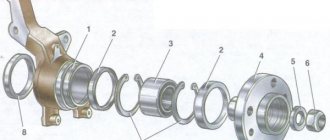
To dismantle the seals and hub bearings, clamp the steering knuckle in a vice.
We pry up the oil seal with a screwdriver......and take it out. We take out the ring. We take out the inner ring of the outer bearing of the VAZ 2131 with a separator and rollers.
Similarly, we remove the oil seal, ring and inner ring of the other (inner) bearing with a cage and rollers.
We use a punch to knock out the outer ring of the outer bearing......and take it out.
Similarly, we knock out the outer ring of the inner bearing. We perform assembly in reverse order. Before installing the bearings, clean the inner cavity of the steering knuckle from old grease. We press in a suitable piece of pipe...
...outer rings of bearings.
We put 40 g of Litol-24 lubricant into the cavity of the steering knuckle and into the bearing separators.
Installing a New Seal
After removing the axle shaft, the metal shield where the brake pads are attached will remain hanging on the copper pipe with the fluid, so it should be fixed by inserting the 2 upper bolts back into the holes. Then follow the instructions:
- Remove the thick rubber gasket from the rear axle flange.
- Pull out the old oil seal by prying it with a screwdriver or pliers. Clean the seat and wipe with a rag.
- Lightly lubricate the new seal with transmission oil and insert it into the socket of the Niva rear axle as evenly as possible.
- Using a round pipe adapter, press the oil seal into the socket with light blows of a hammer. You can use an old seal as an additional attachment.
At the end of the procedure, you must thoroughly wipe all parts free of oil - the brake cylinder, pads, drum and metal shield. Before reassembling, it would be a good idea to check the axle bearing for wear and grease. Wear is indicated by difficulty turning, binding, or slight noise. If you discover a malfunction, take the axle shaft to the nearest car service center; you will not be able to replace the bearing without special equipment.
To check the grease inside the bearing, you need to pry the plastic covering the rollers with an awl and remove it. Then add thick Litol-type lubricant inside and put the plastic in place, and then begin assembly.
At the end, it is important to check the oil level in the rear axle gearbox of the Chevrolet Niva. The test is carried out on a fully assembled car, standing on a level area. The filler plug is unscrewed from the gearbox housing, after which the oil level is determined visually or using a thin wooden stick
If there is a shortage, you need to insert a hose of a suitable diameter into the filler neck with a watering can at the end, where the lubricant is poured. It is more convenient to top up with an assistant: you control the level, and the assistant gradually adds oil
The filler plug is unscrewed from the gearbox housing, after which the oil level is determined visually or using a thin wooden stick. If there is a shortage, you need to insert a hose of a suitable diameter into the filler neck with a watering can at the end, where the lubricant is poured. It is more convenient to top up with an assistant: you control the level, and the assistant gradually adds oil.
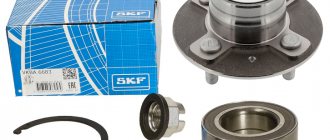
How to remove the front wheel hub of a VAZ 2121 Niva 2131
Removal of the front wheel hub on a VAZ 2121 and Niva 2131 is performed to replace it, as well as replace the wheel bearing, after checking the size of the gap in the bearing and its excess from the recommended values. To carry out repair work, prepare a standard set of tools, and then perform the following sequence of actions:
- Having driven the car into an inspection pit or overpass, we hang the side to be repaired and remove the wheel.
- Next, remove the caliper from the brake disc and tie it up so that it does not hang on the rubber brake hose.
- Unlock the adjusting nut of the hub bearing and, having removed it, remove the cone bushing.
- Using a small chisel and hammer, loosen the edges of the locking plate of the nut of the front and rear mounting of the lever to the steering knuckle.
- Then, using a nineteen-socket wrench, unscrew the nut of the rear mounting of the lever to the steering knuckle.
- Similarly, unscrew the front fastening nut.
- Remove the locking plate located under the nuts.
- Then remove the lever from the steering knuckle and move it to the side so that it does not interfere.
- Disconnect the lower and upper ball joint housings from the arm. Then disconnect the brake hose fastening from the steering knuckle.
- From the splines of the front wheel drive outer joint housing, remove the steering knuckle assembly with ball joints, hub and brake disc.
- We disconnect the steering knuckle, brake disc and hub from each other.
At this point, the repair work to remove the front wheel hub on the VAZ 2121 and Niva 2131 has been completed. Make the necessary repairs, then install in the reverse order.
Operating principle and diagnostics
Replacing a wheel bearing on a Niva is slightly different from its “sisters”, this is due to all-wheel drive, since the wheels must be designed to rotate from the gearbox. Those wishing to carry out repairs should immediately carefully read the requirements of the operating instructions from the manufacturer, otherwise you will waste a lot of time.
The quality of roads, driving style, originality of spare parts, this is not a complete list, which directly or indirectly affects the service life of the wheel bearing. Structurally, the car wheel and the axle shaft are connected to each other by a hub.
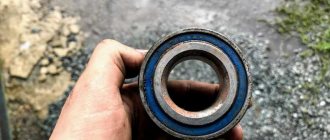
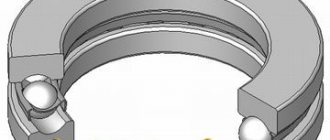
The shape of the bearings resembles cones, hence the name - conical.
A special feature is that only the Niva car has the ability to adjust the gap between the bearing and the hub. Over time, any mechanism wears out and becomes thinner. To extend the service life, engineers came up with this adjustment method.
Remember, too much tightening will cause the wheel to jam, and too little tightening will cause it to break. It is necessary to clamp with a dynamometer with certain readings.
Signs of bearing damage
The primary marker of a problem with a Niva wheel bearing is a characteristic sound, a noise that is difficult to distinguish from the sound of driving on asphalt. Therefore, you need to carefully check the condition of the wheel for characteristic signs:
- the wheel is warm and there is no smell from the pads;
- strong vibrations in the steering column and body from the front wheels;
- pulling the car to the side at high speeds from the direct course;
- heavy steering control off-road;
- a clearly audible crunch when turning the wheel (audible even with the engine turned off, if the car is rolled by hand).
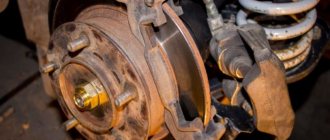
Replacing the front wheel bearing yourself
Replacing a Niva Chevrolet wheel bearing with your own hands will require an inspection hole or a lift. Let's look at how to change the front wheel bearing. You need to hang the front of the car to provide full access to the components. Further dismantling after removing the wheel occurs exclusively in strict sequence.
Front hub Niva 2121 diagram:
- Remove the guide block and caliper. Secure it with something under the bottom of the car so as not to completely dismantle the brake.
- We remove the boot.
- Remove the Niva Chevrolet wheel bearing nut and take out the cone bushing.
- Using a chisel, bend the locking nut of the front knuckle arm.
- Repeat the procedure on the rear fastener.
- Remove both nuts and the stopper plate (you will need a 19 mm wrench).
- Move the lever away from the knuckle and disconnect the brake hoses.
- Remove the fasteners and the entire fist.
- Disconnect the hub base (brake disc) from the knuckle.
Replacing the Niva front wheel hub bearing is the same as on the rear one
Replacement algorithm
- We drive onto a viewing hole, lift or overpass;
- Remove the corresponding left or right wheel;
- By unscrewing the two nuts, remove the brake caliper and move it to the side so that it does not interfere with the process;
Place it on a flat surface
, we begin to carry out diagnostics. First of all, immediately replace the seals, no matter how intact they look, it is better to replace them. Temperature does its job. Carefully tapping it with a wooden tip, we remove the wheel bearings and wash them in kerosene to make diagnostics possible in the future.
It happens that the product is externally normal; you just need to clean the groove, replace the lubricant and that’s it. True, this happens extremely rarely lately, and the only way out is to buy a new part.
Having prepared the place for the new part, using the old bearing as a cage, we press in the new one. Remember, you need to change only in pairs; one at a time will not work. Some car enthusiasts recommend replacing the rotating mechanisms as a whole, but this cannot be done, since the ability to set wheel camber is lost. Because, despite the same type, everyone has a different angle of inclination.
Other self-taught people advise installing “ Iveco”
”, but then you need to use a lathe for turning, as there are inconsistencies.
- We install the entire module in reverse order;
- At the same time, we diagnose the brake pads and replace them if necessary;
- Upon completion, we test the car at different speeds and turns left and right.
If all is well, then replacing the wheel bearing on the Niva was successful.
We remove the hub in the field:
- Pull out the oil seal using a screwdriver.
- Remove the lower ring, the inner sector of the outer bearing and the cage
- The wheel bearing itself is removed
- Unfolding the hub
- Repeat the procedure with the second bearing.
- The outer ring of the second element is removed in a similar way.
Next, the destroyed element is removed and the used lubricant is completely removed.
The cavity for the new part is treated with a new compound and lubricated with a good layer. We coat the bearing itself, coat the internal places.
Then we install the hub bearing on the Niva in the reverse order.
To press in parts, it is worth choosing a pipe section of suitable diameter. Replacement of the Niva Chevrolet wheel bearing is completed.
Bearing adjustment
Adjusting the wheel bearing involves rocking the wheel.
The wheel plays on a bearing. We don’t pull it too hard, if there is a small elevator, we pull it further until the elevator disappears.
Afterwards we punch the wheel with a sledgehammer, or you can take it for a ride in a car. After which the elevator appears again, we remove it in the same way. There is a small elevator left. Let's remove the nut and put everything back as it was. We rode for a day and are adjusting again.