Diagnostics - causes and symptoms of malfunctions
The main reason for replacing a VAZ 2114 bearing under normal conditions is natural wear. The hub assembly is subjected to regular loads, which causes the rolling elements to become unusable.
Other causes of part damage:
- incorrect previous replacement, which resulted in wear of the element;
- strong impacts of the wheel on potholes;
- aggressive driving;
- foreign particles entering the hub: dirt, dust, other particles;
- overheating due to frequent, sharp braking.
How to quickly find wheel bearing noise:
Checking the front bearing of the VAZ 2110:
The hub has a number of signs that indicate its replacement. These include:
- increased noise from the front wheel;
- hum at a certain speed;
- crunching, grinding noise when moving, turning;
- abnormal play of the suspended wheel;
- excessive heating of the disk.
Having noticed at least one of the signs, the owner must take action and replace the wheel bearing.
A little about the device and functionality
The main purpose of the part is to ensure uniform rotation of the car wheels. Given the name of the part, it is easy to guess that wheel bearings are the connecting link between the hub and the axle to which the brake disc and wheel are attached.
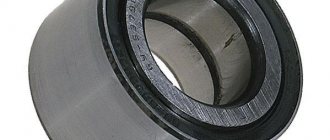
The design of the part fully corresponds to the classic type of rolling bearings. These are two metal rings into which conical rollers are pressed, protected from the body by a durable rubber insulator.
Unlike foreign competitors, domestic bearings are created using outdated HUB technology. They are quite difficult to install, require very precise tightening torque and require plenty of lubrication.
The operation of the mechanism lasts for several years. It is recommended to change a spare part for a VAZ 2114 approximately once every 100 thousand kilometers. But negative operating factors can accelerate the wear process:
- Bad roads. The entire force of the shock load falls on this mechanism of the system. Over time, the metal gets tired and the bearing begins to fail.
- Aggressive reagents. In Russia, in order to save money in winter, aggressive chemicals are often used to remove ice from roads.
- Sudden temperature changes. In winter, owners of warm garages unknowingly shorten the service life of many metal parts, for which sudden temperature changes when leaving and entering the garage create a large load.
Design of the unit being repaired
Structural layout of the VAZ 2114 hub:
- steering fist;
- internal anti-splash ring;
- steering knuckle ring;
- retaining bearing ring;
- hub bearing;
- front hub;
- anti-splash ring;
- hub cap;
- cap seal;
- hub cap;
- screw;
- hub washer.
Note:
The order of the elements is required. Violation of the layout or installation of components not provided for by the technical requirements is strictly prohibited on the hub. The operation of the unit will be disrupted, which will lead to avalanche wear of parts and increased danger of operating the vehicle.
Replacement instructions
Replacing the rear wheel bearing on a VAZ 2114 is carried out as follows:
- Loosen the wheel bolts and wheel locknut before jacking up the vehicle.
- Raise the car using a jack. Tighten the hub nut completely and remove the wheel. Unscrew the mounting bolts on the drum.
- Remove the drum. If it is rusty, pre-treat the joint with WD-40. If after this the drum still does not budge, use long pins. Screw them into the holes and tighten them one by one until the part moves out of place. You can gently help with a hammer by tapping it on the back side.
- Unbend the stopper and unscrew the locknut. If it is tight, use a wrench extension.
- Using a universal puller, press the hub.
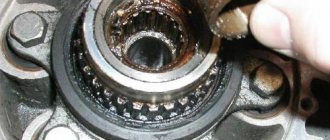
- The inner race remains on the shaft, and the outer part of the bearing remains in the housing. If you want to replace the pads at the same time, you need to remove the axle mounts.
- Now it's time to demonstrate the entire mechanism.
- As a rule, the rear part of the axle is attached to the brake shield. To dismantle you will have to use a hammer.
- Remove the wheel bearing race using a universal puller. If the brake system does not need to be changed, this operation can be performed directly on the vehicle's axle shaft.
- We place the hub on bricks or bars, as shown in the photo. Use a hammer to knock out the old rear wheel bearing.
- Be sure to remove dirt and wash the hub in gasoline. Clean the axle shaft in the same way. Use thick lubricant to treat the seating surface. Place the new bearing in the hub bore. Mounting chamfers will help avoid distortions.
- Press the bearing with your hand and press it in about 3 millimeters. Place the old bearing on top.
- Using the side of the hammer, carefully hammer the part inward. If the process is difficult, you can cool the bearing in the freezer and warm up the hub.
- Once the rear hub bearing is in place, you can install the circlip. For this purpose, round nose pliers are used. Don't forget to lubricate the axle first.
- Carefully attach the assembled mechanism to the trunnion. Be careful to avoid distortions. Then place a washer on the threads and screw on the hub locknut.
- Using a nut, press the hub onto the axle. Tightening torque: 220 N*M. Place the drum, secure it and screw the chassis.
As you can see, replacing a bearing is a rather complicated and time-consuming task. You need to have a special tool. Sometimes it’s easier to ask a car service for help.
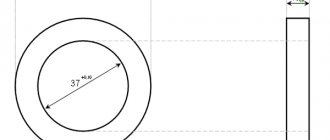
Wheel bearing dimensions for VAZ 2114
Before installing a new part, you must ensure that it is compatible with your vehicle. There is a table of analogues for this.
| No. | Manufacturer, country | Catalog number | Dimensions, mm | Price, rubles |
| 1 | Pilenga | PW-P 1307 | 34*64*37 | 400 |
| 2 | Torque, Finland | T-12106 | 500 | |
| 3 | Lada (original) | 2108-3103020 | 400 | |
| 4 | ASP Mensan | BCR001 | 540 | |
| 5 | SPZ | 2108-3104020 | 400 |
Important:
Each wheel bearing has its own unique number. Based on this, an appropriate replacement is selected.
Causes of wheel bearing failure
Attention : if repair work is not carried out in a timely manner, the likelihood of an emergency on the road increases. As a rule, the use of a low-quality bearing leads to the fact that the wheel may jam during steering, or as a result of the disc being separated from the shaft.
It is also important to note that if the hub fails, it becomes very hot. As a result, the brake system fails, and therefore operation is disrupted. However, the work is never disrupted at the same time, unless there is a strong collision with another object. The car may hit a hole, a bump, or drive onto a curb. As a result, the VAZ 2114 may receive serious mechanical damage.
Destruction occurs gradually and the driver can often understand this by the presence of a specific sound when a specific body vibration appears. There may be small shocks, sometimes the car shakes.
There are several reasons why a malfunction may occur:
- Constant driving on off-road or poor quality roads with a lot of uneven surfaces.
- Transportation of large loads.
- The car may constantly fall into mud or slush.
- Some drivers begin to drive aggressively: they brake or accelerate sharply, or drift.
Depending on what cause is present, deformation of the main housing may occur over time, and sometimes the outer housing and bearing rim may crack. Often the lubricant dries out. Dirt, sand, and dust may get inside the rotating parts.
Sometimes there is a malfunction of the rollers and bearing balls. Often this happens not as a result of inaccurate driving, but from the quality of workmanship itself. Spare parts from domestic or European manufacturers last an order of magnitude longer than from Chinese ones. But they can also become unusable over time as a result of constant use of the car.
When a breakdown just begins to appear, it is almost impossible to recognize it in a timely manner. As a rule, for this purpose you need special diagnostic equipment, which is available in auto repair shops or official dealers. If a whistle, strong hum or crunching occurs, you have to provide it yourself or with professional help.
If the breakdown occurs on the front hub, then identifying the fault is much easier. It is enough to pick up a speed of 40-60 km/h and perform simple maneuvers. Most often, a specific hum appears. If the sound increases when turning to the right, this means that the left bearing has failed. The opposite situation occurs with the left side.
If a breakdown occurs in the rear hub, it is much more difficult. So, for example, the sound may come from one part, but in reality the breakdown may be localized in a completely different place.
However, experts advise that in order not to engage in self-repair in vain, it is recommended to carry out diagnostic measures from professionals. If the car enthusiast does not have the relevant experience, then you can ask the person to show how to carry out such events.
Getting to know the journal bearing
To begin with, I suggest the simplest thing - getting to know the device. The support bearing (OS) is necessary to create a movable connection between the machine body and the shock absorber. On VAZ 2110, 2114 cars, models such as Grant, Kalina, Priora, as well as on all kinds of foreign cars Mitsubishi, Volkswagen, Fiat or Toyota, for example, the location of the OP is approximately the same - the upper part of the pillar. Install the bearing between the support and the upper cup (or cup, anyone) of the shock absorber spring.
If we look at it purely from a design point of view, then we have a variation of rolling bearings. But OP differs from them in the large thickness of the outer ring. The rolling bodies are cylindrical rollers. They are placed perpendicularly and separated from each other. Due to this design, the unit can take on loads from different sides.
The task of the OP is to provide the shock absorbers with the ability to rotate freely in the supports. In any car, be it a Ford Focus or Mondeo, Chevrolet Lanos, Cruze, Lacetti, Aveo, Daewoo Nexia, Hyundai Accent or Skoda Octavia, the OP will always be slightly higher than the front spring. The shock absorber rod will pass through the central cavity of the element. Shock absorber bodies are always mounted to the body where the OP is located. As a result, two types of loads act on the support - axial and radial.
Before you replace and buy a new element to replace the old OP, you need to understand their types. This is where we will start. Do you agree? Then go ahead.
Types of OP
It’s difficult to say for sure which OP is better to buy. Much depends on the specific car. How to check if OP is good or not? First, ask how much the bearings cost. Good parts cannot be cheap. But it’s not worth chasing the most expensive models if you have a budget car. Try to choose the golden mean.
Besides the fact that you need to look at the manufacturer, the specific type of bearing will be an important consideration. There are several varieties of this device.
- OP having a built-in inner or outer ring. For installation, mounting holes on the housing are used, so there is no need for clamping flanges.
- OP, in which the inner ring is separated. Structurally, the outer ring is connected to the body. It is important to take such devices in cases where you need to achieve the most accurate rotation of the outer ring.
- OP having a detachable outer ring. This is the opposite version of the previous bearing. Accordingly, they are taken if necessary to obtain precise rotation of the internal element.
- Single split bearings. The outer ring on such OPs is divided into one precisely. With their help, high rigidity values are achieved.
Sooner or later the fault will manifest itself. This mainly occurs due to dirt, sand and moisture getting into the unit. On average, the first signs of a malfunction appear after about 50-75 thousand kilometers. Replacement is recommended every 100 thousand kilometers.
List of suppliers
- SNR is the largest French supplier in Europe and rightfully ranks first in product quality;
- SKF is the second-ranked supplier of bearing products, known in the markets for 100 years;
- NSK is also the second largest manufacturer of wheel bearings in the world from Japan;
- FAG is a manufacturer from Germany, absorbed by the INA concern, with high quality products;
Types of hair masks
Each hair type needs special care, which is why there are several types of hair masks that are aimed at preventing the problem. For example, dry strands need masks with a moisturizing effect, oily hair, on the contrary, needs drying products, and normal hair types need a balance between nourishing and drying properties. In addition, different types of masks contain certain components that distinguish one product from another.
Hair masks come in the following types:
- Moisturizing.
- Nutritious.
- Restorative.
- Strengthening.
- Carers.
There are also remedies for hair loss and dandruff. Further in the article we will talk about the professional hair mask “Alerana”, the action of which is aimed at intensive nutrition and activation of strand growth.
Replacing front wheel bearings
The tools for repairs remain the same, except for the puller. If you have a universal one, then it will be suitable for the job. But if it’s for the rear bearings, then no – you’ll have to buy another one. The procedure is completely similar, only a disk is installed instead of a drum. It should also be noted that the hub fits onto the outer CV joint and is connected to it using splines. Otherwise, there are no differences, even the VAZ 2114 spare parts are almost identical.
The bearing sizes are different, so installation from the rear axle to the front will not work. When working, be careful not to damage the brake disc. If it has a large output, then it is advisable to replace it with a new one.
Please note that discs and drums (as well as pads) should be replaced in pairs. That is, if you installed new ones on the left front wheel, please do the same on the right one
Otherwise, beats may occur, and when braking, the car will be pulled to the side.
Chassis design
Front wheel bearing
Before you begin the replacement process itself, you need to see all the structural elements that need to be dismantled. Therefore, first you need to understand the structure of the front part of the suspension, or rather, look at the elements in section and determine the location of the bearing.
Front chassis design
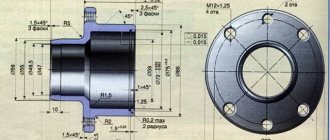
Front suspension assembly: 1 – upper support of the telescopic strut; 2 – upper support cup; 3 – compression stroke buffer with protective casing; 4 – compression buffer support; 5 – suspension spring; 6 – lower spring support cup; 7 – steering rod ball joint; 8 – steering knuckle; 9 – telescopic stand; 10 – eccentric washer; 11 – adjusting bolt; 12 – rack bracket; 13 – steering knuckle; 14 – front brake protective cover; 15 – brake disc; 16 – retaining ring; 17 – wheel hub nut; 18 – splined shank of the wheel drive hinge housing; 19 – guide pin; 20 – wheel hub bearing; 21 – ball joint; 22 – suspension arm; 23 – adjusting washers; 24 – stabilizer strut; 25 – stabilizer bar; 26 – stabilizer bar cushion; 27 – stabilizer bar mounting bracket; 28 – body bracket for mounting the suspension arm; 29 – suspension arm extension; 30 – bracket for fastening the extension; 31 – protective cover of the ball pin; 32 – ball pin bearing; 33 – ball pin; 34 – ball pin body; 35 – suspension strut rod; 36 – outer body of the upper support; 37 – inner body of the upper support; 38 – upper support bearing; 39 – rubber element of the upper support; 40 – travel limiter of the upper support; 41 – protective cap of the upper support; B - zone for monitoring the suspension joint
List of new parts and tools for replacing them
Replacing the front wheel bearing on a VAZ 2114 begins with the purchase by the car owner of the following spare parts:
- front wheel bearing (original art. 11180 – 3103020 – 04);
- front hub retaining rings (usually included in the repair kit under art. 11180 – 3101800 – 86);
- a new front hub (art. 11180 - 3103012 - 00), which will be needed if there is excessive wear of the bearing and rotation in the seat.
It is possible to carry out all the work to eliminate this malfunction without damaging other suspension parts using the following set of tools:
- tire remover;
- set of open-end spanners from 12 mm to 24 mm;
- socket heads from 12 to 19 mm and wrenches;
- specialized wheel bearing puller;
- specialized steering wheel end remover;
- duckbills for removing retaining rings;
- carriage;
- Screwdriver Set;
- regular pliers.
How to change a bearing yourself
Before starting work, you should carefully study all its stages:
- We jack up the car from the side of the faulty bearing, remove the wheel and, having access to the lock nut of the outer CV joint, unscrew it using a 30 mm socket. It is worth considering that when subjected to high loads, the nut can be heavily tightened; in this case, the wheel is put in place, the car is released from the jack, after which we engage first or second gear in the gearbox and with great force and an elongated wrench, it can be torn off.
Next, we proceed to dismantling the brake cylinder, for which we need to unscrew the two bolts that secure it from the inside of the hub with a 17 mm wrench, and using a flat-head screwdriver, carefully pressing the pads away from the disc, we remove this unit to the side.
- We unscrew the nut securing the steering tip from the steering knuckle, and using a specialized puller, squeeze it out of its seat, then we perform a similar operation with the tip of the ball joint located at the bottom of the hub
- The upper part of the steering knuckle is attached to the suspension shock absorber strut with two bolts, the lower of which regulates the vehicle's wheel alignment, mark its position and, after unscrewing these bolts, remove the entire hub assembly. We also remove the brake disc secured with two screws.
- Using a specialized puller, we press the front hub out of the inner race of the bearing, then remove the retaining rings on both sides, and with the same puller, we squeeze the old bearing out of its seat.
- Before installing a new wheel bearing, we clean its seat from old contaminants, carefully inspect it for possible damage, small chips and cracks, and if they are found, the steering knuckle must be changed, otherwise there is a possibility of its rapid breakdown.
- We lubricate the bearing seat in the steering knuckle, which will greatly facilitate its pressing, install one retaining ring and mount the new part using a specialized puller until a characteristic click is heard, after which the second retaining ring is inserted.
- We clean, inspect for damage and, if there is none, lubricate the seat of the front hub. Then, using a puller, we carefully press it into the inside of the new bearing and mount the entire assembly into its seat. After that, we carefully insert the splined flange of the drive, install the brake disc, caliper, ball joint and steering end, after which we tighten the new nut securing the outer CV joint, which comes in the repair kit for new parts, roll its edges into the locking grooves and put the wheel in place.
This completes all work on replacing the front wheel bearing. Also watch the video for a detailed analysis of replacing the front wheel bearing on VAZ 2113, 2114, 2115 cars:
Recommendations and features for replacing the rear bearing
1. Purchase spare parts for VAZ only in trusted stores, if possible, order from the manufacturer. 2. Replace both sides at once; they wear out evenly.3. For an option for installing a part without the use of an impact tool and without a puller, read the link. 4. To remove the inner race from the axle shaft without a puller, use a sharp chisel, or make a notch on the ring with a grinder and split it. 5. Watch a video of replacing a bearing on a VAZ 2114, this will speed up the repair process.
- When to replace
- Symptoms of a problem
- Checking status
- Selection of ZPS
- Replacement
Many experts agree that on the VAZ 2109, like other domestic cars, the rear wheel bearing (RH) is a weak point. This is not due to the low quality of the products. It's all because of the condition of the roads.
New bearings
Considering the condition of the road surface, as well as the need to have a car always ready for travel, replacing a faulty bearing should be done in a timely manner. Otherwise, the consequences of operating a car with a worn bearing could result in expensive repairs and an accident.
What to choose?
Rear and front wheel bearings today are produced by both domestic and foreign manufacturers. The choice, as they say, is yours.
But we still want to give some recommendations on this matter.
- Chinese analogues. We strongly advise against choosing them to repair your VAZ 2114. They are of dubious quality, although they are the most affordable. Such bearings will not be enough for a long service life.
- Imported, mainly from Europe. The price is higher compared to analogues, but the quality is at the same level. When buying imported bearings, pay attention that they are not successful Chinese counterfeits. There are many of these now, unfortunately.
- Domestic. Pay attention to the parts made by Vologda or Samara craftsmen. The quality is quite high, and the price is affordable and adequate. What you need for the VAZ 2114.
To work on replacing the element yourself, you will additionally need:
- Special puller for bearings;
- 30mm socket wrench;
- 19 and 17 mm wrenches.
Replacing the front hub of Lada Granta
- We place the car within the perimeter of the repair area and provide priority safety measures.
- Let's jack up the right (left) side.
- Unscrew the bolts and remove the wheel.
- Let's unlock the hub.
- On the back side, unscrew the two bolts that guide the brake caliper.
Location of two bolts
- We remove the caliper, hang it on a wire (we fix it on the steering tip).
- Unscrew the hub nut and remove the brake disc.
Removing the hub nut
- We unscrew the two bolts - the rack clamps. If necessary, we use a liquid to remove deposits like WD-40.
- Disconnect the strut with the steering knuckle and unscrew the ball joint fasteners.
- We remove the CV joint.
Next, install the new hub assembly and assemble the structure in the reverse order.
Replacing the front wheel bearing of Lada Granta
- The front hub joint is located in the steering knuckle housing, remove it. Pre-clamp the structure in a stationary vice.
- We install the metal spacer - the head at “22” on the surface of the hub. We apply targeted blows with a hammer to press it out.
- We disconnect the inner race of the hinge and remove the separator with metal balls.
- To remove the outer part of the hinge, use pliers and remove the retaining rings.
Organization of repair conditions
Convenient places for replacing the front wheel bearing on a VAZ 2114 are a lift or a pit. However, you can get less comfortable access to the necessary components on a monolithic horizontal platform.
The initial task of the performer is to open access to the steering knuckle. To do this you need:
- unscrew the hub nut located on the front wheel CV joint shaft (behind the protective cap);
- remove the wheel;
- brake caliper assembly with guides and brake pads;
- brake disk.
Method for loosening the hub nut:
- align the nut shoulders using a narrow chisel;
- tighten the handbrake;
- engage first gear;
- secure the wheel with shoes;
- Loosen the nut using a 30mm socket with a long knob (the clamping force is quite large).
Quite rarely, a nut cannot be unscrewed with a wrench due to excessive tightening or corrosion. In this case, do this:
- drill out the nut from the side almost to the thread;
- carefully use a chisel to open the joint of the part;
- unscrew the element.
After loosening the wheel nuts, you should hang the front of the car. Although replacement can only be done on one hub, both front wheels should be lifted. This is the only way to ensure unloading of the anti-roll bar and create conditions for manipulating the parts of the steering knuckle.
The brake mechanism is dismantled in the following sequence:
- unscrew the two bolts “17” securing the prefabricated structure to the steering knuckle (located near the CV joint boot);
- remove the brake assembly and attach it to the telescopic stand to avoid breaking the hydraulic drive pipe.
To replace a defective wheel bearing on a VAZ 2114, it is necessary to remove the brake disc. You can remove the part by unscrewing the two pins securing it to the hub using a “12” key.
Some owners additionally dismantle the protective casing, creating even more convenient conditions for dismantling the rolling support. This element can be removed after unscrewing the three nuts with an open-end wrench set to “10”, which secure the part relative to the steering knuckle.
Necessary tool
Before you start work, you need to prepare all the tools and assemble them in one place:
- Special puller for bearing removal.
- Collar.
- Head at "30".
- Keys or sockets for “17” and “19”.
- Mandrel for knocking out the hub.
- New wheel bearings.
The tool is assembled and ready to use
Preparatory work
Make sure that the workplace is well lit, and it is best if it is on a viewing hole or a lift. Because this is the only way to talk about high convenience when carrying out such work. It would also be a good idea to familiarize yourself with the detailed diagram of the location of the bearing on the front hub of the VAZ-2112.
Thanks to this illustration, the diagram becomes very clear.
Step-by-step work order
First of all, we place the car in a stationary state, put on the handbrake, and, if desired, install wheel chocks. And while the car is on the surface, we tear off all the bolts on the front wheels.
We unscrew the torn bolts and put them aside. We remove the wheel.
Next, we need to use a “30” wrench to unscrew the hub nut
Please note that during its dismantling, you will have to press the brake pedal, and for this we will need an assistant. Then, using a screwdriver, press out the calipers. When this operation is completed, having the key at “17” at hand, unscrew the calipers from the steering knuckles.
Then, using a screwdriver, press out the calipers. When this operation is completed, having the key at hand at “17”, unscrew the calipers from the steering knuckles.
- Carefully unscrew the brake disc from the hub.
- Then, making gentle blows, we release the hub.
- And then the CV joint from the bearing.
Replacing the wheel bearing
Then, when access to the hub bearing is completely open, there are several ways to replace it.
First way
In this case, it is necessary to have a special puller to remove the bearing.
- First you need to take care of removing the stopper.
- Using this device, you simply remove the old bearing and install a new one in its place.
- After this, we carry out the entire assembly process in the same order as removal.
- The advantages of this method include the fact that during this work there is no need to touch the wheel alignment bolt, therefore, you will not have to add additional work.
- The disadvantages of this method include inconvenience during the process. Because you have to contrive and take an extremely uncomfortable position.
Second way
To carry out this work, it is necessary to carefully dismantle the steering knuckle and completely remove the hub.
- Moving to the workbench, we replace the wheel bearing.
- To do this, dismantle the retaining ring and knock the bearing out of its seat, or press it out.
- Next, we perform the installation in reverse order, having previously cleaned the surface of the hub.
Advice! Before you begin removing the alignment bolts, mark their position with a marker or chalk. In this case, the marks should indicate the current position of the bolt on the rack and the previous location of the knuckles. Thanks to such marks, during assembly it will be much easier to navigate the position of these bolts. Although it will not be possible to return to the previous state, it will still be possible to minimize it.
Selection of ZPS
When choosing a rear wheel bearing, you should focus on the required characteristics and manufacturers who today produce ZPS suitable for the VAZ 2109.
Let's start with the characteristics. The choice should be made in favor of bearings with the following parameters.
For the rear hub, a ball, angular contact, double-row closed type bearing is used.
Now let's talk about manufacturers. There are several of them, each of which has its own characteristics.
Replacement
Since the test results showed that the old rear wheel bearing has already served its purpose, it will need to be replaced.
Replacement procedure
Many people ignore the noise and hum of the ZPS until a certain time. But if timely repairs are not done, this can lead to serious problems that can result in the following consequences:
- Initially, hum and noise will cause discomfort due to their unpleasant sounds. Many motorists are accustomed to comfort, so they will do everything to get rid of the noise;
- If you continue to ignore the problem bearing, you will soon have to replace not only it, but the entire rear strut. And these are serious financial losses;
- Bearing wear leads to disruption of the running system. From here, the car can behave in the most unpredictable ways, increasing the likelihood of an accident.
Don’t joke with a problematic air conditioning system, but it is better to start repairing it immediately when you notice signs of its malfunction.
- After checking, lower the car to the ground, loosen the hub nut and bolts holding the wheels.
- Remove the decorative cap from the hub nut, then unlock the nut, loosen the tightening and use a socket with a lever to increase the force, remove the fasteners. Please note that these nuts are tightened with a large torque, so you will have to work hard.
- Loosen the tension on the wheel bolts.
- Use a jack to lift the side on which you will begin the repair. In this case, the car must be in the first gear position at the gearbox.
- Remove the wheel.
- Remove the brake pads and drums, which will allow you to completely unscrew the hub nut and put it aside along with the thrust washer.
- Now you have got rid of everything unnecessary, so you can arm yourself with a special puller to press the hub off the axle.
Removing an element
You will need a vise to hold the removed hub. Without them, removing the bearing will be quite problematic.
Don't forget to remove the retaining ring before doing this.
Using a mandrel and puller, press out the old bearing.
It is extremely important to treat the hub, wash it, removing all dirt. Only after the hub has been cleaned can a new bearing be pressed in that meets the parameters required by VAZ 2109
Only after the hub has been cleaned can a new bearing be pressed in that meets the parameters required by the VAZ 2109.
Replace the retaining ring. It is also better to replace it rather than use the old ring.
Press the hub into its rightful place using a mandrel of suitable diameter
The force must be applied to the inner ring of the new bearing, and not to the outer one.
All you have to do is assemble the knot in reverse order. There shouldn't be any serious difficulties with this.
The last step is the mandatory replacement of the old hub mounting nut. It is not advisable to use an old nut. After installing the fastener, lock the nut.
Carry out a similar operation with the second hub. Experts recommend replacing the rear hub bearings in pairs so that their wear is equal and uniform. In addition, if one bearing fails, the second will soon follow. Why put off already obligatory events?
A competent approach to replacement, the correct choice of rear wheel bearing in accordance with the stated parameters are a guarantee of successful repair of your VAZ 2109. Do not delay in solving this problem, otherwise it will result in serious financial costs for you or, God forbid, an accident.
Sources
- https://zamena-podshipnikov.ru/zamena-zadnego-stupichnogo-podshipnika-vaz-2114.html
- https://luxvaz.ru/vaz-2109/293-zamena-zadnego-stupichnogo-podshipnika.html
How to recognize problems with the hub?
The fact is that the hub is the most important element of any rotating mechanism, including a car wheel. It is the central part of the rotating parts with a hole to allow it to be attached to an axis or shaft. Thus, its main task is to provide rotational motion. To prevent free rotation on the axle, rolling bearings or special plugs are pressed into the hub hole. In addition, it is thanks to the bearings that the hub, as well as the wheel, can rotate.
It is quite easy to notice that the wheel bearing is urgently needed to be replaced; in this case, a characteristic knock occurs in the lower rear part of the body, most often it intensifies when driving on an uneven road or when hitting potholes and bumps. When driving on a relatively flat road surface, a hum may occur. In addition, the brake drum gets very hot.
Removing the rear wheel hub
The repair algorithm is as follows:
- The bolts on the wheels are loosening.
- Unlock the hub nut and use a 30mm wrench to loosen it.
- Using a jack, the side to be repaired is raised.
- The bolts are unscrewed and the wheel is removed.
- Next, you need to unscrew the two guides; they hold the drum on the hub. Place all VAZ 2114 spare parts in such a way that they do not get lost or become dirty.
- Using a small hammer and a wooden spacer, remove the drum. Try not to hit it with metal objects: the brittle aluminum will begin to break down.
- Completely unscrew the hub nut.
- Use a special puller to remove the hub.
This completes the dismantling procedure. All that remains is to remove the bearing and install a new one in its place.
How to check
Before you begin replacing the front or rear bearing of your hub, we recommend that you conduct a simple check of the functionality of this unit. This will allow you to accurately determine the culprit of the malfunction and verify the real need to replace the elements.
There are two verification methods, each of which has its own nuances.
Verification method
What to do
After a long ride, touch the area of the wheel where the noise is coming from.
If the area is hot compared to the other side, the bearing needs to be replaced
It will be useful: Where is the VAZ-2112 starter relay located: diagram and photo
Raise the car, unscrew the wheel bolts, lift the side you are checking. Rock the wheel with more force
If the sound is dull, have a second person apply the brake and repeat the procedure. If there is no noise, the bearing must be replaced
How to check
Before you begin replacing the front or rear bearing of your hub, we recommend that you conduct a simple check of the functionality of this unit. This will allow you to accurately determine the culprit of the malfunction and verify the real need to replace the elements. There are two verification methods, each of which has its own nuances.
| Verification method. | What to do. |
| After a long ride, touch the area of the wheel where the noise is coming from. | If the area is hot compared to the other side, the bearing needs to be replaced. |
| Raise the car, unscrew the wheel bolts, lift the side you are checking. Rock the wheel with great force. | If the sound is dull, have a second person apply the brake and repeat the procedure. If there is no noise, the bearing must be replaced. |
The device of the hub on the Lada Grant
Front
- rounded fist;
- external and internal dirt-reflective metal rings;
- front roller bearings;
- hub;
- washer;
- hub nut;
- retaining ring, plug.
Rear hub device
- hub mechanism axis;
- metal ball bearing;
- mud ring;
- retaining ring;
- washer;
- screw;
- sealing ring;
- rubber boot;
- hub cover.
Resource for replacing hub mechanism elements
The average service life of wheel joints is 80 – 85 thousand km. The indicator is average, as it depends on the following factors:
- quality of workmanship of the part;
- frequency of operation of the technical device;
- driving style;
- quality of road surface;
- aggressive environment;
- high operating temperatures;
- compliance with technical inspection intervals.
Signs that a hub needs to be replaced
- the appearance of uncharacteristic noise during wheel rotation;
- wheel runout in the steering column;
- vibrations at different speeds. Sometimes there is vibration at a certain speed;
- metallic grinding noise as the wheel rotates;
- front wheel hub play.
Diagnostics of the hub mechanism
- We place the car on a level platform, squeeze the parking brake if we are checking the front row. For the rear, we install wheel chocks.
- Let's jack up the front (rear) part.
- We turn the car wheel and carry out troubleshooting.
- We shake the wheel up and down with our hands. In good condition there should be no play. Otherwise, we dismantle and replace worn elements.
Bearings for cars of the Russian automobile industry
The domestic auto industry, which produces passenger cars, still uses old types of bearings in production - single-row roller bearings. Only AvtoVAZ switched to two-row closed hub type HUB-1. HUB-1 means there are no flanges on the body for mounting to the hub. Therefore, owners of Russian car brands have a question about which wheel bearings are better. The most common vehicles on Russian roads today are VAZ 2110, GAZelle, and UAZ Hunter. Of course, you can purchase original parts, but they are often twice as expensive as similar ones from other factories. Let's look at the example of these particular brands of companies that produce the necessary parts.
Bearings for VAZ 2110
For the modern line of VAZ passenger cars (except Niva 4x4, Chevy Niva), three standard sizes of wheel bearings are produced:
- 256907 - for front-wheel drive VAZ 2108-2112;
- 256707 - on Granta, Kalina;
All these models belong to HUB-1, double-row, ball, closed, angular contact. Lada Granta and Kalina differ only in height.
Traditional suppliers of bearings for cars from Togliatti are 5 factories:
- CJSC "LADA Image" - manufactures and sells original Lada wheel bearings through secondary markets;
- Saratov plant - produces parts under the SPZ brand;
- Volzhsky Plant - uses the Volzhsky Standard brand;
- Vologda plant - sells products under the VBF brand;
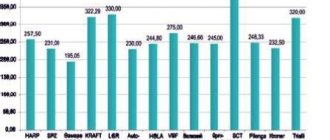
The price-quality ratio of these factories is optimal. The cheapest products are those from the Samara plant (less than 200 rubles), other companies on average sell parts costing 230-275 rubles.
Bearings for UAZ
UAZ hubs use bearing 127509 - roller, conical, single-row, angular contact. There are additional parts marked: A - reinforced and AK - with minor design changes. The part can withstand large axial loads, so the car can be operated in difficult road conditions.
Parts of this type are produced by the Samara and Saratov plants, already mentioned above, as well as the Moscow GPZ-2 and Lutsk (LPZ) plants.
The most affordable products are from GPZ-2, the cost is 182 rubles.
Bearings for GAZelle
The front hubs of GAZelles are equipped with two tapered bearings, roller, angular contact, single-row. The outer one is marked 7305АШ, the inner one is marked 7307А. Both are designed to handle heavy loads.
Such bearings are manufactured at the Volzhsky and Saratov plants. The kit often consists of two bearings, fasteners, lubricant, stopper, and seals. The cost of such a kit from VPZ is 350 rubles.