Installing a car radio is a creative process, but not very complicated. An experienced car enthusiast, at least a little familiar with the basics of electrical engineering, will be able to connect the car radio with his own hands without any problems. We will tell you in this article how to properly connect a radio in a car, and in what order this should be done.
It should be remembered that an incorrectly installed and connected radio will not only sound bad, but may even lead to a short circuit or even a fire in the car.
A good video instruction for installing and connecting a car radio in a car can be seen in the video at the bottom of this page.
Incorrect connection of the car radio causes the following problems:
- When parked, the radio consumes too much electricity, as a result of which the battery is constantly discharged and if parked for a long time, there is a chance that the engine will not start.
- When listening to music at high volumes, the radio starts to “stutter” and significant distortion of the sound signal appears. Also, at high volumes, the car radio may simply turn off.
- When you turn off the power, the radio settings are lost.
All of these problems in 90% of cases arise due to incorrect connection.
Selecting a car radio
In order to choose the right car radio for your car, you must first determine for yourself what expectations are placed on this device.
If your car needs a radio with a navigator, access to the Internet and multimedia, then you can choose devices from the Phantom, Alpine or Mydean brands. Such brands produce radio tape recorders that fit perfectly into a regular place. True, the choice of models is limited and has a high cost.
If the main condition when choosing is sound quality, then Kenwood, Pioneer and Sony brands would be excellent options. They are not particularly sophisticated, but they have high-quality sound.
Also, there are tape recorders with DVD, MP3, with a compartment for USB or memory cards, with or without screens.
Varieties
There are two main types of car radios, which differ from each other in format and set of multimedia functions.
- Single-din (1 DIN) or single-block, widespread in Europe and the CIS countries. Its standard size is 17850 mm.
- Double-din (2 DIN) or double-block, most common in Japan, Korea and America, has a size of 178100 mm.
There is also an intermediate version in 1.5 DIN size 17875, but it is practically not widespread.
The average depth is the same and equals 160 mm.
Please note that older brands of cars may have a standard radio installed. Its dimensions are not suitable for replacement with a 1 DIN or 2 DIN format. To transition from one format to another, use a transition frame. This transition method is also relevant for changing a two-block radio to a single-block one.
When choosing a new speaker system, you need to rely on which socket is in the instrument panel. If the car's configuration requires the use of a single-block radio, then the only correct option would be to purchase a new single-block one. With the intended installation of two-block radios, you can install a radio in 1 DIN and 2 DIN formats.
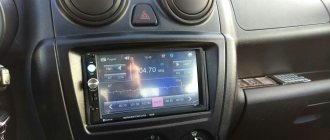
An example of installing a car radio in a car
Before choosing a radio, you need to carefully measure the standard location in order to understand what type of pad is installed during audio preparation. To do this, you need to pull out the old radio, and if it wasn’t there before, then pull out the decorative plug.
To free the compartment from the radio or plug, you need to use a special key found in the car kit. There are no generally accepted standard keys, so each developer puts his own type of key into such a set. To remove the radio, you need to insert the key into the holes on the panel.
And to remove the plug, you have to pry it in the center using a flat-head screwdriver. To avoid the formation of scratches and dents, place some soft material under the screwdriver.
The plug is secured with 4 latches, a pair on both horizontal sides.
Using the example of a Hyundai car, you can see that a rare connector block is installed, which is difficult to match with a car radio.
The opposite side of the block once again proves that choosing an inexpensive option will be almost impossible.
But the antenna plug is standard, so it will fit radios of various brands.
Taking into account the measurements, a Chinese-made radio was selected. It turned out to be 3 mm smaller than the compartment, but using strips of rubber, it can be easily stopped in its normal place.
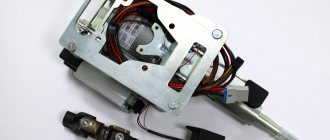
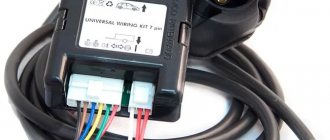
The car radio was supplied with wiring, a connector and tabular data, where the meanings of each wiring were indicated in different colors. The yellow wire had a 10A fuse, which was mounted in an insulated housing. In order for the connection to be made without difficulty, it was necessary to purchase a special adapter, the cost of which was almost half the amount for the radio. Therefore, it was easier to solder the finished block to the wires. If it is not possible to solder, then you can simply twist the wires together. To avoid mistakes when combining wiring, you can use a sign.
Afterwards, the standard block must be attached to the soldered wires using electrical tape. Then connect the car radio and test it.
Due to the fact that the size of the radio was smaller than required, strips of rubber no thicker than 1 mm would need to be glued to each side. This will ensure an operational environment and a tight fit.
If music starts playing during testing, it means that no errors occurred during installation of the car radio. All that remains is to install it in its regular place and use it with pleasure.
Plugs
ISO is an international standard established for car wiring and car radio production. The brown plug is responsible for connecting the acoustics, the black one is for powering it.
Standard radios produced for a specific car brand, as well as electrical wiring outputs for cars of various brands, have their own plug format, which will complicate installation a little. If the plug of the purchased speaker system does not match the socket, you should additionally purchase an adapter that will allow you to switch to the international standard. They exist for all car brands and are widely represented in the automotive market.
In some versions, adapters for other car brands may also be suitable. Installing an adapter designed for another car brand will not affect the quality or safety in any way. Many manufacturers provide their acoustic products with adapters for the ISO format. If the car's electrical wiring and plug comply with the ISO standard, then to connect you only need to connect them.
Radio connection diagrams
You can connect the car radio using several options:
- using an ISO connector;
- combining wires with or without a chip;
- by combining the power wires with the battery screw terminals;
- through the ignition switch or a separate button;
- through the signal.
The connection of the radio is carried out by the owner of the car independently or in a specialized center. The operation of not only the multimedia center, but also the electrical system of the car depends on the correctness of the procedure.
The connection diagram for the radio is often located on the top of the equipment case. Such car radio diagrams display wiring markings in accordance with the standards:
- scarlet – power supply control;
- white with blue stripes – power supply to the antenna amplifier;
- black – electrical engineering;
- bright yellow – power supply to electrical equipment and amplifier.
To securely fix the wiring, you can use regular cable ties.
Connection with and without chip
Such installation of car radios is possible if there is an ISO connector built into it. If the radio has a proprietary electrical connector, then you will have to buy an additional adapter for it, which can be equipped with an additional chip or not.
If the proprietary electrical connector or tape recorder does not have a chip, then the cable is connected by soldering or twisting the wiring. Soldering is the most reliable method in this case. Connect according to the attached table. If the radio has a built-in parking screen, it is connected to the parking brake button.
Connection via battery
If the tape recorder has a high output power, then it can be connected directly to the battery. Such radio tape recorders are usually equipped with subwoofers and all this together reduces the capacity of the ignition contacts, and reliable operation of the device becomes impossible. This method can also be used if all devices are turned off when the engine is turned off. The car radio is connected using a cable whose thickness must be at least 3 mm2.
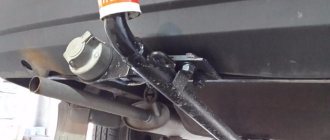
First, the wiring is laid under the hood, avoiding heated and moving parts. And then the cables are led through a special hole under the dashboard, and after installing the tape recorder, everything is carefully sealed to prevent moisture from entering.
To connect to the battery terminals, you need to unscrew the nuts from each of them and insert the stripped car radio wire under the bolt, and, accordingly, tighten the nuts again.
Connection via ignition switch
The positive side of connecting the tape recorder through the ignition switch is to prevent battery discharge during prolonged inactivity. This occurs due to the fact that the yellow wire of the tape recorder, which is responsible for power supply during operation of the equipment, is disconnected. And the red one must be connected to a continuous current source.
The yellow wire, starting from the diagram, must be screwed to the ignition switch terminal, which is under voltage if the ignition is on. This can be determined thanks to the control lamp. This method will ensure that the car radio works if the ignition is turned on.
Via a button instead of an ignition switch
It is possible to connect the car radio via a button, which can turn off the power supply if the tape recorder is not used for a long time. This will help prevent rapid battery discharge.
To connect the car radio, you need to connect the output to any of the wires of the car's power supply network. To turn on the radio, you will need to press a button. And if you need to leave the car for a long time, you need to turn off the power with the switch.
Through a car alarm
The connection via the alarm can be configured in such a way that the tape recorder will turn on when the alarm reacts if the siren is broken. For proper connection, you will need a switching device. The winding of the switching device must be connected to the terminals for inclusion in the security alarm system. Through the contacts of the switching device, the tape recorder is connected to a current source.
After proper connection, the volume control must be set to maximum. When the siren is activated, the car radio should automatically start working. To use the tape recorder for normal purposes, you will need another switch.
Connecting speakers and antenna
To connect the speakers, you need a special wire to supply an audio signal (AK), the thickness of the conductors of which must be at least 2 mm. The acoustic outputs are located on connector B of the ISO connector. All common negative wires that are connected inside the tape recorder must be marked with black stripes. Such wires must be combined with the negative terminals of the speakers.
Polarity must be observed to prevent out-of-phase connection of the speakers. If this happens, the speakers will begin to produce flat and unnatural sound. There is a generally accepted color coding for cables:
- the speaker located on the left and front is white;
- right and front – gray;
- left and back – green;
- right and back – lilac.
The antenna, in the form of a tube or rod, is connected using a coaxial cable, which is connected to the antenna connector and to the tape recorder socket.
Precautionary measures
You need to understand that incorrectly connecting the car radio can lead to unpleasant consequences:
- Breakdown of the radio;
- Deterioration in sound quality;
- Wiring short circuit;
- In rare cases, if you connect the radio to the battery incorrectly, you can quickly discharge it. Sometimes this can cause a fire.
In order not to waste your time, you can use the services of a car repair shop, but you need to be prepared to spend a certain amount that the service will charge for connection. In addition, it is worth considering that the cost of connecting a car radio to a foreign car (for example, Toyota) will be higher. The brand of the car radio is also taken into account. Thus, a Pioneer radio (which is the most common and beloved among motorists) will cost less than a Sony or Kenwood radio.
But if a car enthusiast has a desire to understand the device, the ability to spend a couple of hours and, no less important, the desire to save a decent amount of money, then the rest of the article will describe in detail how to connect a car radio according to the colors of the wires.
Checking the connection, problems and solutions
The easiest way to check the car radio connection is by inserting the key into the ignition system and turning it on. If, when you turn on the low beam and after the radio, the backlight turns on, then everything is in order - the device is connected. You can check whether the tape recorder is working or not using the power button. If the radio does not respond, it means it is not working. And the last check point is the sound, which can be increased or decreased with the corresponding button.
The tape recorder may not turn on if it is connected incorrectly or due to a blown fuse. To fix this problem, you need to remove the radio, check the wiring and compare it with the diagrams. If the connection is incorrect, you need to swap the wires and repeat everything again.
If there is a problem with the sound and the screen displays an error, then there is a small short circuit or leak. This problem can be eliminated by replacing damaged cables and after completely insulating them.
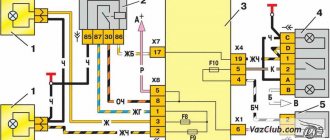
Wire color identification
For the correct connection to work, it is imperative to know the colors of the wires and their designation. The diagram of the radio wires by color is shown in the photo. On all cars and radios (Pioneer, Sony and Kenwood and others) it is customary to use a certain color to indicate the identity of the wire. It is worth noting that the radio wires differ in color and in the presence or absence of a strip. So, all wires with a stripe are a minus, and those without a stripe are a plus.
- Battery negative – black;
- Battery plus – yellow;
- Ignition plus – red;
- Left front speaker – white and white with stripe;
- Right front speaker – gray and gray with stripe;
- Left rear speaker – green and green with stripe;
- Right rear speaker – purple with a purple stripe;
- Antenna – blue;
- Amplifier – blue with a stripe.
Speaker Activation
Manufacturers produce radios designed for four speakers: two rear and two front. Each wire has its own color marking. In each of the bundles there is one positive wire (without a strip) and a negative wire (with a strip). It is not advisable to confuse the polarity.
In this case, in no case should the negative wire coming from the radio be grounded to ground, since it does not relate to the total mass of the vehicle. Typically speakers have two terminals. Radios with low power can be equipped with only one positive wire for each speaker. In this case, the minus of the speakers is mounted to the general minus of the system. The plus connects to the wide terminal, the minus to the narrow terminal.
If everything is done according to the instructions, then there should be no problems and the system will work in normal condition. But there are situations when the sound coming out of the speakers does not meet expectations. Typically, in such a situation, low frequencies are practically inaudible. All this is a consequence of incorrect phasing. The first step is to check all wire connections and replace them if there is a malfunction.