Standard gas tank - article number and price
The standard gas tank has article number 21082110101370. The price ranges from 3,500 to 5,500 rubles. All of them are produced at the same factory, the issue of pricing lies with the conscience of the seller. A used gas tank costs from 1000 to 2000 rubles. No need to be cheap - a gas tank is not just a plastic container, it should not be damaged. The quality of a gas tank used by someone can be doubted.
The dimensions and size of the tank on the Priora are such that the tank will fit in its predecessor models: the volume of the tank has not changed. A full tank always fills up to 43 liters.
Weight of hatchback Lada Priora (VAZ 21723)
The curb weight of the VAZ 21723 hatchback is:
- 1088 kg – produced before 2013. Here it is taken into account that the car is fully equipped, fully fueled, and driven by a driver whose weight is 75 kg. Passengers and cargo are not transported;
- In 2013, after restyling, the curb weight began to reach 1185 kg.
It must be said that the total weight (i.e., the maximum weight of a fully loaded vehicle at which it can be used) remained the same after restyling, namely 1578 kg. This means that the cargo capacity of the hatchback after restyling was reduced by about 100 kg, despite the same trunk size.
Restyling Lada Priora 2013
The 2013 restyling consisted of some changes regarding the appearance, some equipment, interior and engine. Among such changes in Prior we will name:
- A slightly modified exterior geometry, which, however, makes no sense to describe, since visually Priora before and after restyling remained almost indistinguishable in appearance;
- Replacing the radiator grille with an elongated “honeycomb”, slightly tilting the car into the now fashionable “organic” style, characterized by biological forms;
- Improved external lighting technology, thanks to which the car’s dimensions have become clearer in the dark. In particular, the area of the reflectors has been increased, LED sections for side lights and brake lights have been added, which are both brighter and more responsive when switched on;
- A dashboard that is implemented differently: instead of four “dials,” the sensor arrows were arranged in two, without compromising functionality. Purely aesthetically it looks better, but from an ergonomic point of view, a lot depends on habit;
- An increased number of pictograms flashing on the dashboard, making it easier to figure out which lighting equipment is faulty;
- An added niche in the center of the dashboard, in which the on-board computer is placed;
- Extended front seat slides, allowing tall drivers and front passengers to adjust their seat positions more flexibly;
- A box that is more spacious in depth to the right of the driver;
- A more attractive three-spoke steering wheel with an airbag under a triangular cover;
- In the “luxury” configuration – leather upholstery based on a combination of auto fabric and eco-leather;
- New door card design.
Also, since 2013, Priors have been produced in a different engine configuration, from which the 80-horsepower engine was removed, but a new 106 l/s engine was added, which, like everyone else, reaches speeds of up to 183 km/h and reduces fuel consumption to 6. 8 – 6.9 liters per hundred km. This engine is equipped with the “luxury” configurations of the Priora. Of course, such a reduction in fuel consumption is very attractive to the consumer. We can only hope that the developers will continue to work in this direction. In addition, the new engine fits well into Euro-3 and Euro-4 environmental standards, thanks to the closely located catalyst. Due to rapid heating, the catalysis of toxic substances occurs more vigorously, as a result of which a lower concentration of them enters the atmosphere.
The restyled Prior also has a drawback (compared to previous editions of this car): the carpet in the trunk is thinner than its predecessors, which is why the noise level while driving is higher. Motorists are advised to take care of additional sound insulation in the trunk. In addition, the curb weight of the car has increased (to 1185 kg), which is by as much as 100 kg. reduced its cargo capabilities, since the maximum weight remained the same - 1593 kg. for a station wagon, and 1578 kg. for other body variations.
How to remove and install a fuel tank yourself
In order to replace a faulty tank on a LADA Priora you will need the appropriate set of tools:
- Pliers.
- Wrenches included in the set.
- Screwdrivers, both Phillips and flathead.
- Heads included.
Ground clearance Lada Vesta
Crash test Lada Vesta
Fog lights Lada Vesta
Step-by-step instructions for replacing the fuel tank on a Priora with your own hands:
- The fuel tank of the Lada Priora should contain as little fuel as possible. Therefore, it is better to first use as many liters of fuel as are left in the car.
- The car will have to be driven onto an overpass, or, if desired, into a pit.
- At this stage, you have to remove the rear sofa and fold back the carpet, under which the fuel pump cover is actually located.
- The cover is secured with a pair of screws, which must be unscrewed and the cover removed. You will see a device called a fuel pump.
- The wire block can be disconnected by bending the special clamp.
- We start the engine and wait until it stalls.
- Let's compare the pressure. This is done with the help of a starter, which needs to be turned for 3 seconds.
- Remove the “-” terminal from the battery.
- Squeezing the plastic clamp, disconnect the fuel pump tube from the fitting.
- We do the same with the second fitting.
- Now you should loosen the clamp of the air outlet hose and remove it from the pipe.
- We remove the tube that is responsible for draining the fuel from the special compartment of the separator. This can be done by clamping the latches on the sides.
- We also disconnect the hose going from the filler pipe to the tank nozzle.
- Remove the 2 clamps holding the gas tank.
- If you need to completely replace the tank, you will need to change all the supply hoses without exception. Don't forget to remove the air outlet hose from the tank fitting.
- Return to the place where you removed the cover under the rear seats. Make sure that the nut securing the “-” is removed.
- We remove the wire.
- Remove the pressure ring; for this purpose you need to remove 7 nuts.
- We remove the pump very carefully; when removing it, you need to tilt it slightly to the side so as not to damage the fuel sensor.
- There is a rubber O-ring on the gas tank flange. It needs to be replaced because it becomes cracked over time.
- The neck plug through which fuel is poured into the pipe must be removed, after which we remove the lower bracket on which it is supported. It is important to remove the top bracket only after this.
- We remove the upper end from the filling pipe, or rather from its facing part, then remove the pipe. After this we remove the facing part. You can put the elastic back if it is not damaged.
- Remove the hose from the filler neck.
- After everything has been removed carefully and in the correct order, you can install a new unit, and if necessary, replace all seals, gaskets and hoses that are damaged, even if they are minor. Correct work will ensure stable operation of the fuel sensor and fuel pump.
VAZ | Fuel tank ventilation
Fuel tank ventilation
- Attached to the fuel filler neck is a vent hose that is attached to the top of the fuel tank level sensor. Air is vented through this hose when fuel is added to the tank.
- A thin ventilation hose conducts the resulting vapors to the activated carbon container.
- While driving, air flows through this hose when the fuel level decreases, which prevents the formation of vacuum in the tank. Therefore, when installing the tank, pay special attention to ensure that the hose is not twisted or pinched.
The illustration shows the important elements of a closed vapor recovery system. At a certain coolant temperature and engine load, the diaphragm valve (1) opens, to which reduced pressure is transferred from the intake manifold, and a vacuum is also created in the diaphragm valve (2). As a result, fuel vapors collected in a container with activated carbon (picture on the right) are sucked through the intake manifold into the combustion chambers. The activated carbon container is located on the right wing.
Activated carbon container
To protect the environment, the tank ventilation hose on Renault 19 petrol models with a controlled catalyst is connected to a container containing activated carbon. This container is located behind the mudguard in the right wing. When the engine is not running or at idle, gasoline vapors accumulate in this tank and then enter the engine combustion chamber when the engine load increases or the speed increases. The solenoid valve, which receives a command from the injection and ignition control device, is responsible for supplying fuel vapor to the working mixture. When the engine load is appropriate, this valve opens a reduced pressure hose to the intake manifold or engine ventilation system, causing fuel vapor to be pumped out of the activated carbon container.
Checking the ventilation system
- Raise the rear of the car.
- Disconnect the tank and lower it.
- Look at how worn the hoses are and check individual connections for correctness and replace if necessary.
- Disconnect the vent hose from the tank.
- Blow out this hose with a car pump.
- If blowing is carried out with force, check whether the hose is clogged and, if necessary, replace the solenoid valve.
If the Renault 19 overturns, no more than 30 g of fuel per minute can flow out of the ventilation pipe. There is a safety valve located near the tank filler neck in the right wing.
This valve is connected through the filler neck vent hose to the tank. The safety valve is located in such a way that even with very strong inclinations, the outlet remains closed. There is also a valve inserted into the filler neck of the tank to prevent overfilling. If the tank overfills, the overfill valve opens and releases excess pressure through the ventilation hose into the activated carbon container.
Checking the safety valve
- Raise the rear of the car.
- Unscrew the tank mount and remove it.
- Disconnect the vent hose from the tank.
- If you blow into this hose with the car in a horizontal position, the air should flow easily.
- Otherwise, check if the hoses are clogged anywhere and replace the valve if necessary.
VAZ 2170 Lada Priora technical specifications
PERFORMANCE INDICATORS of VAZ 2170 Lada Priora
Maximum speed: 183 km/h Acceleration time to 100 km/h: 11.5 sec Fuel consumption per 100 km in the city: 9.8 l Fuel consumption per 100 km on the highway: 5.6 l Fuel consumption per 100 km in the combined cycle: 7.2 l Fuel tank volume: 43 l Vehicle curb weight: 1095 kg Tire size: 185/65 R14
ENGINE CHARACTERISTICS
Location: front, transverse Engine volume: 1596 cm3 Power: 98 hp Number of revolutions: 5600 Torque: 145/4000 N*m Power system: Distributed injection Turbocharging: no Gas distribution mechanism: Not included Cylinder arrangement: In-line Number of cylinders: 4 Number of valves per cylinder: 4 Recommended fuel: AI-95 Environmental standard: EURO III
The whole truth about the fuel consumption of Lada Priora
Fuel consumption of the Lada Priora is an important indicator of the technical condition of the car. Standard engines burn up to 9-10 liters of gasoline in urban conditions, and on the highway at a calm pace the car requires about 6 liters of fuel. Modified power units (with a modified camshaft profile or turbine) are characterized by increased consumption by 20-25%, which further increases during dynamic acceleration.
How far can you travel?
The volume of the Priora's fuel tank is designed so that the car can travel a certain distance without refueling. In many ways, the power reserve is individual – that is, it depends on the driver’s driving style. Sharp acceleration increases fuel consumption, and the same thing happens if you select the wrong gear. But there is not only a human factor. Firstly, different amounts of fuel are consumed in the city, on the highway and in the combined cycle when recalculated per 100 km.
Secondly, a lot depends on the engine: the Priora was equipped with engines with a displacement of 1.6 liters with eight and sixteen valves and a power of 81, 87, 98 and 106 hp. Plus, since 2013, after restyling, the Priora was equipped with a robotic automatic transmission. The most popular choice is a sixteen-valve engine with 98 hp. along with manual transmission. Calculations will be given for it.
On a full tank
So, the configuration we have chosen consumes:
- 9.8 l per 100 km in the city;
- 5.6 l per 100 km on the highway;
- 7.2 liters per 100 km in the combined cycle.
With the maximum filling of the gas tank, the Lada Priora, powered by AI-95 (according to the passport!) will travel:
- 438.77 km in the city;
- 767.88 km on the highway;
- 597.22 km combined cycle.
It is worth subtracting at least 30 km from these figures so as not to kill the fuel pump - if it pumps air and debris from the bottom of the gas tank, its service life will gradually come to an end.
When the gas pump on the dashboard came on
If the gas station icon lights up on the panel, then this is not good - there is less than 10 liters left in the gas tank. This is, one might say, a critical situation. Of course, there have been cases when a person drove with a “light bulb” another 90 km along the highway, but it is better not to risk it - limit the radius of the gas station search area to 20 km immediately after you see the light bulb.
Tank volume of a Priora car - article number, price, malfunctions
The tank volume of the Priora car “inherited” from its predecessors - 43 liters.
How many years have passed, the VAZ-2108 was equipped with a gas tank of the same volume, the same was installed in the VAZ-2110, and after the VAZ-2110 was removed from the assembly line, and after the launch of production of the Lada Priora, the number of liters did not change! However, the fuel tank of a Priora car (sedan, hatchback and station wagon) has its own article number (catalog number) - it is the same on all three bodies. The Priora should not despair: this fuel tank volume is considered the most optimal, for which there is a simple explanation: the Priora is a city car with low consumption on the highway and average consumption in the city. In the city, it is easy for a motorist to find a gas station, fill the tank regularly; on the highway, it is easy to calculate the distance to the nearest gas station, and then refuel on time. The volume (capacity) of the tank on the Priora is ideal for the operating conditions for which it is intended.
Lada Priora with a tank volume of 43 liters was produced from 2007 to 2013 - there were no changes. The volume does not depend on the body - be it a sedan, hatchback, station wagon or coupe - or on the configuration. The tank capacity on the Priora is designed to allow you to get from point A to point B within the city, sometimes stopping at a gas station. The number of liters, of course, can be called “untrue”: curious Prior owners found out that the car is literally filled “to the brim” with 49 liters of gasoline.
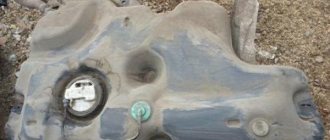
The tank on the Priora looks like this
- Standard gas tank - article number and price
- Basic faults
- Removing and installing the tank
- It will be most convenient to dismantle the fuel tank without gasoline, or with a small amount of it. The work will take place in the following order:
- How far can you travel?
- On a full tank
- With the maximum filling of the gas tank, the Lada Priora, powered by AI-95 (according to the passport!) will travel:
- When the gas pump on the dashboard came on
Removing and installing the tank
Removing the gas tank on a Priora begins with compiling a set of tools:
- Set of wrenches;
- Set of heads;
- Flat and Phillips screwdrivers;
- Pliers.
It will be most convenient to dismantle the fuel tank without gasoline, or with a small amount of it. The work will take place in the following order:
- Drive the car into a pit or overpass, secure it in place by tightening the handbrake;
- Remove the rear seat completely, and then the part of the carpet under which the fuel pump cover is located;
- Remove the two screws that secure this cover and remove it. In front of you is the fuel pump;
- Find the wiring harness block, bend the clamp, after which you can disconnect the wiring block;
- Start the engine, wait until it stalls (the fuel has completely drained out of the ramp). Then equalize the pressure in the fuel drives by turning the starter for about three seconds;
- Remove the negative terminal of the battery;
- Squeeze the plastic clamp on the fuel pump fitting (there are two of them). Disconnect the tube from the pump fitting;
- On the second fitting, bend the second clamp, disconnect the other tube;
- Find the air outlet hose and loosen its clamp. Remove the hose from the pipe;
- Remove the tube responsible for draining gasoline from the separator by clamping the clamps on the sides;
- Where the connecting hose from the fill pipe is attached to the tank nozzle, loosen the clamp. Remove the hose;
- We proceed to direct dismantling. Remove the two clamps that secure the tank;
- If you are going to change the tank, then it is worth changing all the supply hoses. Remove the air outlet hose from the tank fitting;
- Go back upstairs to where you removed the cover under the seats. The nut securing the “-” must be removed. After this, you can remove the wire itself;
- Unscrew the remaining seven nuts that secure the pressure ring and remove it. Carefully remove the pump, tilting it to the side to keep the fuel gauge sensor lever intact;
- There is an O-ring (rubber) on the tank flange. It may have cracked over time, so it might be a good idea to replace it;
- Remove the filler pipe filler plug, and then remove the bottom bracket securing it. Strictly after this, dismantle the upper bracket;
- Remove the upper end from the facing part of the filling pipe and remove the pipe. Remove the facing part itself. If the elastic band is not damaged, it can be put back;
- Remove the hose from the filler neck.
Install the parts in reverse order. You can do without replacing parts, but checking the integrity of the seams of hoses, gaskets and other parts will ensure stable operation of the fuel pump and fuel sensor.
FLS calibration. Priora gas tank capacity.
It all started with the fact that the fuel gauge needle stopped showing the maximum even when I filled the tank full - it did not reach the maximum, first one division, and then one and a half. You can’t live like this, I thought. And, to be honest, I have long been tormented by curiosity, how much gasoline remains in the tank when the warning light comes on? The solution is to open the gas tank.
I removed the chip from the fuel module and ran the starter for about 10 seconds, burning out the remaining fuel in the fuel line. Then I let the battery rest for a few minutes and drove it for another 10 seconds. Enough. Then nothing interesting - I pulled out 2 tubes, unscrewed 8 nuts, removed the pressure ring and here is the fuel module.
The tank turned out to be surprisingly clean. But I didn’t like the FLS at all.
Major breakdowns and malfunctions
There are several main reasons for tank breakdowns after which it needs to be repaired or replaced with a new one.
The studs securing the fuel pump cup are one of the main reasons for tank failure and the reason for its repair. Although the diameter of the studs was increased in Priora, it is not difficult to tear them off.
A tank breakdown occurs when driving on country roads, since the tank does not have any protection and is located in a vulnerable place.
Corrosion in the tank is also one of the reasons for dismantling the tank and cleaning it from dirt or even replacing it with a new one.
Real fuel consumption of Lada Priora per 100 kilometers in different conditions
When operating a Lada Priora car, owners are faced with the problem of increased fuel consumption in city traffic. On the highway, many drivers manage to meet their passport data. The reason for the discrepancies is the difference in traffic density at the test site and city streets. In addition, to obtain the minimum consumption in the city, testers move along flat sections of the road without traffic lights or traffic jams and fill the tank with fuel that meets the standards, which is unattainable in real-life conditions.
Body
| Body type | sedan |
| Number of doors | 4 |
| Number of seats | 5 |
| Wheelbase | 2492 mm |
| Front track | 1410 mm |
| Rear track | 1380 mm |
| Ground clearance | 170 mm |
| Maximum trunk volume | 430 l |
| Width | 1680 mm |
| Length | 4350 mm |
| Height | 1420 mm |
Engine
| Engine capacity | 1596 cm3 |
| Power | 87 hp |
| At rpm | 5100 |
| Torque | 140/3800 n*m |
| Number of cylinders | 4 |
| Number of valves per cylinder | 2 |
| Cylinder diameter | 82 mm |
| Piston stroke | 75.6 mm |
| Compression ratio | 10.5 |
| Environmental standard | Euro 4 |
Actual fuel consumption of Lada Priora depending on engine type
The factory installed 4-cylinder engines with a distributed injection system and catalytic converters on Priora family cars:
- basic 8-valve 81-horsepower VAZ-21114 with a volume of 1.6 liters (later they began to use the VAZ-21116 with a power of 90 hp);
- improved VAZ-21126 with a capacity of 98 hp. With. with a gas distribution mechanism with 16 valves;
- modernized VAZ-21127, developing 106 hp. With.
- for sports modifications, a 1.8-liter VAZ-21128 with a power of 123 or 130 hp was offered. With. (depending on cam profile and control unit).
All power units are designed to use gasoline with an octane rating of at least 95 units.
Some vehicles were equipped with manual air conditioning (not offered on vehicles with the base engine). The efficiency parameters of Lada Priora engines declared by the company are indicated in the table (standards may differ depending on the year of manufacture, since the plant used different test methods).
| Engine model | City flow | When driving on a highway at a constant speed of 90 km/h | Combined mode |
| VAZ-21114 | 8,5 | 5,7 | 7,0 |
| VAZ-21116 | 8,5 | 5,7 | 7,0 |
| VAZ-21126 | 9,8 | 6,0 | 7,7 |
| VAZ-21127 | 9,4 | 5,7 | 6,8 |
| VAZ-21128 | 9,8 | 5,9 | 7,5 |
How to check the geometry of a car body
The opinion that the absence of deviations in the car's wheel alignment indicators can serve as confirmation of the correct body geometry is erroneous. Body diagnostics is a separate procedure that requires special stands and stocks.
Using such devices, using control points, you can check the conformity of the dimensions and diagonals of the engine compartment, trunk, doorways, as well as the distance between side members, reinforcements, load-bearing body parts, etc.
There are three options for checking body geometry:
- Carrying out measurements of distances between control points. This type of diagnostic allows you to quickly check the correctness of the geometry both before starting repair work and during its implementation. Such measurements are carried out using a regular tape measure or a special ruler.
- During comparative measurements, the correspondence of the distances between symmetrical points located on opposite sides of the body is analyzed. This type of test is distinguished by its versatility and ease of diagnosis of body damage. As a rule, experts compare the length of the diagonals between symmetrical points of the body. In this case, you can compare the measurement data on the damaged and intact sides of the car.
- In three-dimensional measurement, the spatial location of control points is determined in relation to the base planes of the body. For such diagnostics it is necessary to have special equipment.
During the measurements, a specialist can determine the extent of the main damage, determine the presence of minor defects and outline a plan for restoration work.
To measure the geometry of the body, measuring rulers are used or stationary equipment is used, a slipway, which allows you to check the distances between control points using special marks or electronic beacons.
To do this, the car is fixed on a platform using chains and measuring sensors are hung on certain points of the body. Quite often, craftsmen are faced with a situation where control points are hidden under the skin of body panels, under bumpers, under protective elements, so they have to partially disassemble the body to provide access to hidden places.
In order to restore the original parameters of the body geometry, straightening work is carried out in a car service center. This is a rather complex and multi-stage job that must be performed by qualified craftsmen who have the appropriate education, experience and a good feel for metal.
Garage specialists can tell you that they can easily restore your car after an accident using a special certified line. But such assurances should not be trusted. Without equipment such as a slipway, the geometry of the body after a serious accident cannot be fully restored. Cars repaired in artisanal conditions, as a rule, have deviations in body geometry.
We have already noted earlier that body diagnostics using control points should be carried out at least once a year or every 30 thousand km. mileage
If the car service is not equipped with special stands, then a body repair technician can use a ruler to measure the geometry of the body, but this is not a very reliable method, which can give an error of about 5 millimeters in one direction or another.
On the slipway you can measure the dimensions of such body elements as:
- luggage compartment opening;
- engine compartment;
- front and rear side members;
- window openings;
- doorways;
- sections of the front, middle, rear of the car.
To straighten the car frame, auto repair shops use hydraulic equipment and vacuum suction cups.
Complete restoration of body geometry (correction after serious accidents) can be carried out by stretching, but only if the metal has retained its characteristics.
Diode pointers are used for computer body diagnostics. This device allows you to perform all the necessary measurements without disassembling. For diagnostics, the machine is installed on a stand. The computer program will take all the necessary measurements and apply them to a virtual template of a specific car model. Such a check takes about 10 minutes, and the owner of the car receives a printout of the body with marked problem areas. The permissible error of such diagnostics is within 5 mm.
Reasons for increased gas consumption of Lada Priora
Economical fuel consumption is hindered by:
- air conditioning or open side windows;
- operating the car in winter in a torn mode;
- driving with a fully loaded cabin or trailer;
- low tire pressure or using winter tires in summer.
Car color
The color of the car affects the heating of the interior in the summer. Studies have shown that light-colored equipment consumes 0.5-1% less fuel due to faster cooling of the air by the air conditioner and less load on the compressor. The resulting difference lies within the statistical error, so the color of the car body does not affect the average fuel consumption. Open side windows and deflectors have a greater impact on fuel costs (increased aerodynamic drag leads to the burning of an extra 1 liter of gasoline per 100 km).
Riding in winter
When starting the engine in subzero temperatures, the thickened oil has increased resistance to crankshaft rotation, and to maintain normal combustion of the mixture, additional fuel is supplied to the cylinders. As it warms up, the fluidity of the lubricant approaches the standard value, and the control unit gradually leans the working mixture. Efficiency in winter is negatively affected by the condition of the road surface, which causes slipping of the drive wheels, as well as a decrease in speed in city traffic due to traffic jams.
If the car is used for short trips, then the engine constantly runs on a rich mixture, since the cooling jacket does not warm up completely while driving. Some drivers do not wait for the interior and windows to warm up while idling and begin to increase the crankshaft speed, which leads to the burning of excess fuel.
In winter, consumption is 1-2 liters per 100 km higher than in summer.
Car load
As the load increases, the weight of the vehicle increases, which requires additional fuel to accelerate and maintain the required combustion rate. Operating a machine with a trailer also has a negative impact on efficiency. The installation of luggage bars and a trunk for transporting things on the roof of the body has a negative impact on fuel costs. A loaded car consumes 15-20% more gasoline. As the speed increases, the difference increases.
Tire influence
The Lada Priora uses pneumatic tires designed for wheels with a diameter of 13 to 15″. Tire size does not have a big impact on efficiency. It is not recommended to use winter tires in summer. At positive ambient temperatures, the rubber mass with increased softness provides additional resistance to movement. Additional disadvantages of winter tires in summer are noise and increased braking distance, which leads to accidents.
When operating the machine, it is necessary to maintain the tire pressure recommended by the manufacturer. When driving on flat tires, resistance increases, which leads to increased fuel consumption and premature tire wear. Please note that tire pressure depends on the load level of the passenger compartment (information on parameter values is given in the factory operating instructions).
Lada Priora tank how many liters
The popular domestic Lada Priora borrowed the tank volume from its predecessor. And many potential owners are interested in the question, how many liters are in the tank? We will definitely answer this pressing question in this material, and also tell you a lot of useful information about the Lada Priora tank, including what troubles to expect, how much it costs and most importantly, what is the capacity of the gas tank.
A short excursion into history, the legendary VAZ-2108 was equipped with a tank, the volume of which was absolutely the same as that of the VAZ-2110 later. The “Ten” has long been discontinued, and the Priora is being produced, but the capacity of the gas tank has not changed since the days of the “Eight”. At the same time, Lada Priora has its own personal article number (that is, catalog number) for the tank. The number is identical for each body: sedan, exactly the same for a station wagon and, accordingly, for a hatchback. According to numerous owners of the car we are considering, its tank volume is the most optimal, and all because Priora is a 100 percent city car with average fuel consumption in urban conditions and low fuel consumption on the highway. According to information from the car manufacturer, the tank volume is 43 liters, however, Lada Priora owners have found through experience that the tank capacity is actually up to 49 liters.
How much gasoline is in the tank when the light is on?
When the warning light on the instrument panel lights up, less than 10 liters of fuel remains in the Priora tank, which is already a signal that the car needs to be refueled. Of course, taking into account the fuel consumption of the Priora, you can drive almost 100 km on 10 liters of fuel, but it is highly not recommended to take risks and check the car’s consumption in such conditions.
We hope our article was useful to you.
← Headlights Lada Priora
Sensors Niva →
Body geometry VAZ 2112 slip dimensions
To independently solve the problem of restoring parts of a VAZ 2112 car, you need to have the geometric dimensions of its body. In professional workshops, these parameters must be taken into account, and they are individual for each machine model. Violation of body geometry must be eliminated, since it significantly reduces the safety of driving such a car. From this article you can learn important information about the indicators on which high-quality repair of the VAZ 2112 body depends.
The influence of body geometry on handling
During the operation of a VAZ 2112 car, sooner or later deformation of body parts occurs. Safety on the road and ease of operation depend on the level of their wear.
VAZ 2112 has been produced since 1999. The car body of this model is similar to the 2110 modification, the difference is that the first is slightly shorter than the second.
The steering wheel makes turns easier and faster.
Model 2112 is characterized by a sporty character. It combines the winning parts of the 10 with the estate rear seat from the 2111, making the car much roomier and more maneuverable. The ability to transform the rear seat allows, if necessary, to significantly increase the volume of the interior. Improved handling characteristics have simplified the process of entering a turn, which has significantly increased the level of safety for road users.
The VAZ 2112 has several modifications, for example, model 21123 is characterized by an original design of the hood and bumper, which allowed the car body to become popular among many car enthusiasts. After some time, the VAZ 2112 had a new grille model, and the hood took on a standard look.
Geometric dimensions of the “two-piece”
VAZ 2112 is one of the most popular models among the cars produced by the domestic automotive industry. It is relatively inexpensive, has a good design and different body styles.
The main geometric dimensions of the body of this car are as follows (in mm):
- length – 4170;
- width without mirrors – 1680;
- height – 1435;
- width with mirrors – 1875;
- rear door opening diagonal – 1320;
- short diagonal of the rear side window frame – 230;
- the distance between the center of the upper beam of the rear door opening to the middle of its lower beam is 1050;
- the long diagonal of the rear side window frame is 710.
The rarest body type of the 2112 is a coupe, or three-door hatchback. This is a sports model, it stands out from others, which are monotonous in terms of the geometric dimensions of the body. It was the design features of the VAZ 2112 coupe that allowed the model to become in demand at one time. However, after ten thousand examples of the 2112 coupe were produced, production ceased, so it is considered a rare model.
Several modifications of the VAZ 2112 were equipped with hatches, which greatly increased the comfort of the driver and passengers on the road. The geometric dimensions of 2112 made it possible to equip the car with many additional functional capabilities.
Body parts most susceptible to deformation
Sharp braking or untimely start provoke, first of all, damage to the bumper. If it is insignificant, then during repairs it is possible to achieve the performance of standard geometry. In the presence of complex deformations, this cannot be done, so it is easier to replace the damaged body part with a new one.
If the owner of the car does not take enough care of the condition of the body, then those parts that have close contact with the road surface are quickly eaten away by corrosion. And repairing the hood, doors and hidden body parts instead of timely prevention is already more difficult and expensive.
The question arose about replacing the TV (s/o) with a VAZ-2110, as there was great sadness. Like everyone else, in order to save money, as well as gain experience, it was decided to do it yourself. The question arose about the geometric dimensions of the engine compartment. I found a couple of diagrams on the Internet
Main differences from LADA 110[edit | edit code]
Priora is a deep restyling of its predecessor, the VAZ-2110. Over 950 fundamental changes[12] were made to the design and more than two thousand new parts were used (almost the same as when creating a completely new model).
Exterior
: front and rear fenders, hood and trunk lid, lighting equipment with fog lights, bumpers, radiator trim, ornamental moldings and alloy wheels, external door handles (since 2008).
During its development, of course, it was possible to eliminate the most serious mistakes the designers made when creating the “tenth” family. In particular, the clearly “broken-off” boundary between the roof and the rest of the body in the area of the C-pillar, which is completely absurd for a small and clearly wedge-shaped sedan, is a thing of the past [13] - this transition has now become smoother; the repeatedly criticized and no less ridiculous in shape [13] rear wheel arches became a thing of history, replaced by more aesthetic ones; The single strip of rear lights from side to side, meaningless for such a compact and narrow car[13], has also disappeared, replaced by two lights located on the sides of the trunk lid and elongated in a vertical plane, which visually increases the width of the car; Other, less pronounced errors in the proportioning of individual elements of the sidewall, plastic and design were also corrected, which, in general, made it possible to largely move away from the awkward image of a “pregnant antelope,” as the car of the previous series was immediately dubbed by the people. More modern lighting technology and elements such as a spoiler built into the trunk lid also significantly “rejuvenated” the appearance of the car. Compared to the previous model, improved technologies for assembling components and mechanisms have made it possible to reduce the gaps between body elements by half, and the bumper-fender-headlamp (lantern) interfaces are now as if drawn. In general, the overall design of the car goes back to the appearance of the “ten”, created in the late eighties in line with the trends of the “biodesign” trend that was popular at that time.
Anti-corrosion protection has been significantly enhanced, galvanization is used, and any type of body is given a 6-year guarantee against through corrosion[14].
Interior
: developed with the participation of designers from the Italian studio Carcerano[15], an instrument panel with a trip computer, a silver console trim with an oval-shaped clock, an armrest with two niches for small items, higher quality upholstery, a multiplex control system for electric drives in the doors, mirrors and actuators ( including the trunk), driver airbag (in all trim levels), front passenger airbag (Lux trim level), windshield and rear window seals, sound insulation, energy-absorbing front door inserts (since 2009) and “dashboard”, allowed to bring it up to the modern level interior design and increased the level of equipment, comfort and safety. The interior space remains unchanged from the previous model. Among the shortcomings, one can note the short length of the front seat slides, as a result of which a tall driver (more than 175-180 cm) may feel cramped; there is no full height adjustment of the seat; the steering column is only adjustable in height.
Power unit
: VAZ-21116 engine with a power of 90 hp. With. (8 valves) or VAZ-21126 with a capacity of 98 hp. With. (16 valves).
The VAZ-21116 engine practically produces 102-107 hp. With. (indications obtained from unofficial bench tests). The VAZ-21126 engine has been significantly modernized compared to the previous 21124, and the main way of its improvement was the introduction of foreign-made components instead of domestic ones that never reached an acceptable level of quality - in particular, a significantly lightweight ShPG of foreign production from Federal Mogul, a timing belt and a tension roller from Gates were used , with a declared resource of 200 thousand kilometers. The compression ratio was increased to 11 by installing a thinner cylinder head gasket (due to the increased compression ratio, the factory manual required the use of gasoline with an octane rating of at least 95). Many other modifications and improvements can be noted, as well as a reinforced clutch, a vacuum brake booster of increased diameter, and a gearbox drive mechanism with closed bearings. Installation of gasoline engines 21128-26 and 21128-27 with a working volume of 1.8 liters and a power of 123 hp. and 130 hp produced as a tuning of Togliatti.
At the moment, only two VAZ-21116 90 hp power plants are installed. eight-valve 1.6-liter engine and VAZ-21127 106 hp. and a five-speed manual transmission[16].
Chassis
: despite the modernization of the front suspension struts with barrel springs, in general, its design with straight forged arms and diagonal reaction rods resting on them (called braces) instead of modern L-shaped arms today seems outdated; New shock absorbers are used in the rear suspension; gearless electric power steering (options with power steering are also available), a more efficient braking system with new ABS and BAS systems (BOSCH 8.1). Front and rear anti-roll bars are installed. The rear brakes are drum brakes; according to the manufacturer, they are sufficiently effective.
Optional equipment
: alarm system with remote control (mono key), immobilizer, audio preparation, standard acoustic system in some trim levels.
A number of trim levels are equipped as standard with air conditioning with climate control, heated windshield and rear windows, heated front seats, light and rain sensors, parking sensors, and electric windows on all doors.