Purpose
As the name of the part suggests, it is designed to store fuel. Thanks to this, the car is able to cover long distances. In addition to this main purpose, the gas tank provides the following functions:
- Prevents fuel vapors from entering the environment. This allows the vehicle to meet high environmental standards. Plus, near a modern car, even when fully refueled, you can’t smell gasoline.
- Prevents fuel leakage during vehicle operation.
This tank is designed so that the car can travel about 500 kilometers. Since each engine has its own fuel consumption, the size of the gas tank will be adjusted to this parameter. Compared to a gasoline powertrain, a diesel uses significantly less fuel (we'll explain why this is so here), so it can have a smaller tank.
How do manufacturers calculate fuel capacity?
It is believed that a car should have enough fuel so that it can travel 500 kilometers at one filling station. This is an unspoken rule that many automakers adhere to. Consequently, the fuel tank capacity will be different for vehicles with high and low fuel consumption.
On average, a fuel tank holds 55-70 liters of gasoline, however, due to the reduced fuel consumption of small engines, there is a tendency for the fuel tank capacity to decrease. This is logical, because a passenger car with a small engine displacement needs much less fuel to travel 500 km. In addition, the efficiency of the fuel itself increases due to an increase in octane number and the use of various additives, which also implies savings and a reduction in tank capacity. A large jeep with a voracious engine will “eat” much more gasoline, therefore, its fuel tank should be larger.
When it comes to diesel, the fuel tank of diesel-powered cars is often smaller compared to gasoline-powered cars. This is logical, since the efficiency of diesel fuel is higher than the efficiency of gasoline. Therefore, a car with a 40-liter tank completely filled with diesel fuel will travel the same distance as a car with a full 50-liter tank. But this is too rough a comparison.
Car fuel tank design
The gas tank consists of the following elements:
- sealed housing - a container that contains fuel during engine operation;
- ventilation tube - ensures the removal of excess air formed during refueling, and also normalizes pressure, which changes due to expansion or contraction of the fuel due to changes in ambient temperature;
- filler neck - a pipe that has access to the outer part of the car body and is intended for filling the tank with fuel;
- intake pipe - a small tube through which fuel flows to the cylinders;
- drain - a hole that is intended for emergency replacement of fuel in case of contamination (in its normal state it is blocked by a plug);
- sensor – a sensor with a hollow float that determines the fuel level and sends a corresponding signal to the vehicle’s electronic control unit;
- filters – they clean the fuel before supplying it to the cylinders, removing coarse particles of dirt and dust that may end up in the fuel.
Conventionally, one of the components of a car tank includes a fuel pump, which pumps fuel from the gas tank to the cylinder group. It is not part of this unit, but the functions of the pump are closely related to the functions of the tank. In many car models, the device is built directly into the tank.
https://youtube.com/watch?v=xB9kFJkIM-k
The tank is made from various metal alloys. Most often used to create it:
- steel – commonly used in trucks and SUVs;
- aluminum – tanks made of this metal are installed on passenger cars.
Also, some vehicle models have gas tanks made of an impact-resistant polymer composition. Their main advantage is lightness. After all, the weight of even the most durable plastic is several times less than the weight of metal.
As for the size of the car tank, it is usually made so that one full refueling is enough to cover 500 - 600 km. On most passenger cars, the tank capacity is 50 - 60 liters. On trucks and SUVs it is much larger.
Fuel system for cars
Protection against gasoline drainage Club of classic VAZ-2107, VAZ 2106 lovers
Fuel tank volume Renault Logan
The idea with a limit switch or a reed switch is good, but it did not suit me due to the lack of an alarm on my car (like many classic drivers). I don’t install an alarm because I think that no one but me needs this car. Even if they climb in for a ride, they won’t be able to start it (there are mechanical anti-theft devices), and there’s not much to steal from it.
The idea of removing the tank and moving it to the left wing, or welding the neck inside the trunk, or welding a mesh into the neck did not work, due to the high labor intensity of removing and washing the tank, etc.
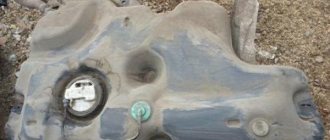
Having examined the filler neck of my car in more detail, I discovered that there was a small step of 1-1.5 mm in it. width. (Marked in the photo with an arrow.)
My car is 92. therefore, the neck is with an external thread, but I looked at younger cars that have a neck with an internal thread; such a step also exists.
Then the pneumatic cylinder body was drilled out from the shoulder side so that the filling nozzle could fit into it freely. On the other side, a piece of pipe of the same diameter is welded to increase the length. The bottom of the resulting glass was tightly welded and using a grinder and a 5mm drill, many holes were made in the bottom and walls of the glass.
I inserted this glass into the filling neck, and so that it could not be taken out from there, I opened it along the edges, closer to the walls of the neck. After that he was stuck there tightly.
True, later it had to be taken out from there using a curved reinforcement because... At first I didn’t make enough holes, the gasoline didn’t have time to flow through them and the refueling nozzle shot off. It was VERY difficult to get him out of there. So you need to immediately make as many holes as possible, at least 2 times more than in the photo, because they show the original version.
The glass in the neck looks like this:
Of course, not everyone has a housing from a KamAZ auxiliary brake pneumatic cylinder lying around in their garage, but you can use any pipe of a suitable diameter instead. Somewhere I even saw that a similar glass was made from an old shock absorber. The main thing is that the resulting glass clings to the step in the filler neck.
Therefore, a sketch of a glass with dimensions is attached:
It is advisable to take the tube for the glass from a soft metal, and the core from a hard one, in order to eliminate the possibility of sparks during core work.
After such protection, there were several attempts to drain, but the pioneers did not get gasoline, the hose did not fit into the tank... After a while, even the attempts stopped, apparently all the drainers in the area already knew that they would not be able to drain my car.
True, such protection has a small disadvantage. It is necessary to ensure that the level of gasoline in the tank is below the level of the bottom of the glass. In my case it turned out to be about 20 liters, which is enough for city driving. And on a long trip, you can fill up the tank full, but you will still run out of gas.
In my opinion, the combination of such protection with a limit switch or reed switch, for Zhiguli cars with alarms, makes the car practically impossible to drain.
How to choose a fuel tank
The process of finding a new fuel tank is usually not complicated. Since this product is adjusted to the vehicle’s parameters, the search must be carried out based on the vehicle model. Only in this case can you select an identical replacement. If you know the spare part code (indicated on the tank itself), then this is an ideal search option. If this information is missing, the VIN code comes to the rescue (read about where it is and what information about the car it contains here).
It is best to buy an original gas tank. But some companies sell analogues of good quality. Among such companies are the Danish company Klokkerholm and the Chinese brand Sailing. Although the Chinese manufacturer has received a bad reputation for the quality of auto parts they sell, this does not apply to their gas tanks. You shouldn’t buy a cheap product - you won’t be able to save money, since after a couple of years a low-quality product will deteriorate and will still need to be replaced.
So, despite its simple design and purpose, the gas tank plays a big role in the comfortable operation of the vehicle. Like other elements of the fuel system, without it the car will not be able to travel long distances.
In conclusion, we suggest watching a short video on how to remove dirt from a gas tank:
How to clean a very dirty fuel tank?
Watch this video on YouTube
Why are the numbers in your passport not accurate?
The actual tank capacity is usually greater than the data in the car documents. Therefore, if the vehicle’s passport indicates 60-65 liters, the actual volume is 70-75 liters. Most car manufacturers add about 10-15%.
One of the reasons for the differences due to which the figures in the passport are inaccurate is the need for a reserve to compensate for the expansion of the fuel as the temperature changes. The pressure inside the container does not increase, and fuel does not leak out. The second reason is protection against fuel leaks when the car, and therefore the tank, is tilted.
conclusions
In general, the design of a fuel tank is not a simple thing. There are many nuances depending on weather conditions, gasoline quality, and mechanical damage that affect the operation of the entire fuel tank system. If you ignore any breakdowns associated with this mechanism, then in the end there may be big problems with the car, and in some cases, fuel detonation. So if you notice a breakdown, you must urgently contact a service center or auto repair shop, even if only the fuel tank cap with a lock is broken.
Design and principle of operation of the fuel tank
Fuel is supplied to the tank through a filler neck located above the rear fender (on the left or right). The left neck position is the most convenient, but for some reason most cars are equipped with a neck on the right side.
The convenience is that at gas stations the queue for cars with the left neck is much shorter, the driver has to walk less, and most importantly, there is less chance of forgetting to take out the gas nozzle and driving away with the hose.
The filler neck is connected to the tank using a pipe called a fuel line. A screw type lid is most often used to close the neck.
On some Ford car models, the fuel filler neck does not have a protective cap (Easyfuel system), but is equipped with a special hatch with a lock, which opens using an electric motor and drive when inserting the filling nozzle into the neck.
Fuel is supplied to the fuel system through the fuel outlet line, while excess fuel is returned to the tank through the fuel return line.
Gasoline internal combustion engines are equipped with fuel tanks with an electric pump for supplying fuel. A special sensor, which is called a fuel level sensor, is responsible for monitoring the fuel level in the tank. In gasoline internal combustion engines it is connected to the fuel pump, in diesel engines it is mounted as an independent element.
In tanks with a simple design, only one control sensor is installed; in tanks with a complex, multi-chamber configuration, there can be two such sensors.
The fuel tank ventilation system ensures constant air pressure inside the fuel tank.
Low pressure can cause the tank to deform and stop the fuel supply. High pressure threatens to rupture the fuel tank
Therefore, it is so important to maintain optimal pressure inside the tank to prevent serious damage
Modern tanks use a closed ventilation system in which the tank does not interact with incoming air.
In order to avoid air discharge inside the tank, a safety valve is installed, which is located on the fuel supply filler cap. The main purpose of this valve is to allow air to flow in one direction and prevent it from flowing in the opposite direction.
Excessive amounts of vapors generated when fuel is supplied to the tank are removed through the ventilation system pipeline, which is located parallel to the pipeline through which fuel is poured into the tank.
The pipeline for removing fuel vapors is equipped with a special compensation tank. There is also a gravity-type valve, which is designed to prevent fuel from spilling from the fuel tank in the event of a vehicle rollover.
When fuel is heated, vapors are removed from the tank using a gasoline vapor extraction system. Such a system is an integral part of the fuel tank ventilation system, which, based on temperature and pressure sensors, captures gasoline vapors and removes them from the tank.
How to prevent gasoline drainage on a classic VAZ 2101-2107
It's no secret that one of the most common problems in classic Lada cars is the lack of protection against illegal draining of gasoline from the tank.
In domestic gas tanks there is neither a reinforced mesh nor other protective devices that would allow the car owner to sleep peacefully at night. One of the common ways to protect the tank from draining gasoline in classic VAZ 2101-2107 is a plastic cap with a key. Some classic car owners install a lock on the tank flap. Others put a button to open the hatch in the cabin. Particularly cunning ones install an alarm sensor on the hatch, which, when opened, triggers an audible signal and scares away thieves and intruders. And only a small proportion of car owners try to thoroughly protect themselves from any attempts to drain precious fuel.
Let's look at this issue in order.
Types of protective caps on the gas tank for VAZ 2101-2107
Plastic caps with a key are the basic and simplest protection against gasoline drainage. According to statistics, on average, an experienced attacker needs less than 1 minute to open this security accessory. Its cost is not high, but so is the degree of protection.
Aluminum cover with a code - this protective accessory is convenient because to open it the car owner does not need to constantly carry an additional key with him, and these covers are stronger in physical properties than plastic ones. However, attackers have found a way to break this protection in 2-5 minutes. In addition, there is a large number of defective lids, which is due to many fakes. The metal is very soft, brittle and can crack with little physical impact. The cost of this cover with a code is 50-100% higher than the plastic one.
Installing a lock on the tank flap VAZ 2101-2107
You can install a lock like a mailbox, but these locks can be opened with almost any powerful screwdriver or wrench. Personally, when I lost my key and came to a car service for advice. The master broke the internal insert in 15 seconds and opened the hatch.
Some car owners install an electric lock and place a button directly in the passenger compartment to open the tank hatch. Let's imagine that an attacker wants to drain gasoline and sees that there are no locks, but the hatch does not open as usual. Most likely he will try to pry off the hatch with a screwdriver or crowbar. As a result, you will receive a scratched and bent rear wing element, the cost of which will cost much more than the cost of gasoline. Agree, this is not a very bright prospect.
There is a way to install an alarm sensor on the gas tank flap. In principle, it’s a pretty effective way to protect your gasoline from being drained. However, if thieves are constantly operating in your area, then in the end, the alarm going off every night can infuriate all the neighbors of your house and ruin your relationship with them.
Personally, my choice in solving this issue fell on a metal glass, which I installed in the neck of the tank. After that, for more than a year, no one tried to drain the gasoline from my seven, although earlier in a week I could come to an empty tank up to 3-4 times in a row. In addition, I took several photographs of the already installed glass in the neck of the VAZ 2107 tank.
After watching a bunch of videos on YouTube on the Internet and reading quite a few articles, I realized that many craftsmen make this glass either from an old stabilizer bar or from a metal pipe of different diameters. Personally, I made my glass from 2 plumbing pipes.
You can see the diagram in the figure. I will explain my choice of this design by the following factors. First I made a regular 150 mm glass from a pipe. When I first poured gasoline from the pistol, I encountered a problem that the fuel under high pressure did not have time to escape and the pistol was constantly firing.
The use of a longer glass, as well as an increase in the diameter and number of holes, would improve the passage of fuel. However, in this case it is necessary to always not add a decent amount of fuel. In my case, I often go to the country and the distance between gas stations is quite long, especially in rural areas.
It is for this reason that I radically changed the design of the glass and additionally welded a tube of a smaller diameter to the bottom, where I placed a pair of wires at the ends to make it impossible to insert hoses of any diameter. In this case, when filling, the fuel goes out with a bang and does not have time to fill the glass even with strong fuel pressure. The design of the glass does not allow it to damage its weak points at the place where the wire is welded using either a crowbar or another tool and, accordingly, to get to the desired fuel.
What is a car fuel tank
A fuel tank means a container specially designed for a specific car model. It is an integral part of the fuel system. Without it, no matter how serviceable the power unit is, it will not be able to work. In older cars, the gas tank was just a reservoir with a specific volume.
In modern cars it is a whole system, which can include a large number of additional elements. An example of this is the adsorber system (read more about it separately).
One tank is enough for a passenger car. Trucks often have two gas tanks. This is due not only to the gluttony of the power unit, but also to the need to reduce visits to gas stations, since not every gas station is adapted to service large vehicles.
EVAP system components
The main components of the fuel vapor recovery system are:
Fuel tank
Has some expansion room at the top to allow fuel to expand on a hot day without overfilling or leaking the EVAP system.
Fuel cap
Typically contains some type of relief valve for ventilation on older vehicles (pre-OBD II), but is completely enclosed (no vents) on newer vehicles (1996 and newer).
Gas tank separator
Located on top of the fuel tank or part of the expansion tank. This device prevents liquid gasoline from entering the adsorber.
Gas tank separatorLiquid gasoline should not be sent directly to the canister because this would quickly overload its ability to store fuel vapor. The separator is relatively problem-free. The only problems that can occur is that the fluid return becomes clogged with debris such as rust from the fuel tank.
Some separators use a slightly different approach to prevent liquid fuel from entering the canister vent line. A float is installed inside the separator. If liquid enters the device, the float rises and the valve closes the tank vent.
If there is a blockage in the separator or in the vent line between it and the adsorber, the fuel tank will not be able to “breathe” normally. Symptoms include fuel starvation or a warped fuel tank.
If you hear a significant "poof" sound when you open the gas cap, suspect poor ventilation. You can check the tank venting by opening the cap and then disconnecting the fuel tank vent line from the canister. If the system is clear of any blockages, you should be able to blow through the vent line into the fuel tank.
Blowing out with compressed air can sometimes clear the blockage. If not, you will have to inspect the vent line and possibly remove the fuel tank to diagnose the problem.
Ventilation valve
The ventilation valve controls the flow of outside air into and out of the adsorber. In some vehicles it is called the Canister Closing Valve (CCV).
One side of the ventilation valve is connected to the adsorber. The other side is connected to a ventilation hose that has a filter or mesh at the end and is attached to the body or frame of the car.
On some vehicles, the vent valve is attached to the canister. In others, it is installed separately.
Ventilation valve
The ventilation valve is controlled by the engine control unit. Normally the valve is open. It closes when the controller checks the EVAP system for leaks.
Adsorber (canister with coal)
This is a small round or rectangular plastic or steel container. It is usually hidden and may be located in a corner of the engine compartment or near the gas tank.
Adsorber FORD Focus
The adsorber is filled with approximately 0.5 - 1 kg of activated carbon. Coal acts like a sponge, absorbing and storing fuel vapors. The vapors are stored in the canister until the car starts, warms up and drives.
The ECU then opens the canister purge valve, which allows intake vacuum to pump fuel vapor into the engine. The coal container is connected to the fuel tank by a ventilation line.
Under normal conditions, the adsorber causes few problems. Since carbon does not wear out, it should last the entire life of the vehicle.
The most common problem with a charcoal canister is a faulty purge or vent valve. Vacuum purge valves can be tested by applying vacuum directly to the valve using a hand vacuum pump.
Adsorber VAZ
The valve should open and not allow vacuum to pass through if it is good. With solenoid type purge valves, voltage can be applied directly to the coil to see if the valve opens. The solenoid resistance can also be checked with a multimeter to see if there is an open or short.
The purge control strategy in many late model EVAP systems can be quite complex, so the best advice here is to look up EVAP diagnostic procedures in the manufacturer's service literature.
DIY gas tank repair
The fuel tank is quite simple, and it is a reservoir that is filled with gasoline. In this case, the gas tank can be made of steel, aluminum, plastic or other materials. It is better to replace a broken gas tank with a new one; inexpensive options can often be found at various car “dismantling” sites. However, if you are on the road, it is possible to repair the tank yourself in order to get to a service point or continue operating the machine until you buy a new part.
Method 1: Repairing the gas tank with a rubber pad and a bolt
The most effective way to repair a gas tank on the road is to seal it with a rubber plug. It is advisable to use it when there is a breakdown in the fuel tank of a large diameter, and a bolt can be inserted into it. Repairs are carried out as follows:
- The hole in the tank that needs to be repaired must first be expanded to the diameter of the existing bolt;
- Next, a washer with a rubber gasket is selected for the bolt;
- Next, you will need to install a bolt through the neck of the fuel tank into the prepared hole and place a washer and rubber gasket on it from the outside and tighten it with a nut.
Important: Select rubber as a gasket that does not dissolve under the influence of gasoline. Do not use “raw rubber”, which will quickly become unusable.
It should be noted that this method of repairing a gas tank is popular among truckers. By sealing the hole in the fuel tank in this way, you don’t have to worry about its reliability. If it is not possible to replace the gas tank in the near future, it is recommended to remove the threads and paint the joints to avoid corrosion. If the patch is done correctly, the gas tank can last for months or even years.
Method 2: Solving the problem with the gas tank on a carburetor engine
Carburetor engines are actively becoming a thing of the past, but they still remain on older car models, and it will be useful for drivers of such cars to know what to do if the gas tank breaks down.
The design of the carburetor with diaphragm-type fuel pumps is such that it allows you to use any container as a gas tank by lowering the hose that comes from the gas pump into it. Find any free bottle; if there is none in the car, you can use the washer reservoir. Fill the container with gasoline and place the soft hose that comes from the gas pump into it. Please note that if you are using a bottle, it will need to be secured well to prevent it from tipping over during travel. When everything is done, you can go to the service station.
Important: Before continuing to drive, make sure there is no fuel left in the gas tank to prevent it from spilling on the road.
Method 3: Repairing the gas tank using a glue patch
If the damage to the car's tank is not very serious, you can make a simple patch on a fabric backing and secure it with glue. To do this, you will need to acquire a piece of fabric, good Moment glue and nitro paint of any color, which is often found in cars. The sequence of actions when repairing a breakdown is as follows:
- Cut out a small piece of thick fabric. If the fabric is thin, you can fold several layers;
- Next, completely saturate the fabric with Moment glue or its equivalent and apply it to the puncture site;
- Next you need to wait 2-3 minutes until the glue dries;
- Once the fabric is securely in place, treat it with nitro paint to minimize the possibility of fuel leaking through it.
Such a patch will help you get to the service center and carry out a full repair of the fuel tank.
Important: Do not replace fabric with rubber when using this method of emergency repair. When the car is moving, the rubber element will quickly peel off, while fabric reinforced with nitro paint will cope just as well with the task of sealing the fuel tank.
Method 4: Cold Welding Method
Cold welding is a great way to repair a gas tank gap. Its complexity is that the driver must have with him: epoxy resin, hardener, sandpaper and cloth. If you have all this, you can repair the gas tank according to the following instructions:
- The first step is to prepare the surface for applying epoxy resin. To do this, carefully clean the area around the damage with sandpaper;
- Next, mix the epoxy resin and hardener. If you need to heat them up, you can put them on a warm engine;
- Soak the fabric with the resulting adhesive base and apply it to the damaged area on the gas tank.
- Wait until the adhesive base dries.
Types of fuel tanks
Regardless of the type of fuel tank, its task does not change: it must ensure maximum fuel safety. For this reason, it is hermetically sealed, but ventilation is no less important for it, since evaporating gasoline can increase the pressure in the line, which can cause damage to some parts of the car’s fuel system.
Gas tanks differ from each other in the material of manufacture, shape and volume. We'll talk about materials a little later. As for the shape, it depends on the design of the car. The lower part of the part is in most cases flat, and the upper part follows the contours of the bottom and parts located under it.
As we have already discussed, the volume of the tank also depends on the type of motor and its gluttony. Automakers, when developing car models, always strive to achieve the ideal balance between vehicle performance and its weight.
If the fuel tank in the car is very large, then when it is full, the car will behave as if it is carrying extra weight, which, in fact, is what it is when the gas tank is full. This directly affects the car’s handling and fuel consumption (a loaded car requires more fuel so that the engine continues to provide the necessary dynamism).
There are three categories of gas tanks:
- For small cars. City cars are always equipped with low-power internal combustion engines with a small volume. Typically, the fuel consumption and weight of such machines is small, so the power unit does not need a large supply of fuel. Typically, the volume of this tank does not exceed thirty liters.
- For passenger cars. In this case, the tank volume can reach 70 liters. Sometimes there are models with an 80-liter tank, but these are mainly those cars that have a decent-sized engine under the hood. The key factor on the basis of which the gas tank volume for a particular car is selected is how far the car will be able to cover without refueling (the minimum figure should be 400 kilometers).
- For trucks. This is a separate category of transport, since depending on operating conditions (for example, transporting heavy loads in mountainous regions), the diesel fuel consumption of such vehicles can be much higher than that stated by the manufacturer. For this reason, many truck models are equipped with two fuel tanks. Their total volume can reach 500 liters.
Truck tank capacities
As for trucks, the KamAZ vehicle is popular, the fuel tank of which, depending on the model, can have a different volume. The minimum capacity is 125 liters. However, due to high fuel consumption, KamAZ is not able to travel a long distance (and even with a load) on such a tank, so the manufacturer has provided other tanks that are used on this vehicle. Thus, the KamAZ fuel tank can have a capacity from 125 to 600 liters in increments of 50 or 40 liters.
There may also be non-standard modifications of 700 liter tanks. The fact is that not only the manufacturing plant produces fuel containers, third-party manufacturers can also do this. In general, there is little chance of finding products on the market; most often you will find tanks from third-party manufacturers.
The second popular truck is GAZelle. Despite the fact that this vehicle is a truck, the GAZelle’s fuel tank holds only 60 liters of gasoline. And this is very inconvenient, given that the car’s fuel consumption is quite high. Consequently, when driving long distances you have to take extra fuel cans with you.
Some owners of these cars replace the old, small tank with a new one. Third-party manufacturers produce fuel tanks for GAZelle with a capacity of up to 150 liters.
All this allows us to conclude that the fuel tank is a changing, not a constant quantity, and it is different for different cars. Even two identical models can use completely different fuel containers with different capacities.
Huge trucks like SCANIA 113 even have tanks of 450-500 liters. The DAF XF can have a fuel capacity of 870 liters, while the heavy-duty MAN F90 truck has a 1,260 liter tank. This is simply an incredibly large capacity, and the small 45-liter tanks of passenger cars look simply ridiculous in comparison.
Fuel distribution
Each engine has individual internal filtration protection. Special meshes are installed on the fuel intakes in the consumable compartments.
If all fuel priming pumps fail, engines can operate normally, subject to certain height and maneuvering load restrictions. These limitations are defined in the Flight Manual.
In cruising flight mode, if all fuel pumps fail, or the power supply to the onboard AC and DC electrical systems is turned off at the same time, fuel supply to the engine is provided by gravity from the wing fuel tanks, while fuel from the central tank ceases to be produced. During flight under the influence of negative overloads, stable operation of the engines is ensured for 10 seconds with a fuel consumption of 1700 kg/hour per engine. In gravity mode, in wing compartment No. 1, due to its lower bottom, there may be an unused fuel balance of up to 420 kg.
Features of the location of the tank in the car
Fuel tank on a car
For each category of vehicle, optimal configurations of fuel tanks are developed, and the most rational location of the tank in the overall structure is selected. For example, in passenger cars the tank is located in the rear under the seat (in front of the rear axle), since in the event of a collision this area is the most protected.
In trucks, fuel tanks (one or more) are most often installed between the front and rear axles on the sides of the frame. This is due to the fact that for this category of cars the most common accidents are head-on collisions. If the car has been “tuned”, its fuel tank can be moved to an arbitrary location, but in some cases this may result in a fine for the owner.
MATERIAL FOR MANUFACTURING FUEL TANK
There are a variety of materials used in the manufacture of fuel tanks:
- steel;
- aluminum;
- plastic.
The plastic used is special – high-strength polyethylene. As a rule, it is used in the production of tanks for use in passenger car models.
Plastic has certain advantages over metal. The most significant thing is the small mass. And the larger the volume of the reservoir, the more obvious it becomes. In addition, plastic allows for the most efficient use of installation space. Unlike the use of metal, it is quite simple to make a container of any shape from polyethylene; the product does not require the use of connecting seams and solders. In this case, the tank will be as capacious as possible.
It should also be noted that the plastic is not susceptible to corrosion, which is also very important
However, plastic fuel containers used in the fuel system of cars also have one significant drawback - the permeability of hydrocarbons at the molecular level. That’s why such tanks have recently been made multilayer.
Metal fuel tanks are welded from stamped alloy sheets. At the same time, aluminum is used for diesel and gasoline cars. For gas - high-strength steel. Aluminum fuel tanks have high strength and wear resistance, since this material, like plastic, is not subject to corrosion.
Design of modern fuel tanks
In order to unify the main components of the transmission, chassis, and supporting body frame, leading automakers produce several brands and models on a single platform.
The “single platform” concept also extends to fuel tanks.
Metal containers are assembled from stamped parts connected by welding. At some factories, welded joints are additionally coated with sealant.
Plastic TBs are manufactured using the thermoforming method.
All finished TBs are tested by the manufacturer for strength and tightness.
Main components of the fuel tank
Regardless of the body shape and capacity, the fuel injection gasoline engine has the following components and parts:
- The filler neck is located under the protective and decorative hatch on the rear sidewall (rear fender) of the body. The neck is connected to the tank by a filling pipeline, often flexible or of complex configuration. A flexible membrane is sometimes installed at the top of the pipeline, “hugging” the barrel of the refueling nozzle. The membrane prevents dust and precipitation from entering the tank.
The hatch on the body is easy to open and may have a locking mechanism controlled from the driver’s seat.
The TB neck of trucks is located directly on the TB body and does not have a filler pipe.
- Filler cap, plastic plug with external or internal thread, with O-rings or gaskets.
- “Pit”, a recess in the lower surface of the TB body for collecting sludge and contaminants.
- Fuel intake with a mesh built-in filter (on carburetor and diesel cars), located above the pit, below the level of the bottom of the fuel tank.
- Mounting opening with a sealed cover for installing a fuel module for injection engines, a float fuel level sensor for carburetor and diesel engines. In the cover of the installation opening there are sealed through pipes for passage of the fuel supply line and connecting wires of the fuel module or float sensor.
- A hole with a sealed lid and a pipe for the passage of the fuel return pipeline (“return”).
- Drain plug in the center of the pit. (Not used on gasoline injection systems.)
- Threaded pipes for connecting the ventilation line and the adsorber pipeline.
Electrical thermocouples can be installed on the outer surfaces of diesel vehicle fuel tanks to heat the fuel at low temperatures.
Fuel tank restoration
The gas tank can be repaired if it does not have significant damage. In many cases, deformation is not eliminated, since, depending on the degree of damage, it only affects the volume of the vessel. But this defect can be eliminated by stretching. In some cases, the walls cannot be bent without cutting them. After such repairs, soldering or welding is required.
You should not try to carry out such work yourself, especially for gasoline tanks. Gasoline vapors are quite difficult to remove from the container. Sometimes it happens that after several washing and drying procedures, the tank still explodes under strong heat (this happens during welding of walls). For this reason, it is better to leave repair work to a professional who knows the intricacies of how to prepare a product for repair. In short, welding work should never be carried out with an empty tank. Usually it is washed well and filled with water. After the work is completed, the water is drained and the tank itself is well dried.
Repairing holes is usually solved by applying a patch. Some motorists use adhesive materials such as two-component “cold welds”, but this is due to extreme poverty. It is better to use this method if a hole has formed on the road, and the nearest service station is still far away.
Fuel tank restoration
As mentioned above, the tank can be restored if it has not too significant defects. It is recommended to entrust the restoration work to a good specialist. There are several repair options, and they directly depend on what kind of defect the fuel tank has. The most reliable and time-tested solutions are:
- Applying patches with further welding or soldering / pure welding. Allows you to solve the problem of even large cracks and holes, as well as eliminate defects in partitions;
- Pulling. Dents are removed by pulling. Usually a rod is soldered to the sunken area, and then pulled out. Too large dents are corrected using a hammer and a mandrel with further soldering or cooking (sometimes the tank has to be cut);
- Crimping. The final stage of tank repair, which must be completed. Pressure testing is carried out under excess water pressure.
As for repairing fuel lines, they can only be repaired in a number of cases. First: their bending radius does not exceed 30 millimeters. Second: they have cracks up to 3 millimeters or worn out up to 2 millimeters. Third: the conical tip of the fuel line is only crushed and does not have serious damage. In any case, before repairing, the fuel tank must be emptied and allowed to dry for 3 hours. It is also recommended to wash it first with a five percent hot solution of caustic soda, and then with a five percent solution of ammonia.
Do-it-yourself fuel tank filler neck repair
I noticed a strong leak of gasoline when refueling, so I decided to check what happened. It turned out that the filler pipe was almost completely rusted and a hole appeared in the pipe, probably from a stone getting into it. I looked up the cost of a new neck on the Internet, the price is about 5,000 rubles ( Toyota Carina ST190 ). I looked at the disassembly sites, they are available only in other cities (a used neck with delivery will cost about 2,500 rubles). Since I need to drive now, I repaired it using materials that can be bought inexpensively today. Now I’ll tell you in more detail with photographs the process of repairing the tank filler neck, maybe someone will find this solution useful for a temporary repair.
Removing the filler neck
By removing the rear left wheel and fender liner from the car, I gained access to the filler pipe. Removing the pipe required a bit of fiddling, as many of the bolts were difficult to unscrew due to rust. As a result, I took out the neck, you can see in the photo what condition it was in.
I sawed off the beginning of the filler neck, it was in good condition. I treated the sawn-off neck with a grinder to remove rust and coated it with zinc (rust converter).
I measured the diameter of the filler neck - 35 mm, the diameter of the small tube for removing gases - 14 mm.
Purchased from the auto store:
- Fuel hose with internal diameter 14 mm;
- Crankcase ventilation pipe with an internal diameter of 32 mm;
- Crimping clamps 6 pcs. (4 pieces for diameter 32-50 mm and 2 pieces for diameter 25-40).
A corrugated pipe for stainless steel sinks (length 900 mm) was purchased at the Leroy Merlin hardware store. The diameter of the corrugated pipe tubes on both sides is 32 mm.
Filler neck assembly
A fuel hose with an internal diameter of 14 mm was placed on a small tube and a crimp clamp was installed.
Next, I cut off two tubes from the pipe, which will be needed to connect the neck to the corrugated pipe and the corrugated pipe to the gas tank. I connected the neck to the corrugated pipe and crimped it with clamps.
I installed the second tube from the pipe on the other end of the corrugated pipe and tightened it with a clamp. This is what happened.
Next, I covered the entire structure with an anti-gravel spray coating for additional protection.
Installing the filler neck
In principle, there were no problems with the installation; I installed the filler neck faster than removing it.
After the repair, I already filled up with gasoline several times, no leaks were found. Repairing the filler neck cost 700 rubles. I think it will last for several months, and maybe it will last longer.
Refueling
Centralized refueling is carried out through a standard fitting installed on the right leading edge of the wing to refuel the aircraft with fuel under pressure up to 350 kPa (3.5 kgf/cm2) with a maximum flow rate of up to 1000 l/min. The duration of a full tank refueling is approximately 16 minutes for LR and B model aircraft. Centralized refueling is carried out automatically or manually.
The process of refueling or its termination is carried out automatically based on signals from the fuel quantity calculation unit (FQIC), when a specified amount of fuel is reached, or from the maximum permissible level indicators in each tank. In manual mode, the amount of fuel is controlled by signals from the tanker's meter and fuel meter; when the required amount of fuel is reached, refueling must be stopped manually; If the maximum permissible amount of fuel is reached, refueling stops automatically.
If fuel enters the drain tank during refueling, refueling is automatically stopped. To pump out fuel that has entered the drain tanks, jet pumps are used, which begin pumping after turning on the main pumping pumps.
Non-centralized refueling.
To ensure non-centralized filling (filling by level), two auxiliary filling fittings are installed in the left and right consoles between ribs 3 and 4 on the access hatch. Each of the fittings communicates directly with the corresponding compartment No. 3.
- fuel system discussion
- About SSJ and An-148 fuel meters - comparison and discussion
(published by: skydiver000)
Read more
page 1 of 81…next »
Random articles
Use of site materials is permitted only if a link is placed on superjet100.info
Fuel tank ventilation system
The fuel tank must constantly maintain pressure equal to atmospheric pressure. The tank ventilation system is responsible for this. Modern vehicles are equipped with a closed fuel tank ventilation system to prevent potential pressure drops or increases.
If the pressure in the tank decreases, it may become deformed. With increased pressure, the tank may simply burst.
- When fuel is taken from the tank, the pressure in it drops and a vacuum (vacuum) occurs. The ventilation system qualitatively eliminates this effect. If the pressure in the tank drops, the safety valve will allow the required amount of air into the tank. This valve is located in the filler cap and allows outside air to flow in only one direction.
- During the refueling process, excess air enters the tank and fuel vapors are formed. The system will effectively displace these excesses, which are displaced through a special pipeline for ventilation. The ventilation pipeline is located parallel to the refueling pipeline and ends in a container in which gasoline vapors accumulate. The specified container is connected to the adsorber of the fuel vapor recovery system. The ventilation pipeline additionally has a gravity valve. This valve prevents the risk of fuel spilling from the tank as a result of the vehicle overturning or tilting up to 45° or more.
- If the fuel in a closed tank heats up, gasoline vapor appears and the pressure in the tank increases. The ventilation system neutralizes the increase in pressure and equalizes it to atmospheric pressure. In this case, the fuel vapor recovery system is directly involved.
In order to increase the efficiency of the gasoline vapor recovery system, sensors can be additionally installed inside the tank to measure fuel temperature and pressure.
Level control sensor
This sensor is found in all tanks and is part of the fuel pump. If the gasoline level decreases, the float moves lower. This entails a change in the resistance of the potentiometer associated with the float. As a result, the voltage in the electrical network drops, and the arrow on the dashboard displays the change. This way the driver sees how much gasoline is left in the tank.