As you know, the engine lubrication system performs the most important functions, eliminating dry friction and providing cooling at the points of contact of mating parts. Motor oil also washes away mechanical wear products and all kinds of deposits from surfaces. As a rule, the main indicator of a healthy lubrication system is tightness and the ability to maintain the required oil pressure in the engine.
It is for this reason that most cars have an oil pressure indicator on the instrument panel. In the event of a malfunction, the emergency oil pressure sensor sends a signal to the indicator in the cabin. Next, we will look at where the oil pressure sensor is located, what types of sensors there are, and also how to check the oil pressure sensor in the engine.
What is the oil pressure sensor used for? What is this?
Without going into serious conclusions, but simply put, this is one of the main components of the engine oil (lubrication) system. The part is primarily responsible for oil control, that is, it checks the pressure and in case of any problems immediately notifies the driver. This could be a corresponding light bulb, as I call it a boat with a thermometer, or a message on the on-board computer, if the car is sophisticated.
Operating principle of the oil sensor
The principle of operation is quite simple, even a beginner can figure it out. Look what's the matter, in most sensors, the work is based on the ability to convert one type of energy into another. To convert the mechanical effect, a converter of mechanical effects into an electronic signal is mounted in the sensor housing. The mechanical effect is transmitted to the membrane; in modern machines it is made of metal and resistors are placed on it, which change the resistance in response to the resulting deformation. Then the converter transmits the electrical signal through the wiring.
DDM sensor device
On older machines, the design and operation of the sensor itself were somewhat different, but the principle itself remained the same. It’s clear that we weren’t talking about any electrical converters. Therefore, the design was simple. So, similarly, the sensor readings were formed from the impact on the membrane. Deforming, the membrane pressed on the rod, which was responsible for compressing the liquid in a special sealed tube. At the other end of the tube, there was a second rod, on which the liquid from the tube pressed, and it raised or lowered the arrow accordingly. A device with a pointer is called a differential pressure gauge; it was simply called a pressure gauge. Accordingly, the arrow went up, the pressure increased, down, the pressure decreased.
Where is?
It’s difficult to say anything definitive about the placement of the sensor. It is clear that logically it should be in the cylinder block, but where exactly is the question. Cars have few general characteristics of where to look for this sensor. It is better to focus on the instruction manual. For example, it is not uncommon for manufacturers to mount it behind the cylinder head, in the area of the timing case or on the camshaft block; on Ladas it is placed there. On foreign cars, they are often installed somewhere at the bottom or in the middle of the engine, in the area of the oil filter or pump, in the crankcase (typical for Mercedes models).
In the photo: the VAZ 2115 oil pressure sensor is leaking oil. Sensor replacement required
By the way, do not forget that on most foreign cars there may be several sensors, in such cases they are located according to this scheme: one in front of the oil pump, the other somewhere behind it. In general, it depends on the model of the car, read the manuals, it’s difficult to say right away where exactly it may be located.
Location of the Gazelle oil pressure sensor
Importance of the device when operating a car
The data transmitted by the device to the on-board panel is important information.
They indicate possible malfunctions in the operation of the machine:
- the oil level drops below the minimum value;
- clogged oil filter;
- violation of the controller wires;
- the appearance of sediment in the oil pan;
- malfunction of the oil supply pump;
- engine oil leakage.
The indicator can also indicate a malfunction of the oil pressure device itself, unlike other breakdowns - this one is minor.
Operation and care
To avoid malfunctions, you should adhere to the operating rules:
- periodically carry out preventive maintenance of the oil system;
- check the operation of the pump;
- clean the filter from waste materials;
- control the lubrication of power plant units;
- if the technical fluid has changed color, change it immediately;
- If the low pressure signal constantly sounds, immediately diagnose the vehicle yourself or contact a car service center.
It is recommended to use engine oil only from trusted companies and suitable for a specific vehicle model. In inexpensive technical fluids, there is an excessive amount of impurities that settle in the lines and cylinders. They disable the main elements of the engine. It is also recommended to change the engine oil after a mileage of 10 or 15 thousand kilometers. Therefore, it is worth reading the car’s service book to find out all the details of the operating rules.
To summarize, we can conclude that the oil controller is one of the main measuring instruments of a vehicle. If it is faulty, then over time the internal elements of the power plant will be damaged, and then you will have to spend a lot of money on repairing the car. You can carry out the replacement yourself, without contacting a service center.
Types of oil pressure sensors
To monitor pressure in the lubrication system, two types of sensors are used:
- emergency;
- measuring
Emergency is designed to notify the driver that the pressure has dropped below a critical value. It connects to the warning light on the dashboard. It is noteworthy that the engines of some cars are equipped with two emergency sensors - low and high pressure, which signal the driver about a drop or excess of pressure in the system.
Measuring elements are not used on all vehicles. The task of these sensors is to provide constant information about the functioning of the lubrication system. With its help, the driver can find out the current pressure.
Pressure sensors have been used since the advent of internal combustion engines. The first of them were a tube with a glass window connected to the lubrication system and installed in the cabin. By the pulsation of oil through the tube, the driver determined the functioning of the system.
Features of work
Then, membrane sensors began to be used on machines to determine the operating parameters of the lubrication system. They come in two types:
- Mechanical.
- Electrical.
Mechanical ones are outdated and not used. The measuring device consisted of two sensors - membrane and measuring. They were connected by a tube filled with oil. The essence of the work is very simple - increasing pressure in the system leads to bending of the membrane installed inside the sensor. The membrane moves, pushes the rod, which squeezes out the oil in the tube. The resulting pressure caused the needle on the measuring sensor to move, and the driver determined the pressure in the system using a set scale. This is how diagnostic analog pressure gauges work now.
How the sensor works
Most of these elements work on the principle of converting one type of energy into another. Initially, a mechanical force is generated, which either directly affects the sensitive element of the sensor, or is converted into an electrical impulse. In modern car models, you can most often see devices of the second type. Thus, electrical impulses are read and interpreted by the ECU system.
Old type sensor design
Classic pointer-type devices with a sensor are something like a pressure gauge. This is one of the varieties. Pressure is measured by deforming the elastic membrane.
When the membrane is compressed, it presses on the rod. The latter, in turn, compresses the liquid in a special tube. At the other end, its liquid also presses on the rod. The latter raises the arrow on the pointer device. This is a diaphanometer.
Modern sensors
More modern products measure the pressure in the oil system using a transducer sensor. It is most often screwed into the cylinder block. Where the oil pressure sensor is located in a specific car model is indicated in the instructions. It can be located in different places. The readings of this sensor are transmitted to the computer in the form of an electronic pulse or signal. There is also another intermediate converter in the device body. It converts mechanical pressure into electrical impulse.
These devices use a rigid, often metal membrane with a resistor as a sensitive element. The latter changes the resistance based on the magnitude of the deformation. The resistance is electronically converted into electrical impulses, which are transmitted to the ECU.
Checking the serviceability of the sensor with a light bulb
You can also check the electronic oil pressure sensor using a 12 V light bulb instead of a tester. To carry out such tests, you will need a charger (or battery) and a compressor (preferably with a pressure gauge). Diagnostics are carried out in the following sequence:
- Wires of sufficient length are soldered to each contact of the light bulb (0.5 - 1 will be enough).
- One end of the wire is connected to the output contact of the DDM.
- The “negative” terminal of the charger (or battery) is connected to the sensor body.
- The second wire from the lamp is connected to the “positive” terminal of the charger or battery. If the sensor is fully operational, after applying voltage from the charger (or connecting all elements of the circuit in the case of a battery), the light should light up. If it does not light up, the sensor is faulty. If it lights up, check further.
- The circuit includes a pump or compressor to pump approximately 0.5 atmospheres of pressure onto the sensitive part of the oil pressure sensor. The value may vary, it depends on the type of device and what operating pressure it is designed for. But more often it is precisely the floor of the atmosphere.
When the specified pressure is reached, the light should turn off, since in a working sensor the electrical circuit is broken. If this does not happen, the sensor must be replaced.
Possible unit malfunctions and their diagnosis
Now that the device and principle of operation of the oil pressure sensor are more or less clear to everyone, we can begin to answer pressing questions regarding this device:
- Where is the oil pressure sensor located?
- How to replace the oil pressure sensor?
- Why is his light on?
- How is it possible to check the oil pressure sensor for proper functioning?
And many others.
To obtain the desired information, first of all, let’s pay attention to possible malfunctions of the oil pressure sensor, of which, by the way, there are only two:
- The first is that the device has lost its seal at its connection point. Yes, unfortunately, there are often cases when a real leak of lubricant begins from under the oil pressure sensor. Under such circumstances, you only need to replace the faulty identifier, that is, checking the oil pressure sensor in this situation is not required;
- Second, the device stopped working normally due to internal defects. In this case, it is also necessary to replace the oil pressure sensor, but it is also important to check it (more on this below). Note that in the event of a breakdown of this kind, the lamp may come on and not go out (taking into account the normal oil level in the engine crankcase), or a corresponding error may appear on the on-board computer.
The location of the oil pressure sensor is not particularly difficult to understand. The device is always located in the crankcase area and is characterized by a wire extending from it. That is, you can understand where the sensor is located and how to remove it without any problems if you inspect your car’s engine in detail.
As for the pinout of the identifier, it is so simple that it involves a pair of output contacts, one of which is responsible for the electronic power supply of the unit, and the other for closing the light bulb burning wires. Considering this nuance, there is no need to take any specific actions in studying the oil pressure sensor connection diagram. That is, if the device breaks down, we just go and change the oil pressure sensor. As they say, nothing superfluous.
Possible faults
If the emergency oil pressure sensor has tripped, there is no need to panic; very often the problem lies in the device itself, which will need to be checked. The most common sensor malfunctions are:
- the membrane is damaged, so the pressure in it does not coincide with the operating oil pressure in the engine;
- clogged oil channels leading to the sensor;
- wear of the resistance layer on the resistor;
- damage to the wiring, leading to the appearance of parasitic resistance;
- deformation of bimetallic plates or damage to their heating element. Some cars are equipped with a special relay through which a buzzer is activated, signaling critical oil pressure at certain speeds, for example, after 1500 rpm. Its failure can also distort the data.
On different models, oil pressure sensors are installed in different places, but always in the cylinder block, cutting into one of the channels of the engine lubrication system. Therefore, it is best to immediately study the operating book, which indicates the location of this device.
If there is no such information, you need to carefully inspect the cylinder block; at least one wire will be suitable for it. Emergency sensors are often installed on top of the cylinder head, and control sensors are installed below, in the block, often near the oil filter, although there are other installation options.
Inspection and repair
If you need to check the device, then take a small piece of rubber hose. On the one hand, a special adapter is attached to it, which corresponds to the diameter of the pump outlet, and on the other, an emergency engine oil pressure sensor. We begin to create artificial pressure using a pump. Be sure to record these pressure/resistance ratios. If the sensor readings and its characteristics match, then the device is working.
There is another way to check the sensor. You need to place it in a foam solution with a lot of soap. Hold the sensor there for a while. Take it out and connect it to the pump. Pressurize the device using a pumping unit. If bubbles come out of the folded joints, the device is unusable and leaks oil.
But if you are convinced of a malfunction, you need to replace the detector. The emergency oil pressure sensor for an eight-valve engine is located on the right side of the engine, and for a sixteen-valve engine it is on the left. Its location may vary depending on the model and make of the car. To remove it, use our instructions :
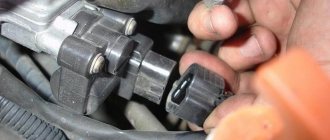
- Disconnect the wire from the sensor that goes to the dashboard;
- There is a thread underneath the sensor, so carefully unscrew it with a wrench. If it is torn off, then try to remove it using pliers;
- Afterwards you just need to remove the sensor from the hole.
Immediately inspect the aluminum O-ring. This may be the cause of oil leakage. Depending on the diagnostic results, you will need to buy either a new sensor or replace the seal. The process of installing a new device is the opposite of removing it. Be sure to check the tightness of the connection between the warning lamp and the oil alarm sensor. At the same time, the method of removal and connection largely depends on the brand of the alarm and the model of the car.
Photo - replacing the emergency oil pressure sensor
Sometimes the problem may lie in the way the sensor is installed. For example, the Land Cruiser Diesel is known for the fact that the device can “fall” into the pan, causing it to give incorrect readings. Sometimes the circuit has oxidized or the computer control wire for the detector has simply broken. Also, if the sensor is crooked, it may incorrectly measure the pressure level due to deformation of the membrane.
The price of a sensor varies from several hundred for a used one to several thousand rubles (for example, for exclusive devices). It is advisable to consult with the seller before purchasing the device, since it is very important that it fits your car.
You may also be interested
How to check the electronic oil pressure sensor
To check the electronic pressure sensor you will need a multimeter and a pump (preferably with a pressure gauge). Before starting the test, you must remove the sensor from the car and switch the multimeter to the “open circuit” diagnostic mode. Connect the sensor to the pump and connect a multimeter to it. It is better to use a pump with a pressure gauge so as not to apply excess pressure, which will damage the electronic device.
By combining the pump, pressure gauge and multimeter, make sure that the needle on the scale is at zero. Next, apply minimum pressure from the pump, as a result of which the membrane on the working sensor should bend, move the pusher and the circuit will open, which will lead to the deviation of the instrument needle towards infinity. It is also recommended to apply pressure close to the maximum and make sure that the sensor operates in this mode.
How to Check a Mechanical Oil Pressure Sensor
The principle of checking a mechanical oil pressure sensor is practically no different from diagnosing the electronic version. To carry out the procedure, you will need a pump with a pressure gauge and a small rubber hose. When checking, the sensor must be removed along with the pointer indicator. The pump is connected to the sensor using a rubber hose, and the connection must be sealed. When everything is connected, you need to start applying different pressures, monitoring it with a pressure gauge. At the moment a certain pressure is applied, its value is recorded and the resistance is also recorded. When several values are taken, you can compare the data obtained with a table of ideal values, which varies from car to car, and can be found in the technical documentation for the car or on the Internet.
Signs of breakdown
Novice drivers can also determine if the sensor is broken. Typically, the on-board computer processes commands from all controllers and displays them on the screen. The corresponding indicators will also blink on the dashboard. If the system does not find any faults, the driver does not receive any warnings.
Signs:
- The car starts with difficulty, especially in the cold season.
- When the car owner starts the engine, it is worth paying attention to the blinking “Check Engine” indication, which indicates that the oil pressure is insufficient. It should also be noted that a similar signal may occur if oil with various types of impurities was used. It is necessary to carry out diagnostics to understand why the malfunction occurred.
- It is difficult to accelerate the engine to the required speed. Also, when the engine is running, excessive vibration may occur.
How to change the oil pressure sensor yourself
If this element malfunctions, replacement is a necessary procedure, since it cannot be disassembled. Without pressure, subsequent movement of the car is dangerous. But the driver can easily cope with replacing the part with his own hands.
Required Tools
Before starting work, you need to prepare the tool and everything you need:
- New pressure sensor.
- The correct size wrench for unscrewing, depending on the car model.
Other tools may be required, depending on the brand of machine.
Step-by-step instruction
The operating procedure depends on the location of the sensor, but in general, the main steps of the operation are carried out according to the algorithm described below. For example, let's look at the procedure for the VAZ-2110.
- First you need to find out how many valves are installed on the engine: 8 or 16. In the first case, the sensor is located behind the engine on the right on the cylinder head, near the timing case. There is only one conductor connected to it. If there are 16 valves, then the sensor is located on the left in the camshaft block.
- Wait until the engine has cooled down to avoid burns during operation.
- Don’t rush to remove it right away; first check the correct operation of the electrical circuit leading to the indicator on the devices. Disconnect the wire from the sensor; the indicator light should go out. Connect the conductor to ground. If the light comes on, it means the wiring is working properly.
- Remove the sensor using a wrench. Unscrew it carefully without losing the gasket or allowing oil to leak. Use a rag to wipe.
- Carefully inspect the removed sensor. If there are no traces of lubricant on it, we can talk about its serviceability. Otherwise, replacement is required. But in any case, during installation, a new O-ring must be installed.
- Connect the wire after replacement.
Check the operation of the device by starting the engine and making sure that there is no emergency light on the devices.
Design and operating principle
Electric ones are now the most common. In this case, the design of the element depends on the purpose.
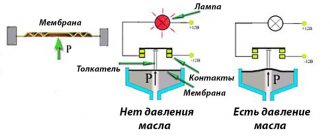
Thus, the alarm sensor includes a membrane with a rod connected to it. There are two contacts inside the part that close the signal lamp circuit. One is stationary, the second is attached to the rod.
The principle of operation is simple: as long as there is no pressure in the system, the power circuit for the warning light on the dashboard is closed. After starting the engine, the pressure increases, which leads to the bending of the membrane, which pushes the rod with the contact and the circuit is blurred - the lamp goes out, indicating that the system is functioning normally. If the pressure drops below a certain point, the circuit closes again.
The measuring sensor is structurally more complex. To ensure the functioning of the information element (with a scale) installed on the dashboard, a change in the resistance of the electrical circuit is required.
This sensor is a mechanically controlled rheostat. Inside there is a nichrome resistance winding (or treadmill), a slider and a drive mechanism.
This element works like this: when the pressure changes, the membrane bends and pushes the rod connected to the drive mechanism. It moves the slider along the surface of the winding or track, changing the resistance in the circuit that supplies power to the information sensor.
Only one type of measuring sensor design is described above. But there are others - semiconductor (based on a piezoelectric crystal) and with a bimetallic converter. But these elements also use membrane movement.
Video: How to check the emergency oil pressure sensor
For diagnostics, you will need a regular pump and a multimeter set to ohmmeter mode. The sensor fitting must be connected to the pump, its terminal to the positive of the ohmmeter, and the negative terminal to be short-circuited to the housing. In this case, the device should show some electrical resistance.
Afterwards, several strokes of the pump are required, and the ohmmeter should show an open circuit, that is, the resistance should reach infinity. In this case, the sensor is working; if not, it requires replacement. After installing the new sensor, the engine starts and the indication disappears. If it remains, you need to look for the reasons for the motor malfunction.
It is more difficult to diagnose the condition of the control sensor, since it is difficult to regulate the pressure readings with the pump. To do this, a special insert for two outputs is installed in the mount under the sensor. The sensor itself and an analog pressure gauge, specially verified, are inserted into them. After starting the engine, compare the readings of these two devices and draw a conclusion about the serviceability of the device.
