Bumpers of any car can be safely classified as consumables. They are often damaged due to collisions with a variety of obstacles. A broken body part not only loses its protective characteristics, but also spoils the appearance of the car, so the only correct solution is to replace it.
In this article we will talk in detail about what features the rear bumper on a VAZ-2115 car has, and also provide step-by-step instructions for replacing it in case of damage.
Tools needed to replace the bumper yourself
Removing the rear bumper is not difficult, but owners of VAZ-2115 cars should be aware that on these cars the fastening of the part is somewhat different from other models. Therefore, we recommend that you listen to our advice and prepare a set of tools and accessories listed below:
- socket wrench and socket 13;
- an extension cord that allows you to conveniently work with the head and spend significantly less effort to unscrew the nuts;
- Phillips screwdriver;
- ratchet handle.
We recommend that you first clean the bumper from dirt so as not to get dirty during the work. If you have everything ready, you can start removing the damaged part.
Dismantling of 1st generation cars
For this procedure, you will need Torx keys 20 and 30, a cloth or rags to wipe the trim and the place where the fender liner is attached.
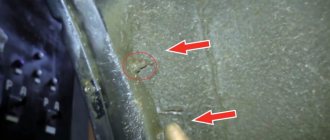
Now you can unscrew the screws holding the front bumper of the Renault Duster. Their location is indicated by arrows in the photo. There are a total of 5 screws around the perimeter, one located at the bottom, under the decorative trim.
After this, using a T20 key, you need to unscrew the screws holding the fender liner. One is located near the junction of the fender and bumper.
There are 2 screws on each side of the fender liner. The second one can be found at the bottom. After this, the T20 key will no longer be needed. You need to take the T30 key.
The most powerful fasteners are located at the top. After these screws are unscrewed, you must carefully move the plastic to the side to disconnect the part from the latches located on special brackets. If during the removal process the brackets are damaged or bent, it is better to replace them with new ones.
After this, it remains to perform a few simple steps.
- Move the top part of the plastic a little
- Pull the bumper towards you, releasing it from its seats
- Disconnect the PTF power connector
How to properly disconnect the PTF connector on a Renault Duster.
The length of the cable is designed in such a way that you can remove the bumper and then disconnect the connector located on the right bracket.
The connector is 4-channel, providing power to two PTFs at once.
Removing the rear bumper: step-by-step instructions
To remove a rear bumper that has visible mechanical damage, you must do the following:
- unscrew the screws that connect the part to the rear fender liners;
- using a 13mm socket and an extension, unscrew the two nuts located inside the bumper itself on both sides;
- remove the license plate located on the bumper. This is the very feature that applies to the VAZ-2115;
- disconnect the wires that supply current to the license plate lighting from the vehicle’s electrical network;
- unscrew the two fastening bolts located in the central part of the part. This operation is also best performed using a socket, holding the nuts on the back side with an open-end wrench so that they do not turn;
- remove the old bumper;
- We begin installing the new part - first screw it in the center, then install the license plate and connect the backlight wires. After that, screw the bumper to the frame and fender liners.
The whole procedure usually takes no more than an hour, and to complete it you do not need to contact a car service and spend money on repairs. You just need to buy a new part.
How to Remove the Front Bumper on a VAZ 21099
Tuning VAZ 2109
VAZ-2109 owners are not aware of the unsurpassed vitality and durability of the front and rear bumpers from the very beginning. There are many cases where even the bolts came off as a result of a strong impact, but the bumper remained practically untouched. However, there are times when you need to remove the front and rear bumpers of a VAZ-2109. This job is simple, but requires some knowledge.
In both cases, the same set of tools is needed to perform such repairs:
- ratchet
- Chapters 10 and 17
- Flat carabiner for 13
- Phillips screwdriver
To remove the bumpers you only need 2 heads from the whole set
Remove the front bumper
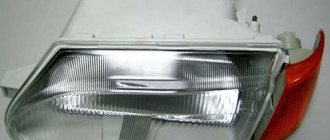
When removing the front bumper, the headlights do not need to be removed at all. If the bumper is removed for body repairs, it is best to remove the headlights from a safety point of view.
For convenience, the front of the car should be raised.
- With a 17 head, unscrew the two bolts that are attached to the bottom of the front wings. This operation is performed on both sides.
- Using 10 sockets, remove two screws from each side. They are located on the inside of the bumper and connect it to the body bracket.
- Remove the locking pins from the bracket holes on both sides.
- Remove the bumper from the front brackets.
Replacing the front bumper of VAZ 21099
Want to know more about how to replace your front bumper
for
VAZ
2108-
VAZ 21099
? And also interested.
Quick removal of BAZ VAZ 2109. Do it yourself
Quick exit VAZ bumpers
2109. We remove
the bumper
sequentially.
In this video you will learn how to remove the bumper
.
If you are completely removing the structure using fasteners, it is best to use a key up to 13. In this case, the order would be as follows:
- From below, unscrew the two nuts that secure the front bracket to the body.
- Remove the bracket.
- Using a Phillips screwdriver, loosen the three screws and remove the bumper side bracket.
Some features
When performing repairs to remove the front bumper, it is necessary to take into account some features, such as the year of manufacture of the car. If the VAZ-2109 is released by the end of 1985, the procedure will be as described above.
When disassembling the front bumper, consider the year of manufacture of the car, there are some differences in the removal process
If you left your car after 1985, you must:
- Remove the nuts from the side and front fender mounting bolts.
- Loosen the two nuts that secure the bumper to the engine compartment.
- Before lifting the bumper, pull it slightly towards you.
Fly off rear bumper
You can leave it in place while repairing the tail lights and license plate. If the body is supposed to be done, these elements should also be disabled.
All electrical wires coming from the lamps and license plates must be disconnected before removing the rear bumper.
- Operating procedure:
- Loosen the lower rear mounting bolts on both sides with socket 17.
- Wrench for 10. Remove the two side bumper bolts on each side.
- Remove the studs from each bumper side bracket and remove it.
- Using wrench 13, loosen the two nuts securing the rear bracket and remove it.
- Remove the eight 10mm bolts that secure the beam to the bumper housing.
- Remove the beams. As you can see, there is nothing difficult in removing the bumper. It is enough to follow the sequence of actions. The ability to do this work yourself will help the owner of a VAZ-2109 save on car service costs.
Repair or tuning of the VAZ-2115 bumper
Removing the rear bumper is not always necessary to replace it. Very often, car enthusiasts tune this part or restore it after minor damage using special adhesives.
If we are talking about changing the shape of the bumper, increasing its strength characteristics, then we can recommend using materials such as polystyrene foam or polyurethane foam. They have a number of advantages:
- easy to process, which makes it possible to create any suspension configuration;
- light weight, almost complete absence of load on the car;
- resistance to high temperatures;
- durability, retention of shape for a long time;
- resistance to moisture.
In order to change the appearance of the bumper, you must first draw a sketch of the future part on paper. The next stage is preparing the product, cleaning it from dirt, washing and thoroughly drying it. After this, you need to use plywood to determine the boundaries of filling with foam or polystyrene foam and carry out the necessary work. After drying, the rear bumper will take on a completely new look to suit your taste preferences.
In addition, you can install a rear bumper reinforcement, which is made of durable plastic that is resistant to mechanical damage. This product is quickly attached to the part and significantly increases its strength characteristics.
A bumper is a part that protects a car when hitting obstacles and minor accidents. After the incident, she needs repairs. Or the motorist decides to upgrade it. For the convenience of performing these actions, dismantling is performed. Therefore, it is important to know how to remove the front and rear bumpers of a VAZ 2109 with your own hands.
How to remove the bumper of a VAZ 2109
Considering the current opportunities in terms of purchasing spare parts, materials, tools, as well as the relative simplicity of the design of the VAZ 2109 car, doing body repairs yourself is far from the most difficult task. Many perform body work on their own, not inferior in quality to specialized workshops.
The task is to return quality
Tools
The peculiarities of fastening the VAZ 2109 buffer are that it is supported by self-tapping screws and bolts. This allows you to use a minimal set of tools for removal. When performing work you will need to stock up on:
- Keys for 17, 13 and 10.
- Heads for 10, 13 and 17.
- Ratchet.
- Phillips screwdriver.
Installation
Installation is carried out in the reverse order of work. To place an object you will need:
- Place the body kit tightly.
- Tighten two nuts under the hood.
- Secure the bolts to the side members and front wings.
In the version released before 1985:
- The body element is installed, and studs are inserted into the holes.
- Nuts are tightened on the side.
- Bolts are screwed into the wheel arch liners.
How to remove the front body kit
When doing the work yourself, you need to clearly know how to remove the front body kit:
- Using head 17, unscrew the two fasteners from below. They are connected to the front fender liners.
- Using head 10, unscrew the nuts on the side fastening of the bumper, two on each side.
- The studs are removed from the holes in the brackets.
- The object is being dismantled from the front.
In some cases, it may be necessary to remove the body part along with the fasteners. The process looks like this:
- Using wrench 13, unscrew the two nuts securing the front bracket and remove it.
- Using a screwdriver, twist three self-tapping screws and remove the side bracket.
On a VAZ 21099 car produced before 1985 and models released later, the removal process is somewhat different.
With later versions of the car, the part is removed as follows:
- The fasteners are twisted from the side members and front wings.
- Under the hood, you will need to unscrew the two nuts that secure the part.
- When removing the body kit, it is carefully pulled away from the body.
Tuning VAZ 2109
VAZ-2109 owners know firsthand about the unprecedented survivability and strength of the front and rear bumpers. There are many cases where, as a result of a strong impact, even the bolts were torn off, but the bumper remained practically intact and unharmed. However, there are situations when it is necessary to remove the front and rear bumpers of a VAZ-2109. This work is not difficult, but requires certain knowledge.
In order to perform such a repair, in both cases you will need the same set of tools:
- Ratchet
- Heads for 10 and 17
- Flat open-end wrench 13
- Phillips screwdriver
To remove bumpers you will only need 2 sockets from the entire set
Removing the front bumper
When removing the front bumper, it is not necessary to remove the headlights. If the bumper is removed for the purpose of repairing the car body, then in terms of safety it is best to remove the headlights.
For ease of operation, the front of the car must be raised.
Work order:
- Using a 17mm socket, unscrew the two bolts securing the front fender liners from below. Perform this operation on both sides.
- Using a 10 mm socket, unscrew two bolts on each side. They are located on the inside of the bumper and connect it to the body bracket.
- Remove the mounting pins on both sides from the holes in the brackets.
- Remove the bumper from the front brackets.
If you remove the structure completely with fasteners, then it is best to use a 13 key. In this case, the order will be as follows:
- From below, unscrew the two nuts that secure the front bracket to the body.
- Remove the bracket.
- Using a Phillips screwdriver, unscrew the three screws and remove the side bumper bracket.
Some features
When carrying out repair work to remove the front bumper, it is worth taking into account some features, namely the year of manufacture of the car. If the VAZ-2109 was produced before the end of 1985, then the procedure will be as described above.
When removing the front bumper, take into account the year of manufacture of the car, there are some differences in the removal process
If the car was manufactured after 1985, then you must:
- Unscrew the nuts on the side members, as well as the mounting bolts on the front wings.
- From the engine compartment, unscrew the two nuts that secure the bumper.
- Before removing the bumper, pull it slightly towards you.
Removing the rear bumper
When repairing the rear bumper, the taillights and license plate can be left in place. If body work is to be carried out, then these elements should also be disconnected.
Before starting work on removing the rear bumper, all electrical wires coming from the lights and license plate must be disconnected.
How to replace a rear body kit
The sequence of actions for removal is as follows:
- Remove the fasteners using wrench 17.
- From the side, using wrench 10, unscrew the fastening bolts.
- Remove the mounting studs. Due to this, the sides of the object sag slightly.
- Lightly grasping the back of the buffer, pull it away from the body, and remove the object.
- Dismantling the rear brackets attached to the body. This is done with key 13. To remove them, you need to unscrew two screws with a screwdriver.
- It is necessary to remove the beam from the buffer, which increases the rigidity of the structure.
- Removing beam strips.
The installation process is performed in the reverse order of removing the rear bumper.
Replacing the rear buffer
For ease of operation, lift the rear of the vehicle.
Unscrew two nuts on the side securing the buffer to the body on both sides of the car
Holding the buffer, unscrew one rear buffer mounting bolt on both sides and remove the buffer
Install the new buffer in the reverse order of removal.
VAZ-2109 owners know firsthand about the unprecedented survivability and strength of the front and rear bumpers. There are many cases where, as a result of a strong impact, even the bolts were torn off, but the bumper remained practically intact and unharmed. However, there are situations when it is necessary to remove the front and rear bumpers of a VAZ-2109. This work is not difficult, but requires certain knowledge.
In order to perform such a repair, in both cases you will need the same set of tools:
- Ratchet
- Heads for 10 and 17
- Flat open-end wrench 13
- Phillips screwdriver
To remove bumpers you will only need 2 sockets from the entire set
Removing the front bumper
When removing the front bumper, it is not necessary to remove the headlights. If the bumper is removed for the purpose of repairing the car body, then in terms of safety it is best to remove the headlights.
For ease of operation, the front of the car must be raised.
Work order:
- Using a 17mm socket, unscrew the two bolts securing the front fender liners from below. Perform this operation on both sides.
- Using a 10 mm socket, unscrew two bolts on each side. They are located on the inside of the bumper and connect it to the body bracket.
- Remove the mounting pins on both sides from the holes in the brackets.
- Remove the bumper from the front brackets.
If you remove the structure completely with fasteners, then it is best to use a 13 key. In this case, the order will be as follows:
- From below, unscrew the two nuts that secure the front bracket to the body.
- Remove the bracket.
- Using a Phillips screwdriver, unscrew the three screws and remove the side bumper bracket.
Some features
When carrying out repair work to remove the front bumper, it is worth taking into account some features, namely the year of manufacture of the car. If the VAZ-2109 was produced before the end of 1985, then the procedure will be as described above.
When removing the front bumper, take into account the year of manufacture of the car, there are some differences in the removal process
If the car was manufactured after 1985, then you must:
- Unscrew the nuts on the side members, as well as the mounting bolts on the front wings.
- From the engine compartment, unscrew the two nuts that secure the bumper.
- Before removing the bumper, pull it slightly towards you.
Nuances
Before you begin withdrawal, you will need to complete a number of preparatory steps:
- The object is thoroughly washed from dirt and dust.
- The fasteners are tapped with a hammer. Next, traces of corrosion are removed with an iron brush.
- The fasteners are treated with a WD-40 solution. After applying the substance, you need to wait 15-20 minutes. During this time, the product will destroy dirt and corrosion.
- Drive the car to a viewing hole, overpass, or use a jack. The work process will be more convenient.
When replacing the buffer, do not apply much force. This will damage the nut threads. Subsequently, in order to remove the bolt, it will need to be cut off (using a grinder), and this will significantly slow down and complicate the work process.
Almost any motorist can replace the VAZ 2109 buffer. It is important to know the sequence of the operation and be especially careful.
Home / Catalog / Lada / Lada / VAZ 2113 / VAZ 2114 / VAZ 2115 with 1.5i liter and 1.6i liter engines, repair book in color photos in electronic form / ...Show book contents
Content
Introduction
Emergency procedures
- Wheel replacement
- Actions in case of engine overheating
- Starting the engine from an additional power source
- Circuit breakers
- Emergency pressure drop in the engine lubrication system
- Turning on the low battery indicator
- Turning on the engine system malfunction indicator
- Turn on the brake warning light/parking brake warning light
Daily checks and troubleshooting
Operating a car in winter
A trip to the service station
Operation and Maintenance Instructions
- Technical information
- Controls, instrument panel and interior equipment
- Car care
- Vehicle maintenance
- Fuels and lubricants
Warnings and safety rules when working on a vehicle
Basic tools, measuring instruments and methods of working with them
- Basic set of necessary tools
- Methods of working with measuring instruments
Engine and its systems
- General information
- Servicing the engine without removing it from the car
- Engine disassembly and assembly
- Ignition and engine control system
- Supply system
- Lubrication system
- Cooling system
- Intake and exhaust system
- Chapter Appendix
Transmission
- General information
- Clutch
- Transmission
- Drive shafts
- Chapter Appendix
Chassis
- General information
- Front suspension
- Rear suspension
Steering
- General information
- Steering wheel
- Steering gear
- Steering rods
Brake system
- General information
- Car service
- Front wheel brakes
- Rear wheel brakes
- Parking brake
Body
- General information
- Front bumper
- Rear bumper
- Hood
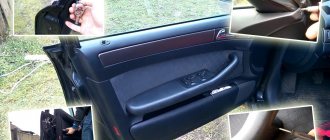
- Front door
- Rear door (VAZ 2114/2115)
- Body dimensions
Gas equipment
Car electrical equipment
- General information
- Generator
- Starter
- Egnition lock
- Replacing steering column switches
- Replacing the power window switch
- Outdoor lighting devices
Fault codes
- Controller JANUARY-4
- GM Controller (IFSI-2S, ITMS-6F)
- OBDII protocol controllers
Electrical circuits
Dictionary
Useful tips for car owners
How to pay and download
Reasons for removing a part
Drivers of the “nine” dismantle the front and rear protective elements in such cases.
- Replacement of a VAZ 2109 bumper with the same (basic) one due to severe wear or breakage.
- Installation of a new, more beautiful, protective element.
- Lifting.
- Painting or straightening the body (followed by installing the protective element back).
- Removing the radiator, repairing lighting devices.
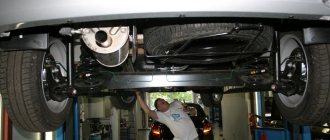
In the first case, the protection is removed because it has become unusable. Driving without a VAZ front bumper not only disfigures your car externally, but also leaves body elements and the engine cooling system unprotected. The situation is the same with the rear bumper: without it, the Lada does not look complete, and the body, muffler and rear suspension are at risk. Therefore, it is necessary to remove the damaged part and replace it with a new one. The factory element for BA3 2109 can be purchased everywhere in auto stores.
When replacement is made for the purpose of decoration or bumper tuning is performed, the driver removes the protection and looks for a new one to suit his taste. There are many options for lowered and chunky racing pieces on the market. Some people prefer to equip the “nine” with bumpers from its “successor” - Lada 2114. This is not the best step, because you will have to tinker with installation. The mounting holes are slightly different from those on the 2109. In addition, the rounded shapes of the 2114 exterior do not quite match the chopped style of the “nine”.
You will have to remove the factory part if you decide to completely repaint the body. After all, part of the body is located under the bumper. Dismantling is also necessary to get to the radiator and headlight wiring. If there are failures in the engine cooling system, there are times when you need to remove the radiator. In addition, there is a gap between the protection and the body (sagging), and many believe that such a solution spoils the appearance.
Car enthusiasts do the bumper lifting themselves. This procedure involves cutting off the top edge. Not everyone can do this kind of work with their own hands, and if you are not sure that you can cut the layer evenly, contact a specialist.
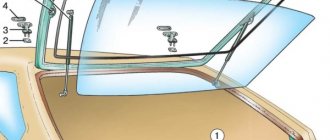
Rear bumper
1. Using a Phillips screwdriver, unscrew the screws (self-tapping screws) securing the fender liner to the rear bumper (on each side).
2. Disconnect the fender liner from the bumper.
3. From the bottom of the car, using a 10 mm socket wrench and an extension, unscrew the two side nuts securing the rear bumper (on each side).
4. Then slightly pull the left and right sides of the bumper to remove the mounting studs from the holes in the bumper brackets.
5. Then remove the rear combination lights.
6. Remove the rear license plate of the car.
7. After this, unscrew three more bolts securing the central part of the rear bumper, while holding the nuts from the inside with a second spanner from turning.
8. After we have unscrewed all the fastening nuts/bolts, we pull off the rear bumper and carefully pull it towards ourselves.
9. Use a Phillips screwdriver to unscrew the fastening screws and then remove the license plate lamps.
10. Then we finally remove the bumper from the car.
Note:
In order not to damage the paintwork of the rear bumper, immediately after removal, place it on a soft surface (for example, on a blanket).
11. When replacing the rear bumper, we reinstall the side brackets from the old bumper to the new one.
12. Install the rear bumper on the car in the reverse order.
Note
: When installing, pay attention to the fact that the holes on the side bumper mounting brackets have the shape of slots, which allow you to adjust the gap between the bumper and the fender.
Bumpers
It is sometimes necessary to remove the front and rear bumpers to replace them or repair other body elements. Dismantling does not require special skills, so even a beginner can cope with this task
The only difference when removing the front bumper compared to the rear one is that the plastic fender liners will need to be additionally removed in front.
Otherwise, the dismantling and repair procedure is performed as follows:
- There are nuts on the side that hold the bumper to the body. They need to be unscrewed. Mostly on most VAZ 2109 there are 2 of these fasteners on each side;
- Now find the front bumper mounting nuts and remove them;
- When unscrewing the front fasteners, be sure to hold the bumper, otherwise it may fall and be damaged;
- If you remove the front bumper, then remove the fender liners. All removal work is completed;
Dismantling process
- Carefully examine the condition of the bumpers visually. If there are deformations or damage, these areas can be straightened;
- Old peeling paint and traces of rust can be easily cleaned using 200-400 grit sandpaper;
- If the bumper is made of plastic, all damage is repaired using special putty;
- The holes on the plastic bumper are covered with plastic elements from old bumpers or other elements that have suitable dimensions, thickness, and strength;
- Using a soldering iron with a power of 40-60 W, you can weld plastic elements.
Failure to maintain clearances
Connection of bumper elements
To fasten the elements of a damaged plastic bumper, you can use four methods.
- Melt the plastic of the bumper and additional inserts. The seam width should be about 15 millimeters. And the depth of the soldering depends on the thickness of the body element.
- Parallel seams. Wire or nails without heads can help here. These fasteners are soldered on the reverse side. A fairly reliable connection option.
- Flexible copper wire. A more complex, but also more effective method. The connection is made according to the principle of the second method, then the wire is soldered from the inside with a snake or zigzag. Some people also solder it from the front side.
- Lattice. The most reliable and durable option. Using a mesh or a piece of decorative radiator grille, the elements of the plastic body are fastened together.
Body repair is a rather complex and sometimes labor-intensive process. Based on video lessons and instructions, you can complete a number of tasks. But for complex damage, it is better to turn to professionals.
Video review of the procedure for removing and installing the rear bumper of a VAZ 2115
–>
The bumper bracket 2109 is a rigid mount to the car body (with thrust rings and tightening metal plates). The hitch is rigid, without the ability to adjust the tilt and height of the attachment. But this is not necessary in technical terms - the ground clearance of the “nine” is quite high as it is. But many people have problems with removing and reinstalling the “drummer”. And all because not everyone knows the correct order of how to remove the bumper. There is nothing complicated about it. It is not difficult to carry out such a procedure yourself.
Installation
Installation is carried out in the reverse order of work. To place an object you will need:
- Place the body kit tightly.
- Tighten two nuts under the hood.
- Secure the bolts to the side members and front wings.
In the version released before 1985:
- The body element is installed, and studs are inserted into the holes.
- Nuts are tightened on the side.
- Bolts are screwed into the wheel arch liners.
Removing the front bumper
Removing the front bumper is much easier than the rear, so it is recommended to start with it. Everything here is extremely simple, since it is held on a mount under the wing. Procedure:
- Unscrew the nuts on the side members.
- Remove the fastening bolts (you will have to hold them on one side with a ratchet or a spanner).
- From the hood side, unscrew 2 more nuts that hold the bumper itself (in this case, it will lag a few cm behind the body and begin to dangle - this is normal).
- All that remains is to grab the bumper from the front, pull it towards you a little and carefully remove it. You should be careful, since the structure is quite fragile (although it perfectly absorbs force at the moment of impact).
During the dismantling process, you will notice that the fastening points are heavily rusted - then it will be quite difficult to unscrew the nuts and bolts. How to remove the bumper in this case?
The best option is to pre-lubricate everything with WD-40. This is a universal lubricant that has the effect of dissolving oxidation (including rust). Sold in almost every automotive supply store. After removing the “drummer”, it is recommended to thoroughly clean the bracket itself completely from rust or replace it with a new one.
Replacing the rear buffer
For ease of operation, lift the rear of the vehicle.
Unscrew two nuts on the side securing the buffer to the body on both sides of the car
Holding the buffer, unscrew one rear buffer mounting bolt on both sides and remove the buffer
Install the new buffer in the reverse order of removal.
VAZ-2109 owners know firsthand about the unprecedented survivability and strength of the front and rear bumpers. There are many cases where, as a result of a strong impact, even the bolts were torn off, but the bumper remained practically intact and unharmed. However, there are situations when it is necessary to remove the front and rear bumpers of a VAZ-2109. This work is not difficult, but requires certain knowledge.
In order to perform such a repair, in both cases you will need the same set of tools:
- Ratchet
- Heads for 10 and 17
- Flat open-end wrench 13
- Phillips screwdriver
To remove bumpers you will only need 2 sockets from the entire set
Removing the front bumper
When removing the front bumper, it is not necessary to remove the headlights. If the bumper is removed for the purpose of repairing the car body, then in terms of safety it is best to remove the headlights.
For ease of operation, the front of the car must be raised.
Work order:
- Using a 17mm socket, unscrew the two bolts securing the front fender liners from below. Perform this operation on both sides.
- Using a 10 mm socket, unscrew two bolts on each side. They are located on the inside of the bumper and connect it to the body bracket.
- Remove the mounting pins on both sides from the holes in the brackets.
- Remove the bumper from the front brackets.
If you remove the structure completely with fasteners, then it is best to use a 13 key. In this case, the order will be as follows:
- From below, unscrew the two nuts that secure the front bracket to the body.
- Remove the bracket.
- Using a Phillips screwdriver, unscrew the three screws and remove the side bumper bracket.
Some features
When carrying out repair work to remove the front bumper, it is worth taking into account some features, namely the year of manufacture of the car. If the VAZ-2109 was produced before the end of 1985, then the procedure will be as described above.
When removing the front bumper, take into account the year of manufacture of the car, there are some differences in the removal process
If the car was manufactured after 1985, then you must:
- Unscrew the nuts on the side members, as well as the mounting bolts on the front wings.
- From the engine compartment, unscrew the two nuts that secure the bumper.
- Before removing the bumper, pull it slightly towards you.
Removing the rear bumper
When repairing the rear bumper, the taillights and license plate can be left in place. If body work is to be carried out, then these elements should also be disconnected.
Before starting work on removing the rear bumper, all electrical wires coming from the lights and license plate must be disconnected.
HELPFUL HINT For ease of operation, when replacing the front bumper, lift the front of the car.
1. Unscrew two nuts from the side fastening of the front bumper to the brackets on the body on both sides of the car.
2. Holding the bumper, unscrew one bolt of the front bumper mounting on both sides and remove the front bumper from the car. 3. Install the new front bumper in the reverse order of removal.