Bumper VAZ 2110
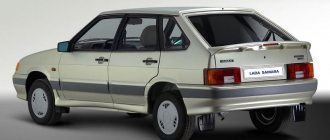
Removing the front bumper of VAZ 2110, 2111 and 2112 is not difficult. Both the rear and front bumpers of the VAZ 2110, 2111 and VAZ 2112 are absolutely the same. Moreover, it was easy to remove the bumper on this particular car, since there was no protection or fender liners.
how to remove the front bumper of a VAZ 2110
In order to change the bumpers on a VAZ 2110, you will need the following tool - these are socket and open-end wrenches for 8 and 10, as well as a double-sided screwdriver. And “there’s a pair for each creature” (two socket and open-end wrenches), it’s simply not convenient to use one or another wrench everywhere.
How to unscrew the front bumper of a VAZ 2110
How to unscrew the front bumper of a VAZ 2110
And so, if the car has fender liners, you will have to unscrew them from the bumper along the line of the bumper's wheel arch.
Replacing the front bumper ten, twelve
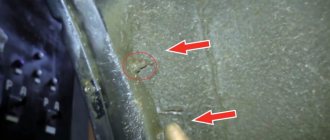
Next, the right and left sides of the front bumper are held in place by one 8mm bolt on each side. As a rule, they are rusty and often even the bolt heads break off. The bolt remains in the nut and then it is difficult to secure the side of the bumper. To screw the bolt back into it, you have to drill out and tap a new thread. To avoid this, first spray it with “VDshka” or brake fluid, wait 5 minutes and carefully turn the bolt counterclockwise. If it starts to turn tightly, tighten the bolt a little, lubricate it again and continue unscrewing.
How to remove the bumper of a VAZ 2110
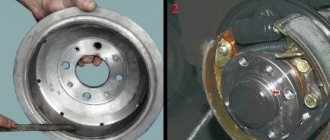
The same applies to the “apron” studs, to which the bottom of the bumper is attached with 10mm nuts. Most often, on the vast majority of cars, this part of the “apron” is deformed, the studs are broken off and the bumper is not attached to it at the bottom (impacts on curbs, off-road driving, etc.). But the bumper still holds tight. You don’t have to worry, he won’t go anywhere. And so, unscrew the nuts...
How to remove the front bumper tens with your own hands
And in order to unscrew the last two 10mm bolts that hold the bumper in the upper part, you will have to remove the radiator grille, but how to remove the grille of a VAZ 2110? Yes, it’s very simple... Open the hood and unscrew two 8mm screws on both sides of the grille (photo below).
How to remove the grille of a VAZ 2110
After that, it is necessary to release the lower mounting ears of the radiator grille. Hook with your fingers and slightly pull all 4 teeth in order towards the radiator.
Replacing the radiator grille of a VAZ 2110
Now, we got to the treasured bolts. You just need to unscrew them a little (not necessarily all the way) so that the bolt washers release the edge of the bumper.
Replacing the bumper of a VAZ 2110
If you also have to replace the fog lights of the VAZ 2110, then they must first be disconnected from the power supply (in the under-bumper part). Simply unplug the plugs. And on the bumper itself they are held in place by only two screws on both sides.
How to remove the bumper on a VAZ 2110 (video)
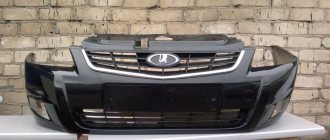
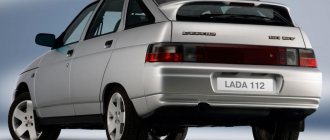
Front bumper VAZ 2110, price - on average 1,700 rubles
Rear bumper VAZ 2110, price is the same 1,700 rubles on average
Radiator grille VAZ 2110, price 250-300 rubles.
Required tools and accessories
The mounting scheme for bumpers on the VAZ-2110 is quite simple and does not require any special knowledge or equipment. At the same time, the procedure for dismantling and reinstalling standard plastic bumper covers is the same for cars with a sedan body (VAZ 2110), hatchback and station wagon. In order to remove the VAZ 2110 bumper, you will need the following tools or devices:
- 10 mm and 8 mm wrenches (preferably open-end and socket types).
- Flat head screwdriver.
- Phillips head screwdriver.
- A container of WD-40 liquid for soaking rusted hardware.
- Rags for wiping.
- Protective gloves.
How to remove the front bumper on a VAZ-2110
Before starting work, it is advisable to place the car in a garage or enclosed area with good natural or artificial lighting. For ease of dismantling the lower attachment points, work should be carried out above the inspection hole. The procedure for replacing the front bumper of a VAZ 2110 is performed according to the following sequential steps:
- Using a Phillips screwdriver, unscrew the screws securing the bumper to the arch liners (carry out the operation on both sides).
- Unscrew the 2 screws that connect the bumper body kit to the lower edge of the fender liner.
- Moisten the two side mounting bolts with WD-40 and wait a few minutes until the liquid gets into the threads.
- Unscrew the hardware with an 8 mm wrench, turning the bolts counterclockwise. In this case, you should not apply much force, since you can bend the bolt head. If the use of WD-40 does not help, you need to rinse the bolt with this liquid again and try to swing it out of place with a wrench.
- Using a similar pattern, tighten the 10 mm nuts securing the lower side of the bumper. If it is difficult to move the nut, it is necessary to tighten and unscrew it along the threads, applying WD-40 to the contact point.
- Then you will have to remove the decorative radiator grille of the VAZ 2110.
- There are 2 8mm hex head screws on the top of the grille that need to be removed.
- Use your hand to pry the 4 plastic clips on the lower edge of the grille and pull them towards the radiator. Set the grate aside.
- Unscrew the last two bolts by 10 mm, which tighten the upper edge of the VAZ 2110 bumper.
- Disconnect the fog lamp wiring harness plugs.
- Pull the corner of the body kit towards you and remove it from the grooves of the metal bracket. Similarly, disengage the other corner and remove the bumper from the VAZ 2110 for further repair or replacement.
- The removed bumper can be disassembled by dismantling the headlight (left and right). If they are in good condition, these parts can be installed on the entire cladding.
Why are they replacing?
The reasons for replacing bumpers are different for everyone. But a few basic examples can be given.
- The driver is a fan of tuning, so he decided to change these body elements.
- The old body kit is covered with scratches and chips, so it needs updating and painting. This work is complicated, so it’s easier to just replace it.
- As a result of an accident or an accident, the old bumpers have become unusable, so they need to be replaced with similar or more exclusive, original ones. Depending on the wishes of the car owner.
- There was a desire to install original optics in order to provide a visual effect and improve the quality of the headlights. But the old bumper is not suitable for these purposes. We have to dismantle it.
Removing the front bumper
So, you have made the appropriate decision, because the old body element will go to its well-deserved rest, and a new structure will take its place. Whether it will be a factory bumper or whether it will be about tuning is up to you. The main thing here is to dismantle the old structure and install another in its place - a matter of technology. More precisely, the reverse sequence of dismantling.
For removal you will need a certain set of tools and materials, which include:
- Open-end wrenches 10 and 8 millimeters;
- Socket wrenches 10 and 8 millimeters;
- A set of screwdrivers or one double-sided screwdriver;
- The almighty WD40;
- Dry, clean rags;
- New body parts, linings, etc.
Further, the set of tools and materials depends entirely on the front and rear body kit element you choose. Some bumper models require certain tools or attachments. It is best to ask the seller about this.
When purchasing the car, moldings were glued on the front bumper, as well as on the doors of the car. Even when I was getting ready to go on a trip in 10 years, I didn’t doubt for a second that I would get rid of this “beauty”.
It’s early morning, I’m looking around 10. Those same mooooldings.
There, during the inspection. On the spot, he tore off the side moldings of the front bumper.
And if he decided to remove these things from the doors at home upon arrival, then he did not stand on ceremony with the bumper. Knowing that I would paint the bumper due to many years of chips, I was not afraid to tear them off when it was cold.
By the way, the seller offered to buy a front bumper from him in the color that he had bought in advance in Togliatti when moving the car. He says he bought it for two, and I’ll give it back for two. Deal. In general, my brand new bumper went home in 12th.
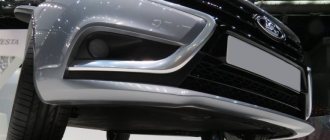
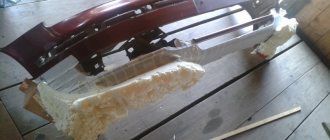
Installing the bumper is simple, I replaced it in about 30 minutes at a leisurely pace. But...there is one thing. The top bar of the bumper, which in the original had a bevel angle like the radiator grille, turned out to be tilted towards the radiator. It will be visible in the photo.
The sharper angle of the top strip of the new bumper is visible.
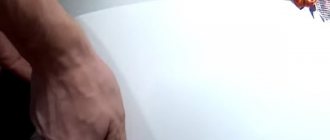
Because of this, the angle of the headlight eyelashes (which is slightly closer to the headlight itself.
This is how the corner of the eyelash is refracted
Looks about original
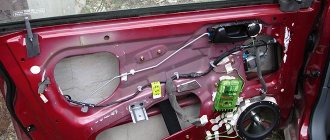
By the way, the painted bumper turned out to almost match the body. Mina, this is that it did not have an internal amplifier. My native one has one, but it is fused into the bumper itself, so I installed a new one without an amplifier.
By the way, when removing the door moldings (pre-heated with a hair dryer), I discovered a leak on the left doors.
This crap was hiding under the left moldings... We will fix it in the spring. Then complete body polishing
Installing the front bumper
When reinstalling the bumper, you must first insert it into the guide brackets on the sides of the VAZ 2110. Then the trim is attached in the reverse order. All fasteners should be replaced with parts that have new threads. Before installation, it is advisable to lubricate the hardware, thus providing minimal protection against corrosion.
The fastening of the cladding should not be immediately tightened until it stops. It is necessary to align the part as evenly as possible, achieving gaps across the body of almost the same width. After this, you can finally secure the cladding by tightening all the fixing bolts and screws.
Rear bumper
The rear bumper suffers when parking unsuccessfully, when the VAZ 2110 hits a fence or other obstacle. In this case, the cladding cracks and loses its appearance, and the owner has no choice but to change the part. To perform bumper dismantling work you will need:
- 10 mm and 8 mm wrench (preferably open-end and socket types).
- A container of WD40 liquid for soaking rusted hardware.
- Rags for wiping.
- Protective gloves.
Removal instructions
To remove the rear bumper of a VAZ 2110 or 2112, you must first turn off the power to the on-board network by removing the ground wire from the battery terminal. The rest of the work is carried out at the rear of the machine:
- Open the trunk lid and fold the rear trim to the side.
- On the left side there is a wiring connector for the license plate lamps that needs to be disconnected.
- Unscrew two 10 mm bolts that serve for the lower fastening of the side parts of the VAZ 2110 bumper. These bolts are highly susceptible to corrosion and are difficult to unscrew.
- Similar mounting points are located under the lower edge of the trunk lid near the rear lights.
- Pull the trim off the guide brackets. In this case, it is necessary to monitor the tension of the wiring of the backlight lamps to prevent it from breaking.
- Unscrew 3 cross-shaped screws securing the electrical wiring and 3 more for the housing of the backlights.
- Detach the light housing from the trim.
- The cladding has been completely removed and is ready for repair or replacement.
Other points and removal of fog lights
If there is a need to replace the fog lights, you should first remove them from the charger. To do this, simply disconnect the plugs. They are held on the bumper by two screws. This completes the procedure for removing the bumper. If you strictly follow all the rules, you can quickly and easily complete this procedure without contacting a car service.
The main thing is to know all the subtleties and design features of the front bumper on the VAZ-2110, and then no difficulties will arise when dismantling and replacing the structure. If you doubt your abilities, contact the nearest service center, where specialists will replace all the necessary parts in a short time. However, for such pleasure you will have to pay a decent amount. That’s why it’s better to figure it out on your own, because there’s nothing super complicated about it. It is important to be careful and strictly follow all the rules.
Many people are interested in how to remove the front and rear bumpers on VAZ 2110 and 2112. There may be several reasons for this work. Although, in general, this body kit element looks quite good. And he has enough strength. Which makes motorists very happy. Our roads are not very smooth; it is not difficult to catch a stone with your bumper. In winter, snow is not always cleared off. Therefore, the bumpers get hit quite hard. To reduce the risk of damage to this element, you must drive as carefully as possible. In winter, carry a shovel with you. If there is a snowdrift in front of you, then it makes sense to get out of the car and dig it out, at the same time you will warm up.
How to remove the front and rear bumpers on VAZ 2110 and 2112?
This question usually comes to car enthusiasts when it is necessary to replace or repair this structure. The most common reasons are the following:
- The bumper is damaged
. If scratches and chips appear, it makes sense to carry out restoration work or replace it with a new one; - Tuning
. Many car owners change their bumpers to more beautiful ones. Replacing the body kit, the most common modification; - Installation of non-original optics.
In all these cases, the bumper will have to be removed from the car. Some restoration work can be done directly on the car, but this is not always convenient.
Removing and installing the front bumper
Before work, be sure to prepare the car. To do this, simply disconnect the battery. Also, do not forget to put the car on the handbrake. Replacement is carried out in the following order:
- First, remove the decorative one. To do this, you need to unscrew the top mounting screws using a 10mm tube. Next, release the clamps of the lower grille fastening, and remove it;
- If there are installed fog lights, remove the connectors from them;
- Loosen the nuts securing the engine protection;
- Using a Phillips screwdriver, unscrew all the screws securing the fender liners to the bumper;
- Use a 8mm socket to unscrew the screws securing the bumper to the brackets;
- The body kit is also attached to the front of the car; here you will need to unscrew 2 10mm screws;
- After this, the bumper is moved forward and removed from the car.
When installing, assemble in the reverse order.
Removing and installing the rear bumper
The job of removing the rear bumper is not too different from that described above. Their attachment points are the same, but there are some differences. Therefore, let's look at the process in more detail:
- Open the trunk and disconnect the wires that power the license plate lighting. To do this, you will need to fold back the rear trunk trim.
- It is usually attached with clips. Next, remove the connector. And unscrew the negative wire from the stud;
- We unscrew the screws of the upper bumper fastening, they are located at the edges;
- The screws securing the lower part of the body kit are unscrewed;
- Move the bumper back and remove it. At the same time, it is important to pass the wires through the holes in the body panel;
- The next step is to remove the casing that mounts the room lights. To do this, unscrew the 3 fixing screws.
When assembling the new bumper, do not forget to replace the license plate lighting housing. All actions are performed in reverse order.
At the same time, pay attention to the fact that the bumper latches fit into the grooves of the body. To do this, when installing, be sure to first press the bumper as tightly as possible to the body and make sure that everything matches.
Bumper repair
In many cases, it makes sense to bother restoring the bumper to its original appearance. For this, there are a large number of different techniques. Let's look at the most common ways of doing this:
- If there are scratches, first of all, clean the damaged area. Next, level the surface using putty. When choosing it, pay attention to compatibility with plastic. After the leveling layer has dried, the bumper is primed and painted;
- Cracks are usually sealed using a soldering iron. But there is one caveat here. To avoid further growth of the damage, you need to drill holes slightly away from the ends of the crack. Soldering is best done on the back side of the bumper. This will preserve the appearance of the body kit. After repairing the damage, the part is puttied and painted;
- In case of chips and holes, you will have to restore the damaged piece. This can be done using fiberglass and epoxy glue. If everything is done carefully, then there will be no problems with the appearance.
Removing the front and rear bumpers is required to repair and paint the bumper yourself or in the case of do-it-yourself body repair of a VAZ 2110. It is easier to carry out work on an overpass or inspection pit.
The procedure for removing the front bumper on a VAZ 2110-2112 is as follows:
1. After preparing the car for repair work, remove the radiator grille.
4. Loosen the five front engine guard mounting nuts using a 10mm socket wrench.
5. On the left and right sides of the bumper, unscrew one lower mounting bolt of the bumper to the body bracket using an 8 mm socket wrench.
6. Next, loosen the top two bumper mounting bolts using a 10mm socket wrench.
Note.
It is better to perform the following operation together with an assistant.
7. It is necessary to move the bumper forward simultaneously on both sides along the guides of the side brackets, after which you can remove the bumper along with the headlight covers.
After repairing the bumper, install the front bumper with all previously removed parts on the car in reverse order.
Note.
The work of replacing the rear bumper is shown using the example of a VAZ 2112 hatchback car. On VAZ 2110 sedan models, the rear bumper has similar mounting points. The bumper of the VAZ 2111 station wagon model is attached using four screws at the top (in the opening of the luggage compartment door); it also does not have license plate lights installed on it.
To remove the rear bumper on a VAZ 2110-2112, you must perform the following procedure:
1. First, unscrew the two lower bumper mounting nuts (one nut each on the left and right sides of the car) using a 10mm deep socket wrench.
2. Using the same key, you need to unscrew the two upper mounting bolts (one on both sides) of the bumper. The bolts are located near the rear light.
Warning.
When performing the following operation, do not move the bumper far from the body to prevent damage to the wiring of the license plate lights.
3. After this, simultaneously slide the bumper back on both sides, but carefully, trying not to damage the body paint, and then remove it from the brackets.
Search and find other questions in the section: VAZ 2110 car body.
Replacing the bumpers of a VAZ 2110 car. How to remove the bumper.
How to put it in its place
Installation of the rear bumper (standard type) is carried out in the reverse order of dismantling. Before finally putting the part in place, it is necessary to set uniform gaps between the bumper and the body of the VAZ 2110 car. After this, all fastening points are tightened.
If it is intended to install a cladding of a different shape, the attachment points may differ. Such a part is adjusted to the VAZ 2110 car locally, modifying the standard attachment points.
Work progress
- Since the wiring (license plate light) is connected to the rear bumper, it would be better to disconnect the negative terminal of the battery to avoid a short circuit;
- Open the trunk and fold back the rear trunk trim, then fold back the edge of the side trim on the left side to expose the wiring harness that goes to the license plate light. Disconnect the wire block;
- Unscrew the nut and disconnect the license plate light wire going to ground;
- After this, unscrew 1 bolt of the upper fastening of the bumper mount on both sides;
- Next, unscrew 1 bolt of the lower bumper mounting on both sides;
- Now we remove the bumper itself, pushing it back and passing the wires through the hole in the rear panel of the body;