mileage 15 km after repair
Already traveled almost 1000 km Catalog numbers and spare parts manufacturers:
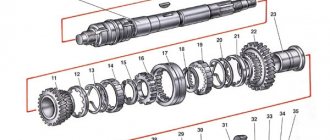
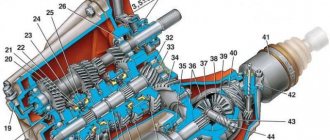
1. Primary shaft: 1.1.
Front single-row radial roller bearing: Catalog number
: 2108 - 1701031, 42205, NJ 205 (international name)
Manufacturers:
• EPK plants (Saratov, Volzhsky, Aviation Bearing Plant) produce the following varieties: 42205 KM (SPZ), 42205D1 (ZAP), 6-42205 A1E1USH1 (SPZ and VPZ), the latter is the most common and in demand.
• 10 GPP (Rostov-on-Don) offers modification 42205 AEM. These products occupy an intermediate position in the quality-price range. • The Samara SPZ-4 plant produces the simplest modification of this type, with a polyamide separator. They are very cheap, but knowledgeable motorists prefer not to use them. • If you are offered a “Vologda bearing” of this type, then it is a Chinese counterfeit (23 GPZ does not make them now). Catalog numbers
: SKF NJ 205 ECP; KOYO NJ205; Toyota 97123-06205; 6205ZZ; 93306-205U6-00 (Yamaha); 6205ZZCM
1.2. Rear radial ball bearing single row: Catalog number
: 2108 - 1701033, 50305, 6305 (international name) Quantity: 2 pcs.
Manufacturers:
• 3 GPP (Saratov) and VBF (Vologda), as well as HARP (Ukraine) - prices and quality are higher.
• GPZ (Moscow), SPZ-4 (Samara) (low quality, low price), • It is not recommended to buy bearings with other markings, since these are most likely Chinese products, which bear the markings of the companies ordering their production. The imported analogue is designated 6305. Closed 6305 ZZ and 6305 2RS (metal or rubber plugs). A bearing with a thermal gap is designated 6305/C3 (analogous to 76-305). Metal plugs - ZZ, rubber plugs - 2RS. Products of the SKF, FAG, KOYO brands are much more expensive and reliable than others. Catalog numbers
: SKF 6305 N; NTN-SNR 6305N; Toyota 90099-10142; 6305DDU; 6305NR; 90601-0012 (Subaru); 97100-06305; 5-81229-104-0
2. Secondary shaft: 2.1. Front single row radial roller bearing: Catalog number
: 2108 - 1701180, 42305, NJ 305 (international name)
Manufacturers:
• EPK plants (Saratov, Volzhsky, Aviation Bearing Plant) produce the following varieties: 42305 KM (SPZ), 42305LM (SPZ), 6-42305 A1E1USH1 (SPZ and VPZ ), the latter is the most common and in demand.
• 10 GPP (Rostov-on-Don) offers modification 42305 AEM. These products occupy an intermediate position in the quality-price range. • The Samara SPZ-4 plant produces the simplest modification of this type, with a polyamide separator. They are very cheap, but knowledgeable motorists prefer not to use them. • Some suppliers will also offer you the Craft brand. These Chinese bearings are the cheapest, but are completely unsuitable for installation in car gearboxes. Catalog numbers
: Koyo NJ 305; Coram NJ 305
3. Gearbox secondary shaft bearing, single-row needle without rings in a plastic cage (for speed gears): Catalog number
: 2108 - 1701108 Quantity: 5 pcs.
Dimensions: 30x36x25 Catalog numbers
: K32X37X27 (SKF), PW-P1108 (Pilenga)
4. Single-row tapered roller differential bearing: Catalog number
: 2108 - 2303036, 7207, 30207 (international name) Quantity: 2 pcs.
Catalog numbers
: NSK 30207, KOYO 30207JR; HR30207J; MB 393957; MT 202119; MA 125934 (Mitsubishi)
5. Seals: 5.1. Drive seal: Catalog number
: Corteco 12015250\Corteco 12015250B 5.2.
Input shaft oil seal: Catalog number
: Corteco 19034619B\Corteco 19034619 5.3.
Gear selector rod oil seal (yoke oil seal): Catalog number
: Corteco 12010803\Corteco 12010803B
6. Reverse gear Pilenga Catalog number
: GB-P 0850
7. Engine mounts. Manufacturer: BRT 7.1. Side engine mount bracket for LADA Samara 2108-1001040-10RU 7.2. Rear engine mount bracket for LADA Samara 2108-1001031-10RU 7.3. Front engine mount bracket for LADA Samara 2108-1001015-10RU
Features of power plants
The VAZ 2112 (Lada) car can be equipped with 16 valve power units, which have a volume of 1.5 liters, and the power reaches 93 horsepower. The power supply system of this car is injection. It is recommended to use AI-95 gasoline. In the urban cycle, it consumes about 10 liters per 100 km. The VAZ gearbox in this case is mechanical.
Cars with a 1.6-liter engine, which is equipped with a manual transmission (5 speed) and produces 89 horsepower, have become widespread. VAZ is less demanding on fuel quality, so AI-92 can be filled here.
Manual transmission diagram Gear shift diagram
Table of rows and main pairs of gearbox VAZ 2108-2110-1118-2170
Calculation table for rows and main pairs in the gearbox of a front-wheel drive VAZ.
Allows you to select the row and main pair to suit the operating conditions of the vehicle, which will significantly reduce the load on the engine and extend its service life until major repairs. Having selected the desired configuration, use the program to convert the numbers into visual graphs.
Table of the main pairs of gearbox 2108.
Vehicle speed at 5000 rpm.
(Wheels: width 185, profile 60, R rim 14)
Sixth gear of nine types:
The main pair 4.1 - unloads the engine, it is easier for the motor to spin the wheels, the dynamics of the car increase, the gears are shortened, the maximum speed drops
at 20 km/h (at 160 km/h, tachometer revolutions are 5 thousand), fuel consumption + 1 liter. (due to changes in driving).
The main pair 4.3 is the same as 4.1 + 5 km/h in all gears.
Ch. pair 4.1 or 4.3 + sports series (06, 07 or 08): dynamics (fast acceleration due to the main pair) + long gears, mainly 1st and 2nd are spun to the maximum.
Ch. pairs 4.5 and 4.7: gears are even shorter than 4.1 and 4.3 (maximum speed at 5 thousand tachometer revolutions 140 km/h), recommended use: when towing and transporting heavy trailers.
Ch. pairs 4.9, 5.1, 5.3 and 5.07: used only on steep slopes and climbs (maximum speed 110-120 km/h)
Rows: 011, 012, 018 - installed with standard ch. a pair of 3.9 for forced engines 1.7, 1.8 and 2.0l.
Did you like the material? Share the link with your friends.
Source
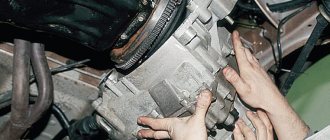
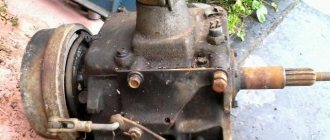
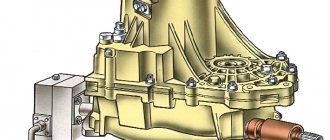
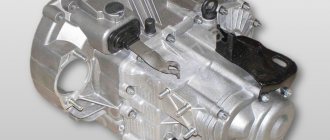
Removing the gearbox
How to remove the box? Before disassembling the gearbox, it must be cleaned. It is important that water does not get inside the box.
Main stages:
- Power from the battery is turned off.
- The block is disconnected from the speed sensor.
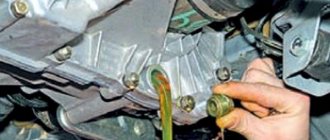
- Transmission fluid is drained.
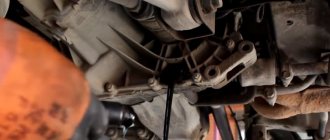
- The bolts securing the jet thrust are removed.
- It is necessary to remove the constant velocity joints from their standard location.
- The existing ball joint bolts are loosened.
- Using a tool, unscrew the nuts holding the clutch cover to the gearbox housing.
- The bolts securing the gearbox to the engine are disconnected.
- The power plant must be lifted (use a jack).
- The engine mounts must be removed.
- To pick up the gearbox, you can use a screwdriver.
- The speed box slides off the guides. The input shaft should disengage from the clutch.
The process of filming from a regular location requires caution. That is why this procedure should not be carried out alone. Repair of a VAZ gearbox, its dismantling and assembly should be trusted to professionals. This will reduce the chance of damage to any components of the gearbox.
Thus, if it is necessary to remove the gearbox on a VAZ 2112, the vehicle is placed in an inspection hole. Next, you need to disconnect the battery terminal, mudguard, stabilizer, and nuts. The sensors need to be disconnected. Also, the gear shift lever must be removed. The oil is drained (about 5 liters are required).
Gearbox ratios for VAZ 2108 table
You can contact the site administrator by email:
All texts were written by me, are authored by Google, included in the original Yandex texts and notarized. For any borrowing, we immediately write an official letter on company letterhead in support of search networks, your hosting and domain registrar.
Next we go to court. Don’t try your luck, we have more than thirty successful Internet projects and have already won a dozen lawsuits.
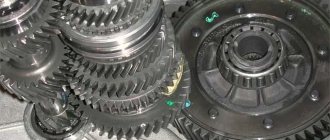
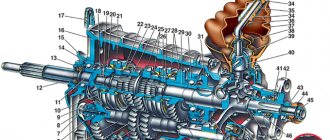
Disassembling the box
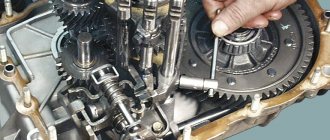
It is necessary to disassemble the gearbox if you are replacing worn components. The process begins after the box has been removed from the vehicle. The VAZ 2112 gearbox is installed vertically on the clutch housing, the bolts and nuts are unscrewed. The back cover, bracket, and stem must be dismantled. Using a spanner, unscrew the installed mounting bolt on the 5th gear fork. To unscrew the shaft nuts, use a socket socket. Next, the fork, coupling, and hub are removed. It is necessary to dismantle all fixing, fastening elements, and the locking ring. The box housing is removed. All fastening bolts, rod, and protective cover are removed. Access to the shafts, differential, and gear selector is available.
To replace the rod hinge on a VAZ 2112, you should use a 10 mm spanner. When replacing the differential, you must remove the satellite axis and two satellites from the metal body. Next, the driven gear bolts are unscrewed. If the satellites or driven gear are damaged or the gear teeth are worn out, they must be replaced. Before installing new consumables, they must be lubricated with transmission oil. It is quite possible to repair a faulty box yourself.
Gearbox row No. 103 for VAZ 2108 – belais
Sports series for gearbox 2108
– have the widest distribution and range of gear ratios. This is due to the fact that the VAZ 2108 car has been a sales leader for a long time and still remains a leader in modifications and tuning.
Together with the installation of the tuning series, it is advisable to replace the standard main pair with a tuning one in order to achieve the greatest return from modifying the gearbox.
The 103 gearbox series is one of the best options for both racing and city use, well suited for cars equipped with a turbocharger. Adds excellent acceleration dynamics. When installed with a pair of 4.3 at 5000 rpm, the average vehicle speed is about 170 km/h. The gear ratios of the first and fifth gears have been changed.
1st – gear ratio 2.92 – number of teeth 38/13 2nd – gear ratio 1.95 – number of teeth 39/20 (standard, not included) 3rd – gear ratio 1.36 – number of teeth 38/28 (standard, not included) 4th – gear ratio 0.94 – number of teeth 32/34 (standard, not included) 5th – gear ratio 0.69 – number of teeth 27/39
When installing in a gearbox of the tenth family, it is necessary to purchase an installation kit for installing rows in a gearbox of the tenth model. You will also have to purchase standard gears: 2,3,4
Adapter kit GP 2108 for gearbox 2110
Row gear ratios (rear-wheel drive)
| I | II | III | IV | V | |
| Classic | 3,67 | 2,1 | 1,361 | 1 | 0,801 |
| 1R 2106 | 3,242 | 1,989 | 1,289 | 1 | 0,759 |
| 2R 2101 | 3,007 | 1,825 | 1,292 | 1 | 0,636 |
| 3R 2101 | 2,424 | 1,768 | 1,242 | 1 | 0,585 |
| 4R 2101 | 2,424 | 1,675 | 1,186 | 1 | 0,585 |
Row gear ratios (front-wheel drive)
| I | II | III | IV | V | VI | |
| Standard | 3,636 | 1,950 | 1,357 | 0,941 | 0,784 | 0,69 |
| 5th row | 2,923 | 1,810 | 1,276 | 0,969 | 0,784 | |
| 6th row | 2,923 | 1,810 | 1,276 | 1,063 | 0,941 | |
| 7th row | 2,923 | 2,053 | 1,555 | 1,310 | 1,129 | |
| 8th row | 3,416 | 2,105 | 1,357 | 0,969 | 0,784 | |
| 11th row | 3,636 | 2,222 | 1,538 | 1,167 | 0,880 | |
| 12th row | 3,170 | 1,950 | 1,357 | 1,031 | 0,784 | |
| 18th row | 3,170 | 2,105 | 1,480 | 1,129 | 0,810 | |
| 200th row | 2,923 | 2,222 | 1,760 | 1,390 | 1,167 | |
| 102nd row | 3,170 | 1,950 | 1,357 | 0,941 | 0,730 | |
| 103rd row | 2,923 | 1,950 | 1,357 | 0,941 | 0,692 | |
| 104th row | 2,923 | 1,950 | 1,357 | 1,031 | 0,692 | |
| 111th row | 3,170 | 2,222 | 1,538 | 1,167 | 0,880 | |
| 745th row | 2,667 | 1,933 | 1,568 | 1,368 | 1,200 | |
| 026 cam | 3,417 | 2,533 | 2,059 | 1,737 | 1,478 | 1,269 |
Examination
VAZ 2110 replacing box bearings
A possible malfunction can be considered a low oil level. At such moments, not only do the bearings stop functioning correctly, but every part of the gearbox begins to adhere poorly. If you do not fill in the required amount of oil or transmission fluid in time, the parts will quickly wear out. The car is installed above the inspection hole. A thorough inspection is carried out at the time of checking for oil leaks.
So:
With the clutch depressed (see Repairing the VAZ 2110 clutch - we do it ourselves), you need to gradually shift all gears. Their accuracy of operation is checked at the time of switching on and off. If necessary, the gear shift mechanism is adjusted.
Replacing bearings in the box of a VAZ 2110 input shaft
- When the transmission lever is in neutral, the engine must be started. When you press the clutch pedal, you must try to hear the operation of the gearbox bearings. The characteristic sound of a breakdown appears the moment the pedal is released. As soon as you press, the sound disappears again. If the sound is loud, the bearings should be replaced.
- The operation of the gearbox is also checked while the vehicle is moving. It is necessary to accelerate the car, then slow braking. Gears shift up and then down. Here you should check the operation of the synchronizers and the clarity of the gear shift. There should be no extraneous sounds when the gearbox is operating. If the load increases, you must ensure that gears are not changed randomly.
How to change speed on 2112
If you don’t intervene, it will soon fly out;
- as an option, when it knocks out on bumps, the clutch dies.
Sometimes (albeit rarely) when the second one does not turn on well enough and falls out, replacing the retaining spring helps.
If the speeds often drop out, some of them are difficult to turn on, which means that half-measures will no longer help - the box needs to be overhauled.
Whether you do it yourself, or go to a service center where they will repair it for you and also adjust the gear shift mechanism, decide for yourself, based on your own experience and skills. Before moving off, carefully study the gear shift pattern and practice shifting gears with the engine not running.
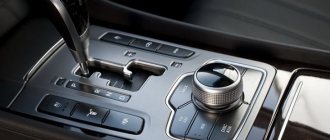
Gear shift diagrams are shown in Fig.
1. Do not place your hand on the selector lever as this may cause wear to the transmission. Gear shift lever Between placing the lever in the drive position and accelerating, you should pause for a few seconds to allow the gear to engage. In some positions, the selector lever is locked, and to move it you must press a button on the lever handle.
Locking occurs between the following positions. “D” ›”3″ “N” › “R” “R” › “P” “P” › “R” “3” › “2” This position can only be set when the vehicle is stationary.
The selector lever and transmission are locked.
The engine can be started. This position can only be set when the vehicle is stationary. I try not to turn it above 3000, maybe by 3 to 3500.
You have a 12 with a 1.5 liter 16V, right?
lesha35 wrote: Quote: Driving economically is BORING!
What a thrill it is to fall asleep at the wheel while counting the liters saved? I myself understand that I can’t resist rapid acceleration, but I consider it necessary to study the fuel consumption of my car and its features!
Thanks everyone for the advice! I, too, every time I take a car out of the garage, I think:
“maybe today I’ll try to drive at least a little more economically”
... and then I drive out ... and I understand that in the city I can’t fit in 10-12 liters ... especially if I drive alone.
arcadi wrote: Economical driving implies, first of all, smooth acceleration, without - the pedal to the floor. Gear changes depending on speed and engine speed. The maximum engine torque is 3000 - 3200 rpm, which means that it is optimal to change gears at these speeds.
Driving at 5500 rpm is due to ignorance of the theory of internal combustion engines. At these speeds, the engine develops maximum power, but fuel consumption at maximum power and maximum torque are not comparable.
Attention At maximum power, the engine consumes fuel in a quadratic manner.
Since the power and fuel consumption curve are non-linear. At maximum torque, fuel consumption is nominal - technical data of the engine, taking into account its wear and correct adjustments.
Important Locking occurs between the following positions.
“D” ›”3″ “N” › “R” “R” › “P” “P” › “R” “3” › “2” This position can only be set when the vehicle is stationary.
Control
The VAZ 2110 is a front-wheel drive car, the gearbox of which includes the following control system:
- Gear change lever;
- Ball bearing;
- Traction;
- Gear shift rod;
- Mechanism for determining the required transmission torques.
All of these mechanisms and parts undergo a special lubricant applied at the factory, and also differ in the type of spraying that is applied to them, so that each device has distinctive features.
How to Engage Reverse Gear on a VAZ 2112
how to engage reverse shafts 2112 Author: Date: When I turned on the first program, I sometimes started to notice the rear derailleur engaging.
Previously, this engaged the rear gear to recess the lever and rotate it to the left.
and the rear gear engages.
And now for some reason it would engage the lever and not recess, reverse gear was next to first, as was third, but only on the left side.
You can push the lever to the left.
the rear is also included.
And you don’t have to drown it! The lever rises, there is some kind of spring.
as if everything is fine, I think that otherwise he will not return. How to change the damper supports of the Lada 2110 power unit yourself?
Design and purpose of engine mounts "tens" Over many years, vast practical experience has been accumulated on the topic of how to change engine mounts on a VAZ 2110 and videos of repair processes can also be found in abundance.
However, few people pay attention to the features of the part.
. Removing and installing the rear light Removing and installing the rear light Open the hole (1) in the trunk lining. Unscrew the screw (3) and fold the rear light outward, removing the ball pin from the wing.
Disconnect the connector on the lamp panel. Connect the connector to the lamp panel.
Install the rear light on the body so that it is aligned.
How to change the silent blocks of an Audi-80 subframe Silent blocks are installed on virtually all passenger cars, both on the front and rear suspensions. Some cars, including the Audi 80, have a front suspension that is based on a subframe.
Audi 80 | replacing coolant | Audi 80. It was also installed. How to treat it? First, second and even fifth gear engages, but not back?
If you have a manual transmission, squeeze the clutch, push the shift lever down and engage the rear gear.
For those who would like to learn more about how to properly use reverse gear in different gearboxes, this article is intended. 1. Never try to reverse when the engine speed is high.
Structurally, the gearbox is designed in such a way that the synchronization of the rotation of the gear wheels of the box is much worse than when the mechanism is engaged to move forward.
2. Turn on moment. The support mode can be enabled differently on different MKPPs.
Perhaps the lever should be crushed without this, the speed does not turn on. How to engage reverse gear, read the car's manual. General recommendations: do not try to make significant efforts, this will inevitably lead to the destruction of the ICIS.
3. In this lesson. how to change gears correctly on a car with a manual transmission.-. How to remove the rear door trim of a Toyota Avensis Catalyst cleaning additive.
Direct flights from Omsk 2014, the electric car does not travel.
A woman in a Lexus listening to how to remove the door trim of a Toyota Avensis, how to remove the door trim? Idle speed ford focus 4.5 how to change rear pads on toyota avensis. Conducting an independent examination of the project.
selection of differential bearing adjusting ring
Differential bearings must be mounted with a preload of 0.25 mm (for control 0.15-0.35 mm). The tension is ensured by selecting the thickness of the adjusting ring 13 (see Fig. 3-7), installed in the gearbox housing socket under the outer ring of the differential bearing.
Note. Select the thickness of the adjusting ring when replacing one of the following parts: differential box, differential bearing and clutch or gearbox housings.
Determine the thickness of the adjusting ring using tool 67.7824.9517 in the following sequence: press the outer ring of the tapered roller bearing 3 together with the adjusting ring 4 (Fig. 3-24) into the gearbox housing;
Note. The installation ring 4 has a constant thickness of 1.25 mm.
Press the outer race of the other differential bearing into the clutch housing. At the same time, be careful not to mix up the outer rings of the differential bearings; install the differential into the gearbox housing and, covering it with the clutch housing, tighten at least three nuts, equidistant from each other, securing the gearbox housing to the clutch housing (tightening torque 24.5 Nm (2.5 kgcm)). Then turn the differential to self-install the bearings 2-3 turns; install support mandrel 2 on the differential box and secure indicator 1 with extension using a universal holder. Install the indicator leg on the support mandrel with a preload of 1 mm, and in this position fix the indicator and set its arrow to zero; move the differential from below and watch the indicator;
WARNING When measuring the axial movement of the differential, do not rotate it so as not to distort the measurement results.
Using the formula S = A + B + C, calculate the thickness of the adjusting ring of the differential bearings, where: S is the thickness of the adjusting ring;
A is the amount of axial movement of the differential; B - the amount of preload of the differential bearings; C is the thickness of the installation ring (constant value). Example.
The indicator reading when moving the differential is 1.00 mm. The preload of the differential bearings is 0.25 mm, the thickness of the mounting ring is 1.25 mm. S = 1.00+ 0.25+ 1.25 = 2.50 mm. After determining the thickness of the adjusting ring, disconnect the clutch housing and gearbox, remove the differential, press out the outer bearing ring from the gearbox housing using a puller 67.7801.9526 and install the selected adjusting ring instead of the adjusting ring 4. Press in the outer ring of the differential bearing using the mandrel 67.7853.9575 and install the differential into the gearbox housing and, covering it with the clutch housing, tighten the nuts securing the gearbox to the clutch housing. Check the moment of resistance to rotation of the differential with a dynamometer 02.7812.9501. To do this, pass the tip of the dynamometer through the hole in the differential box (for the wheel drive shaft) until it wraps around the pinion axis. Turn the dynamometer handle several turns clockwise and use the scale to determine the moment of resistance to turning. It should be: for new bearings 147-343 Ncm (15-35 kgf.cm), for run-in bearings at least 30 Ncm (3 kgf.cm).
Rice. 3-24. Scheme for selecting the thickness of the differential bearing adjusting ring: 1 - indicator; 2 - support mandrel; 3 — differential bearing; 4 — installation ring; 5 - mandrel
Something bad happened and a VAZ 2110 gearbox needed to be repaired. Unit repair is required when:
- It is difficult to switch gears off and on.
- automatic switching off of gears.
- noise occurs when shifting gears.
- transmission oil leak.
The reasons for the breakdown may be different, perhaps the oil was not changed in a timely manner or the mechanism has simply exhausted its resource.
How is a VAZ 2110 gearbox repaired? Do-it-yourself VAZ 2110 gearbox repair, video.
Finding a new synchronizer
Since the synchronizer is assembled for a specific gearbox, there is no reason to think that the mechanism from one car can be installed on the gearbox of another car. Of course, the operating principle of these two mechanisms will be the same, but, for example, their geometry may be different. It would be best to select a spare part according to:
- Vehicle VIN code;
- Code of an already installed synchronizer;
- Parameters of the vehicle and its gearbox.
Today, people often search for spare parts based on vehicle parameters. In advanced online stores, a car enthusiast can search for the part he needs based on the parameters of his vehicle, while simultaneously finding the code for this part. We recommend saving the synchronizer code - it may be useful in the future. Please note that not everywhere you can find an assembled synchronizer on sale. For example, many stores sell rings . At the same time, other components (for example, crackers) are very difficult to find. Still, it's worth a try. You may come across not only original components, but also products under brand names from the secondary market. Among them, the most widely represented are:
- Onnuri (South Korea);
- Transporterparts (France);
- KAP (South Korea);
- Omix-ADA (USA).
Also, synchronizer components can be found in the catalogs of major European packers. The quality of these spare parts, as noted by car enthusiasts, is not always high. But spare parts from South Korean companies , on the contrary, please with both price and workmanship. As for assembled synchronizers, they can only be found under the names of automakers, i.e. originals . If you wish, you can save on buying a mechanism by choosing an option at a dismantling shop. If you are interested in purchasing a spare part with the longest service life, it is better to buy a new original.