Lada 2113 Black Storm › Logbook › Instructions for flashing VAZ firmware for beginners, setting up UOZ
Warm greetings to everyone!
Today we will light, light, set on fire! I will try, together with you, to figure out the third main question of any firmware for a gasoline engine - when to ignite the fuel-air mixture?!
First, a little theory. What is UOZ? Translated as ignition timing. What kind of corner is this? How is it related to ignition? Where did the word advance come from? I’ll tell you in simple terms how I understand it!
For a full working cycle, 4 strokes occur in the engine: - Compression of the fuel-air mixture; — Working stroke; - Release; — Inlet; Now, as I understand it, this is a matter of degrees, which the firmware uses: - 0g - the piston is at TDC, the end of the compression stroke, the mixture is set on fire; — 180g — piston at BDC, end of stroke, start of release; — 360gr — piston at TDC, end of exhaust stroke, beginning of intake; — 540gr — piston at BDC, at the end of the intake stroke, the beginning of the compression stroke; - 720g - piston TDC, at the end of the compression stroke, and set the mixture on fire again.
In total, the crankshaft rotates two revolutions - 720 degrees. We are interested in the moment - the end of the compression stroke - 540 - 0 g! It is at this moment, when the engine has compressed the fuel mixture very strongly, that it is necessary to ignite it in order to obtain maximum pressure on the piston. The stronger the pressure on the piston, the more powerful our motor. The pressure is maximum at the moment when all the fuel burns, the gases expand greatly, and it is at this moment that our piston must be at the very top of the combustion chamber - TDC (top dead center), so that powerful pressure begins to push it back down - to BDC (bottom dead center). dot). The stronger the pressure, the faster the piston moves down, the more powerful our motor. And we feel it with our body. And we say: “Waaaaaaaaaaaaaaay, get over it guy, how your pelvis is collapsing!” Chip tuners have a device called an ass meter
.
Butt meter
- a device located inside a person that cannot be deceived; it shows the person how his car rolls. A very important device that replaces expensive dynos.
We laughed a little! The ignition timing is the angle before TDC is reached on the compression stroke. For example, OZ = 30g. This means that our spark plug will ignite the fuel-air mixture when the crankshaft is in the 0°-30° position, or 720°–30°. The calculation is simple: 720g - 30g = 690g.
But you ask, how is this possible? Why so early? The piston is not yet at the very top of the combustion chamber! I will now reveal the meaning of the word “advanced”. The fact is that while the mixture begins to burn, flare up, precious time passes! During this time, the crankshaft has time to rotate at a certain angle, it can have time to travel 20 degrees, it can travel 15 degrees while the mixture is burning. Thus, the piston manages to get closer to TDC.
In my opinion, the most difficult task of an engine tuner is to determine the best, most accurate ignition timing angle at which the fuel will have time to ignite by the time our piston is at TDC! This is the angle that gives a significant increase in power, it gives maximum acceleration.
Moreover, the burning time of the mixture is different, depending on the octane number of gasoline, the fuel-air ratio, the amount of this mixture in the combustion chamber, and the temperature of the fuel mixture. If the mixture is rich, it burns faster than a lean mixture. High octane fuel burns longer than low octane fuel. 98 gasoline burns longer than 95 gasoline.
So, it is important to know which angle is early
, and which one is
later
, so as not to get into detonation. Let's look at an example. Given an angle equal to 30 degrees and an angle equal to 35 degrees. Here the angle of 35 degrees will be before the angle of 30 degrees. (720-30=690g or 720-35=685g). 685g will come earlier than 690g. It's simple.
I noted several possible causes of detonation: 1) Low-quality gasoline with a low octane number. 2) High engine compression ratio. 3) Engine temperature (the higher it is, the higher the likelihood of detonation). 4) Ignition angle too early. 5) The mixture is too lean (15.5/1-16.5/1) (firstly, it burns worse, and secondly, it does not cool the combustion chamber).
After a bit of thinking, it became clear what was what. Now I’ll tell you about my technology for adjusting the ignition angle, without using various paid programs and an engineering unit. The technology is not fast, but it is effective.
So, let's move on from theory to practice.
1) I configure January 7.2 exclusively on j7es/j7esa sports firmware. Precisely with the “RAM” version, because this firmware allows you to configure the OZ and other important calibrations online, on a simple non-engineering unit January 7.2
in the free program
openOLT, HSP test, R-tuner (works only with j7esa)
. January 5.1 has to be configured in a more complex way, the block must be reconfigured many times.
What is ignition timing and what does it affect?
Ignition timing is an important parameter that determines the operation of the accounting ignition system. Here the concept assumes the time during which the ignition system ignites the compressed working mixture with a spark discharge. It is defined as the position of the crankshaft of the car engine at the moment the impulse is applied to the spark plug in advance relative to top dead center in degrees.
This is all connected because it takes several days for the working mixture to burn in the cylinder, because the speed of propagation of the flame front is approximately 20-30 m/s. If the mixture is ignited with the piston in the TDC position (i.e., top dead center), then its combustion occurs on the expansion stroke, also partly on the exhaust. As a result, effective pressure on the piston will not be provided. Therefore, the ignition moment, which is good, is selected so that the pressure of the burned gases.
We set the ignition correctly on the 8-valve injection VAZ-2114 (+video inside)
The second Samara became the first car among VAZ front-wheel drive vehicles with an injection power system initially. The first copies of the VAZ-2114 were still going on sale with an eight-cylinder injection engine and a contactless ignition system, and the following engines already had a fully electronic system with the same 8 valves. Before you set the ignition, you need to find out what system is installed on the engine, which is what we will do now.
Ignition systems of the 8-valve injection VAZ-2114
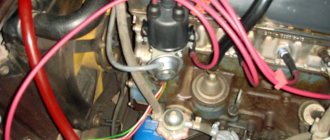
Ignition system module
It is quite simple to calculate the cost of the ignition system on a VAZ-2114 - if a breaker is installed, an analogue of the distributor of a contact ignition system, this means that the system is non-contact, but with a breaker-distributor. In this case, the ignition timing is set by turning the distributor to a certain degree . The accuracy of the adjustment depends on the experience of the technician, as well as the equipment used. Nevertheless, such a system will allow you to flexibly and accurately set the ignition using a strobe light.
Injector types
The injector controls fuel injection and can also control the ignition.
On all new injection machines, the ignition is set by a computer and regulated by filling in different firmware. But this was not always the case, and on older cars, the same Japanese from the 90s, the computer regulates only fuel injection, and the ignition timing is set using a distributor and is set in the same way as on old Lada models, and depending on the speed The ignition timing is adjusted using a more complex vacuum system than on carburetor Zhigulis. Sometimes, one tube breaks, and during operating mode the traction may disappear; you will have to look for and correct this defect. But let’s return to more modern ignition systems that are controlled using a computer, especially since these were the ones that were originally installed on the injection VAZ.
Setting the ignition on an injection engine
As can be seen from the above diagram, which is implemented in eight-valve injection engines, for the correct operation of the ignition system, the electronic engine control unit must be supplied with the necessary information from the sensors. The main sensor for system operation is the crankshaft position sensor . It is located on the ebb of the cylinder block next to the generator drive pulley, to the left of it, when looking at the end of the crankshaft.
Crankshaft position sensor
A timing gear disk is installed on the crankshaft pulley, which generates electromagnetic oscillations, and the sensor converts them into a pulse, this pulse is supplied to the computer. The control unit, based on the position of the crankshaft, sends a signal to the ignition module, which distributes the spark between the spark plugs.
In addition, the crankshaft position sensor sets the timing of fuel injection, so first of all we will check its condition.
Removing the timing belt protective cover
Scheme of signal receipt from the crankshaft sensor: 1 – crankshaft master disk; 2 – crankshaft position sensor; 3 – angle of rotation of the crankshaft; 4 – output signal of the crankshaft position sensor
Align the mark on the flywheel with the mark on the gearbox housing
We check the coincidence of the marks on the oil pump pulley and the tide on the cylinder block
We check the coincidence of the marks on the camshaft drive toothed pulley and the timing belt cover
If the three marks coincide, it means that at this moment the pistons of the first and fourth cylinders are at top dead center. It is at this moment that the gap between the teeth on the drive disk should coincide with the tide on the cylinder block, and the 20th tooth from the gap should coincide with the crankshaft position sensor. It is at this moment that the sensor sends an impulse to the engine control unit, indicating to it that the piston of the first cylinder is at the top dead center of the compression stroke.
We check the completed work. Step-by-step instruction
As can be seen from the diagram above, the ignition system consists of high-voltage and low-voltage circuits. In this regard, there are several points that you need to know when checking the system.
High-voltage wires operate at a voltage of about forty thousand volts. In our case, such a voltage is not dangerous for life, but receiving a discharge even with a low current strength and such a voltage is unlikely to be beneficial for health and mood. Therefore, it is advisable to work in rubberized gloves and use tools with insulated handles.
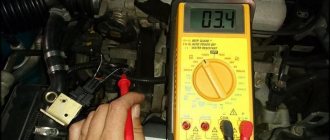
To check the condition of the system, you will need pliers with insulated handles, a standard set of tools and a multimeter. Please note that we only check the operation of the circuits, and not the operation of the microprocessor part. This requires computer equipment and special training.
Check the voltage at terminals C and B of the ignition module
Checking ignition coil contacts 2 and 4 with a multimeter
Checking high voltage wires
This way you can check and set the ignition on a VAZ-2114 with an injection 8-valve engine with your own hands. Good luck to everyone!
Source
Error codes for incorrect ignition
Useful video:
If you have a special tester or a standard dashboard capability, some problems with the spark supply system can be pinpointed. To do this, you need to know the decoding of error codes:
- 300 – presence of misfires;
- 301-302-303-304 – detection of leakage for each individual cylinder;
- 335-336-337-358 – malfunction in the crankshaft position sensor wiring circuit;
- 342/343/346 – problems with phase distribution sensors;
- 363 – no ignition of the fuel-air mixture.
After eliminating the cause of the failure, you can reset the errors. In the absence of an on-board computer, identifying the problem using codes is only possible with a special scanner. To avoid erroneous self-diagnosis, periodically check all sensor connectors for integrity.
Causes of ignition problems
As mentioned earlier, in order to set the ignition in the electronic system you will have to go into the “brains”, there you can also check the functionality of the sensors, so they greatly influence the operation of the system, regardless of the type of ignition.
On the electronic type, the main causes of failures are:
Before moving on to the radical measures proposed in the third option, it is worth additionally checking the correct location of the labels. In cars with contactless ignition, this is the ignition installation of the VAZ 2114, and for cars with an electronic system, debugging is important to check the synchronization of the injection system with the gas distribution mechanism.
Injector types
The injector controls fuel injection and can also control the ignition. On all new injection machines, the ignition is set by a computer and regulated by filling in different firmware. But this was not always the case, and on older cars, the same Japanese from the 90s, the computer regulates only fuel injection, and the ignition timing is set using a distributor and is set in the same way as on old Lada models, and depending on the speed The ignition timing is adjusted using a more complex vacuum system than on carburetor Zhigulis. Sometimes, one tube breaks, and during operating mode the traction may disappear; you will have to look for and correct this defect.
But let’s return to more modern ignition systems that are controlled using a computer, especially since these were the ones that were originally installed on the injection VAZ.
Getting ready to adjust the ignition
In order to correctly set the ignition timing of the VAZ 2114 and carry out debugging, you need to prepare. The method described below does not require acrobatic agility from the owner and is quite feasible both in the uncomfortable and cramped environment of a garage and if the car enthusiast has a tummy.
IMPORTANT! Thorough preparation always speeds up the process of technical work significantly, regardless of what exactly needs to be repaired.
Preparation for debugging ignition marks is carried out as follows:
Marks and direct adjustment
When the preparation is completed and the car is ready to work with it, you can begin to set the ignition marks of the VAZ 2114. The task of the procedure is to check the synchronism of the system (correlation of the camshaft, crankshaft and injection timing), with some nuances for the electronic system.
For electronic ignition systems, there is a small nuance - the need to check the distance from the master disk to the sensor. Normally, this distance should not exceed 0.7 mm, but should not be less than 0.5 mm. You can use a valve feeler gauge to check.
Necessary tool
To set the ignition on cars with an electronic system, you will need the following tool:
- Keys for unscrewing the bolts securing the timing belt casing;
- Ratchet with extension for cranking;
- A valve feeler gauge that can be used to check the distance from the crankshaft position sensor to the drive disc;
- A rag for cleaning the sensors from dirt.
If desired, you can replace the sensors with new ones (the cost of which is low). For example, the crankshaft position sensor rarely fails, but always at the wrong time.
Useful video
You can find interesting information by watching the additional video below: https://www.youtube.com/watch?v=pNyBny-_HoQ
On a car with contactless ignition, everything is even easier; you don’t have to remove the wheels, but you will need an assistant. It is necessary to find the compression stroke of the fourth cylinder. To do this, insert a rubber cone into the spark plug hole and turn the ratchet. Pushing out the cone will mean that the compression stroke has been found.
Having illuminated the spark plug hole, we align the longest mark of the cover with the mark of the pulley. We set the breaker to the appropriate clock and check the operation of the system according to the fourth point described above.
Source
Causes of ignition problems
As mentioned earlier, in order to set the ignition in the electronic system you will have to go into the “brains”, there you can also check the functionality of the sensors, so they greatly influence the operation of the system, regardless of the type of ignition.
On the electronic type, the main causes of failures are:
Before moving on to the radical measures proposed in the third option, it is worth additionally checking the correct location of the labels. In cars with contactless ignition, this is the ignition installation of the VAZ 2114, and for cars with an electronic system, debugging is important to check the synchronization of the injection system with the gas distribution mechanism.
Getting ready to adjust the ignition
In order to correctly set the ignition timing of the VAZ 2114 and carry out debugging, you need to prepare. The method described below does not require acrobatic agility from the owner and is quite feasible both in the uncomfortable and cramped environment of a garage and if the car enthusiast has a tummy.
IMPORTANT! Thorough preparation always speeds up the process of technical work significantly, regardless of what exactly needs to be repaired.
Preparation for debugging ignition marks is carried out as follows:
Marks and direct adjustment
When the preparation is completed and the car is ready to work with it, you can begin to set the ignition marks of the VAZ 2114. The task of the procedure is to check the synchronism of the system (correlation of the camshaft, crankshaft and injection timing), with some nuances for the electronic system.
For electronic ignition systems, there is a small nuance - the need to check the distance from the master disk to the sensor. Normally, this distance should not exceed 0.7 mm, but should not be less than 0.5 mm. You can use a valve feeler gauge to check.
The further procedure for the electronic ignition system is as follows:
On a car with contactless ignition, everything is even easier; you don’t have to remove the wheels, but you will need an assistant. It is necessary to find the compression stroke of the fourth cylinder. To do this, insert a rubber cone into the spark plug hole and turn the ratchet. Pushing out the cone will mean that the compression stroke has been found.
Having illuminated the spark plug hole, we align the longest mark of the cover with the mark of the pulley. We set the breaker to the appropriate clock and check the operation of the system according to the fourth point described above.
Exhibiting UOZ on your own
The magnitude of the SOP depends directly on the amplitude of rotation of the crank shaft. The higher the rotation speed, the earlier the SOP should be set. Otherwise, there will be a decrease in power, overheating and premature failure of the internal combustion engine.
So, work begins with preparing the keys and indicator. Some experts also recommend acquiring a special OZ corrector, which allows you to set this characteristic automatically.
- The car should be put in neutral and the handbrake should be applied;
- remove the cover from the breaker;
- use a special wrench to turn the crank shaft until the marks on the cover and the shaft pulley match;
- connect the indicator at one end to the ignition module, at the other end to the ground of the power unit;
- loosen the breaker fastening;
- turn on the ignition;
- hold the distributor slider against the stroke and turn the breaker until the indicator goes out;
- turn the distributor a little more, and then return it to the original exposure and record it at the very moment the indicator lights up.
A VR or vacuum regulator is introduced into the system in order to automate the adjustment of the SOP as much as possible. The VR independently changes the angle, depending on a particular load.
How to set the ignition on a VAZ using marks
Almost all modifications of the VAZ-2114 and 2115 are equipped with engines with BSZ (non-contact electronic ignition). To make the setup, you need to:
Note! It is prohibited to turn the camshaft pulley itself.
Having placed the marks on the VAZ model, you can see that the pistons of cylinders 1 and 4 are located at the dead center at the top, if everything is done correctly. In this case, the power unit operates correctly because the crankshaft sensor sends correct data to the ECU.
Checking the set ignition
To check the ignition on an 8-valve engine, an injector, you should prepare:
Attention! Due to the lack of special equipment, the described method can only test the operation of the circuits. Diagnostics of the microprocessor part will not be available.
If you managed to set the ignition correctly on the VAZ model and this was confirmed by the test, but problems are still observed, you need to check the power system.
Checking completed actions
To diagnose the actions performed, you will need pliers, a standard tool and a tester (multimeter). High voltage wires can be checked with a multimeter. Normal wire resistance is from 5 kOhm to 12 kOhm.
At this stage, we will perform diagnostics of circuits, and not microprocessor elements. To check the latter, you will need specialized equipment and experience, which we do not have.
So, how is the check done:
- First you need to turn off the ignition and diagnose the contacts on all plugs and pads. It is also necessary to diagnose the tightness of the fit, as well as the contact of the high voltages in the module.
- Next, remove the block from the module and diagnose the voltage at terminals C and B. In this case, the tester must be configured in the mode for measuring low alternating current.
- Check the high voltages. To do this, you need to install a working spark plug in the cap and attach it to the block head. At this point, your assistant should try to start the engine by turning the starter. If the wire is working, then a spark will jump between the spark plug and the block head. Thus, it is necessary to diagnose all wires.
- In the event that there is no spark on only one cable, it is necessary to thoroughly diagnose the module itself, but in most cases the device must be replaced. If everything works correctly, the spark plugs are working properly, but there are still problems with the engine, you need to check the power system.
Consequences of incorrectly setting timing marks
If the ignition is set incorrectly, the following negative aspects are possible:
Note! If the engine has 8 valves, then the consequences are not so critical - traction disappears, the belt quickly wears out and breaks.
After repairs, the following factors most often indicate an incorrectly set ignition: