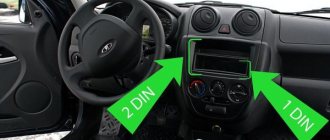
| Depending on the configuration of the Lada Grant, electric windows (ESP) or mechanical (manual) were installed on cars. In case of ESP repair, first learn how to remove the window regulator yourself. |
When replacing power windows, first disconnect the negative terminal of the battery.
Common faults
There are many reasons why the window regulator on Kalina does not work and why the device needs to be replaced, but we will look at the main ones:
- The electric motor brushes are stuck, usually as a result of overheating of the brush elements themselves, which, as a rule, are not resistant to sudden temperature changes. Accordingly, as a result of heating the brushes, the plastic socket may melt. This will also cause the brushes themselves to lose mobility. If the malfunction has just begun to appear, you can knock on the plastic door lining several times to restore the unit’s functionality. However, over time, this method will no longer be able to produce the required result, so intervention in the design of the joint venture will be inevitable.
- The cause of the malfunction, which may require replacement of the joint venture, can also be the ill-conceived electrical circuit installed at production. The contacts themselves are not able to withstand the necessary load that is placed on them. The SP system may fail due to the fact that the electrical circuit is not supplemented with a unloading relay. So in the event of a breakdown, it often happens that the car owner has to repair not only the power windows, but also the control panel itself.
As practice shows, in most cases, repairing a unit is either completely impossible, or can be done, but with great difficulty. Accordingly, the best option would be to install a new joint venture (video author - Emilien Ok).
Replacement of front electric windows of Lada Granta
You will need: a flathead and Phillips screwdriver, a 10mm wrench and remove the front door trim.
Front ESP mounting diagram:
1. glass guide fastening nut; 2. nut for fastening the gearmotor; 3. glass holder bolt; 4. block with electric drive wires.
First you need to remove the Granta door glass; to do this, you need to lower it to its lowest position. Further:
- Remove the door trim mounting bracket by removing 3 bolts.
- Remove 2 bolts (according to diagram No. 3), holding the glass.
- Remove the front door glass by lifting it up and turning it in the door opening.
To remove the Lada Granta power windows you need:
- Unscrew the 8 nuts securing the glass guides (No. 1 according to the diagram), as well as the 3 nuts securing the window lift motor to the inner door panel (No. 2 according to the diagram).
- Remove the window lift mechanism assembly with the gear motor from the door cavity.
- The photo shows the assembled ESP Grants.
Removing and replacing the window lift mechanism
Replacing the cable without dismantling the entire window regulator is quite problematic, therefore it would be more convenient to remove the entire mechanism.
First, you need to lower the glass so that you have access to the brackets securing the glass to the window lifter; unscrew the two fastening bolts with a “10” head. Next two options
, it would be more convenient to completely remove the glass by turning it slightly counterclockwise, but removing it from the door can scratch or damage the tinting; to avoid this, simply secure the glass with tape.
Next, with the same head, both nuts of the middle fastening, one nut of the lower, and one of the upper fastening of the guide of the lift mechanism are unscrewed.
The plastic socket is removed from the slot of the handle, and the three fastening nuts are unscrewed with an “8” socket head. Now you can remove the window lift mechanism assembly through the door access window.
If the glass was removed completely and the guides were turned away, its correct position in the opening is regulated by moving the bolts in the oval holes of the bracket.
Many VAZ 2110 cars are equipped with electric windows; to dismantle such a mechanism, the principle is the same
, with the only difference that first of all it is necessary to disconnect the switch from the gearmotor, then the lift is removed and the gearbox itself is disconnected.
After removing the entire VAZ 2110 window lifter mechanism, the drive cable is easily replaced with a new one. Assembly is carried out in the reverse order of disassembly. If you have provided new holders (pistons) in advance, no problems will arise.
When installing the glass lift handle, pay attention to the tightness of the fit; if it is loose, you can wrap the slot with a layer of electrical tape or fume tape, pressing it into the grooves of the slots
Installation
For installation, no special fixtures, instruments or other equipment are required. The entire installation process is trivial and will be simple for any male person. The main thing is to have desire and skillful, masterly hands. Before starting the installation, you need to purchase a five-pin standard relay for VAZ car models in advance. Then the door closer itself is installed; all you need to do is run a wire under the door trim and that’s it. But the most important role here is played by the alarm system, since a free open channel comes from it, to which the automatic glass closer system is connected.
Through this signaling channel, a negative pulse is sent, which polls the sensors.
When you have already reached the finish line of installing the closer, you must disconnect the negative power cable from the battery. This is a kind of protection against short circuits that can occur and damage the entire electrical wiring of the car. These actions must be completed without fail.
The next step is to remove the door card from the driver's door. When removing, you need to act carefully so as not to damage or deform it. If it is not available, then it is better to buy hedgehog clips in advance. The new ones are better, there will be no worries about poor fastening.
After this, the connectors are removed from the power window control module in the Lada Granta model.
Having found wire number 6, you need to cut it. You need to take this procedure responsibly, as you can get confused and harm yourself. Surely insulated wiring will not be needed. Those wires that will go into the cabin must be carefully insulated and bundled into a common wiring assembly. On the reverse side, the wires are soldered to each other, insulated, and a wire that will be located inside the car is soldered to these wires.
Wires are pulled through the holes. They are located in the door and counter. With a little effort, you can do everything so veiledly that no one will even guess that there were any interventions in the car’s electrical system.
In the Lada Granta model, you need to find a white wire with a black stripe in the common wiring harness. There should be a cut into this wire, after which 2 female terminals are hung. For those who find it difficult, after reading the instructions, you will find the output, which is located in the alarm control unit, which is responsible for this piece of information.
After a short tampering with the electronics, all the wires to connect them to the relay are ready. Below it will be listed which number what is attached to.
The only thing you need to take care of is setting the time during which the alarm will emit impulses to close the windows. As practice shows, the time should not be more than 4-7 seconds.
There are minor shortcomings in installing a window closer in the Lada Granta car model; a small short circuit may occur in contacts 87 and 30.
Some contact designations:
- 30 – button to control the driver’s door glass
- 87 – overall vehicle weight
- 86 – white-black wire
- 85 – additional channel signaling.
As you can see, it’s nothing complicated, you just need a little basic knowledge in electronics and the desire to do it yourself, and not ask for help and pay extra money for it.
Installation of window regulators on Lada Granta
Today we decided to publish step-by-step instructions for installing electric windows on a Lada Granta with your own hands. The material was prepared by experts in the field of this car.
Considering the fact that parts are usually installed by highly qualified service center employees, it is best to carefully study the instructions that relate to the operation of the car, as well as the instructions for new window lifts, in order to be sure that all elements of the mechanism replacement operation are carried out as accurately as possible.
Also, do not forget to disconnect the battery while working. It may happen that there is no way to disconnect the battery, in which case there is only one way out - removing the fuses of the circuits that are connected to the electric lifts, as well as to the car lighting.
– a set of new glass lifts for the Lada Granta door.
– a special control unit and switches for the device being installed.
– connectors and wires for connecting parts.
How to install electric windows on Granta with your own hands
1. The first step is to remove the car door trim.
2. Now you need to dismantle the mechanical window regulator for the subsequent installation of the electric window regulator.
3. We install an electric window regulator on the Lada Granta.
To do this, we use the mounting elements on which the mechanical window lifter was attached.
4. Installation of control units. We cut holes in the door trims for installing power window control units, having previously marked the cut locations. For this we made templates from cardboard.
5. Wiring. We lay the wiring from the window regulator into the car's interior. We did not use a ready-made tourniquet due to its absence. The tourniquet was made by hand. Our recommendation is to entrust this operation only to professionals. We will not show the process of making a wiring harness in detail in order to protect you from mistakes that could lead to a negative result. A cable duct (alarm corrugation) was used to conduct the harness from the door to the salon. Holes were made in the door plugs and door pillars and the ends of the cable duct were inserted. For clarity, we used blue electrical tape when making the wiring.
Do-it-yourself installation of a window regulator on a Lada Granta has been successfully completed. Let us remember that the previous article was about installing armrests on a Lada Kalina with your own hands.
How to disassemble the grant window lifter button
We are carrying out work to replace the window lifter mechanism. Operations for removing the window regulator are shown on the driver's door. The window lift mechanism of the right front door is removed in the same way. Set the glass to the top position. Disconnect the wire terminal from the negative terminal of the battery. Remove the front door trim (see “Removing the front door trim”).
We secure the glass with tape to the door frame. Loosen the tightening of the glass holder bolts (see “Removing the front door glass”).
By pressing the latch, we disconnect the wiring harness blocks of the window lift motor gearbox.
Main causes of failure
Most likely the power window fuse is at fault.
The angle is not good, but this is exactly what the mounting block looks like when you look at it from above
From the situation you described, it follows that the fuse is to blame. There are enough symptoms and prerequisites for its breakdown. First, you raised one glass, which is already good, since raising both windows at the same time is not recommended due to the increased load. Then they started to lift the second window, and the fuse burned out.
If one of the glasses works, then the fuse is good.
The button is broken
The power window buttons in the Norma configuration usually do not cause problems
If only one of the two or four power windows does not work, depending on the configuration and equipment of the car, then the problem is most likely in the button or in the wiring to it. It is necessary to remove the front door trim and ring the buttons, you can also look at the voltage on them.
Front passenger window button
Motor failure
Appearance of the new motor (purchased to replace a broken one)
The window lift motor on the Lada Granta rarely causes problems. This part is reliable, but it can also fail. You can check the motor by applying voltage to it forcibly, that is, directly from the battery.
Procedure if the window regulator does not work
1. In the mounting block, check the power window fuse (F2, 30A) and the power window relay (K2).
2. Remove the door trim and check the voltage at the motor terminals using a multimeter or a 12V test lamp.
If there is no voltage, then check the serviceability:
- power window buttons
- wiring (connector connection)
- electrical package control unit (central body electronics unit), which is installed on “luxury” vehicle trim levels
- central locking unit
If current flows to the motor, but the glass does not move, then there may be several reasons:
- malfunction of the window lift motor (for example, the drive motor brushes are stuck/sticking, the plastic gear in the gearbox is worn out)
- The window lift cable is frayed
- glass is jammed (distorted)
According to the results of the survey “what was the cause of the malfunction of the power windows,” it turned out:
- in 50% of cases the problem was in the window lift motor
- in 22% the reason was in the power window cable
- the remaining 28% were divided into parts (glass distortion, faults in the power window button and wiring)
Let us remind you that many also encounter a malfunction of the Lada Granta fuel pump.
Keywords: Lada Granta doors | Lada Granta glass | Lada Granta window lifter
Share on social networks:
Found an error? Select it and press Ctrl+Enter..
Installation of power windows on a VAZ 2107
Electric windows designed for models 2104-05-07 are suitable for the front doors of the 2107 car; the easiest way to install a rack and pinion design. We install rack ESPs as follows:
- disassemble the door from the inside - remove the window handle (using a special tool or screwdriver);
- unscrew the lock release button;
- unscrew the armrest screws (three fastenings - front (top), middle and back)
- dismantle the door trim (main part);
- remove the upper part of the casing (“loaf”);
- Using a 8mm wrench, unscrew the mechanism bolts;
- unscrew the bolts of the glass guide bar, remove the guide, it will not be needed;
- we take the SME out of the door;
- unscrew the screws securing the mechanism to the glass (4 pieces - two screws on one side and two on the other);
- unscrew the window lift cable tension nut and remove the cable roller;
- completely pull out the window lifter mechanism;
- drill two holes in the door with a diameter of 6 mm (one of them is next to the hole in the door closing handle);
- We do the drilling on the same plane, and fasten the gearmotor in place of the mechanical window lifter. All screws must be taken from the kit; standard screws will not fit - they are long and will rest against the lift mechanism. If there are no short screws with the window regulators, you need to shorten the standard screws;
- We fasten the glass holders to the electric window with standard screws;
- We take out the wires from the lifts, install the buttons either on the door itself or on the central armrest, next to the gearshift lever console.
We assemble the door, and this completes the installation of the window regulator on the VAZ 2107.
The procedure for replacing a window regulator on a Grant with your own hands
So, the first step is to complete several preparatory steps, without which it is impossible to get to the structure itself.
- Remove the front door trim
- Unscrew the bolts securing the glass to the lift bar
- Disconnect the power wires from the window motor
Next we perform the following steps. Using a 10 mm socket, unscrew all the nuts securing the trapezoid to the door. They are clearly shown in the photo below.
There are 11 such nuts in total.
When everything is unscrewed, lightly press on each of the lift studs so that it moves inward.
Then, by simple manipulations with the trapezoid, you can pull it out together with the motor.
We thread the motor through the same hole in the door and remove the remaining part of the Granta window regulator, as is clearly shown below.
If you have any questions about further repairs or replacing the motor itself, then the video review below will show and explain everything in detail.
Tips for installing ESP
- Electric lifts are produced by many companies; there are various designs. But you should not buy parts from unknown manufacturers, and you should keep in mind that cable power windows quickly fail. The most reliable ESPs are plank and rack type. On average, sets of lifts consist of 2 pieces. VAZ cars cost approximately 2500 to 3000 rubles, too low a price should be alarming.
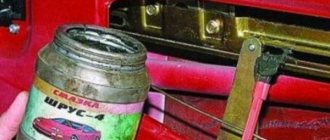
- In order for the mechanism to reliably raise and lower the glass, it is necessary to lubricate the guides in the doorways with silicone grease.
- Universal electric windows are always inferior in quality to those parts that are specifically designed for a particular model. It is better not to purchase universal ESPs - they usually do not last long.
- Many drivers install ESP buttons on the instrument panel or next to the gearshift lever, but there is a small disadvantage - you have to pull the wires. It is more convenient to mount the buttons on the door armrest - there is no need to get confused in the electrical wiring, installation of lifts takes less time, and it is convenient for the driver to raise and lower the window.
Lada Granta SETUP › Logbook › Electric windows on Standard. All at once.
With the arrival of spring, I quite clearly felt that I no longer wanted to lower and raise the windows with my hands. I want to push buttons. This means that it’s time to install electric windows. To drive just like a white gentleman. Want
ESP is not harmful. Put
– not so difficult. The Drive is full of entries. Ready-made sets of rack ESP “Granat” and “Forward” are sold. There you will find the mechanisms themselves, wiring, and buttons. And even instructions for connecting.
But we are not looking for easy ways.
Rack and pinion
Rear window lifters Garnet for Lada Granta, Kalina
If you have a desire to transform and make your car more comfortable, we suggest you purchase and install “Granat” electric windows for the VAZ 1118 Kalina, VAZ 2190 Granta on the rear doors. It is interesting to note that this design is a unique Russian development
It is also important to note that many motorists have already given preference to “Granat” window lifters and are satisfied, as they are easy to install, reliable, have a long service life and are an excellent choice for car tuning
The kit contains all the necessary parts: electric windows (2 pcs.), 2 switches, a reliable electrical wiring harness and stylish plugs for the interior of your car. As well as a passport for this product.
I would like to note that the window lifters of the Granat VAZ 1118 Kalina, VAZ 2190 Granta for the rear doors have a number of positive qualities. Firstly, when installing these window lifters, the motorist can rest assured of the excellent quality of construction and reliability of all parts of this window lifter. The main reason for this is the absence of any bending elements, which often lead to interruptions in operation and rapid breakdown
Secondly, it is very important that the power window wiring does not require special maintenance or special care. It is also important to note that the “Granat” window regulators do not have any distortions in the glass
Noise level no more than 50 dB. (which is no louder than your car engine running). Window lifters “Grenade” will provide you with fast operation; raising or lowering the windows will take no more than 5 seconds.
Remember that after repeated and continuous raising and lowering of the windows (about 10), the manufacturer recommends taking a short break from work (about 7-10 minutes).
As for the installation of “Granat” window lifters, everything here was also carefully thought out by the company’s engineers. You will not need to drill additional holes and modify the doors of your car, which will take you a lot of time and effort. Because this design is attached directly to the original window lifter guide. The design is very simple and will be understandable to every car enthusiast.
You can buy Window lifters Garnet VAZ 1118 Kalina, VAZ 2190 Granta for rear doors on this website or in a specialized store. The warranty period for this product is 18 months from the date of its manufacture by the manufacturer. That is, in case of any interruptions, breakdowns or other problems with the “Granat” window regulators due to the fault of the manufacturer, repairs and replacement of individual parts are carried out free of charge.
Features of connecting power windows
Unlike conventional mechanical devices, power windows are not equipped with traditional gear reducers, but with a special drum. The shaft of a DC electric motor is inserted into its hole located in the center. In this case, the motor is only a component of the gearmotor, on which, as we found out earlier, the speed and quality of raising and lowering the windows depends.
Before installing a new power window, you must select the correct device based on its technical characteristics, and also make sure that the product is in a fully folded state. Otherwise, you are unlikely to be able to install the product efficiently and ensure its flawless operation after connecting it to the vehicle’s on-board network.
You've probably noticed that on almost all foreign cars the power window buttons are duplicated on each car door. To connect additional ESP buttons in the doors, you need to run an additional three wires into each door.
Standard ESP connection diagram
Changed to this scheme (here without rear ESP)
Connection diagram for additional ESP button.
How the additional ESP button is made on Kalina
To install one duplicate button in the door you will need:
- 2x contact (plastic connector) block male + female 1 pair
- Large male terminals 2 pcs.
- Mom large 2 pcs.
- Mom little 7pcs
- Earth 1pc.
- Power window button 1 pc.
- Button installation cup 1 pc.
- Power window button connector 1 pc.
- Wire diameter 0.75 4 met.
- Door pistons 7pcs
If your ESP buttons have been moved to the doors. then the insert into the harness for additional buttons will look like this. The meaning is that we need to run 3 wires into each door:
- Ground (Ground, in theory, can be taken into the doors, but there is not always good contact there, so it is better to run a separate ground wire)
- +12V “after ignition” (with power window relay at ChYa)
- Button illumination (take it from the cigarette lighter, since it is in the middle between the doors.)
Disconnect the negative terminal from the battery.
We look for +12V on the ESP relay (black and white wire) to it and screw both of our red +12V
Then we climb through the door. There are 2 wires going to the ESP motor - gray and blue, through a connector. Unplug the connector:
We take 2 wires (I have black and black and white), of such length that we can reach from the original chip with the blue and gray wire going into the corrugated door to our future button. We crimp 2 large male terminals onto them and insert them into the connector. We put it on the chip with blue and gray going into the corrugated door, so that the black comes from the gray, and the black and white from the blue:
Insert the wires into the button connector:
- Red +12V
- Black mass
- White backlight
- Black with gray wire chips
- Black and white with blue wire chips
We crimp with small “mothers” and insert the ESP buttons into the connector. We do it according to the scheme:
- Red +12V to slot 2
- Black ground - in slot 5
- White backlight - in slot 4
- The black wire from the gray wire of the chip goes into slot 6
- Black and white from the blue wire chips - into slot 3 (THREE).
Don’t confuse the button connector sockets! That’s not all, we need two more short wires, through which we will now connect our button to the ESP motor, like we’ll do it as it was. For beauty, we take the same colors of wires that were attached to the original chip going to the door from corrugated material, i.e. black and black and white. It will be like a continuation of the original wires, and in the middle of them is our button. We insert the black wire into socket 1 of the button connector. Black and white - into socket 7. We crimp the other ends of these wires with large “mothers” and put the purchased connector on them so that when putting this on connector to the dangling chip going to the ESP motor:
- The black wire went to the gray ESP motor chips
- Black and white - to the blue wire of the ESP motor chip.
In principle, that's all. Don't pay attention to the orange wire in the photo - it's a mass for heating the mirrors.
You can use the button from Kalina. it is more beautiful and a little more expensive than the VAZ 2110.
Electrical circuits of cars VAZ 2110, VAZ 2111, VAZ 2112, repair
How to fix stuck power window buttons on a Priora
If the power window buttons work every once in a while or get stuck, but at the moment it is not possible to purchase a new control unit, you can fix the problem as follows:
- We remove the control unit. To do this, you need to carefully snap off the 6 plastic clips on the body of the decorative cover;
- Let's disassemble the block. To do this, you also need to unclip 6 clips on the body of the unit itself;
- We take out the control board and clean it of any contaminants;
- We remove the buttons themselves by carefully bending the side fastenings with a screwdriver;
- We remove all dirt and debris from the paths using alcohol and cotton wool;
- Lubricate the working part of the button with silicone grease (this is not necessary, but this will make the button move smoother);
- We assemble everything in reverse order.
Replacing the power window button Renault Logan and Megan
VIDEO REVIEW » alt=»»>
You can also replace the power window button block on Renault Logan and Megan cars yourself.
- All you need is a flathead screwdriver and a cloth or tissue.
- To remove the control unit, just carefully pick it up with a screwdriver and gradually pull it out of its seat. To avoid accidentally damaging the casing during dismantling, it is recommended to wrap the screwdriver in a thin cloth.
- Next, you need to disconnect the terminals with the wires, making sure that they do not fall inside the casing. Then you need to connect the new unit and install the buttons in place.
Car: Lada Granta. Asks: Evgenia Kislyakova. Question: The glass went down, but didn’t go back up, what happened to the window regulator?
Good afternoon. I stopped in the parking lot, raised the right passenger window all the way, began to lift the left one, and it stood in the middle. I had to put Grant in a friend’s garage; I was afraid to put it in the parking lot in case it rained or a bird flew in.
Two front windows broke at once. I don’t have electrics at the back; the windows are lowered and raised using handles. When I press the power window button, nothing happens. I tried it with the machine turned on too.
Lada Granta 2012, 87 l. With. - breakdown
Lada Granta, 2015
Lada Granta, 2015
Comments 12
Hello everyone, I also have a grant, but the right window lifter does not work for me
Hello. I have the same problem, and I also have window closers, the right lift has stopped working. How did you solve the problem?
I didn’t decide, I gave up, every other time it either works for me or doesn’t, I just started lifting the windows with my hands (like this is more reliable than checking every time whether it’s up or not)
Good day!
When I press the button on the right front passenger window, the window goes down all the way and immediately returns up (LADA GRANTA luxury).
What could be the reason?
I would like to inform you that an additional security alarm was installed along with the standard one.
My right one is also having some nonsense
=) That’s right... the button is dead, the power window buttons are connected in series
This happened to me, and I thought the engine was dead. But it turned out that the button is the brain... I disassembled and reassembled everything works
I stopped by the service center, one of the electricians said, go to the officials, you’re not the first, supposedly the engine of the grant is bent, I’ll talk to them tomorrow, everything would be fine, but the officials are in another city 60 km from mine, I work until half past six , after work, either rush or ask to take time off earlier.
But the most annoying thing is that they will have to leave the car to get home - figure out how to do it yourself, and...
I have a major Shumka there, but I feel like they won’t stand on ceremony, they’ll tear everything up, so when I get there, I’ll ask what holes they need, and I’ll tear them off as needed =) (there’s a possibility that they’ll also come after me, saying, well, I shorted the Shumka there =) )
Design and types of window lifters
So, what is the SP device on Kalina:
- grooves designed to fix the glass itself;
- rails that allow it to move up and down;
- sealing elements, damper, and motion limiters;
- drive mechanism;
- a lifting device that ensures the transmission of vibrations of the movement of the drive element to the glass.
Connection diagram for SP on Kalina
Depending on the drive, SPs are divided into mechanical or “meat grinders”, in which the glass is lifted by turning the handle, and also electric. In the latter, the system is controlled using a button. This electrical circuit is based on a motor with a gearbox.
In addition, joint ventures are divided among themselves and according to the type of device used that sets the glass in motion. They can be rack and pinion, cable or lever. Each of these types has its own advantages and disadvantages.
Comments
Products for LADA at the best price
A selection of accessories for LADA from AliExpress
| Depending on the configuration of the Lada Grant, electric windows (ESP) or mechanical (manual) were installed on cars. In case of ESP repair, first learn how to remove the window regulator yourself. |
When replacing power windows, first disconnect the negative terminal of the battery.
Applicability on cars
| Brand | Automobile model | Body type | Number of doors | Years of manufacture |
| VAZ | VAZ-1117 / LADA Kalina | station wagon | 5 | 2004 — 2013 |
| VAZ | VAZ-1118 / LADA Kalina | sedan | 4 | 2004 — 2013 |
| VAZ | VAZ-1119 / LADA Kalina | hatchback | 5 | 2004 — 2013 |
| VAZ | VAZ-2192 / LADA Kalina II | hatchback | 5 | 2013 - present |
| VAZ | VAZ-2194 / LADA Kalina II | station wagon | 5 | 2013 - present |
| VAZ | VAZ-2190 / LADA Granta | sedan | 4 | 2011 - present |
| VAZ | VAZ-2191 / LADA Granta Liftback | station wagon | 5 | 2014 - present |
| Datsun | on-DO | sedan | 4 | 2014 - present |
| Datsun | mi-DO | hatchback | 5 | 2015 - present |
The power window rack is a housing in which the glass movement mechanism is located - a toothed chain drive. An electric motor is fixedly mounted on the rack, driving the mechanism.
The fixedly located gear motor eliminates the possibility of damage to the electrical wiring in the door.
The window lift rack is absolutely rigid. Thanks to this, there is no rattling, vibration or resonance when raising and lowering the glass.
Window lifters are extremely lightweight and compact. They work almost silently.
When installing power windows, it is necessary to drill three holes in the door.
Video
A simple way to increase the speed of the windows on a VAZ:
Specifications:
DC power supply with a voltage of 12V and a current of no more than 2.5A;
The glass lifting time is no more than 5 seconds;
Nominal lifting force 120 N;
Noise level 40 - 50 dB.
In order to unify and reduce the cost of the people's car, the designers of OJSC AvtoVAZ retained most of the parts (approximately 70%) from the Lada-Kalina car. And the electric door windows were no exception - Lada-Granta cars are equipped with an electric drive for raising and lowering the front door windows, which is completely similar in design and execution to the mechanism previously installed on Lada-Kalina cars.
If in previous VAZ models, on which a mechanical window lifter was installed, the usual gear reducer was used, then on the VAZ 2190 model there is only a drum with a hole into which the output shaft of the gearmotor is pressed.
The gearmotor itself is structurally made of a direct current electric motor, excited by permanent magnets and a worm gearbox.
Installation Features
As for installation, it is carried out in the reverse order of removal:
- First, the new mechanism is secured with eleven nuts.
- Then the wiring and electric motor are connected.
- After this, find the screw that secures the inner handle of the lock and tighten it completely.
- At the final stage of installation of the front joint ventures, the adhesive tape is removed.
- Next, through the hole in the rear door, a new window regulator is installed instead of the old one.
- Using a 10 mm wrench, you need to tighten all the corresponding screws and nuts. Use an 8mm wrench to tighten the nuts that secure the assembly. The tape is removed.
After completing the installation, you need to check how correctly the window opens and closes, whether there are any distortions and whether the mechanism as a whole is securely fixed. If mistakes are made, the problem must be corrected immediately so that it does not catch you at the most inopportune moment.
Sorry, there are no surveys available at this time.
How to remove and connect the window lift button - using the example of LADA Kalina/Priora
Repairing the window lifter button on Kalina, Priora or Grant is not difficult. And no serious financial costs will be required, since the price of the “native” passenger door button is only 150 rubles. The cost of the control unit on the driver's door is about 600 rubles.
To remove the button on the passenger door or the control unit, you do not need to remove any decorative trim or door trim. There is no need to look for screws to unscrew them, since there are none.
- It is enough to carefully pick up the button or block with a flat screwdriver and simply pull it out of its seat. To avoid accidentally scratching the casing, it is recommended to wrap the screwdriver in a thin cloth.
- Then you need to disconnect the wire terminals to completely free the power window control module. Next, you need to tightly connect the terminals to the new button and return it to its place.
VIDEO INSTRUCTIONS » alt=»»>
How to remove the module and control unit for power windows for 2 and 4 windows: how to remove the panel, repair
Description of the power window control unit
What is the glass control module used for, what is its operation scheme, and in what cases is the system repaired? First, let's look at the purpose and operating principle of the device.
Purpose and device
The module itself is controlled using buttons located on the panel in the car interior, or by an anti-hug system if the ESP is supplemented with closers. If the latter are present, when the car owner sets the vehicle to security, the device automatically closes all windows completely. If the closers are multifunctional, then when the car is further opened, the windows will return to their original position. The module is equipped with buttons with which control is carried out.
If necessary, the car owner can block the control buttons on the panel, thus preventing the windows from opening and closing unnecessarily.
We invite you to familiarize yourself in detail with all the functions that the control unit performs:
- Controls the windows, as well as the sunroof, if available, if necessary or when the car alarm is activated.
- If we are talking about door closers, the driver will be able to configure the system in such a way that even when the alarm is turned on, the unit does not completely close the windows, which will ensure ventilation of the interior.
- The device will block the movement of the glass if necessary, for example, if the device encounters an obstacle while driving.
- If the unit has a movement blocking button, the driver can press it to block opening or closing. This is especially true if there are children in the vehicle.
- If the cable breaks during operation of the ESP, the module will automatically block the operation of the system and turn off the electric motor.
- In addition, the system will shut down if a short circuit occurs in the operation of the electrical circuit or motor.
Operating principle
As for the principle of operation, in general the system works according to a fairly simple principle. Voltage is created on ESP electric drives by pressing control buttons. Two wires are connected directly to the mechanism itself - blue and gray. When voltage is applied to the blue wire, the glass rises, and when voltage is applied to the gray wire, it lowers.
If the system uses closers, then first the impulse goes to them, and only then to the motor with the relay. Accordingly, if there is a closer, the system is supplemented with another module. All communication mechanisms
autocentrum.ru
Power window doesn't work
Modern, well-equipped cars are always equipped with electric windows. The presence of such a function is no longer a special innovation, but, nevertheless, it is appreciated by numerous motorists for the convenience that this system provides.
However, during the operation of their car, car owners often notice how poorly the window regulator works, that it does not respond to pressing a button or periodically jams. To understand what happened to this element, you need to have an idea of the window lift system as a whole and the principles of its operation, and only then start troubleshooting.
Components of the window lift system
The power window system operates thanks to electric motors that are built into car doors and are responsible for raising and lowering the side windows. The electric window system includes the following elements:
regulators (electric motors);
Operating principle of electric windows
The electrical control system, as a rule, has a trapezoidal design that ensures easy lowering and raising of the windows when the corresponding buttons are pressed on the main switch block, which is either located next to the driver or is embedded directly in the door cards. An independently functioning motor is installed inside each door, which is capable of working in two directions, raising the glass up and lowering it down. The power window system on modern cars includes special relays that control the electric current going to the window motors.