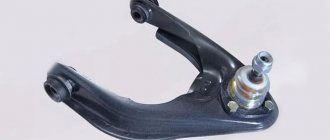
The following components are also required:
- Silent block remover for removing the upper control arm from the car;
- Steering end remover, without which it is impossible to unpress the outer steering ends
Most likely, if you decide that you can replace silent blocks on a VAZ 2107 yourself, then you have the rest of the tools. These should be elements such as:
- Jack;
- Socket and open-end wrenches 22;
- Socket and socket wrenches 13;
- Thin, well-sharpened chisel;
- Hammer;
- Mount.
All of the above has most likely convinced you that silent blocks are a very important component of the car. Only one conclusion follows from this - you should not skimp on buying high-quality branded silent blocks. You can also use polyurethane components, but the cost may leave you a little shocked.
So, after all the tools and parts for replacement are prepared, you should start with a process such as replacing the front silent blocks.
- Loosen the wheel bolts and lift the required wheel using a jack. After this, immediately remove it and loosen the nut on the axis of the upper arm using a 24mm wrench. You can immediately unscrew the steering tip nut and unpress it.
- At the next stage, unscrew the upper ball joint nut using a 24mm wrench. Using a puller, unpress the support pin from the bipod. If there is no puller, simply unscrew the support from the lever using several 13mm wrenches.
- Unscrew the upper arm eye nut and remove it. It is noteworthy that replacing silent blocks involves unscrewing the vertical bolt securing the bumper.
- The next step is to drag the lever to the workbench and clamp it in a vice. Now you should press out the silent blocks with a previously purchased device. Next comes the installation of the front arm silent blocks. Next, install the lever in place, having previously processed the axis of the upper lever. For this you can use nigrol, lithol, motor oil. It is not recommended to tighten the axle nut completely. Tightening is carried out with the vehicle completely lowered.
- Secure the support, put on and secure the wheel, and lower the car from the jack.
Next, prepare a set of silent blocks to carry out such a process as replacing the silent blocks of the rear levers. First of all, you should remove the silent blocks of the rear control arms from the VAZ 2107.
- Remove the wheel from the car;
- Unscrew the lever axle nuts on both sides using a 22mm wrench and remove the thrust washers.
- Screw the complete puller bolt onto the lower arm axle. Tighten the nut while holding the bolt from turning. The puller glass, at the same time, presses on the lower lever, pressing it from the silent block.
- The next step is to remove the silent block from the lower arm.
- On the opposite side of the rear lever axis, the silent block is pressed out in the same way.
Next, the rear silent blocks are directly replaced:
- The new silent block must be centered in the hole of the lower arm;
- To prevent the lower arm of the silent block from moving relative to the axle during pressing, a thrust washer should be placed on the axle on the opposite side and the old self-locking nut should be screwed in.
- Install the puller onto the lower arm axle and tighten the nut. The puller glass should press on the silent block flange. If you didn’t know how to press in a silent block, then this is how it’s done. It is worth noting that when pressing in, a glass of smaller diameter must be installed on the silent block remover than when pressing out.
- Release the puller by unscrewing the screw. Next, install the thrust washer on the axle and tighten the new nut without tightening it.
- In the same way, press in the silent block on the opposite side of the lower arm and screw in a new nut, installing a washer.
- Finally tighten the nuts on the lower control arm after installing the vehicle on the wheels.
In general, this process is not particularly simple, but if you follow the step-by-step instructions, it will be easy to do, just like repairing shock absorbers yourself. The subframe silent blocks are also replaced in a similar manner. Don't forget to reinstall the tie rod ends and then tighten them. The next step is to tighten the lower and upper arm nuts after the machine is completely lowered to the ground.
Replacing the upper arm
Removing the upper arm
To replace the upper arm of the VAZ 2106 front suspension yourself, you will need keys 13 and 22, a jack, a support, and a wheel wrench for removing the wheel. To dismantle the upper front suspension arm, you must follow the instructions:
- Raise the car on a jack and remove the wheel, then place a support under the lower arm and lower the car. This is necessary to load the suspension to the point that the car is standing under its own weight. The levers will then be aligned.
- Secure the upper arm axle with a wrench and loosen the axle nut by unscrewing it until it aligns with the end of the axle.
- Unscrew the bolts that hold the upper ball joint in place, and then move the lever up a little and completely unscrew the axle nut, pulling the axle out of the lever.
- Remove the lever together with the silent blocks without dismantling them.
Next, carry out all the work that required you to remove the front suspension arm of the VAZ 2106, and install it in place or replace it with a new one. The assembly process is the same as disassembly, but in reverse order.
Replacing ball joints
The work scheme (like all others) begins with cleaning the parts from dried dirt. You need to make it a rule to clean all the elements at the bottom of the machine before starting diagnostics and repairs. The most convenient way to do this is to first use a stream of water from the nozzle of a portable car wash, and then dry it with compressed air.
To replace the ball joints, first remove the wheels of the VAZ 2107.
The jack for loading the lower part of the suspension rests on the lower arm, simulating a “load” on the suspension.
- Unscrew the ball pin nut (for example, the top one).
- A special pressing tool is used to separate the steering knuckle and the support pin;
- Unscrew the ball joint and remove it in its protective case.
- A new support is installed and assembly occurs in the reverse order.
The lower support is also replaced. After this, the car is jacked up on the other side and the ball joints on the other side of the suspension are replaced.
After this, it is necessary to adjust the wheel alignment; this must be done at a service station on a special stand.
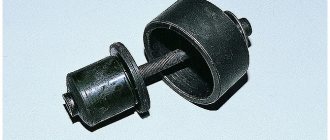
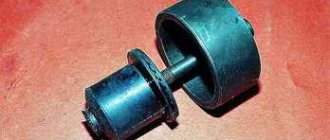
Let us recall that the silent block is a connecting element in the suspension of the VAZ 2107, and any other “classic”, which has an elastic liner made of polyurethane or rubber in order to soften the shocks of the suspension and vibrations. These parts take on large shock loads.
The figure shows the mounting diagram for the silent block of the lower arm.
Because of this, silent blocks are susceptible to wear, as a result of which the alignment is disrupted. It is advisable to change silent blocks every 50-100 thousand km. Mileage.
Replacing silent blocks in the upper control arm of a classic with your own hands.
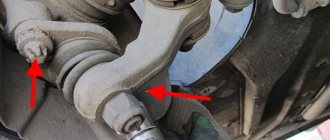
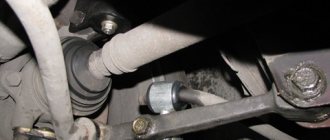
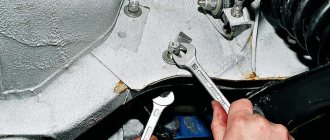
So, let's begin! In rear-wheel drive VAZs, the silent blocks in the upper arm can be changed without even driving into a hole and without removing the arm from the ball (provided that you have a remover for silent blocks). But first you need to determine whether the bushings of the silent blocks are stuck to the bolt securing the lever to the body. To do this, jack up the car and remove the wheel.
Arrows point to bolt and nut
We loosen the nut securing the upper arm with a 22mm wrench and try to turn the bolt. If it spins and the bushings stay in place, then you're in luck! But if this bolt rotates with great effort and the bushings rotate with them, then as they say: “Houston, we have problems!” Next we will consider both cases.
If the silent blocks are not stuck.
Further actions depend on whether you have a puller for silent blocks. If there is one, then you don’t have to remove the lever completely, but just unscrew the nut 22 to the end, take out the bolt and turn the lever towards yourself (for the convenience of further repairs).
We turn the lever for convenience.
Next, take a puller and press out the silent blocks.
Removing the silent block using a puller
And with his help we press in new silent blocks. Before pressing, the mounting hole must be cleaned and preferably lubricated with lithol. In the upper arms, silent blocks are pressed into place up to the ribs, as shown in the photo below.
The new silent should be pressed in exactly like this.
But what to do if you don’t have a silent block remover? Then you will have to completely remove the lever. We take out not only the bolt securing the upper arm to the body, but also take out the ball from the hub (this is faster than unscrewing 3 bolts securing the ball to the arm). Detailed removal of the ball joint is written here.
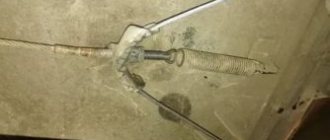
We removed the lever, put the lever ear on a pipe or on a yew tree (as in the photo), the main thing is that the silent block does not rest against anything, and knock it out with a hammer.
To press in new ones, we need a mandrel (old bearing, piece of pipe, nut head). The inner diameter of the mandrel must be equal to the diameter of the skirt of the new silent block. And we begin pressing in new parts using this mandrel, having previously lubricated the seat with lithol. Reassemble in reverse order.
Important: we pull the bolt securing the lever to the body only under the load on this wheel! Those. The car should not be on a jack, but on all wheels!
If the silent blocks are stuck to the bolt.
This is a very difficult case, since you will have to spend a long time trying to get the bolt that secures the front upper arm to the body.
For those who want to save themselves a lot of time and are ready to fork out a little, I advise you to buy a new bolt, this lever from disassembly and just cut off the old bolt with a grinder.
Well, if you have time and nerves, then we take a gas burner in our hands and burn out the silent block. Follow fire safety precautions! After all the rubber has burned out, you can begin to knock out the bolt. Get ready to do this for a very long time. After you remove the bolt, knock out the remaining clip of the burnt silent tape from the lever and follow the instructions written above.
Lada 2106 › Logbook › Replacing the lower arm of a VAZ 2106
After a spring inspection of the front suspension, a crack was discovered in the lower left arm. I was pleased with the decision to change the lever to a stronger one.
At the same time, I decided to change the springs, since they had never been changed since the factory and had already sagged quite a bit. I also decided to replace all the ball joints and the steering linkage set.
At first everything went according to plan, I removed the old lever and pressed out the silent blocks. New silent blocks are still new USSR, in quite excellent condition.
I used a 32 head as a press-in.
I installed the new lever in place, then it was time to install the spring. And this is where the adventures began. The new Soviet spring clamp has given a long life.
As a result, I had to do some magic using a crowbar and a pry bar. Half an hour and the spring was in place.
Phobos decided to take new springs with variable pitch.
They turned out to be 3 cm longer than the original ones (long-term use affected them).
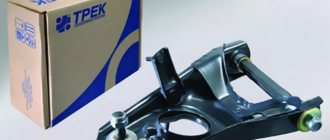
I put it down in frequent turns. The next day I started installing the ball joints and steering linkage. I chose TREK TRS SPORT ball joints, BELMAG steering linkage.
On the second side the spring became much lighter. As a result, almost the majority of the front suspension was replaced in two days. Next, a wheel alignment was done.
Lower arm repair
If the lower arm is slightly bent and no other damage is detected, then you can continue to operate the car, you just need to check the wheel alignment. Repair or replacement of this element of the front suspension is carried out in the following cases:
- severe damage to the lower arm;
- appearance of cracks.
To complete the work you will need the following tools:
- set of open-end wrenches;
- set of heads;
- metal brush;
- jack;
- puller for pressing out silent blocks;
- device for removing ball joints;
- mounting blade;
- penetrating liquid;
- hammer;
- vice.
Removing the lever
The need to dismantle the lower arm arises when the specified element fails to replace the axle or silent blocks.
Work order:
- Raise the front of the car. To do this, use a jack, but you can also use a lift.
- Remove the wheel.
- Unscrew the lower shock absorber mount.
- Loosen the nuts on the axle.
- Release the stabilizer pad mounting.
- Lightly load the suspension. To do this, you will need a reliable support, which is placed under the lever and the car is lowered slightly.
- Unscrew the nut on the support and press out the pin. This is done using a special puller.
- Unload the suspension. This must be done smoothly. Gently pull back the stabilizer to move it through the pin located on the lower arm.
- Remove the spring. To do this, it is pryed up and removed from the support cup.
- Unscrew the axle mounting bolts. Under them there are washers that are used to adjust the camber angle of the wheels. You need to remember their location, otherwise you will have to make adjustments again.
- Remove the lower arm. To do this, use a mounting spatula, which is used to gently press out the axle.
Video: sequence of dismantling the lower arm
Replacing the ball joint
You can replace the ball joint on the lower arm without removing it. Since we have already removed the lower arm, it will be much easier to change the ball joint on it:
- Clean the ball joint mounting nuts. This is done using a metal brush; you can also lubricate the threads with WD-40.
- Remove the support. To do this, unscrew the three fastening nuts and remove the indicated element. Carefully inspect the lever to detect possible damage and cracks.
- Install a new ball joint and tighten all nuts.
The new ball joint already comes with lubricant, so there is no need to lubricate it additionally. Some supports have an oil nipple in the lower part, through which you can additionally fill it with lubricant over time.
Video: replacing the ball joint
Replacing silent blocks
The sequence of work to replace silent blocks on the removed lower arm:
- The lever is securely fixed in a vice.
- Using a puller, the old hinges are pressed out.
- Inspect the lever for damage.
- One silent blocks are inserted. A puller is also used for this.
- The axle is inserted into the hole along with the washers.
- Press in the second hinge. They do this in the same way as in the previous case.
Video: replacing silent blocks
Experts recommend that after replacing the ball joint and silent blocks, use only new nuts.
Lever Installation
After repairing the lever body, replacing silent blocks or a ball joint, installation of the lower lever is performed in the reverse order:
- The axle and the lever are secured using bolts.
- The lower edge of the spring is installed in the support cup. After this, they begin to tighten the lower lever. Make sure that the stabilizer does not catch on the bushing.
- Insert the threaded part of the ball joint and fix the nut.
- Fix the stabilizer pad.
- Install the shock absorber and tighten the nut.
- Check the tightness of all nuts. They must be clamped securely and firmly.
- Install the wheels and remove the car from the jack.
At this point, the replacement of the lower arm is considered complete, and you can continue to operate the car safely and comfortably.
Video: installing the lower arm
By regularly inspecting the condition of the front suspension on the VAZ 2107, you can notice and eliminate any malfunctions in time. Even a novice car enthusiast can replace the lever, ball joint or silent blocks on his own. Keeping the suspension in good condition ensures not only comfortable, but also safe operation of the vehicle. The use of high-quality parts from trusted manufacturers will significantly increase their service life and repairs will need to be performed much less frequently.
Purpose and main elements of suspension
Wheel suspension was created much earlier than the car itself. Initially, it was used on horse-drawn carriages, which were intended for comfortable riding over long distances. They had at least 4 wheels installed, because of this, the designers had to worry about how to ensure the vertical movement of the wheels relative to the body
This was especially important for driving on rough roads
The first pendant designs were created during this period. Later, almost without any changes, they were used in the first machines that had just begun to appear on the market. The speed of these cars could barely reach 30 km/h. But with the development of the industry, it was necessary to reconsider the approach to suspension designs.
Initially, suspension was perceived only as a means of achieving the most comfortable ride, but cars became faster and faster, and the emphasis shifted to handling quality. In the 20s of the last century, a new system of car organization appeared: an independent suspension system was created for the front, and subsequently for the rear wheels.
Today in the passenger car sector it is possible to install independent suspension only for the front wheels. It can be combined with an independent, semi-independent and dependent rear system. Although a large number of schemes already exist, they are all united by common components. There is:
- guide elements that provide a given trajectory of movement of the wheels relative to the body;
- elastic elements responsible for the required force to move the wheels;
- elements whose purpose is to dampen vibrations.
Guide elements: levers, struts, ball joints and rubber-metal joints.
Elastic elements: springs, leaf springs, torsion bars and pneumatic chambers.
Front suspension
The front end of the VAZ “six” has a more complex suspension design, since the front wheels are steerable and it is on this part of the car that heavy loads fall. The front suspension of the car is an independent double wishbone with coil springs, hydraulic shock absorbers and a stabilizer bar.
Front suspension diagram of VAZ 2106: 1 - hub bearings; 2 — hub cap; 3 - nut; 4 — steering knuckle axle; 5 - cuff; 6 — hub; 7 — brake disc; 8 — protective cover of the upper ball pin; 9 — upper ball pin; 10 — bearing (liner) of the upper support; 11 — upper lever; 12 — compression stroke buffer; 13 — spring insulating gasket; 14 — shock absorber; 15 — shock absorber mounting pad; 16 — axis of the upper arm; 17 — rubber bushing of the hinge; 18 — outer bushing of the hinge; 19 — adjusting washers; 20 — suspension cross member; 21 — stabilizer bar cushion; 22 — stabilizer bar; 23 — axis of the lower arm; 24 - lower arm; 25 — clip for attaching the stabilizer bar; 26 - spring; 27 — rubber bushing of the shock absorber spring; 28 — lower spring support cup; 29 — steering knuckle; 30 — lower ball pin race insert; 31 — lower support bearing; 32 - lower ball pin
Cross member
The front beam is the strength element of the volumetric structure. The material used to manufacture the product is steel. The cross member is located in the engine compartment below. The power unit is fixed to it through the cushions, as well as the lower arms of the shock absorption system.
The cross member is the power element to which the engine and lower suspension arms are attached
Levers
The front suspension consists of four levers - two upper and two lower. The lower elements are fixed to the crossbar using an axle. Between the beam and the axle there are washers and shims that change the camber and angle of the front wheel steering axis. The upper arm axle is a bolt that goes through the mudguard post. Rubber-metal products are installed in the holes of the levers - silent blocks, through which the suspension elements in question can move. Using ball joints, the steering knuckle (trunnion) is mounted to the levers. The wheel hub with the brake disc is fixed on it using tapered roller bearings. The hub is tightened on the axle with a nut, and on the right the fastener has a left-hand thread, and on the left it has a right-hand thread.
The front suspension arms connect and hold the elements of the shock-absorbing system
Shock absorbers
Shock absorbers ensure a smooth ride of the car, i.e., eliminating bouncing on uneven surfaces. Damper devices of almost identical design are installed at the front and rear. The difference lies in the size, mounting methods and whether the front shock absorber has a buffer. The front dampers are mounted with their lower part to the lower arm, and mounted on the top on the support cup.
The shock absorber in the suspension design ensures a smooth ride of the car
Table: parameters of the “six” shock absorbers
| vendor code | Rod diameter, mm | Case diameter, mm | Body height (excluding stem), mm | Rod stroke, mm |
| 2101–2905402 2101–2905402–022101–2905402–04 (front) | 12 | 41 | 217 | 108 |
| 2101–2915402–02 2101–2915402–04 (rear) | 12,5 | 41 | 306 | 183 |
Springs
The “six” is equipped with cylindrical springs, the upper part of which rests against the rack through the gasket and support cup, and the lower part rests against the recess of the lower arm. The purpose of the elastic elements is to provide the necessary vehicle clearance and smooth out shocks while driving on uneven roads.
Springs are an elastic element that provides ground clearance and smoothes out shocks when driving over uneven surfaces.
Stabilizer
The stabilizer is a part that reduces body roll when cornering. It is made of special steel. In the middle, the product is fixed to the front side members through rubber elements, and at the edges - to the lower arms.
To reduce roll when cornering, the suspension uses a transverse stabilizer
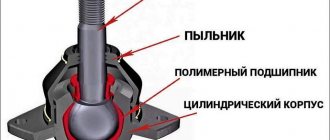
Spherical bearing
The ball joints of the front suspension are a hinge, thanks to which the car is able to maneuver and move smoothly. In addition, these elements make it easy to control the front wheels. The support consists of a housing with a ball pin and a protective element in the form of a rubber boot.
The front suspension contains 4 ball joints that connect the arms and the steering knuckle to each other
Replacing the front cross member
To replace the front suspension cross member of a VAZ 2106 you will need a small set of simple tools:
- keys for 13, 17, 19 and 22;
- screwdriver;
- hammer;
- extension cords
Jumper under the hood
Having prepared all this, get to work. First, remove the lower front suspension arm from the car (we'll tell you how to do this below). It should be removed assembled with the ball joint and silent blocks. After this, open the hood, remove the carburetor air filter and cover this hole with something to protect it from the penetration of contaminants during operation.
Prepare a cross member that will be needed to support the engine in a suspended state when dismantling the front suspension cross member. The material used is an ordinary construction board 5 cm thick. The length of the crossbar should be made equal to the distance between the flanges of the front wings. In the middle of the traverse, make a hole into which a long bolt or pin with a bracket is inserted.
Supports under the cross member
Install a traverse on the flanges of the front wings of the VAZ 2106 under the hood and insert a long bolt and bracket into its hole. The latter should be connected with a bolt to the eye of the power unit. By slightly tightening the nut on the stud, you need to remove the gaps in the connections between the bracket bolt and the motor eye.
Using a socket, through the hole in the cross member on both sides, you need to unscrew the nuts holding the motor mounts and remove the nuts with spring washers. Next, place supports under the cross member and lower the car onto them so that the cross member lightly touches them.
On each side it is necessary to unscrew the horizontal and vertical bolts that secure the cross member to the side members. When jacking up the car, the cross member will remain on the supports. At this point, the process of dismantling the VAZ 2106 front suspension cross member with your own hands is completed: replace it with a new one and reassemble everything in the reverse order of disassembly.
Silent blocks VAZ 2106
Quite high loads are constantly placed on the silent blocks of car suspensions, especially on roads with poor surfaces. Such conditions significantly reduce the life of these parts, as a result of which they fail and need to be replaced. Since the controllability of the car depends on the condition of the silent blocks, you need to know not only how to identify a fault, but also how to replace these suspension components.
What it is
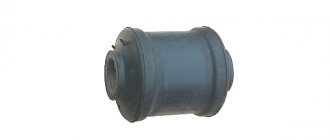
The silent block is a rubber-metal product, structurally made of two iron bushings with a rubber insert between them. Through these parts, the components of the car's suspension are connected, and thanks to the rubber part, vibrations transmitted from one suspension element to another are dampened.
Silent blocks connect suspension elements and dampen vibrations
Where installed
On the VAZ 2106, silent blocks are pressed into the arms of the front suspension, as well as into the reaction rods of the rear axle, connecting it to the body. The condition of these elements must be periodically monitored, and if they are damaged, repairs must be made in a timely manner.
The front suspension of the classic Zhiguli consists of the following parts: 1. Spar. 2. Stabilizer bracket. 3. Rubber cushion. 4. Stabilizer bar. 5. Lower arm axis. 6. Lower suspension arm. 7. Hairpin. 8. Lower arm amplifier. 9. Stabilizer bracket. 10. Stabilizer clamp. 11. Shock absorber. 12. Bracket bolt. 13. Shock absorber bolt. 14. Shock absorber bracket. 15. Suspension spring. 16. Steering knuckle. 17. Ball joint bolt. 18. Elastic liner. 19. Cork. 20. Insert clip. 21. Bearing housing. 22. Ball bearing. 23. Protective cover. 24. Lower ball pin. 25. Self-locking nut. 26. Finger. 27. Spherical washer. 28. Elastic liner. 29. Pressure ring. 30. Insert clip. 31. Bearing housing. 32. Bearing. 33. Upper suspension arm. 34. Upper arm amplifier. 35. Compression progress buffer. 36. Buffer bracket. 37. Support cap. 38. Rubber cushion. 39. Nut. 40. Belleville washer. 41. Rubber gasket. 42. Spring support cup. 43. Upper arm axis. 44. Inner bushing of the hinge. 45. Outer bushing of the hinge. 46. Rubber bushing of the hinge. 47. Thrust washer. 48. Self-locking nut. 49. Adjusting washer 0.5 mm 50. Distance washer 3 mm. 51. Cross member. 52. Inner washer. 53. Inner sleeve. 54. Rubber bushing. 55. Outer thrust washer
What are there
On the VAZ “Six” and other Zhiguli models, silent blocks made of rubber were installed from the factory. However, instead of them, you can use polyurethane products, thereby improving the performance of the suspension and its characteristics. Polyurethane hinges have a longer service life compared to rubber ones. The main disadvantage of polyurethane elements is their high price. If a set of silent blocks made of rubber for a VAZ 2106 costs about 450 rubles, then made of polyurethane it will cost 1,500 rubles. Hinges made of modern material not only improve the behavior of the car, but also better absorb shock and vibration, reducing noise.
Silicone silent blocks, despite their higher cost, improve the characteristics and performance of the suspension
What is the resource
The service life of rubber-metal joints directly depends on the quality of the products and the operation of the vehicle. If the car is used mainly on good quality roads, then the silent blocks can last 100 thousand km. If you frequently drive through potholes, of which there are many on our roads, the service life of the part is noticeably reduced and repairs may be required after 40–50 thousand km.
How to check
Problems with the hinges can be judged by the behavior of the car:
- controllability deteriorates;
- Vibrations appear in the steering wheel and knocks in the front when driving over uneven surfaces.
To make sure that the silent blocks have exhausted their service life and require replacement, they should be checked. First, the parts are visually inspected for damage to the rubber. If it cracks and partially comes out, then the part is no longer able to cope with its tasks.
Hinge wear can be determined by visual inspection
In addition to inspection, you can move the upper and lower arms with a pry bar. If knocking and strong vibrations of the silent blocks are observed, then this behavior indicates a lot of wear on the hinges and the need to replace them.
How to raise or lower the suspension of a VAZ car with your own hands
Sooner or later the time comes to modify the car’s suspension, or, more simply, the motorist is ready to tune the suspension of his VAZ
It doesn’t matter what the reasons are that the motorist decided to raise or lower the car’s suspension: both suspensions are possible, or only the front or rear
You need to understand what responsibility the motorist will have if he decides to lower or raise the car’s suspension. Technologically, lowering or raising a car's suspension is not that difficult, even if the driver has little experience as an auto mechanic. The meaning is different.
How to lower the suspension of a VAZ car
Tuning a car's suspension has some features. Before you lower or raise your car's suspension, you need to think about what the results will be after modifying the suspension. You need to understand that changing the factory standard parameters of the car will lead to a change in the physical properties that were originally included in the design.
Lowering the suspension not only improves the vehicle's handling, but also changes the appearance of the car. There are some peculiarities in lowering the suspension. When lowering, the motorist reduces the ground clearance (clearance). You also need to understand that when the suspension is lowered, the car will not drive on German autobahns and European roads.
There are potholes on our roads, and you will also have to cross tram rails. First, to lower the suspension, you must first diagnose the suspension and calculate the installation gaps between the wheel arch and tires.
It should also be taken into account that the tires will have to be changed to low-profile with high-profile
This is important to consider
Before raising or lowering the suspension, it is worth taking into account popular experience, which shows that all suspension components need to be changed at the same time. If you change suspension elements selectively, this will give the opposite results
How to raise the suspension of a VAZ car
If the car suspension is raised, then you need to make sure that the car does not lose its characteristics. The main suspension components need to be replaced:
Shock absorbers, when replacing there is no need to do anything on your own. In the catalog you need to select those shock absorbers that the manufacturer offers for a specific car model.
But to raise the suspension, stiffer and shorter shock absorbers are chosen.
Anti-roll bar. It is better to change the stabilizers together with the struts.
The springs are chosen to be stiffer and shorter.
The suspension of a VAZ car is raised for several reasons. As a rule, car owners decide to raise the suspension in 2 cases: to increase load capacity and increase ground clearance (cross-country ability). Most often questions arise about how to properly raise the rear suspension. There are lift kits on the market today for different car models. These kits allow you to raise the suspension to a certain height.
We must not forget that an increase in vehicle clearance is accompanied by some changes in the physical properties of the car. For example, the center of gravity increases. This may negatively affect the vehicle's performance when cornering at certain speeds.
The important thing is that before you raise or lower the suspension yourself, you need to take into account a very important value - weight redistribution, which matters when turning the car
Weight redistribution is affected by lowering the center of gravity and increasing the distance between the wheels. Increasing the distance between the wheels is done by switching to wider tires. But this method is limited by the dimensions of the car. Lowering the vehicle's center of gravity can be achieved by installing short struts. This reduces the suspension travel. The racks must be chosen sufficiently rigid.
If the motorist is not ready to calculate all the relationships between parts, physical properties of the car and suspension components, then in order to raise or lower the suspension, you need to choose the second option - purchasing a complete suspension package for a specific car model. On request, as a rule, there are various proposals for modifying the suspension. Specialists will select components for the VAZ based on their preferences and the requirements of the car owner.
But you will need to install them yourself. If you think that raising or lowering a car’s suspension is just a matter of replacing springs and shock absorbers, then this will be a big mistake. Suspension tuning requires making changes to the type of tires and wheels, calculating how the behavior of the car will be affected by changing the suspension. This is provided that the result of the modification is necessarily positive.
xenon-kiev.com.ua
Modernization of VAZ 2106 suspension
Today, many owners of classic Zhiguli cars are improving their cars and making changes not only to the appearance, interior, power unit, but also to the suspension. VAZ 2106 is a car with a wide field of activity for tuning. The only limitation is the financial capabilities of the owner. Let's look at the main points for modifying the suspension.
Reinforced springs
They resort to installing reinforced springs on the “six” when it is necessary to make the suspension stiffer, since many are not satisfied with its softness.
Springs from a VAZ 2121 along with a reinforced cushion are often installed on the front of the car. Such elastic elements have a slightly larger coil thickness and rigidity. The rear suspension is mainly equipped with springs from the “four”. In addition to them, dampers from Niva are installed, which will be especially important for those cars that run on gas, since the equipment weighs a lot.
VAZ 2106 owners often replace standard springs with elements from Niva
Air suspension
One of the options for modernizing the suspension is installing air struts. After implementing such a design, it becomes possible to change the ground clearance and generally increase the level of comfort. The car receives driving characteristics similar to the behavior of imported cars. When installing air suspension, both the front and rear shock absorption systems are subject to conversion. To do this, purchase a kit of necessary items, which includes:
- compressor;
- connecting elements;
- pneumatic struts;
- sensors, etc.
The air suspension kit consists of a receiver, compressor, air cylinders, connecting elements
to pneumatic changes in this order:
- Remove the springs from the suspension.
- We cut off the bumper almost completely and make a hole for mounting the air strut in the lower cup and upper cup.
- We install air cylinders.
- The front suspension is also completely disassembled.
- We weld a plate onto the lower arm so that the airbag can be mounted, while removing the stabilizer mount.
- We drill a hole in the plate for the lower mount of the air strut.
- We are finalizing the little things and installing an air spring.
- We repeat similar actions on the other side.
- We install the compressor, receiver and remaining equipment in the trunk.
- We place the suspension control unit in an accessible place.
- We connect the air struts and electrics in accordance with the diagram that comes with the kit.
Video: installing air suspension on classic Zhiguli cars
Electromagnetic suspension
Another option for improving a car’s suspension is electromagnetic suspension. The basis of this design is an electric motor. It can operate in damping and elastic element mode. The operation is controlled by a microprocessor. This type of suspension is installed instead of standard shock absorbers. The uniqueness of the design lies in its virtually trouble-free operation. Plus, it has a high level of security. If for some reason the pendant loses power, the system can switch to mechanical mode thanks to the electromagnets. The most popular manufacturers of such suspensions are Delphi, SKF, Bose.
The electromagnetic suspension is controlled by a microcontroller, ensuring a smoother ride and safer
The suspension of the VAZ “six” does not stand out for its complexity. Therefore, the owners of this car can repair it. You can identify and fix problems by reading the step-by-step instructions. When the first signs of problems appear, you should not delay repairs, since other suspension elements will also be subject to increased wear.
Replacing silent blocks on the upper arm of a VAZ-2107
Now we will describe how the silent blocks on the upper arm are changed, and the described method does not require complete removal of the element from the car.
Everything is done like this:
- To gain access to the lever, jack up the front wheel on the side where the work is being done and remove it. You will also have to unscrew and remove the plastic wheel arch protection (if equipped);
- We unscrew the nut of the upper arm mounting bolt, having previously treated it, as well as the hinges themselves with WD-40;
- We unscrew the bumper mounting bolt, since it will interfere with the removal of the lever fastening element (only on VAZ-2105 and 2107, on other classic models this is not necessary);
- Remove the mounting bolt. After this, the hub will go down, which will make it possible to rotate the lever on the ball joint, so that the side with the hinges is on the outside. This will provide full access to the silent blocks, without the need to completely remove the lever;
- Using a puller, press out the worn element. This is done like this: we put a washer on a long bolt, and then a piece of pipe with a diameter larger than the silent block. We pass the bolt through the hinge, so that the pipe begins to rest against the lever, and the hinge itself is inside it, put on the second washer and screw on the nut. We take two keys - with one we tighten the nut, and with the second we hold the bolt. As it twists, the nut and washer will push the hinge into the inside of the pipe until it comes out completely.
- Before installing a new element, clean the seat and lubricate it with soapy water. To fit, we use a puller with a tube of smaller diameter so that it rests against the side.
- Pressing is done like this: we put a washer and a tube on the bolt, into which we insert a new element. We pass the bolt through the hole in the lever, add the second washer and nut. Before tightening, center the silent block relative to the hole. We tighten the nut until the hinge rests on the washer. Unscrew the puller and install a piece of larger diameter on it. We position the device so that the pipe is on the side where the hinge moves. By tightening the nut, we seat the silent block until the bulges on its outer ring rest against the lever.
- We change the second hinge in the same way. After this, we turn the lever back, lift the hub to align the holes of the lever and the car body, install the mounting bolt, lubricating its body and threads with nigrol, tighten the nut, put the wheel in place and remove the car from the jack.
Replacing the lower arm on a VAZ 2101-VAZ 2107
Welcome!
The lower arm - it is located in the front suspension and a ball joint is screwed to it, and the front spring itself is also on it; replacing this arm is not quite easy, it may take you more than one day to replace it (If you are doing the work for the first time) but still, the good news is that this lever is not very expensive and if yours becomes unusable (a crack will appear on it, for example), then it will need to be replaced in the near future with a new one and we do not recommend that you use the car at all (If the lever has a crack appears) until it is replaced. Note! To change the lower arm, you only need: All the keys that you have in your arsenal, as well as a wheel wrench and a jack, since the wheel will have to be removed on the side on which you will change the arm!
Where is the lower control arm located? In the front suspension of the classic, there are many levers, but some of the largest and most important (Without them the car would not move at all) are the lower and upper lever, the upper lever is at the top and is not subject to special deformation (Only if the car is not lowered and only if You didn’t drive it into a hole at high speed), the lower arms are most often subject to deformation, because they are located at the very bottom, and if you drive the car into a sharp hole (into a hatch, for example), then after the collision the wheel will fall to the bottom and all the weight the front part on the lever will shift, in connection with this your lever will bend or even crack, so you need to monitor them periodically and, if possible, after a strong collision with a bump, check the levers for condition, for clarity, the lower lever (namely the one on the left parts placed) is shown in the photo below.
When should the lower control arm be replaced? It is changed only in case of severe deformation, if the lever is slightly bent, then you can still ride on it (Of course it’s better to change it, but in fact you can do the camber and continue driving), but if it is cracked, then this lower lever must be replaced, if the lower arm is severely deformed, the wheels lose camber and because of this the car begins to pull to the side; in addition, the tire tread wears out faster due to the broken camber, so if there is severe deformation (Even if it is not cracked), try to replace the lower arm with a new one.
How to replace the lower arm on a VAZ 2101-VAZ 2107?
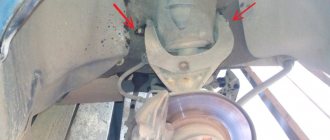
Removal: 1) The lever is easy to remove and install, but you can spend a lot of time on this, otherwise you will essentially need to unscrew the nuts that secure it and after that the lever can be removed from the car, first remove the front spring (How to remove spring, read the article: “Replacing the spring in the front part of a VAZ”) and when it is removed, use a wrench (a cap wrench is most convenient, but a wrench will also be convenient with a cap wrench) unscrew the two nuts (Indicated by red arrows in the large photo) , which attach the lower arm to the cross member and after that, remove the lever completely assembled with the ball joint, with silent blocks and with the axle, but just remove it carefully, because there are metal washers behind the lever in the places where it was attached to the cross member (see. small photo) we do not recommend that you remove them at all, or if you decide to remove all the washers, then remember where they were, otherwise the alignment angles of the front wheel will be lost and it will not sit straight.
Note! When the lower arm is removed with everything assembled, you can remove the ball joint from it, but it is better to buy a new arm assembly so that everything new is installed on it, but still, to remove the ball joint, you need to unscrew the three nuts that hold it attached to the lever and after that, you can completely remove it from the lever!
Installation: Install the new lever in the reverse order, and all the washers must be in their places so that the adjustment angles of the front wheel are at a minimum and by the way, when you tighten the nuts that secure the lever to the cross member, be sure to tighten them all the way, lowering the car to do this and having loaded the side on which you are replacing the lever with a new one, tighten the nuts until they stop and that’s it, the replacement is successful.
Additional video clip: Watch the video that explains the process of removing the lower arm and the process of installing it, in addition, this video shows some nuances that we did not indicate in this article, so be sure to study it in order to obtain additional material in order to so that the replacement is simply remembered much better and is done not from paper but from memory.
How to Replace Silent Blocks on a VAZ 2106
How to replace silent blocks of a VAZ-2106
Quiet blocks Used in the design of cars of all models. They are rubber inserts between parts of the suspension, used to absorb vibrations and, accordingly, to ensure a smooth ride of the chassis. The silent blocks themselves are subjected to very high loads, which leads to their frequent failure.
In this article we will describe in detail how to replace silent blocks on a VAZ-2106; we provide step-by-step annotations and useful tips that will help you perform this complex Do-it-yourself function, without the involvement of car service specialists.
Tools and accessories needed to replace silent blocks
First, you will need to prepare all the necessary tools. Without them, it will be quite difficult to get to the silent blocks in the VAZ-2106 and dismantle defective parts. So, for high-quality and convenient repairs you will need:
- special tools for disassembling ball bearings, front levers, removing and installing a new metal and rubber hinge, as well as for pressing out the remote steering tips;
- open-end wrenches, combination wrenches and 13, 22 and 24 mm wrenches;
- connector;
- fastening kit;
- a thin and sharp chisel that allows you to carefully remove the lower silent blocks without removing the lever;
- hammer.
How to replace silent blocks |
lower control arms for Vas
classic without the help of a puller. VKontakte Groups:.
Replacing silent blocks on VAZ 2101 2107
How to replace silent blocks |
lower arm machine
Vas
Classic model using universal.
Additionally, you will need to prepare the new suspension components for installation on the car. today It is best to purchase polyurethane bushings that are several times different from your normal extended life.
But if your goal. make repairs at minimal cost, then you can make traditional rubber parts.
Replacing the upper arms and their rubber-metal joints on a VAZ 2106 Zhiguli
- Repair manuals
- Repair manual for VAZ 2106 (Zhiguli) 1976-2005.
- Replacing the upper arms and their rubber-metal joints
Repairing auto parts yourself is a responsible task that should be taken as seriously as possible. Sometimes a faulty spare part takes the driver by surprise, forcing him to spend a lot of time and money searching for a good service station, but there is an alternative solution to the problem; this requires a small amount of knowledge and a set of tools.
When replacing the upper arms and their rubber-metal joints on a VAZ 2106 Zhiguli, you need to be extremely careful and not neglect the little things. To get acquainted with the issue, car enthusiasts often use various Internet portals dedicated to auto parts. Some of them use narrowly focused forums. But, as a rule, only generalized information is provided there, which is known initially. Where can you find a reliable source that offers really useful things? Our portal is open for this 24 hours a day. Online mode allows us to help clients at any time convenient for them. Moreover, a mobile version has been developed that is available to everyone.
A detailed description of such a unit as replacing the upper arms and their rubber-metal joints of the VAZ 2106 Zhiguli has a good structure with thematic headings. In addition, there is always the opportunity to familiarize yourself with the intricacies of installation. There are often situations when a driver is confident in his abilities, but when he gets down to work, questions begin to arise. Thanks to our portal, such moments can be easily avoided. The site is a database that is updated regularly. By using it as a support during repair work, the car enthusiast receives a serious advantage. Each of the articles has reliable support, tested in practice.
In addition to the repair manual, the owner of a personal car will be able to prevent a lot of breakdowns that occur due to the human factor, thanks to the information located on the site. Users are presented with a lot of useful recommendations for proper operation, which will help significantly extend the life of the unit and avoid many negative consequences.
Online support is an excellent and most convenient way to obtain the necessary information. Another significant plus is that articles are written for people. We understand that the reader will do everything with his own hands, and we try to make it as convenient and efficient as possible. Use the resource at any time of the day and find the answer to any question you may have regarding cars.
↓ Comments ↓
1. General information
1.0 General information 1.1 Safety precautions
2. Diagnosis of faults
2.0 Diagnostics of faults 2.1 diagnostics of faults in the engine and its systems 2.2 Diagnostics of faults in the clutch 2.3 diagnostics of faults in the gearbox 2.4 Diagnostics of faults in the driveline, rear axle, chassis, steering and braking system 2.5 Diagnosis of faults in the body 2.6. Diagnosis of electrical equipment faults
3. Engine
3.0 Engine 3.1 Cylinder head and timing mechanism 3.2 Lubrication system 3.3 Oil change 3.4 Replacing the camshaft drive chain guide 3.5 Replacing the camshaft and valve levers 3.6 Replacing the valve stem seals 3.7 Replacing the intake and exhaust manifold gaskets 3.8 Replacing the cylinder head gasket ov 3.9 Disassembling the head cylinder block, valve grinding
4. Engine power system
4.0 Engine power system 4.1 Replacing the air filter element 4.2 Replacing the fuel pump 4.3 Repairing the fuel pump 4.4 Replacing the fuel tank and its hatch cover
5. Carburetor
5.0 General information about the carburetor 5.1 Cleaning the fuel filter 5.2 Replacing the idle air system solenoid valve 5.3. Adjusting the carburetor 5.4 Replacing the carburetor 5.5. Carburetor repair
6. Engine cooling system
6.0 Engine cooling system 6.1 Replacing the coolant 6.2 Replacing the coolant pump 6.3. Replacing the thermostat 6.4 Replacing the engine radiator
7. Exhaust system
7.0 Exhaust system 7.1 Replacing exhaust system parts
8. Clutch
8.0 Clutch 8.1 Replacing fluid and bleeding the clutch hydraulic drive 8.2 Adjusting the drive 8.3 Replacing the clutch master cylinder 8.4 Repairing the clutch master cylinder 8.5 Replacing the clutch slave cylinder 8.6 Replacing the pressure plate assembly and clutch release bearing
9. Gearbox
9.0 Gearbox 9.1 Checking the level and changing the oil in the gearbox 9.2 Replacing the reverse light switch 9.3 Replacing the secondary shaft cuff 9.4 Replacing the gearbox 9.5 Repairing the gearbox 9.6 Replacing the speedometer drive 9.7 Features of repairing a five-speed gearbox
10. Cardan transmission
10.0 Cardan transmission 10.1. Maintenance 10.2. Replacing the driveshaft
11. Rear axle
11.0 Rear axle 11.1 Checking the serviceability of the rear axle 11.2 Changing the oil 11.3 Replacing the axle shaft and its cuff 11.4 Removing and installing the rear axle 11.5 Replacing the cuff of the drive gear 11.6 Replacing the gearbox 11.7 Repairing the gearbox
12. Front suspension
12.0 Front suspension 12.1. Maintenance 12.2 Replacing the bearings and hub cuff 12.3 Replacing the cushions and stabilizer bar 12.4 Replacing the ball joints 12.5 Replacing the shock absorbers 12.6 Replacing the springs 12.7 Replacing the upper arms and their rubber-metal hinges 12.8 Replacing the rubber-metal joints of the lower arms on a car 12.9 Replacing the lower arms 12.12 . Adjusting wheel alignment angles
13. Rear suspension
13.0 Rear suspension 13.1 Checking technical condition 13.2. Replacement of rear suspension parts
14. Steering
14.0 Steering 14.1 Adding oil 14.2 Checking the condition of the steering 14.3 Adjusting the gear engagement 14.4 Replacing steering rods 14.5 Replacing and repairing the pendulum arm 14.6 Removing and installing the steering wheel 14.7 Removing and installing the steering shaft 14.8 Removing and installing the steering mechanism 14.9 Removing the bipod
15. Brake system
15.0 Brake system 15.1 Checking the condition of the hydraulic drive 15.2 Checking the vacuum brake booster 15.3 Checking the functionality of the pressure regulator 15.4 Replacing brake fluid and bleeding the brake system 15.5 Replacing the brake pads of the front wheels 15.6 Replacing the brake pads of the rear wheels 15.7 Replacing the brake caliper of the front wheel 15.8 Replacing the brake cylinders of the front wheels 15 .9 Repair of front wheel brake cylinders
16. General information
16.0 General information 16.1. Checking electrical circuits 16.2 Fuse blocks 16.3 Replacing fuses 16.4 Replacing the main and additional fuse blocks 16.5. Replacing the relay 16.6 Replacing the ignition switch 16.7 Replacing the contact part of the ignition switch 16.8 Battery 16.9. Generator 16.10. Starter 16.11. Ignition system 16.12. Lighting, light and sound alarms 16.13. Windshield cleaner and washer 16.14. Repair of the electric heater motor 16.15. Control devices
17. Body
17.0 Body 17.1 Replacing the front bumper 17.2 Replacing the radiator grille 17.3 Replacing the hood latch 17.4 Replacing the hood 17.5 Replacing the windshield 17.6 Replacing the interior rear view mirror 17.7 Replacing the sun visor 17.8 Replacing the headliner 17.9 Replacing the ceiling grab handle
18. Heating and ventilation system
18.0 Heating and ventilation system 18.1 Replacing the electric heater fan 18.2 Replacing the heater radiator 18.3 Replacing the radiator casing 18.4 Replacing the heater valve
19. Car body care
19.0 Car body care 19.1 Car washing 19.2 Preservation and protection of paintwork
20. Applications
20.0 Applications 20.1 Tools used in addition to the standard set 20.2 Electrical diagram of VAZ-2106, VAZ-21061, VAZ-21063 cars produced in 1976–1987. 20.4 Tightening torques for threaded connections 20.5 Basic data for adjustments and monitoring 20.6 Characteristics of spark plugs 20.7 Fuel, lubricants and operating fluids used 20.8 Lamps used on the vehicle 20.9 Lip seals (oil seals)
| EXECUTION ORDER |