Tool:
- Jack or ditch lift
- Open-end wrench 19 mm
- Open-end wrench 24 mm
- Straight box spanner 17 mm - 2 pcs.
- Straight box spanner 19 mm - 2 pcs.
- Curved box spanner 24 mm
- Ball joint puller
- Driver for socket attachment
- Torx wrench attachment E12
- Wheel chock (shoe) - 2 pcs.
- Punch
- Large hammer
- Bench vice
- Chisel
Parts and consumables:
- Silent block of the front suspension arm - 4 pcs.
- Soap solution
Notes:
Remove the lever from the car to replace it or replace the silent blocks of the lever. The work to remove the left and right front suspension arms is similar. Carry out the work on an inspection ditch or overpass.
Removing the front suspension arm
1. Disconnect the ball joint from the control arm as described in this article.
2. Unscrew the nut securing the brace to the front suspension arm and remove the washer as described here.
3. Unscrew the nut of the bolt securing the stabilizer bar to the arm and remove the bolt as described in this article.
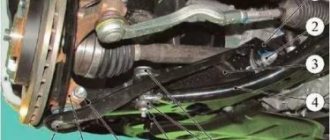
4. Using two 19 mm spanners, unscrew the nut of the bolt securing the lever to the body.
5. Using a soft metal drift, knock out and remove the bolt, then move the lever out of the bracket and remove it.
Replacing the silent block of the front suspension arm
1. Place the lever from the silent block in a vice and, using attachments, press it out of the suspension arm.
2. Before pressing in, moisten the new silent block with soapy water.
3. Knock down the silent block of the extension with a chisel on both sides of the lever.
4. Pre-press new silent blocks in a vice and finally press them by striking a punch with a diameter of 8 mm through three windows in the rubber layer.
5. Install the lever in reverse order. Tighten the threaded connections of rubber-metal hinges after removing the jack or ditch lift.
The article is missing:
- Photos of parts and consumables
- High-quality photos of repairs
You can recognize problems in the front suspension system, and more specifically the silent blocks on the Lada Kalina, by the characteristic sounds it makes while driving. Thus, driving on an uneven road may be accompanied by various cracks, squeaks and other unpleasant noises. This situation not only causes great discomfort, but can also cause a more serious malfunction or cause an accident.
Replacing silent blocks on Kalina
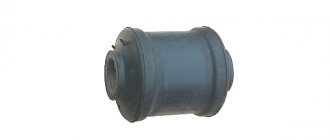
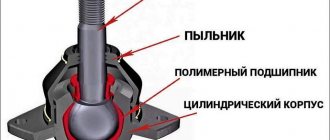
Front suspension silent block close up
The silent blocks on the Lada Kalina car are located exactly the same as in the VAZs of previous years. These elements are located generally on or adjacent to the wishbone . You will have to change them either on the entire element at once, or by selecting the most damaged ones. Of course, if there is damage on one of them, the wishbone with rubber (stock – approx.) stabilizers must be removed and replaced with polyurethane analogues.
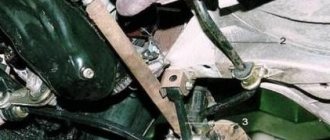
Removing the wishbone
- In order to begin work on replacing old silent blocks with new ones, you need to place the car on a viewing hole, a lift, or jack it up.
- Next, you need to remove the wheel and spray all the connections on the wishbone with WD-40.
- After the lubricant has penetrated into all hard-to-reach places, we begin to unscrew the bolts.
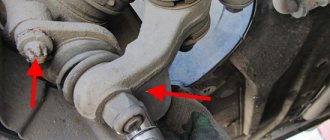
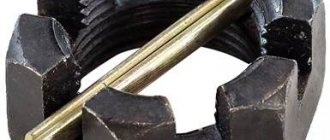
- First of all, we begin to dismantle the ball joint bolt, but before that we remove the cotter pin from the bolt.
- Then we unscrew the bolt securing the longitudinal tension hinge (where the “daisies” are attached - approx.) and remove it from the seat.
A generously lubricated bolt is a guarantee of success.
When dismantling this unit, there should be no problems.
For the best impact on the bolt, you can use a wrench extension.
Rubber-metal longitudinal tension joint
The rubber-metal longitudinal tension joint, or popularly simply “daisy”, is designed to take the brunt of the impact from uneven road surfaces; despite the fact that this element is very important, it is very easy to dismantle.
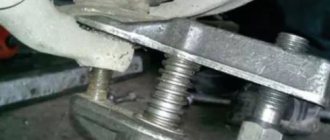
- Having previously clamped the lever in a vice, we knock out the silent blocks one by one using a chisel or a thin flat screwdriver.
Punching out “daisies” is not an easy task.
This is what the old suspension elements look like
To cause the least damage to silent blocks, it is better to place pieces of wood between the vices.
Stabilizer strut and cushion
- The stabilizer bar, or simply “eggs,” and the cushion provide the stabilizer bar with stable operation while driving the car.
- It is very easy to dismantle the “eggs”, just unscrew the mounting bolt from the transverse arm, and simply release the other end from the anti-roll bar by simple rocking.
Sometimes it happens that they just break
After unscrewing the fastening, it is very easy to remove the pillow, but putting on a new one is much more difficult.
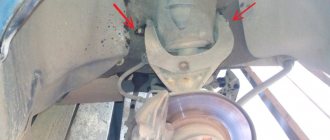
Cross Arm Bracket
- The largest silent block of the lever located at the very base, despite the fact that it has, among others, more impressive dimensions, is not difficult to dismantle.
- The easiest option to remove it is to set it on fire. When the rubber on it burns out, you just have to take it out and clean the seat. (Of course, you can press it out through a vice, but this will take time and may cause some inconvenience).
We install new silent blocks
Now the moment has come when you can install new silent blocks on the Lada Granta, the main thing is to know how to press them in. The landing site will need to be pre-lubricated, you can use graphite lubricant, then the nut is screwed on, the silent blocks of the grant are pressed in, the price for them is not high. In this case, you can do without special devices that allow you to press parts. And you don’t need to remove the lever itself, as some people do.
When you have figured out how to change the silent blocks on the grant, it is worth remembering that after replacing you need to loosen the nut so that you can attach the crab. It must be taken into account that the holes intended for fastening are displaced. So Lada Granta, replacing silent blocks is not complete without a hammer, which is useful for adjusting the holes. It will be necessary to use it on both sides.
After replacing the silent blocks on the grant is completed, you may encounter an amazing effect. Drivers notice that the roughness in steering disappears, the steering wheel becomes more obedient, and the road holds without problems. Therefore, if there is a suspicion that the silent blocks of the front levers of the grant have become unusable, it is better to immediately look for the cause and replace them. As a result, you will receive a machine whose performance will only please you.
Important!
If during the work you find that the bolts and nuts are in poor condition (there are cracks, traces of severe rust, bad threads - approx.), then it is best to replace such elements with new ones, using high-quality steel bolts and nuts with a self-locking element .
Other front suspension elements
The remaining elements of the front suspension, which contain rubber-metal and metal hinges, are replaced immediately as an assembly. These include:
- Spherical bearing.
- Stretch bracket.
- Steering end.
These elements cost about 500 rubles per set, and also do not require specific installation skills.
What to do about the knocking?
If you do not pay attention to the problem and do not change the silent blocks on the grant, the knocking will become increasingly stronger. Therefore, it’s time to drive the car into the pit, remove the engine protection, and look at all the details. You can swing the car from the desired side, whether you hear a knock or not, but it will happen if the silent block on the grant has become completely unusable. If the problem is in the stretcher, then you need to pull it too, the resulting knock will be proof that the cause of the breakdown has been found.
You can replace the silent blocks with grants, the price of which seems reasonable, right in the pit, without the need to remove the levers.
Tools required:
1. 2 keys for 24. 2. Extension tubes. 3. Head 17. 4. Thin screwdriver. 5. Punch, it is better to give preference to the canonical one. 6. A hammer, it will hardly be possible to do without it in work when the silent blocks of the grant need to be replaced.
Causes of knocking in the front suspension
In total, there are four main reasons why noises and squeaks can annoy the Lada Kalina car owner, and three of them can be eliminated independently and everything can be returned to a safe state.
- The first reason why knocking occurs in the suspension is the poor quality of the road surface . A suspension that is in good working order can also produce some extraneous noise. If the noise disappears when you drive onto a good road, then everything is fine with your suspension, you can move on to the point below.
- If knocking and simultaneous vibration occur in the steering wheel, the reason may lie in a faulty steering rack . If you can tighten the steering rack yourself, then it is better to entrust its repair or replacement to professionals.
- The third reason is the front suspension strut spring that has lost its elasticity . Since the spring tone is significantly reduced, the suspension hits directly against the body. How to change the front struts, and along with it the spring, is described in detail in this article.
- And the last reason is cracked silent blocks, which are simply necessary to thoroughly dampen knocks and vibrations that occur while driving. Read below for information on how to properly replace these front suspension elements.
If you are going to drive a car in winter, it would be a good idea to check the condition of the chassis and transmission so that you do not have to do repairs right on the road, in dirty snow slush. Any Granta owner can save both time and money if they check the car themselves. Today we are talking about the chassis and transmission.
LADA > Granta
Rear suspension
Replacing the rear suspension of a Ford Focus 2 with your own hands
Unlike the front, it has undergone virtually no changes. Here, just like on the first Soviet G8s, a semi-independent beam is used. It is attached to the body on hinges (fortunately, there are no “crabs” in the design). A helical spring with constant stiffness is used as an elastic element. To dampen vibrations and prevent swinging, two shock absorbers are used.
- High reliability. The design does not have additional levers, which, in addition, can bend when falling into a large hole.
- Energy intensity. The Lada Granta absorbs all bumps perfectly, especially if oil shock absorbers are installed at the rear.
- Cheap maintenance. Due to its simple design, this pendant can be rebuilt even with your own hands. And the cost of new rubber-metal elements is unlikely to empty the pockets of even the most stingy car owner.
The main difference between the “Grant” suspension is the wheel alignment angles.
Granta 38 4 new size
We make sure there is no play (knock). If there is a knock on the front wheel, ask an assistant to press the brake pedal. If the knocking noise disappears, it means the wheel bearing is faulty, and if the knocking noise remains, then the ball joint is most likely worn out.
The hub bearings of the front and rear wheels are not adjustable and must be replaced if there is play.
To check the serviceability of the ball joint, insert a mounting blade between the suspension arm and the ball joint housing. Be careful not to damage the ball joint boot.
Stabilizer struts for the Lada Granta: selection and replacement - AutoExpert
Tool:
- Straight box spanner 17 mm - 2 pcs.
- Driver for socket attachment
- Extension for the end attachment on the wrench
- 13mm wrench attachment
- Large hammer
- Punch
- Medium flat screwdriver
- Knife
Parts and consumables:
- Aerosol lubricant type WD-40
- Anti-roll bar strut - 2 pcs.
- Stabilizer bar cushion - 2 pcs.
- Metal brush
- Soap solution
Notes:
Remove the stabilizer bar struts and pads if they show significant wear, cracking, tearing or swelling of the rubber. Carry out the work on an inspection ditch or overpass. The operations for removing the right and left stabilizer bar struts are similar.
Removing the anti-roll bar link
1. Using a 17 mm spanner, unscrew the nut securing the stabilizer link to the front suspension arm, holding the bolt with a wrench of the same size.
2. Use a soft metal drift to knock out the bolt.
3. To make it easier to remove the strut from the stabilizer bar, unscrew the two nuts securing the stabilizer pad bracket from the desired side.
4. With the right side of the stabilizer lowered, remove the strut from the stabilizer bar.
Note:
As a rule, on cars with high mileage, worn struts can be easily removed. If the stand cannot be removed immediately, we recommend inserting a thin screwdriver blade between the rod rod and the rubber bushing and pressing out the rubber. After this, a penetrating liquid such as WD-40 should be injected into the resulting gap and, shaking the strut from side to side, remove it from the stabilizer bar.
5. Install the new stand in the reverse order, having first cleaned the end of the bar with a brush and lubricated it with soapy water.
Removing the anti-roll bar cushions
1. To replace the stabilizer bar cushions, unscrew the nuts of the bolts securing the stabilizer bar struts to the arms and remove the bolts (first photo of the article).
2. Using a socket with a 13 mm socket, unscrew the nuts securing the airbag bracket to the body and remove the bracket.
3. Remove the stabilizer link from the rod (see above).
4. Remove the pad from the barbell.
Note:
Typically, worn pads can be easily removed from the bar, but if you have difficulty, cut the pad with a knife and remove it.
5. Install the new cushion in reverse order, lubricating the rod and the hole in the cushion with soapy water.
6. Replace the cushion on the other side of the stabilizer bar in the same way.
Removing the anti-roll bar
1. To remove the anti-roll bar, disconnect the stabilizer links from the front suspension arms and remove the stabilizer bar cushion brackets (see above).
Granta 39 7 new size
The suspension springs must not be damaged. Tearing, cracking and severe deformation of rubber bushings, cushions and compression buffers of shock absorbers are unacceptable.
Liquid leakage from shock absorbers is not allowed. A slight “fogging” of the shock absorber in its upper part, while maintaining the characteristics, is not a malfunction.
If the rubber element of the upper support of the front suspension telescopic strut settles or is destroyed, the support must be replaced.
Shock absorber
Do-it-yourself oil change in Kia Rio 3, oil filter replacement
This element is a damping device. The shock absorber serves to reduce the range of vibrations of the car body. In other words, the element prevents spontaneous rocking. The work of the shock absorber is based on hydraulic resistance. Inside it there is a liquid of a certain viscosity. It moves through a special valve. Thus, the device absorbs sharp impacts while preserving vulnerable suspension parts. Therefore, the shock absorber is one of the most important components in the chassis. On our roads, this element lasts about 60-80 thousand kilometers. But this period may be shorter, even with careful driving. It is enough just to damage the protective boot, and all the dirt will accumulate in the rod seal.
Also note that the damping element changes in pairs. That is, in the event of a breakdown of the rear left shock absorber, the rear right shock absorber also changes. As for the front struts, they are more durable. Often they are replaced already assembled with a spring, since they fail no earlier than after 150-200 thousand kilometers.