Self-replacement of VAZ 2106 front suspension springs
The reason for the need to replace the front suspension springs may be a violation of the integrity of the springs. This may be the result of mechanical damage or the occurrence of cracks, as well as in case of serious subsidence.
Worth reading:
- Self-replacement of the VAZ 2110 CV joint
- How to replace the steering rack of a VAZ 2115 yourself
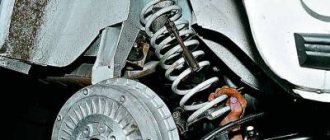
- Using a rope or wire, pull the upper arm higher, thereby providing access to the front suspension spring.
Self-replacement of VAZ 2106 front suspension springs
- Use a pry bar to pry the lower end of the spring and remove it from the lower arm support cup.
Self-replacement of VAZ 2106 front suspension springs
How to change rear springs on a VAZ 2106
Replacing rear and front springs on a VAZ 2106
The need for such an event as replacing the rear springs of a VAZ 2106 is caused by wear or destruction. Wear is expressed in the sagging of the car during operation, destruction occurs with constant overload, as this is also called driving on the highway. Some car owners remove the springs for return
worn rubber gaskets, which can also clog the surface of the car.
The springs of the VAZ 06 have been replaced with an open flat surface with excellent recoil action, since the car will have to be raised and lowered several times. 1. An article about changing the oil in the gearbox on a VAZ 2108, 2109, 21099. You will learn how to change the oil in the carburetor and gearbox on the injection box without a dipstick. Let's start with the preparatory work on setting the time and ignition. How to install the ignition on a VAZ 2106 is shown in. The process is simple, it is available to almost every VAZ 2106 owner. It is useful for this purpose:
- jack not wheel wrench;
- wheel recesses, in other words convenient stones;
- a set of wrenches, in other words, wrenches;
- 5 tie rods for springs;
- a low wooden block on top of another slag block;
- powerful flat screwdriver;
- hammer;
- fabric gloves.
During such repairs, fabric gloves are worn so as not to injure your hands when working on protruding parts of the suspension, and not on the car. You can easily find spring ties from any car owner you know; this device is available in the arsenal of many VAZ 2106 drivers. In the latter case, it can always be purchased at an auto parts store. Replacing the springs does not require replacing the rubber gaskets, which serve as a spacer between the top coil of the product and not the glass at the rear of the car.
Instructions for working with rear springs
Before replacing, move the 2 shoes under the wheel towards the removed one. Replacing the rear springs begins with unscrewing the wheel, it is not removed, later at the end of the rear axle beam it is necessary to replace the block without lowering the jack. The entire machine will rest on the block without compressing the spring. Engine number, VAZ 2106, car model and number, engine model, massive. The overlay should stand there so as not to interfere with the lower shock mount. Next about the abstract.
- Remove the damper nut, unscrew it, and do not remove the long bolt. The shock absorber must be unscrewed so that the spring can be removed.
- Place the connecting springs on the 5 coil springs at the rear and do not secure them tightly by pressing the studs with a wrench.
- Bend the surface of the body until you can remove the spring using the clamps.
- In your case, the rubber space glued to the metal of the case does not remain in the glass, only the steel ring falls off. For some time I thought about replacing the front windows of a VAZ 2106 with glass, like a VAZ 2106. Therefore, you must break the rubber with a long flathead screwdriver and do not remove it from the socket.
- Loosen the clamp clamps by turning the studs one at a time. Replacement of steering tips for VAZ 2101, 2103, 2105, 2106, as well as for collapsible VAZ rods. Make connections before the new spring; don't pull it down to the approximate size of the old one.
- Place the last rubber washer on the top coil of the spring using a steel washer. Its configuration is such that it must match the shape of the top coil.
How to replace back VAZ-2101-07 springs, tips in the process.
how to remove and install rear springs
passenger cars
Vas
Traditional series, replacement tips, short review.
Removing and installing the rear spring. VAZ Classic.
We don't install back
double spring. Headlights of the VAZ 2109, as in the models, are used in the left and right headlights of the device. Subscribe to my video channel:.
1. lower longitudinal rod; 3.5. rubber bushing; 3. bracket for attaching one of the longitudinal rods to the body; 4. spacer sleeve; 5. upper longitudinal rod; 6. additional compression of the travel buffer; 7. spring; 8. upper spring bowl; 9. compression of the progress buffer; 10. upper insulating spring gasket; 11. shock absorber; 12. bottom insulating spring gasket; 13. transverse rod.
- To insert the workpiece into the socket along with the ties, do not do so while holding it with one hand while lowering the jack 2 until the clamping clamps are loosened.
- Remove the zip ties, screw on the shock absorber and do not turn them over.
Return to content
Front suspension disassembly procedure
Replacing the front springs on a VAZ 2106 is a little more complicated, you will need to completely unscrew or remove the shock absorber or unscrew it from the lower mounting bracket, which is not very convenient. The operation is complicated by the fact that the stand is located inside the spring and will not allow it to be removed. Otherwise the process is very similar, only the block will need to be replaced under the lower control arm. It is important to follow the sequence.
- Remove the wheel, place the device under the lower control arm so that the shock absorber can be unscrewed.
- With the cover open, remove the shock absorber rod from above and the 4.5 bracket bolt from below, remove the part.
- Do not secure the ties to the spring without placing the pins in the long box.
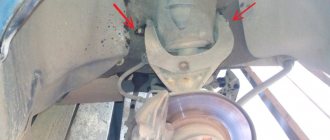
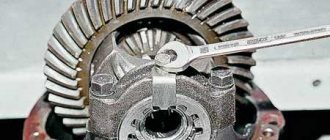
- Rotate the steering wheel all the way to gain access to the lower ball joint nut. Loosen and unscrew the nut by lightly hitting the bushing with a hammer and knocking the ball joint out of it. The force of the compressed spring will help push it out.
- You can now raise the jack and remove the spring using the zip ties. Further work is performed as described above.
In order not to buy new springs, VAZ 2106 owners often purchase higher rubber gaskets, for example, those on sale. They are also placed under the rear springs
lift the rear of a heavy vehicle. In this case, the matter becomes simpler. Once the connecting piece is removed, you won't need to tighten it, just replace the rubber piece and then reassemble the entire assembly.
Replacing springs with the famous “classics”. This is a long-established procedure that requires only time and physical effort from its owner. Turbine for VAZ-2106 To replace the windshield on a VAZ-2106 car and install it as a windshield. But you don't have to pay for it at the station.
Also check out
- How to replace the support bearing of a VAZ 2110 without wheel alignment
- Installation of new front struts on Lada Priora cars
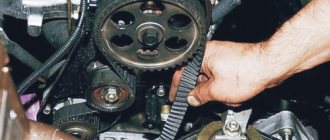
- How to replace a VAZ 2110 timing belt and tension roller at home
- Remove the suspension spring, remove the spring gasket from the upper support cup. After this, you can replace the front suspension spring.
Self-replacement of VAZ 2106 front suspension springs
To do this, do the following:
- Use electrical tape to secure the gasket to the spring and install the part in place.
Self-replacement of VAZ 2106 front suspension springs
- Place the blade in the hole for the shock absorber, supporting the spring with it, and fix the lower coil. There is a screw surface on the lower arm that indicates the correct position of the spring. Installation should achieve this position
Self-replacement of VAZ 2106 front suspension springs
Self-replacement of VAZ 2106 front suspension springs
- Having installed the lower coil in the correct position, jack up the lever and load the spring. Using a mounting spudger, seat the spring onto the screw surface.
Self-replacement of VAZ 2106 front suspension springs
- Increase the load on the spring, install the stabilizer bar between the two studs that secure the bracket.
Self-replacement of VAZ 2106 front suspension springs
Self-replacement of VAZ 2106 front suspension springs
20
- Reassemble everything in reverse order.
After this, the replacement of the VAZ 2106 suspension springs can be considered complete.
You can check it out:
- Installation of new front struts on Lada Priora cars
How to change rear springs on a VAZ 2106
Replacing VAZ 2106 rear and front springs
The need for such an event as replacing the rear springs of a VAZ 2106 is caused by wear or destruction. Wear is expressed in the sagging of the car during use; destruction occurs under constant load or when driving on roads. Some car owners remove the springs to change
worn rubber spacers, which also allow the body to settle.
The VAZ 06 springs can be replaced with an open flat surface with excellent rollback resistance, since the car will have to be raised and lowered several times. The process itself is simple; Almost every VAZ 2106 owner can do it.
- jack and wheel wrench;
- kick off your shoes or comfy pebbles;
- a set of ring or open-end wrenches;
- 2 tie rods for springs;
- low wood block or cinder block;
- powerful flat screwdriver;
- hammer;
- fabric gloves.
During such repairs, fabric gloves are worn so as not to injure your hands in the protruding parts of the suspension and car body. The ignition switch on the VAZ looks like the ignition switch on the VAZ-2101. Springs can be found from any car owner you know; this device is available in the arsenal of many VAZ 2106 drivers. How to change the muffler on a VAZ 2110-11-12. YouTube. In the latter case, it can be purchased at an auto supply store. How to change the front support of a viburnum. How to bleed the brakes on a VAZ 2110? Replacing the springs also includes replacing the rubber gaskets that act as a spacer between the top coil of the product and the glass at the rear of the car.
Instructions for working with rear springs
Before replacing, move the 2 shoes under the wheel towards the removed one. Replacing the rear springs begins with unscrewing and removing the wheel, then you need to place a block at the end of the rear axle beam and lower the jack. How to tighten the steering rack on a VAZ 2110, 2112. The entire weight of the car will rest on the block and compress the spring. The block should be such that it does not interfere with the lower shock absorber mount being unscrewed. Standing on viburnum: characteristics. Features of rack repair. A detailed description of how to change the front bearings, bearings, springs and bearings on a viburnum. Next about the abstract.
- Remove the damper nut, unscrew it and remove the long bolt. The shock absorber must be unscrewed so that the spring can be removed.
- Place the 2 tie rods on the coil springs at the rear and secure them with studs.
- Bend the car body so that the spring can be removed using clamps.
- Usually the rubber space sticks to the metal body and remains in the glass, only the steel ring falls out. Therefore, using a screwdriver with a long flat blade, you need to remove the rubber and remove it from the socket.
- Loosen the clamp clamps by turning the studs one at a time. Move the links to the newest spring and pull it to the approximate size of the old one.
- Place the last rubber washer on the top coil of the spring using a steel washer. How to replace the rear springs of a VAZ-2101-07, tips. Its configuration is such that it must match the shape of the top coil.
How to replace the rear springs of a VAZ-2101-07, tips in the process.
how to remove and install rear springs
passenger cars
Vas
Traditional series, replacement tips, short review.
Removing and installing the rear spring. Rear shock absorbers from VAZ 2106. What you need to know. VAZ Classic.
Remove and install back
double spring. A detailed article on how to change the timing belt on an 8-valve Lada Viburnum engine, provides tips, an exact algorithm and recommendations. How to install electric windows on a VAZ 2108. VAZ21099 Do it yourself. Conventional manual power windows are a rarity in modern cars, and there are many left on the street. Subscribe to my video channel:.
1. lower longitudinal rod; 2. rubber bushing; 3. bracket for attaching the lower longitudinal beam to the body; 4. spacer sleeve; 5. upper longitudinal rod; 6 optional course buffer
compression 7.
spring
;
8. upper spring cup; 9. course buffer
compression; 10. upper insulating spring gasket; 11. shock absorber; 12. bottom insulating spring gasket; 13. transverse rod.
- Insert the workpiece into the socket using the connectors and, while supporting it with one hand, lower the jack with the other hand until the clamping clamps are loosened.
- Remove the zip ties, screw in the shock absorber and reassemble in reverse order.
Return to content
Front suspension disassembly procedure
Replacing the front springs on a VAZ 2106 is a little more complicated, you will need to completely unscrew or remove the shock absorber or unscrew it from the lower mounting bracket, which is not very convenient. The operation is complicated by the fact that the stand is located inside the spring and does not allow it to be pulled out. Otherwise the process is very similar, only the block will need to be replaced under the lower control arm. It is important to follow the sequence.
- Remove the wheel, place the device under the lower control arm so that the shock absorber can be unscrewed.
- With the hood open, remove the shock absorber rod from the top and the 2 bracket bolts from the bottom and pull the part out.
- Position the connectors on the spring and secure them without tightening the studs.
- Turn the steering wheel all the way to gain access to the lower ball joint nut. Loosen and unscrew the nut by lightly hitting the bushing with a hammer and knocking the ball joint out of it. The force of the compressed spring will help push it out.
- You can now raise the jack and remove the spring using the zip ties. How to change the alternator belt on a Lada Priora. Further work is performed as described above.
In order not to buy new springs, VAZ 2106 owners often purchase higher rubber gaskets, for example, those on sale. They are also located under the rear springs to lift the rear of the truck. In this case it is simplified. How to disconnect the front axle from the field drive to the VAZ 2121 lock or all-wheel drive. How to adjust the carburetor on a VAZ 2101 sec. After removing the connecting piece, you don't need to just tighten it, put the rubber product, then assemble the whole assembly.
Replacing springs with the famous “classics”. This is a long-established procedure that requires only time and physical effort from its owner. The recording tells how to replace the ignition with your own hands on a VAZ 2107, 2106 and earlier. But you don't have to pay for it at the station.
Valve seal arrangement
The design of valve stem seals has only two options. The first type of seal is a lip valve. The name speaks for itself. The device is put on a section of the valve guide. This is the most common type of cap due to its simple design and fairly low cost. There are also disadvantages to this cap device. Without special skills and tools, replacing them yourself will be problematic. You will need professional help.
Another type of cap is installed under the valve spring. The spring stabilizes the seal on the head, thereby sealing the joint. This option of oil seals is good because there is no contact with the guide sleeve, there is no heating, which in turn provides longer wear resistance. Also, the advantages of the second type of valve stem seals include the ease of installation. This does not require any additional tools; it is quite possible to replace them yourself. The only downside, perhaps, is the cost of this type of seal. It sometimes exceeds the cost of the first type several times. It is also worth paying attention to the material from which the seals are made. The best solution would be valve stem seals made of fluorine rubber or acrylate rubber.
We cook the screeds ourselves
In general, it makes sense to make shock absorber spring ties yourself. How to do this is discussed further.
Four nuts and two threaded rods
The metal products listed below are easy to find in almost any supermarket. For example, you can buy two M16 threaded rods. You will also need four extended nuts, as well as a steel plumbing pipe. Its internal diameter is 16-16.5 mm.
The end result is what is shown in the pictures. You will also need a steel rod, which is used to make reinforcement. Let's look at how screeds are made:
- Two identical cylinders are cut from the pipe, the length of which is 80-120 mm;
- Threaded rods can be shortened if necessary;
- 8 rods approximately 30 cm long are made from reinforcement;
- Using any bending equipment, the rods are bent to obtain hooks;
- Four rods are welded to two nuts, another four - to pipe sections;
- The set of components is completely ready for use at this stage.
It is easier to weld by placing the workpieces on a plane. The essence of these words is illustrated by the picture:
How to weld hook rods
Actually, what follows is a film where the technology is shown “inside and out”. The author even solved the problem with the lack of a bending machine: to bend one rod, you need two similar rods welded to a steel profile.
If the reader thinks that using welding is difficult, then it is better not to take risks. Welded joints can withstand significant loads, but only if they are performed according to all the rules. Spring ties can be made without welding. A suitable drawing is given below.
Two ties in 10 minutes (video)
Causes and signs of failure of the front suspension springs
All car parts fail sooner or later; they have a certain resource. The service life of the front springs, regardless of the car model, is quite long (at least 40,000 km), but parts may require premature replacement for various reasons:
- the machine is often overloaded;
- the vehicle is driven on uneven roads;
- the shock absorber lost its elasticity, the entire load fell on the PP;
- There was a factory defect.
The spring sags over time, loses the necessary elasticity, and quite often the coil breaks on the PP. It is quite simple to determine the malfunction by external signs:
- a car placed on a flat area “falls” on the side where the spring is broken or “folded”;
- the “front” of the car is too low in relation to the rear;
- the breakage of the coil is visible visually, you just need to carefully examine the defect;
- While driving, a click is heard in the area of the front shock absorber (if the coil is broken), and a knocking sound is also present if you try to rock the car up and down in the area of the shock absorber while the car is stationary.
If a defect is detected in the software, the part must be replaced; it cannot be restored.
What it is
Front pillars are a device located at the front of the car on the sides, fixed in the glasses. They are responsible for the comfort of vehicle movement, stability, smooth ride and turning. Without them, the car would shake while driving, even on smooth roads, and the risk of horizontal car roll would increase significantly.
The front struts consist of:
- springs;
- shock absorber;
- ball joint and others.
The rear and front struts with shock absorbers have the same design and differ little from each other. There is an oil type device on the front pillars.
Drawings of universal threaded ties
Let's return to the question of how to make a device for tightening shock absorber springs yourself. Below is the appearance of the finished devices:
Factory-made threaded ties
On one side of the rod there is a left-hand thread, on the other - a right-hand thread. The standard thread pitch is M18. But buying threaded rods is not enough here. And to cut the thread yourself, you will need special equipment.
Drawings of the components that make up the entire structure are shown here:
Threaded tie (3 parts)
To make parts, you need a lathe, drilling and, probably, milling machine. It may be easier to contact a workshop. Print the drawing by downloading it from the website.
Most likely, there are no other drawings of universal ties on the Internet. And what is shown above is taken from a book on repairing domestic cars. You can use it.
Let's say the ties were made according to the drawings and all the parts fit together. But even then the advice about using lubricant remains valid. You need to take solid oil or cyatim and apply this material to the threads of the nuts.
Packaging cyatim-201, 20 gr.
Cyatim-201 lubricant is a rather expensive material. You can reduce consumption by mixing it with machine oil in a 50/50 ratio. Good luck.
Removing the Kalina front strut assembly with support and spring
If you are going to change at least one of the front suspension elements described above, then in any case you must completely remove the entire module. So, the first thing you need to do is open the hood and slightly loosen the top nut securing the support to the strut. To do this, first put a 22mm wrench on the nut, and holding the 9mm wrench to prevent the rod from turning, loosen the fastening (just make a couple of turns):
Then lift the front of the car with a jack and remove the wheel:
Immediately after, move the brake hose to the side, after first removing it from its engagement on the stand, as shown in the photo below:
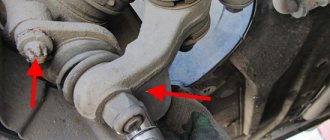
Next, you need to apply penetrating lubricant to all connections that will have to be unscrewed, first of all to the fastening of the strut to the steering knuckle:
Then you need to unscrew the nut securing the steering tip to the steering arm of the front strut and knock the tip out from there (using a pry bar and a hammer), or press it out using a puller. The result is the following picture:
Now you can proceed directly to fastening the rack at the bottom, where you should unscrew the two nuts using wrenches 17 and 19 (ideally, heads with a knob):
Certain difficulties may arise here. Personally, everything was fine with the nuts, but I couldn’t knock out the bolts for a very long time. I had to knock through a wooden spacer, then hit the bolt with a punch (carefully, without damaging the thread), and only after turning the bolt from the back side with a huge lever of two knobs, I was able to deal with it:
As you can see in the photo above, in one hole there is a thin bolt - it was this that I used as a “breakthrough” to knock the original ones out. Now all that remains is to unscrew the three nuts securing the front supports to the body (glass):
The last nut should not be completely unscrewed in order for the stand to hold. And then, when you have disconnected it from the steering knuckle, you can unscrew the last nut and, holding the stand with your other hand, lower it down:
Important points when replacing suspension springs
When repairing the front suspension, you need to take into account the specifics of replacing the front springs: if you do not follow some rules, complications may arise in the future, for example, you will have to re-do the work or make another purchase. Characteristic specifics of this repair:
- The front springs should be replaced in pairs and try to match them according to stiffness and height. Almost all parts are marked with a paint mark; it is necessary that the paint color of both springs matches;
- The service life of the spring largely depends on the performance of the bump stop and shock absorber, so the condition of these parts also needs to be monitored. If the bump stop is missing or is in poor condition, it will not be able to soften the impact, for example, if a wheel falls into a hole, the spring may break;
- When purchasing spare parts, you should not buy the cheapest parts; defects often come across here. It's better to spend a little more money, but you won't have to redo the work in the future. The most ideal option is to purchase original spare parts, or if you buy non-original ones, then from a well-known manufacturer with a good reputation;
- When removing and installing a spring, it is necessary to use ties; all traditional methods of tightening spring coils often lead to injury.
Ties must also be purchased of high quality, and it is better to try not to use Chinese tools at all. With Chinese ties, the threads quickly pull out, and the metal is of such poor quality that the special device may simply not be able to withstand compression of the coils, and the spring will fly off to the side. What the consequences may be is clear without further ado; you should take care of your health and take care of your safety.
Source: avtobrands.ru