Having appeared on the domestic market about 3 years ago, the Lada Largus model immediately began to attract increased interest from practical owners. For this car, the manufacturer has provided two options for equipping it with power units: 1.6-liter with eight and 16 valves.
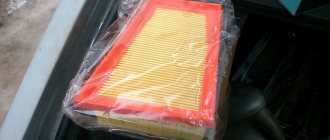
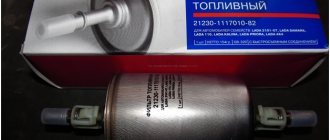
The air path filter supplied from the factory has its own code - “8200431051”. In some versions of Lada Largus, the standard equipment includes an element from Renault, which has a different code - “8201153808”.
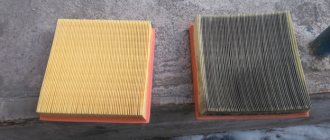
Replacing the air filter in the air supply circuit is not particularly difficult, so the vast majority of owners easily cope with this task. Before purchasing a new filter, it is recommended to first remove the old component and measure its geometric parameters.
General aspects: when to change
The instructions that come with the Lada Largus suggest the need to replace the filter every 20 thousand km of mileage. Here we recommend making an adjustment for this scheduled maintenance period and reducing the indicated period. This need is caused by the peculiarities of operating a car in an environment of increased pollution and gas pollution, which is important for modern megacities and dusty unpaved “destinations”.
Do-it-yourself Renault Duster headlight adjustment video
If you neglect to replace this important component, the consequences for the engine can be very sad. The engine will begin to experience air starvation, which will negatively affect not only fuel consumption, but will also cause increased oil consumption. And this already “smacks” of a quick overhaul of the unit, because the components of the piston group will not keep you waiting long. A practical difference between modern elements is the ability to clean them by washing. Thus, the service life of these components is approximately twice as long compared to traditional filters.
Replacement period and technology
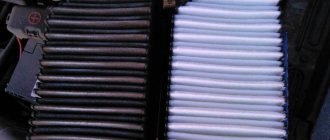
The operating instructions for the Lada Largus car recommend replacing the air cleaning element every 15,000 km. However, this indicator can be adapted to suit you. The period of use may vary depending on the operating conditions of the vehicle. Frequent trips along dusty country roads significantly shorten the life of the cleaning element. As contamination increases, the throughput of the material decreases, which directly affects engine power. A visual inspection of the inside of the air barrier to determine the degree of contamination will help determine whether maintenance work is required. If the air duct filter mesh for the Lada Largus is being changed, experienced drivers recommend replacing some other related components in conjunction with this kind of work.
Theoretically, the sequence of work in any car is the same: open the air barrier housing, take out the used consumable, install a new one and return everything to its place. In practice, the technical work for Lada Largus 8 valves and 16 valves is slightly different. But the answer to the question of how to change the filter on Largus is simple.
In the 8-valve version, replacement is carried out in the classic way:
- find the required compartment;
- unscrew the bolts;
- remove the used element and install a new one;
- We return everything to its place by tightening the bolts.
Replacing the air filter Lada Largus 16 valves is carried out in almost the same way, but there are some nuances:
- we find a compartment that is hidden behind the engine;
- remove the resonator pipe and remove the protection;
- remove and change the filter element;
- After completing the work, return all the elements to their place and tighten the lid.
Having appeared on the domestic market about 3 years ago, the Lada Largus model immediately began to attract increased interest from practical owners. For this car, the manufacturer has provided two options for equipping it with power units: 1.6-liter with eight and 16 valves.
The air path filter supplied from the factory has its own code - “8200431051”. In some versions of Lada Largus, the standard equipment includes an element from Renault, which has a different code - “8201153808”.
Replacing the air filter in the air supply circuit is not particularly difficult, so the vast majority of owners easily cope with this task. Before purchasing a new filter, it is recommended to first remove the old component and measure its geometric parameters.
The need to replace the air filter on Largus
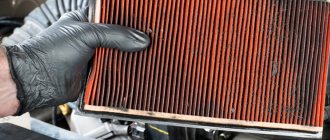
It has long been undeniable that the air filter in the air duct plays a significant role, because along with its fuel “colleague” it ensures the purity of the mixture sent to the combustion chambers. The power characteristics of the LADA Largus engine directly depend on this factor. Operating a car involves no alternative and gradual clogging of the component we are considering. You should not wait until the filtering function completely stops, because the operation of the motor will be impossible, and the harm to it cannot be overestimated. A Lada Largus with a dirty air filter will be prone to increased fuel consumption and an unjustified reduction in power. The manufacturer deliberately placed the air filter in the most convenient location. So that the owner is not lazy to look into it and assess the degree of clogging. If the fact of contamination is obvious, then resort to replacement as soon as possible. This work will be feasible even for an owner who has just embarked on the path of a car enthusiast.
How to replace the cabin filter: instructions
First you need to determine where this element is located in the cabin. On the dashboard you need to identify the back side - that’s where the filter is installed. Replacing it is not at all difficult, but it will take a lot of time. Some drivers can’t even cope, give up and turn to professionals.
It is necessary to prepare a new filter element, unpack it, inspect it, understand its design, especially if you are doing this for the first time. You must have a knife on hand. Stationery will do. Then proceed like this:
- Place the machine on a level surface so that there are no distortions. Provide clear access to the passenger door from the front.
- Sometimes Lada owners dismantle the seat to make it easier to approach the desired area. But it will be easier to push it all the way back. The seat in this position will no longer hurt. But if you still have doubts, then unscrew the mounting bolts (there are 4 of them), remove the seat and take it out of the cabin.
- In the center of the dashboard (on its back side) there is a rectangular plastic housing. An insert is soldered into the end area. It looks like a lid. It is necessary to carefully cut the hole, focusing on the outer contour of the insert. The hole should be rectangular.
- Insert the filter into the resulting niche. That's it, now mount the seat back and enjoy the fresh air in the cabin.
These instructions are suitable for the first installation of the cleaning system. If your Lada Largus already has a filter that needs to be replaced, you must first carefully remove it from its niche. It can no longer be used, so throw away the dirty element without regret.
What to do on 16-valve units?
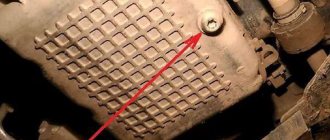
- We find the place of “dislocation” of the element. It is located in the central part of the compartment directly behind the engine.
- Here you will have to unscrew a couple of bolts holding the filter box.
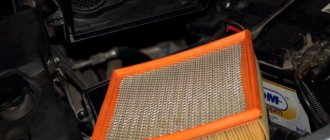
- By loosening the air duct clamps and removing the protection, the halves of the filter box are opened.
- For convenience, the element body should be moved to the side.
- We remove the exhausted component outside.
- We install the new component in its original place.
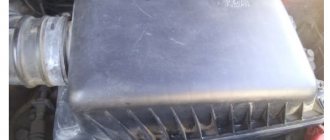
- Now the body must be returned to its “legal” position.
- Don't forget to install the previously removed plastic protection.
- Tighten the body bolts.
- We clamp the clamps of the air line and, having checked the tightness of the unit, start the engine and enjoy its “free breathing”.
The air filter replacement is complete.
Accessibility for everyone
If we compare replacing the cabin filter with air conditioning with other repair operations, then the fact is immediately obvious that this work will not require the owner to have certain skills or spend time. Moreover, now you know where it is located, as well as how to change it correctly. To perform the procedure, you will need a minimum of skills and knowledge in the field of the features of the car interior ventilation system.
Here, accuracy comes to the fore, since removing the non-removable plug will require special care. If an unfortunate mistake occurs at this stage, the consequences can only get worse. This circumstance makes some owners inclined to seek help from the service, which is quite justified, because the correct installation of the filter directly affects the correct operation of the entire ventilation and heating system of the interior space of the Lada Largus model.
24 February 2015LadaOnline 56 483
On the Lada Largus, a cabin filter is not installed by the manufacturer, so after the first trip dust appears in the car's interior. The filter element can be installed during a scheduled technical inspection, but if desired, you can do it yourself. Let's take a closer look at how to install a cabin filter on a Lada Largus.
You will need: a new Lada Largus air filter (catalog number: 7701059997, approximate price 350 rubles), a sharp knife or metal file.
Procedure:
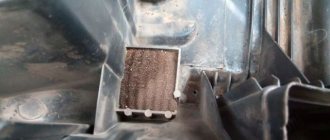
Move the front passenger seat as far back as possible. Then bend down to gain access to the air filter plug, which is located near the front passenger's left foot (see photo).
It is necessary to cut out the plug using a sharp utility knife or a metal file. After the piece of plastic is cut out, you should clean the edges of the cuts and turn on the stove fan at maximum speed so that all the chips fly out of the opening for the filter.
The Lada Largus cabin filter is assembled, which means that along with the filter there is also a new plug. The cabin filter is larger than the hole made, so when installing it, the filter element must be compressed. First insert the upper part of the filter, and then snap the lower part into place. The whole process will not take more than 30-40 minutes of video, and the moment of removing and installing the air filter can be seen in the video:
On Lada Largus, the air filter should be replaced depending on operating conditions, every 10,000 km, or every 5-7.5 thousand runs under more severe conditions. Let us remind you that on the website you can find other instructions for repairing Lada Largus.
Keywords: Lada Largus filters | air ducts Lada Largus | air conditioner Lada Largus | stove Lada Largus19
Found an error? Select it and press Ctrl+Enter..
Other FILTRON selections for this brand
| Automobile | Selection |
| Selection of FILTRON filters for LADA (BA3) 110 (VAZ-2110)(1.3 Wankel) | View selection |
| Selection of FILTRON filters for LADA (BA3) 110 (VAZ-2110)(1.5) | View selection |
| Selection of FILTRON filters for LADA (BA3) 110 (VAZ-2110)(1.5i) | View selection |
| Selection of FILTRON filters for LADA (BA3) 110 (VAZ-2110)(1.5i 16V) | View selection |
| Selection of FILTRON filters for LADA (BA3) 110 (VAZ-2110)(1.6) | View selection |
| Selection of FILTRON filters for LADA (BA3) 110 (VAZ-2110)(1.6) | View selection |
| Selection of FILTRON filters for LADA (BA3) 110 (VAZ-2110)(2.0i 16V) | View selection |
| Selection of FILTRON filters for LADA (BA3) 111 (VAZ-2111)(1.5i) | View selection |
| Selection of FILTRON filters for LADA (BA3) 111 (VAZ-2111)(1.5i) | View selection |
| Selection of FILTRON filters for LADA (BA3) 111 (VAZ-2111)(1.5i) | View selection |
Auto Light Control (Installing an automatic light switching system) – Mitsubishi Autoelectrics
Details Published 22.11.2012 17:17 Victor Martynov
ASX retrofit material used with permission from VS.
If your car was equipped from the factory with a simple headlight switch, then you are missing out on the convenience of using the Auto Light Control system.
This system improves comfort while driving by automatically switching the low beam on and off depending on the level of outside light (for example, in tunnels, in rainy weather and snowfall, at night).
In this case, the side and low beams, as well as the license plate lights, will automatically turn on.
Agree - you will be able to see better, and your car will be better distinguishable if your car's lighting turns on automatically depending on the lighting conditions.
By equipping your car with the Auto Light Control system, you will receive all of the above benefits of this system.
This can be implemented, and it’s not difficult at all, because Electronic car control units provide control of the Auto Light Control system and you only need to install the necessary spare parts, as well as activate this functionality in the car’s ETACS.
You need to purchase the following parts:
| |
| Light and solar activity sensor (8651A096) | |
| Light and solar activity sensor (7825A019) |
The light sensor can be in two versions: 8651A096 - only with a light sensor and 7825A019 - with a light sensor and a photo sensor for climate control. If you plan to equip your car with a climate control system, then you need to purchase a light and solar activity sensor with catalog number 7825A019.
In addition to these two parts, you will also need to make wiring and as a spare part. The part is not supplied separately. For manufacturing, you will need to find a plug to connect to the light sensor socket. It looks like this:
The exact same plug is found on every ASX and is intended to connect the 4WD switch. On vehicles with non-all-wheel drive, this plug is attached to the back of the plug in place of this switch.
- There is another option - to use a computer connector.
To connect the light sensor to the ETACS unit, you will need three missing contacts in the connector. These contacts, which are so necessary for us, can be safely taken from the connector, which is located behind the standard radio and is not connected to anything; it is intended for connecting the standard MMSS. On ASX it is C-101, on Outlander XL it is C-21.
When all the necessary parts have been assembled and the wire has been manufactured, you can begin installation. First of all, we remove the radio and dashboard.
Then, putting your hand under in the direction of the red arrow in the photo, in the direction of the sensor plug, we squeeze it to the top from the inside.
Now let's move on to wiring. We insert a plug into the hole for the sensor to connect it.
Then we connect the missing contacts in the connector of the ETACS unit: ASX-C411, Lancer X and Outlander XL-C301. They must be connected to pins 3, 18 and 20.
| ETACS Lancer X, Outlander XL | ETACS ASX |
| Lancer X, Outlander XL | ASX |
Installing contacts on connector C-411 on an ASX car does not present any difficulties due to its convenient location. But it’s quite difficult to do on Lancer X and Outlander XL. It is located on top of the ETAX, which is already difficult to reach, and the suitable wires with a connector are wrapped in adhesive foam, which is very difficult to tear off.
The easiest process, taking less than 5 minutes, is to replace the steering column light switch with a similar one, but with an AUTO function.
We connect the light sensor to the plug and insert the sensor into its place.
- Before assembling the interior, we secure the wiring under the panel so that it does not rub against anything and does not become the source of a new “cricket”.
- After this we collect everything that we took apart.
- The next step is to make the following changes to the Variant Coding of the ETACS ECU.
How to connect this sensor 8651A096. Behind the dash there is a plug with two contacts, and three come out of the sensor itself. Should I pull it directly into etax, then what are the hole numbers? P.S. I want auto light.
Yes, taped with electrical tape behind the radio next to its connectors. Not in Arabic!
“To connect the light sensor to the ETACS unit, you will need three missing contacts in the connector. These contacts, which are so necessary for us, can be safely taken from the connector, which is located behind the standard radio and is not connected to anything; it is intended for connecting the standard MMSS. On ASX it’s C-101, on Outlander XL it’s C-21.”
Is there this connector with free contacts on Lancer X?
Articles
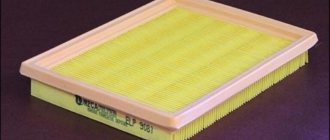
The air filter for Lada Largus with a 16-valve engine was previously designated as follows: 7701045724. Then a “new” article number appeared - 8200431051.
ICE filter element K4M
Both article numbers, old and new, refer to one part (pictured). It also has analogue substitutes.
All items listed above are taken from the Renault catalog.
Selection of analogues
- AGRALE NA-2642
- BORG & BECK BFA2020
- FILTRON AP185/1
- NISSAN 1654600QAU
- CHRYSLER 4408341
- COMLINE EAF107
- AC PC2124E (KIT 2 pcs.)
- ASHUKI 0396-1501
- COOPERSFIAAM PA7523
- IFA 7475
- FI.BA FA-4750
- BLUE PRINT ADZ92217
- FINWHALE AF798
- HENGST E461L01
- MANN C 1858/2 or C 1858/1
- MEAT & DORIA 16187
- VALEO 585026
- IVECO J1321044
- UNICO AE 1778/2
- VAUXHALL 44 08 341
- HOFFER 16187
- IRISBUS J FA-130
- JP 1218608809 or 1218608800
- PROFIT 1512-0206
- KAWASAKI AR 475 PM-S
- OPEN PARTS EAF3076.10
- KNECHT/MAHLE LX 773
- GENERAL MOTORS 93161448 or 91159955
- SAKURA A-25440
- MAGNETI MARELLI 150010220500 or 152071760828 or 154098335590
- OPEL 91159955 or 4408341
- PATRON PF1116
- MECAFILTER 120 or ELP3779
- WILMINK 16187
- SOFIMA S 5740 A
- LYNXauto LA-1402
- VAICO V46-0070
- AC PC2120E or PC1126
- AMC NA2642
- MISFAT P412
- AUTOMEGA 30820004310051
- KRAFT 1715220
- FEBI 32227
- SWAG 60 93 2227
- FRAM CA8964
- GOODWILL AG 710
- WIX WA6595
- MULLER PA475
- FILTER HP 2036
- TECNOCAR A2205
- PURFLUX A1231
- MGA FA3034
Tips for choosing a filter
We list only the best brands: BOSCH, MAHLE, HENGST, MANN Filter. ASAM, in turn, supplies filters to Renault/Dacia factories. Well, VALEO is a well-known and trusted manufacturer from France.
The domestic brands listed above are not only GAZ and Nevsky Filter, but also AGRALE, IRISBUS and some others.
Let's sum it up
As we stated, replacing the air filter is so simple that it cannot raise any questions. Resolving such issues in the conditions of a service station is a waste of the financial component. Despite the simplicity of execution, this procedure is very important to ensure the correct functioning of the Lada Largus engine. The excellent condition of the element contributes to the engine “demonstrating” its declared characteristics, which can only please the owner of LADA Largus.
Source
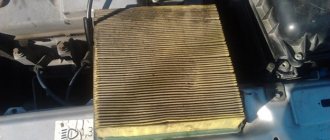
2271-3-8-04-05
...and remove the replacement element from it.
...and remove the replacement element from it.
...and remove the replacement element from it.
We clean the cavity of the air filter housing and install a new element in the reverse order.
Lada Largus: replacing a replaceable air filter element for a 16-valve engine
Problems when paying with bank cards
Sometimes difficulties may arise when paying with Visa/MasterCard bank cards. The most common of them:
In order to solve these problems, you need to call or write to the technical support of the bank where you are served. Bank specialists will help you resolve them and make payments.
That's basically it. The entire process of paying for a book in PDF format on car repair on our website takes 1-2 minutes.